Home>Production & Technology>Treble>How To Change Bass And Treble Itunes Playback
Treble
How To Change Bass And Treble Itunes Playback
Modified: February 15, 2024
Learn how to change the bass and treble settings for iTunes playback and enhance your listening experience. Adjust the treble to your preference and enjoy crisp and clear audio.
(Many of the links in this article redirect to a specific reviewed product. Your purchase of these products through affiliate links helps to generate commission for AudioLover.com, at no extra cost. Learn more)
Table of Contents
Introduction
Welcome to the world of iTunes, where you can listen to your favorite songs and albums with just a few clicks. But what if you want to enhance the audio quality and customize the sound to your liking? That’s where the bass and treble settings come into play.
Adjusting the bass and treble in iTunes can make a significant difference in how your music sounds. Whether you prefer deep, booming bass or crisp, clear treble, iTunes provides you with the tools to fine-tune your listening experience.
In this guide, we will walk you through the steps to change the bass and treble in iTunes playback. By following these steps, you can ensure that your music sounds exactly the way you want it to, whether you’re using headphones, speakers, or any other audio output device.
Are you ready to take control of your audio experience? Let’s dive in and explore how to adjust the bass and treble settings in iTunes with ease.
Step 1: Opening iTunes
The first step in changing the bass and treble settings in iTunes is to open the application on your computer. iTunes is available for both Windows and Mac, so make sure you have the latest version installed.
To open iTunes on a Windows computer, click on the ‘Start’ button in the bottom left corner of your screen. Type ‘iTunes’ in the search bar, and select the iTunes app from the list of results.
On a Mac, you can find iTunes in the ‘Applications’ folder. Open the finder by clicking on the smiley face icon located at the bottom of your screen. From the sidebar, select ‘Applications’, then locate and click on the iTunes app.
Once you have successfully opened iTunes, you will be greeted by a familiar interface where you can access your music library, playlists, and other features.
Now that you have iTunes up and running, let’s move on to the next step and access the equalizer settings.
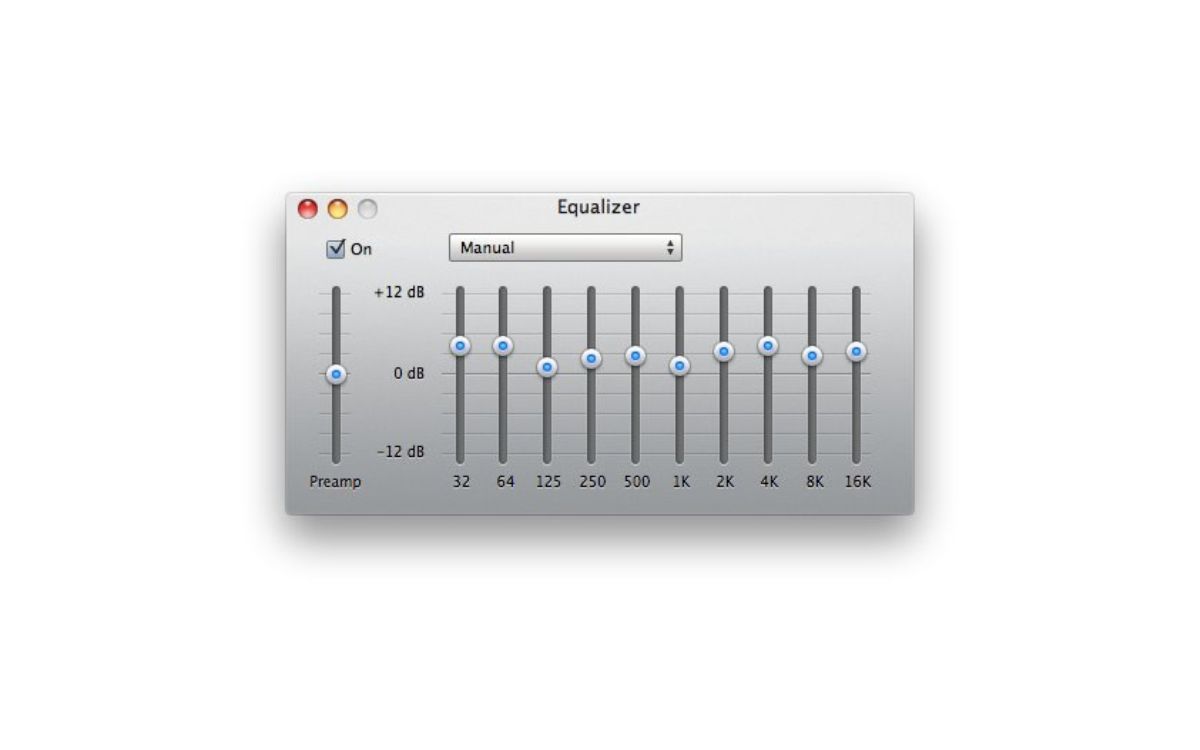
Step 2: Accessing the Equalizer
The equalizer is a powerful tool that allows you to adjust the bass, treble, and other audio frequencies in iTunes. To access the equalizer settings, follow the steps below:
- On the top menu bar of iTunes, click on ‘Window’.
- A dropdown menu will appear. From the options, select ‘Equalizer’.
Alternatively, you can use the keyboard shortcut ‘Command’ + ‘Option’ + ‘E’ on a Mac or ‘Ctrl’ + ‘Shift’ + ‘2’ on a Windows computer to open the equalizer.
Once you have accessed the equalizer, a window will appear with a graph displaying different frequency ranges and sliders for bass, treble, and other audio adjustments.
Now that you have successfully opened the equalizer, it’s time to move on to the next step and start adjusting the bass in iTunes.
Step 3: Adjusting the Bass
Now that you have accessed the equalizer settings in iTunes, you can begin adjusting the bass to your liking. The bass frequencies are responsible for the deep, low-end sounds in your music.
To adjust the bass in iTunes, follow these steps:
- In the equalizer window, locate the slider that corresponds to the “Bass” frequency range. This is typically located towards the left side of the graph.
- Move the slider up to increase the bass or down to decrease it. As you move the slider, you will notice the change in the graph and the audio output.
- Take some time to listen to your music while making adjustments to find the balance that suits your preferences. Experiment with different levels of bass to achieve the desired effect.
Remember, adjusting the bass too high can result in distorted or muddy sound quality, while setting it too low may lead to a lack of depth in your music. Find the sweet spot that enhances the overall listening experience without overpowering other elements.
Once you are satisfied with the bass adjustment, it’s time to move on to the next step and fine-tune the treble in iTunes.
Step 4: Adjusting the Treble
After adjusting the bass to your liking, it’s time to focus on the treble frequencies. The treble range handles the high-end sounds, including vocals, cymbals, and guitar strings.
Follow these steps to adjust the treble in iTunes:
- In the equalizer window, locate the slider that corresponds to the “Treble” frequency range. This slider is generally located towards the right side of the graph.
- Move the treble slider up to increase the high-end frequencies or down to decrease them. As you make adjustments, you will hear a difference in the clarity and sharpness of the audio.
- Take your time to listen to different genres of music and determine the level of treble that suits your preferences. Experiment with various levels until you find the ideal balance that enhances the overall sound quality.
Similar to adjusting the bass, be cautious not to set the treble too high, as it may result in harsh or piercing sound. On the other hand, setting it too low can lead to a muffled audio experience. Aim for a level that adds brightness and detail without overpowering other elements of the music.
Once you have fine-tuned the treble to your satisfaction, it’s time to move on to the final step and save your changes in iTunes.
Step 5: Saving the Changes
Now that you have adjusted the bass and treble to your desired levels in iTunes, it’s important to save your changes so that they apply to your future playback sessions.
Follow these simple steps to save the changes you made in the equalizer:
- In the equalizer window, click on the ‘OK’ or ‘Done’ button to close the window.
- Your adjusted bass and treble settings will now be saved in iTunes.
From this point forward, whenever you play music in iTunes, it will use the customized bass and treble settings you’ve chosen. Whether you’re rocking out to your favorite tunes, enjoying a podcast, or watching a movie, the audio will now sound precisely the way you want it to.
If you ever wish to make further adjustments to the bass and treble settings in the future, simply follow the steps outlined in this guide. You have full control over your audio experience in iTunes!
With the ability to customize the bass and treble settings, you can truly tailor your music to match your personal preferences and taste. Say goodbye to dull and flat audio, and say hello to an immersive and satisfying listening experience.
Now that you’ve mastered the art of changing the bass and treble in iTunes playback, sit back, relax, and enjoy your favorite songs with enhanced audio quality customized just for you!
Happy listening!
Conclusion
Congratulations! You have successfully learned how to change the bass and treble settings in iTunes playback. By adjusting these audio parameters, you can enhance your listening experience and personalize the sound to suit your preferences.
Now that you know how to open iTunes, access the equalizer, adjust the bass, tweak the treble, and save your changes, you have the tools to create a customized audio experience in iTunes. Whether you prefer deep, thumping bass or crisp, clear treble, iTunes allows you to optimize the sound to your liking.
Remember to strike a balance when adjusting the bass and treble, as setting them too high or too low can result in suboptimal sound quality. Take the time to experiment and find the perfect levels that enhance the overall audio without overpowering other elements of the music.
So, the next time you listen to your favorite songs in iTunes, make sure to apply your newly acquired knowledge and fine-tune the bass and treble to create an immersive and enjoyable listening experience.
Thank you for joining us on this guide. We hope that this information has empowered you to harness the full potential of iTunes and unlock the best possible sound quality for your music.
Happy listening!