Home>Events & Info>Playback>How To Change Playback Speed On Audacity

Playback
How To Change Playback Speed On Audacity
Modified: January 22, 2024
Learn how to change the playback speed on Audacity with this easy-to-follow tutorial. Speed up or slow down your audio recordings for optimal playback.
(Many of the links in this article redirect to a specific reviewed product. Your purchase of these products through affiliate links helps to generate commission for AudioLover.com, at no extra cost. Learn more)
Table of Contents
Introduction
Welcome to our guide on how to change playback speed on Audacity! Audacity is a powerful and versatile audio editing software that allows users to modify audio files in various ways. One of the key features of Audacity is the ability to adjust the playback speed of an audio track.
Changing the playback speed can be useful in a variety of situations. Maybe you want to speed up a podcast episode or audio lecture to save time, or perhaps you need to slow down a song or speech to transcribe it more accurately. Whatever the reason, Audacity makes it easy to modify the playback speed without affecting the pitch of the audio.
In this step-by-step guide, we will walk you through the process of changing the playback speed on Audacity, so you can adjust your audio files to your desired tempo. Whether you’re a musician, podcaster, or simply someone looking to customize audio playback, this tutorial will help you harness the power of Audacity’s playback speed feature.
Before we dive into the details, make sure you have Audacity installed on your computer. If you haven’t already, you can download Audacity for free from the official website and install it following the instructions provided. Once you have Audacity up and running, you’re ready to learn how to change the playback speed of your audio tracks.
Step 1: Launching Audacity
The first step in changing the playback speed on Audacity is to launch the software on your computer. Locate the Audacity icon on your desktop or in your applications folder and double-click on it to open the program.
Once Audacity is launched, you will see the main window with various options and tools. Take a moment to familiarize yourself with the interface if you haven’t used Audacity before. The main toolbar and timeline are where you will be working to modify the playback speed of your audio tracks.
If you already have an audio file that you want to modify, you can proceed to the next step. If not, you can create a new audio file by clicking on ‘File’ in the top menu and selecting ‘New’ from the drop-down menu. Alternatively, you can use the keyboard shortcut ‘Ctrl + N’ on Windows or ‘Command + N’ on Mac.
Once you have opened a new audio file or imported an existing one, you are ready to start changing the playback speed in Audacity. The next steps will guide you through the process of selecting the desired track and accessing the playback speed option.
Step 2: Opening the audio file
Now that you have Audacity open and ready, the next step is to open the audio file that you want to modify the playback speed for. Audacity supports a wide range of audio formats, so you can import files such as MP3, WAV, FLAC, and more.
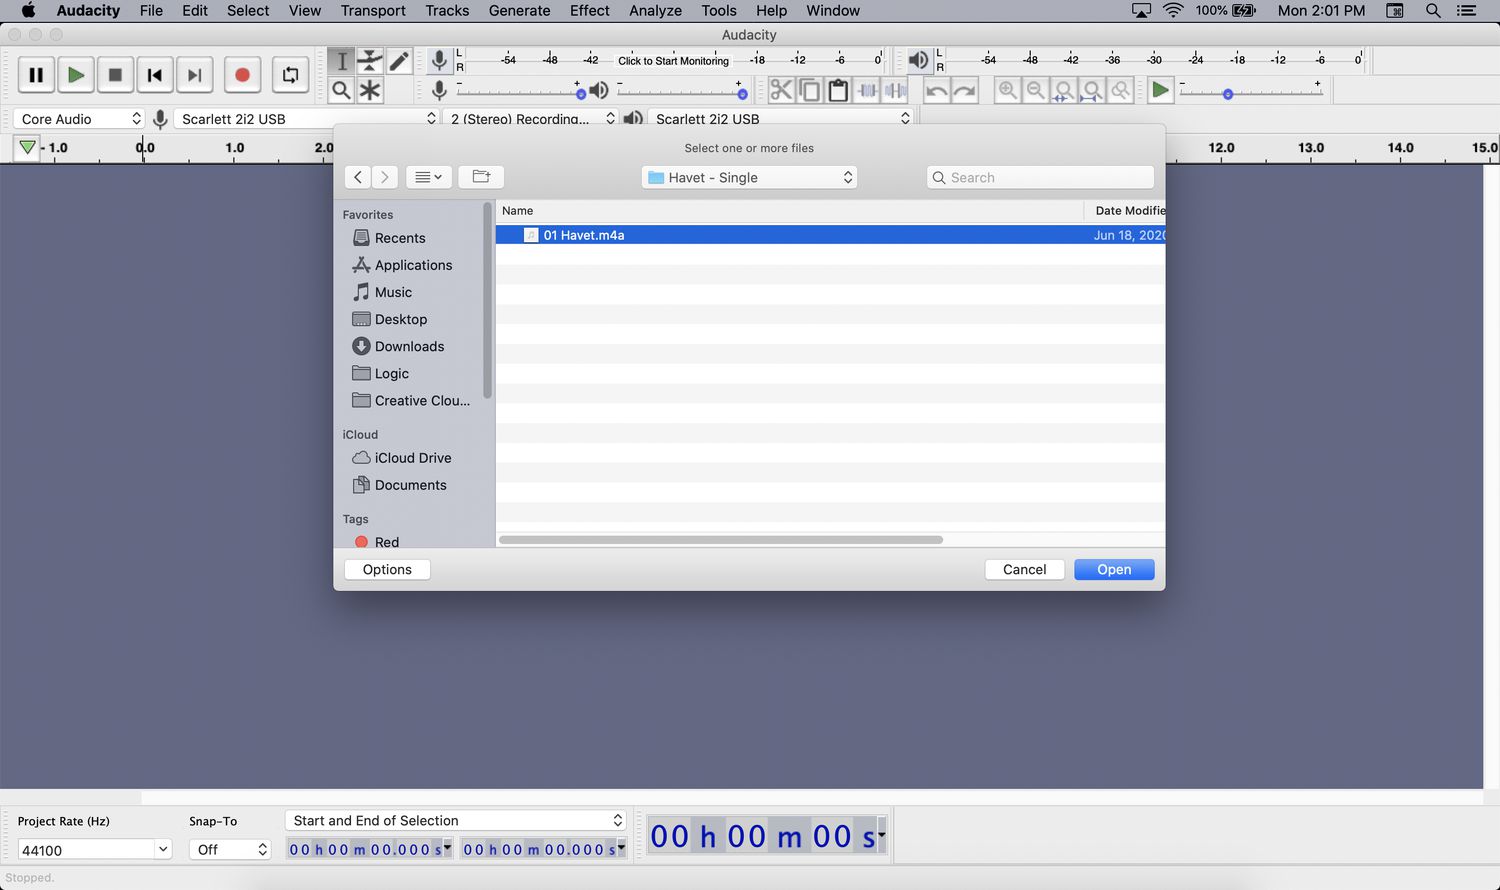
To open an audio file, click on ‘File’ in the top menu and select ‘Open’ from the drop-down menu. Alternatively, you can use the keyboard shortcut ‘Ctrl + O’ on Windows or ‘Command + O’ on Mac. This will open a file browser window where you can navigate to the location of your audio file.
Once you have located the audio file, select it and click ‘Open’ to import it into Audacity. The audio waveform will appear in the Audacity workspace, representing the sound data of your file.
If you have multiple tracks in your audio file, each track will be displayed as a separate waveform in Audacity. You can choose to modify the playback speed for a specific track or for the entire file, depending on your needs.
Now that you have opened your audio file in Audacity, you are ready to proceed to the next step and select the track that you want to modify the playback speed for.
Step 3: Selecting the desired track
After opening your audio file in Audacity, the next step is to select the specific track that you want to modify the playback speed for. This step is especially important if your audio file contains multiple tracks or layers.
To select a track, simply click on the waveform of that track in the Audacity workspace. You will notice that the selected track becomes highlighted or outlined, indicating that it is the active track for editing.
If you want to select multiple tracks, you can hold down the Shift key on your keyboard while clicking on the additional tracks. This allows you to modify the playback speed for multiple tracks simultaneously.
Alternatively, if you want to select all tracks in your audio file, you can click on the Edit menu in the top menu bar and choose the “Select” option followed by “All.” This will select all tracks in your audio file for simultaneous playback speed adjustment.
By selecting the desired track(s), you ensure that any changes made to the playback speed will only affect the selected track(s) while leaving the other tracks untouched.
Once you have selected the track(s) that you want to modify, you are ready to move on to the next step and access the playback speed option in Audacity.
Step 4: Accessing the playback speed option
Now that you have selected the desired track(s) that you want to modify the playback speed for, the next step is to access the playback speed option in Audacity. This option allows you to adjust the speed at which the selected track(s) will be played back.
To access the playback speed option, navigate to the top menu bar and click on the ‘Effect’ menu. From the drop-down menu, choose ‘Change Tempo’. Alternatively, you can use the keyboard shortcut ‘Ctrl + T’ on Windows or ‘Command + T’ on Mac.
By selecting the ‘Change Tempo’ option, a dialog box will appear on the screen, displaying a slider and numerical values. This dialog box is where you can adjust the playback speed of the selected track(s).
The slider represents the percentage of the original playback speed. You can move the slider to the left to decrease the speed, making the track play slower, or move it to the right to increase the speed, making the track play faster.
In addition to using the slider, you can also directly input a numerical value in the ‘Percent Change’ field. This allows for precise adjustments to the playback speed.
It’s important to note that changing the playback speed may affect the duration of the track. Increasing the speed will shorten the duration, while decreasing the speed will lengthen it. Keep this in mind when deciding on the desired playback speed for your track(s).
Once you have accessed the playback speed option and are ready to make the desired adjustments, you can proceed to the next step and change the playback speed of the selected track(s).
Step 5: Changing the playback speed
Now that you have accessed the playback speed option in Audacity, you can proceed to change the playback speed of the selected track(s). This step allows you to adjust the tempo at which the audio will be played back.
To change the playback speed, you can either use the slider in the ‘Change Tempo’ dialog box or input a specific numerical value in the ‘Percent Change’ field.
If you’re using the slider, you can simply drag it to the left to decrease the speed or to the right to increase the speed. As you move the slider, you will notice the numerical value in the ‘Percent Change’ field updating accordingly.
If you prefer to input a specific numerical value, you can directly type it into the ‘Percent Change’ field. This allows for more precise control over the playback speed adjustment.
It’s worth mentioning that changing the playback speed will alter the pitch of the audio. Increasing the speed may result in a higher-pitched sound, while decreasing the speed may lower the pitch. However, Audacity’s playback speed adjustment is designed to maintain the pitch when changing the tempo within reasonable limits.
Experiment with different playback speeds until you find the desired tempo for your track(s). You can always preview the changes before applying them to ensure they meet your expectations.
Once you are satisfied with the adjusted playback speed, you are ready to proceed to the next step and apply the changes to your selected track(s).
Step 6: Applying the changes
After adjusting the playback speed to your desired tempo, the next step is to apply the changes to the selected track(s) in Audacity. This will modify the playback speed of the audio file based on the adjustments you made.
To apply the changes, simply click on the ‘OK’ button in the ‘Change Tempo’ dialog box. Audacity will then process the modification and update the selected track(s) with the new playback speed.
It’s important to note that once the changes are applied, they are permanent and cannot be easily reversed. Therefore, it’s a good practice to make a backup of your original audio file before applying any modifications to ensure you can easily revert back if needed.
After clicking ‘OK’, Audacity will update the waveform display in the workspace to reflect the modified playback speed. You will see that the waveform is stretched or compressed, depending on the changes made to the tempo.
If you are not satisfied with the modifications and wish to make further adjustments, you can simply repeat steps 4 and 5 to access the playback speed option and refine the tempo settings.
Once you have applied the changes and are content with the modified playback speed of the selected track(s), you can proceed to the next step and preview the edited audio to ensure it meets your expectations.
Step 7: Previewing the modified audio
After applying the changes to the playback speed of your selected track(s) in Audacity, it’s important to preview the modified audio to ensure it sounds as desired. This step allows you to listen to the edited audio and make any necessary adjustments before finalizing your work.
To preview the modified audio, simply click on the play button located in the main toolbar of Audacity. This will start playing the track from the beginning, allowing you to listen to the changes in real-time.
As the modified audio plays, pay attention to the tempo and listen for any potential distortions or undesirable artifacts that may have been introduced by the playback speed adjustments. If you notice any issues, you can go back to step 4 and step 5 to modify the playback speed further and refine the changes.
While previewing the audio, consider how well the modified playback speed aligns with your intentions. Does it sound too fast or too slow? Does the pitch remain consistent even at higher or lower speeds? Take note of any areas that may require additional adjustments during the next steps.
It’s also a good idea to listen to the modified audio with a fresh pair of ears or seek feedback from others to ensure objectivity and gather different perspectives on the changes made to the playback speed.
Once you are satisfied with the previewed audio and feel confident in the modifications, you can proceed to the final step and export the edited audio as a separate file.
Step 8: Exporting the edited audio file
After making the necessary adjustments to the playback speed in Audacity and previewing the modified audio, the final step is to export the edited audio as a separate file. This allows you to save your work and use it in various applications, such as sharing it online or incorporating it into a multimedia project.
To export the edited audio file, navigate to the top menu bar and click on the ‘File’ menu. From the drop-down menu, select the ‘Export’ option. You will be presented with various export formats to choose from, depending on your specific needs.
Audacity supports a wide range of audio formats, including common formats like MP3, WAV, and FLAC. Choose the format that best suits your requirements and click on it to proceed.
After selecting the export format, you may be prompted to provide additional information about the audio file, such as the file name, location, and quality settings. Fill in the necessary details according to your preferences.
Consider whether you want to apply any additional settings or changes during the export process, such as adjusting the bit rate or selecting a specific file format option. These settings can have an impact on the final quality and compatibility of the exported audio file.
Once you have specified the export settings, click on the ‘Save’ or ‘Export’ button to initiate the export process. Audacity will process the audio and create a new file with the modified playback speed according to your specifications.
After the export process completes, you can navigate to the location you selected during the export and locate the edited audio file. You can now use this file for your desired purposes, whether it’s sharing it online, incorporating it into a project, or simply enjoying it yourself.
Congratulations! You have successfully changed the playback speed of an audio track using Audacity and exported the modified file. Feel free to experiment with different playback speeds and explore the various possibilities that Audacity offers for audio customization.
Remember to save your project file in Audacity format as well, so you can revisit and make further adjustments to the playback speed or other audio elements in the future.
Thank you for following our guide on how to change playback speed on Audacity. We hope this tutorial has been helpful in enhancing your audio editing skills and empowering you to create unique and personalized audio content.
Conclusion
Changing the playback speed of an audio track can be a powerful tool in your audio editing arsenal, allowing you to customize the tempo and duration of your audio files. Whether you need to speed up a podcast, slow down a song for transcription, or simply want to experiment with different playback speeds, Audacity provides a user-friendly interface and robust features to help you achieve your desired results.
In this guide, we walked you through the step-by-step process of changing the playback speed on Audacity. From launching the software and opening your audio file to selecting the desired track, accessing the playback speed option, and making the necessary adjustments, you learned how to confidently modify the tempo of your audio tracks.
We also emphasized the importance of previewing the modified audio to ensure it meets your expectations before exporting the edited file. Taking the time to listen and make any necessary refinements will ensure a seamless and pleasurable listening experience for your audience.
With the knowledge gained from this guide, you are now equipped to unleash your creativity and explore the endless possibilities of altering the playback speed in Audacity. Whether you’re a musician, podcaster, content creator, or simply someone who enjoys playing with audio, the ability to change the playback speed opens up a whole new world of audio customization.
Remember that Audacity is a versatile audio editing software with many other features and effects to explore. As you become more comfortable with changing playback speed, you can dive deeper into Audacity’s toolbox to further refine your audio creations.
We hope this guide has been helpful in expanding your understanding of how to change playback speed on Audacity. As you continue to explore and experiment, don’t hesitate to leverage the power of Audacity to bring your audio projects to life.
Happy editing!

