Home>Events & Info>Playback>How To Change Playback Volume In Finale
Playback
How To Change Playback Volume In Finale
Modified: January 22, 2024
Learn how to easily change the playback volume in Finale with our step-by-step guide. Enhance your listening experience and control the playback levels for flawless musical performances.
(Many of the links in this article redirect to a specific reviewed product. Your purchase of these products through affiliate links helps to generate commission for AudioLover.com, at no extra cost. Learn more)
Table of Contents
Introduction
Finale is a powerful and versatile music notation software that is commonly used by composers, musicians, and music educators. One of the key features of Finale is its playback function, which allows users to hear their compositions played back in real-time. Being able to adjust the playback volume is essential for achieving the desired balance and dynamics in your music.
In this article, we will explore various methods for changing the playback volume in Finale. Whether you want to make your music louder or softer, mastering these techniques will enable you to achieve the perfect sound during playback. From using the built-in mixer window to incorporating expression and dynamics markings, we will cover everything you need to know to effectively control the playback volume in Finale.
So, whether you’re a seasoned composer or just starting to explore the world of music notation, read on to discover how to take control of your playback volume and bring your compositions to life.
Adjusting Playback Volume in Finale
When it comes to adjusting the playback volume in Finale, you have several methods at your disposal. Each method offers its own unique advantages and allows you to fine-tune the volume to your liking. Let’s explore these methods in detail:
1. Using the Mixer Window:
Finale’s Mixer window is a comprehensive tool for controlling various aspects of your playback, including volume. To access the Mixer window, go to the “Window” menu and select “Mixer”. In the Mixer window, you will see a list of instruments, each with its own volume slider. Simply drag the slider up or down to adjust the volume for a specific instrument. This method offers precise control and allows you to create a balanced mix.
2. Using the Playback Controls:
Another way to adjust the playback volume is by using the Playback Controls. Located at the top of the Finale interface, these controls include buttons for play, stop, and volume adjustment. To change the volume, click on the volume icon and drag the slider to increase or decrease the volume. This method is quick and convenient, especially if you want to make temporary volume changes during playback.
3. Using the MIDI/Audio Tool:
The MIDI/Audio Tool in Finale is a powerful tool that allows you to directly adjust the volume of individual notes or sections. To use this tool, select the desired notes or section, go to the MIDI/Audio menu, and choose “Edit Region/Events”. In the dialog box, you will find the volume control slider. Move the slider to the right to increase the volume or to the left to decrease it. This method is perfect for making precise volume adjustments for specific parts of your composition.
4. Using the MIDI/Audio Setup Window:
If you want to make global volume adjustments to your entire composition, the MIDI/Audio Setup window is the way to go. To access it, go to the MIDI/Audio menu and choose “Play Finale Through MIDI/Audio”. In the setup window, you will find a volume slider that controls the overall volume. Simply move the slider to adjust the playback volume for your entire composition. This method is ideal for making broad changes to the overall volume.
5. Using Expression and Dynamics Markings:
In addition to these technical methods, you can also control the playback volume by utilizing expression and dynamics markings in your music. Finale allows you to add these markings to indicate how loud or soft a particular passage should be played. By adding dynamics markings (such as piano or forte) and adjusting their values, you can effectively control the playback volume. This method adds a level of musicality and nuance to your playback.
Method 1: Using the Mixer Window
The Mixer window in Finale is a powerful tool for adjusting the playback volume of individual instruments. It provides a visual representation of the instruments in your composition and allows you to control their volume levels with ease. To use the Mixer window to adjust the playback volume in Finale, follow these steps:
- Open Finale and load your composition.
- Go to the “Window” menu at the top of the screen and select “Mixer”.
- The Mixer window will appear, displaying a list of instruments in your composition.
- Locate the instrument for which you want to adjust the playback volume.
- Find the volume slider associated with the instrument.
- Drag the slider up to increase the volume or down to decrease it.
- Repeat the process for other instruments as needed.
The Mixer window allows you to make fine adjustments to the volume of each instrument in your composition. By moving the volume slider, you can increase or decrease the volume of specific instruments, achieving the desired balance and mix in your playback. This method is particularly useful if you want to emphasize certain instruments or create a specific sonic landscape.
Not only does the Mixer window allow you to adjust the playback volume, but it also provides additional controls for pan (stereo positioning), solo, mute, and effects. These features give you even more creative control over the sound of individual instruments in your composition.
Once you have made the necessary volume adjustments in the Mixer window, you can play your composition and hear the changes take effect. This real-time feedback allows you to fine-tune the playback volume to achieve the desired sound for your music.
Overall, using the Mixer window is a straightforward and effective method for adjusting the playback volume in Finale. It provides a visual representation of your instruments and gives you precise control over the volume levels. By mastering this method, you can create a well-balanced mix and bring out the best in your compositions.
Method 2: Using the Playback Controls
In Finale, adjusting the playback volume can be done quickly and conveniently using the built-in Playback Controls. These controls allow you to play, stop, and adjust the volume of your composition. To adjust the playback volume using the Playback Controls, follow these steps:
- Open Finale and load your composition.
- Look for the Playback Controls located at the top of the Finale interface.
- Identify the volume button, which is represented by a speaker icon.
- Click on the volume button to reveal the volume slider.
- Drag the slider to the right to increase the volume or to the left to decrease it.
By utilizing the Playback Controls, you have the freedom to adjust the playback volume on the fly. This method is especially useful when you want to make temporary volume changes during playback, such as emphasizing a certain section or instrument. The real-time feedback allows you to fine-tune the volume and immediately hear the effects.
In addition to adjusting the volume, the Playback Controls also offer other playback-related functions. For example, you can use the play and stop buttons to control the playback of your composition. This allows you to preview your music and make adjustments as you listen. You can also use the rewind and fast-forward buttons to navigate through your composition quickly.
Another advantage of using the Playback Controls is their accessibility. Since they are always visible at the top of the Finale interface, you can easily access them at any time, regardless of which window or tool you are currently using. This makes the process of adjusting the playback volume seamless and efficient.
Whether you are working on a complex orchestral piece or a simple piano composition, the Playback Controls provide a straightforward and intuitive method for adjusting the playback volume in Finale. By mastering this method, you can easily control the volume and bring out the nuances of your music.
Method 3: Using the MIDI/Audio Tool
In Finale, the MIDI/Audio Tool is a powerful feature that allows you to make precise volume adjustments to individual notes or sections of your composition. This tool gives you granular control over the playback volume, allowing you to emphasize specific musical elements. To use the MIDI/Audio Tool to adjust the playback volume in Finale, follow these steps:
- Open Finale and load your composition.
- Select the notes or section of your composition where you want to adjust the volume.
- Go to the MIDI/Audio menu at the top of the screen and choose “Edit Region/Events” or use the shortcut Ctrl+Shift+E (Windows) / Command+Shift+E (Mac).
- A dialog box will appear, showing the selected region or events.
- Locate the volume control slider in the dialog box.
- Move the slider to the right to increase the volume or to the left to decrease it.
- Click “OK” to apply the volume adjustment.
Using the MIDI/Audio Tool allows you to make specific volume adjustments to individual sections, notes, or even specific instrument parts within your composition. This level of control is particularly useful when you want to highlight a solo, accentuate a specific melody, or create dynamic contrasts in your music.
Additionally, the MIDI/Audio Tool is not only limited to volume adjustments. It also provides various other editing functions, such as adjusting the pitch, duration, or articulation of notes, offering a comprehensive toolset for fine-tuning your composition.
By utilizing the MIDI/Audio Tool, you can shape the playback volume to suit your musical intentions and bring out the desired expression in your composition. Whether you want to make subtle changes to a few notes or have more extensive control over a larger section, this method provides the precision required to achieve your desired results.
Overall, the MIDI/Audio Tool is a versatile and powerful tool for adjusting the playback volume in Finale. Its ability to make detailed and targeted volume adjustments allows you to create rich and expressive interpretations of your music.
Method 4: Using the MIDI/Audio Setup Window
In Finale, the MIDI/Audio Setup window provides an efficient way to adjust the overall playback volume for your entire composition. This method allows you to make global volume adjustments, ensuring a consistent and balanced sound throughout. To use the MIDI/Audio Setup window to change the playback volume in Finale, follow these steps:
- Open Finale and load your composition.
- Go to the MIDI/Audio menu at the top of the screen and choose “Play Finale Through MIDI/Audio”.
- The MIDI/Audio Setup window will appear, displaying various settings for your playback.
- Locate the volume slider in the setup window.
- Drag the slider to the right to increase the volume or to the left to decrease it.
Using the MIDI/Audio Setup window allows you to adjust the playback volume for your entire composition with a single control. This method is particularly useful when you want to make broad changes to the overall volume or if you need to match the playback volume to other tracks or reference recordings.
Furthermore, the MIDI/Audio Setup window offers additional settings for customizing your playback experience. You can adjust the playback device, change the MIDI channel assignments, and configure other playback options to tailor the sound to your preferences.
Once you have made the necessary volume adjustments in the MIDI/Audio Setup window, play your composition to hear the changes take effect. The global adjustments made using this method affect every instrument and part in your composition, ensuring a consistent playback volume.
The flexibility and ease of use of the MIDI/Audio Setup window make it a valuable tool for managing the playback volume in Finale. Whether you need to make quick adjustments or fine-tune the overall volume of your composition, this method provides a convenient and centralized solution.
Overall, using the MIDI/Audio Setup window is an efficient and effective method for changing the playback volume in Finale. By utilizing this feature, you can easily control the volume of your entire composition, allowing your music to be heard exactly as you intend.
Method 5: Using Expression and Dynamics Markings
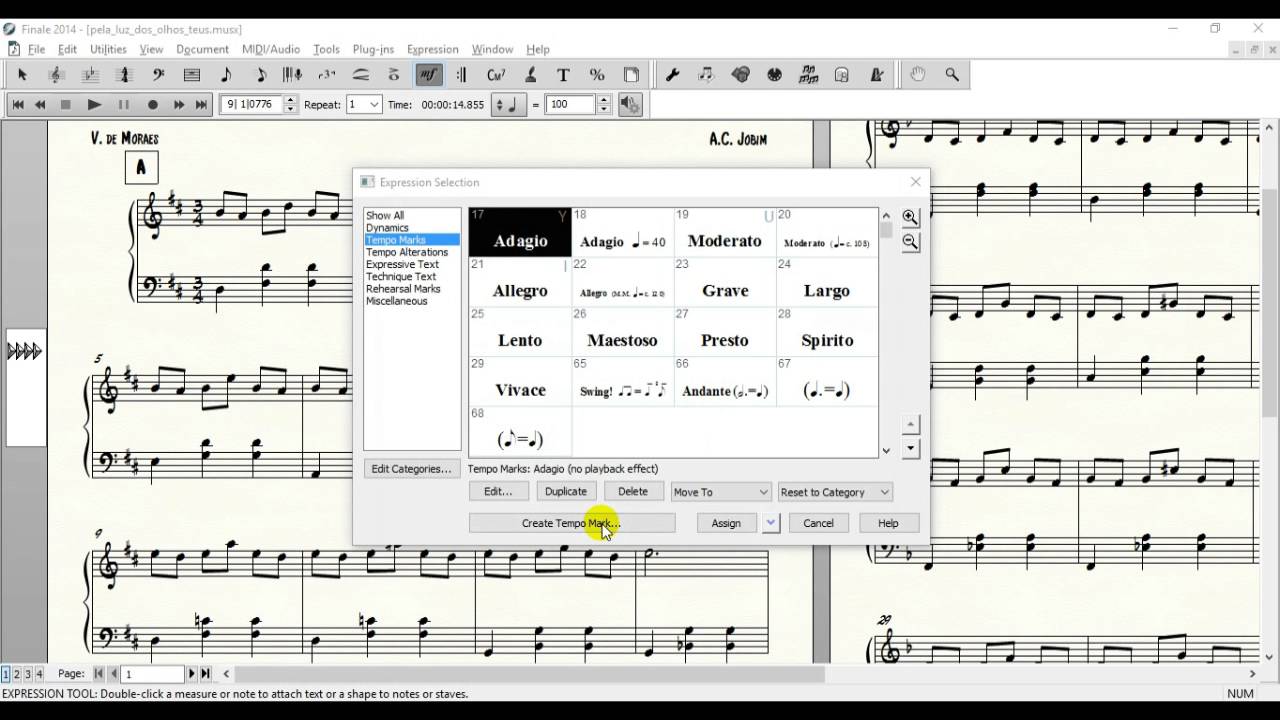
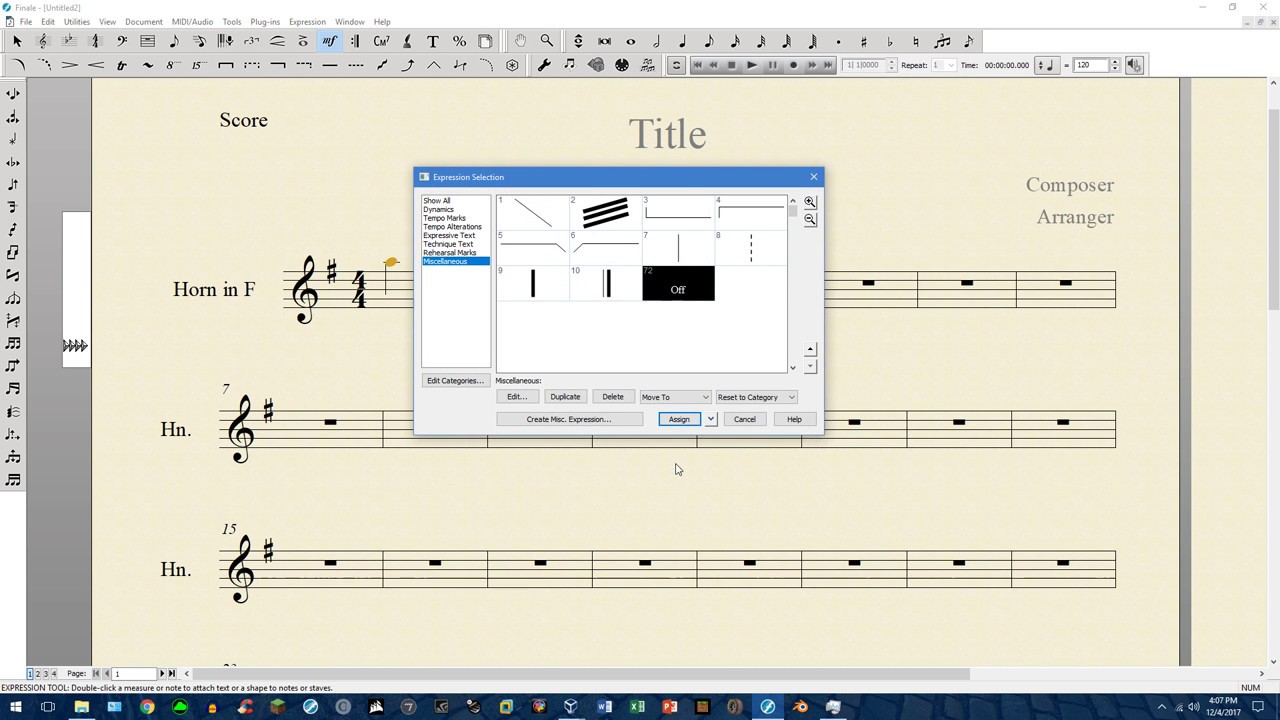
One of the most musical and expressive methods for adjusting the playback volume in Finale is by utilizing expression and dynamics markings. These markings allow you to add musical instructions to your composition, indicating how loud or soft specific passages should be played. By incorporating expression and dynamics markings, you can effectively control the playback volume and bring out the desired nuances in your music. To use expression and dynamics markings to adjust the playback volume in Finale, follow these steps:
- Open Finale and load your composition.
- Select the measure or section where you want to introduce an expression or dynamics marking.
- Go to the Expression Tool or Dynamics Tool in the toolbar.
- Choose the appropriate marking from the available options.
- Place the marking above or below the staff in the desired measure or section.
- Adjust the value of the marking to indicate the desired volume (e.g., piano, forte).
By adding expression and dynamics markings, you bring a level of musicality and nuance to your composition. These markings not only affect the playback volume but also convey important musical instructions to the performer or playback system.
In addition to generic markings like piano and forte, Finale allows you to create custom markings to further refine the playback volume control. For example, you can indicate specific dynamic changes within a measure, creating nuanced crescendos or diminuendos. Custom markings enable you to shape the playback volume precisely according to your musical intentions.
Once you have added the desired expression and dynamics markings, play your composition in Finale to hear the changes take effect. The playback system will interpret the markings and adjust the volume accordingly, creating a more expressive and realistic playback experience.
Utilizing expression and dynamics markings not only enhances the musicality of your composition but also provides a powerful means to control the playback volume in Finale. By utilizing this method, you can infuse your music with dynamic contrasts, shaping the volume to convey the desired emotional impact and artistic expression.
Overall, using expression and dynamics markings is an effective and artistic method for adjusting the playback volume in Finale. By incorporating these markings into your composition, you can elevate the musical interpretation and add depth to your music.
Conclusion
In Finale, adjusting the playback volume is crucial for achieving the desired balance and dynamics in your compositions. By mastering the various methods available, you can take full control of the playback volume and bring your music to life.
In this article, we explored five different methods for adjusting the playback volume in Finale. We learned how to use the Mixer window to fine-tune the volume of individual instruments, the Playback Controls to make quick adjustments on the fly, the MIDI/Audio Tool for precise volume changes in specific notes or sections, the MIDI/Audio Setup window for global volume adjustments, and expression and dynamics markings to add musical expression to our compositions.
Each method offers its own advantages and can be used depending on the specific needs of your composition. Whether you want to emphasize certain instruments, create dynamic contrasts, or achieve a consistent balance throughout, these methods provide the tools necessary to achieve your desired playback volume.
Remember, while adjusting the playback volume is essential, it is equally important to strike a balance between controlling the volume and maintaining the integrity of your musical expression. Experiment with different methods and listen carefully to the results to find the perfect balance for your compositions.
By utilizing these methods effectively, you can refine your compositions and ensure they sound exactly as you envision. The playback volume plays a crucial role in delivering your musical intentions and immersing your listeners in the emotional journey of your music.
So, whether you’re a composer, musician, or music educator using Finale, take advantage of these methods to master the art of adjusting the playback volume. With the right techniques, you can create breathtaking musical experiences that resonate with your audience.