Home>Events & Info>Playback>How To Change Your Playback Device
Playback
How To Change Your Playback Device
Modified: January 22, 2024
Learn how to easily change your playback device and enjoy your favorite content on a different audio device. Simplify your audio experience with our step-by-step guide.
(Many of the links in this article redirect to a specific reviewed product. Your purchase of these products through affiliate links helps to generate commission for AudioLover.com, at no extra cost. Learn more)
Table of Contents
Introduction
When it comes to enjoying your favorite music, movies, or videos on your computer, having the right playback device can make all the difference. Whether you are using headphones, speakers, or even a Bluetooth device, ensuring that your playback device is set up correctly can significantly enhance your audio experience.
In this article, we will guide you through the process of changing your playback device so that you can seamlessly switch between different audio output options. Whether you want to plug in your headphones for some private listening or connect your computer to a set of external speakers for a more immersive sound, we will walk you through the necessary steps to make this happen.
Not only will we explain how to change your default playback device, but we will also show you how to modify the playback device for specific applications. This way, you can direct the sound output to a specific device according to your preferences, ensuring that you get the best audio quality possible no matter what you are doing on your computer.
Furthermore, we will provide troubleshooting tips in case you encounter any issues while changing your playback device. From common problems like no audio output to more specific hardware-related issues, we will cover a range of potential problems and their solutions to help you overcome any obstacles that may arise.
No matter if you are a casual computer user or a tech-savvy individual, our step-by-step guide will ensure that you have a smooth and hassle-free experience when changing your playback device. So, grab your favorite headphones or speakers and let’s dive into the world of optimized audio playback on your computer!
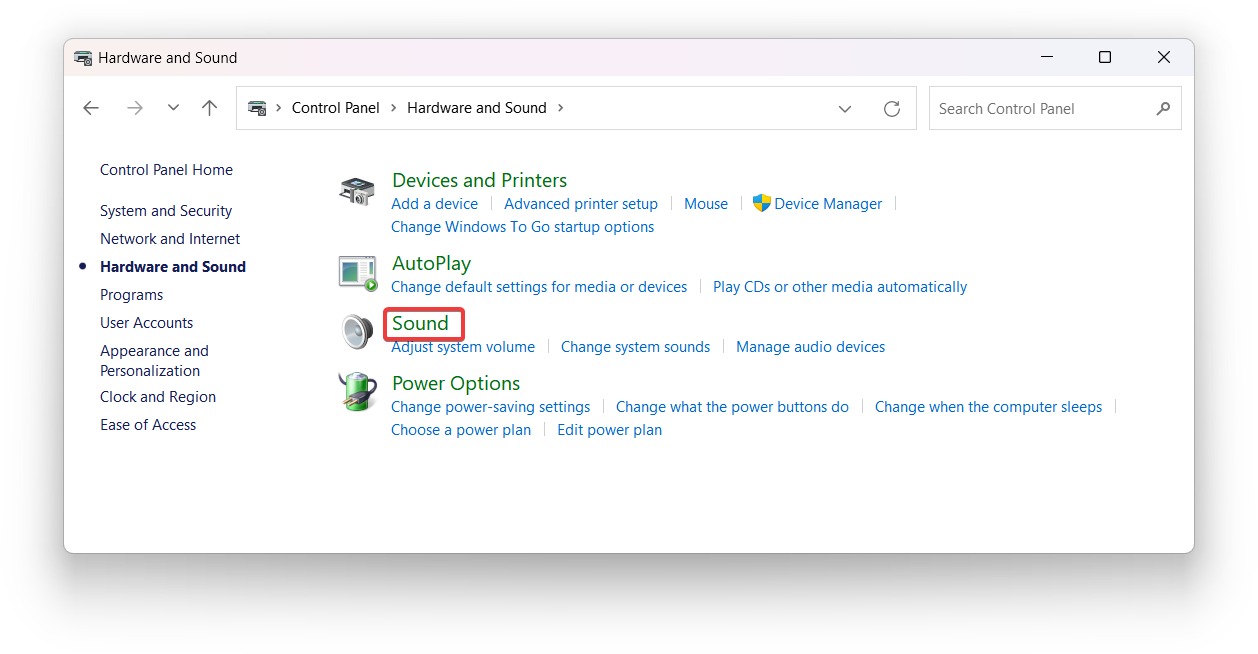
Step 1: Accessing the Sound Settings
The first step in changing your playback device is to access the sound settings on your computer. Here’s how to do it:
- Click on the “Start” button on the bottom left corner of your screen.
- From the Start menu, select “Settings”.
- In the Settings menu, click on the “System” option.
- Within the System settings, select “Sound” from the list on the left-hand side.
Alternatively, you can also access the sound settings by right-clicking on the volume icon in the system tray (located in the bottom right corner of the taskbar) and selecting “Open Sound settings”.
Once you have accessed the Sound settings, you will see various options related to audio playback and recording. This is where you can change your default playback device and configure other audio settings.
Remember, the exact steps to access the sound settings may vary depending on the operating system you are using. The steps outlined above apply to Windows 10, but if you are using a different version of Windows or a different operating system, the process may have slight variations.
Now that you have successfully accessed the sound settings, you are ready to move on to the next step, which is choosing the default playback device.
Step 2: Choosing the Default Playback Device
Once you have accessed the sound settings on your computer, it’s time to choose the default playback device. The default playback device is the audio output device that your computer will use unless specified otherwise. Here’s how you can do it:
- In the Sound settings, under the “Output” section, you will see a list of available playback devices.
- Identify the playback device you want to set as the default. This could be your headphones, external speakers, or any other audio output device that is connected to your computer.
- Click on the dropdown menu next to the playback device you want to choose as the default.
- Select the desired device from the list. It will be marked as the default playback device.
Once you have chosen the default playback device, any audio played on your computer will be directed to that device by default. This means that you will hear the sound output through the selected device.
If you want to use a different device for a specific application or want to switch between devices, you can do so by following the steps in the next section.
It’s important to note that if you disconnect the default playback device from your computer or if it is not functioning properly, the sound output will automatically switch to the next available device in the list. This ensures that you can continue to enjoy audio playback even if your primary device is not available.
With the default playback device set, you are ready to proceed to the next step and test the new playback device to ensure it is working correctly.
Step 3: Testing the New Playback Device
After selecting a new default playback device, it’s important to test it to ensure that it is functioning as expected. Here’s how you can test the new playback device:
- Play any audio or video file on your computer.
- Observe if the audio is coming through the newly selected default playback device.
- If the audio is being played through the desired device, and everything sounds good, then congratulations! You have successfully tested the new playback device.
- If the audio is not coming through the correct device, or if you encounter any issues such as distorted sound or no sound at all, proceed to the troubleshooting section for further assistance.
Testing the new playback device is essential because different devices may have different audio properties, such as volume levels and sound quality. By listening to some audio or video content, you can ensure that the audio playback is clear, crisp, and to your satisfaction.
If you’re not satisfied with the audio quality or if you want to try another device, you can go back to the sound settings and repeat the steps to choose a different default playback device.
Now that you have successfully tested the new playback device, you can move on to the next step, which is changing the playback device for specific applications.
Step 4: Changing Playback Device for Specific Applications
Sometimes, you may want to use a different playback device for specific applications. For example, you may want to use your headphones for gaming or a specific set of speakers for video editing. Luckily, you can easily change the playback device for individual applications. Here’s how:
- Go to the sound settings on your computer.
- Under the “Output” section, locate the “App volume and device preferences” option and click on it.
- A window will open, displaying a list of applications that are currently running on your computer.
- Select the application for which you want to change the playback device.
- From the dropdown menu next to the application, choose the desired playback device.
- Repeat the process for any other applications that you want to assign a specific playback device to.
By changing the playback device for specific applications, you can enjoy a customized audio experience tailored to each individual program or activity.
For example, you can set your music player application to use your high-quality speakers while directing your communication apps, such as Skype or Zoom, to use your headset for better audio clarity during calls.
This flexibility allows you to make the most out of each playback device, optimizing your audio experience for different purposes and applications.
Now that you have learned how to change the playback device for specific applications, let’s move on to the final step: troubleshooting any playback device issues you may encounter.
Step 5: Troubleshooting Playback Device Issues
Despite our best efforts, sometimes playback device issues can arise. If you encounter any problems with your audio output, here are some troubleshooting tips to help you resolve them:
- Check the physical connections: Ensure that your playback device is properly connected to your computer. Check cables, connectors, and ports for any loose connections or damage.
- Update audio drivers: Outdated or faulty audio drivers can cause playback issues. Update your audio drivers to the latest version provided by your device manufacturer.
- Restart your computer: Sometimes a simple restart can resolve temporary glitches or conflicts in the system.
- Check volume levels: Make sure that the volume is not muted or set too low on both your computer and the playback device itself.
- Run audio troubleshooting tools: Most operating systems have built-in audio troubleshooting tools that can help identify and resolve common audio issues. Use these tools to diagnose and fix the problem.
- Try a different playback device: If possible, test your computer with a different playback device to determine if the issue lies with the device itself or your computer’s settings.
- Check for software conflicts: Some software applications or system settings may interfere with the proper functioning of your playback device. Temporarily disable or uninstall any recently installed software to see if it resolves the issue.
- Consult manufacturer support: If all else fails, reach out to the manufacturer of your playback device or the computer for further assistance. They may be able to provide specific troubleshooting steps or identify any known issues.
Remember, troubleshooting steps may vary depending on your operating system and specific audio devices. It’s always a good idea to consult the documentation or support resources provided by the manufacturer for more detailed troubleshooting guidance.
By following these troubleshooting steps, you can overcome common playback device issues and ensure that you have a seamless and uninterrupted audio experience on your computer.
Now that you are equipped with the knowledge to troubleshoot any playback device issues, you can confidently enjoy your favorite media with optimized audio settings.
Conclusion
Changing your playback device can greatly enhance your audio experience on your computer. Whether you want to listen to music, watch movies, or engage in multimedia activities, having the right playback device can make a world of difference.
In this article, we walked you through the steps to change your default playback device, test the new device, and even customize the playback device for specific applications. By following these steps, you can configure your audio settings to suit your preferences and optimize the audio quality for different activities.
We also provided troubleshooting tips to help you overcome any playback device issues that you may encounter. From checking physical connections to updating drivers and running diagnostic tools, these troubleshooting steps can assist you in resolving common audio problems.
Remember, each operating system may have slight variations in the steps to access sound settings and change the default playback device. It’s always a good idea to refer to the specific instructions for your operating system.
By understanding the process of changing playback devices and troubleshooting common issues, you can enjoy an immersive and high-quality audio experience on your computer.
So whether you prefer listening to your favorite tracks with headphones, immersing yourself in a movie through external speakers, or using different devices for specific applications, the power to choose your desired playback device is in your hands.
Take the time to explore and experiment with different playback devices, find the perfect audio setup for your needs, and sit back, relax, and enjoy the rich and vibrant sound that enhances your digital experiences.