Home>Devices & Equipment>Subwoofer>How To Test Subwoofer With Multimeter
Subwoofer
How To Test Subwoofer With Multimeter
Published: January 20, 2024
Learn how to test your subwoofer using a multimeter and ensure optimal sound quality. Find step-by-step instructions and troubleshooting tips for accurate results.
(Many of the links in this article redirect to a specific reviewed product. Your purchase of these products through affiliate links helps to generate commission for AudioLover.com, at no extra cost. Learn more)
Table of Contents
- Introduction
- Step 1: Gathering the necessary equipment
- Step 2: Checking the impedance of the subwoofer
- Step 3: Testing the connectivity of the subwoofer
- Step 4: Measuring the DC resistance of the subwoofer
- Step 5: Evaluating the frequency response of the subwoofer
- Step 6: Inspecting the voice coils of the subwoofer
- Step 7: Verifying the power handling capability of the subwoofer
- Step 8: Analyzing the cone movement of the subwoofer
- Step 9: Examining the overall sound quality of the subwoofer
- Conclusion
Introduction
Subwoofers are an essential component of any audio system, delivering deep and powerful bass that adds richness and depth to music, movies, and other forms of audio content. Whether you’re a music enthusiast or a home theater enthusiast, it’s crucial to ensure that your subwoofer is functioning properly to enjoy the full audio experience.
Testing a subwoofer with a multimeter is an effective way to assess its performance and identify any potential issues. A multimeter is a versatile tool that can measure various electrical properties, such as impedance, connectivity, resistance, and voltage. By conducting a comprehensive test, you can determine if your subwoofer is in good working condition or if it requires any repairs or adjustments.
In this article, we will guide you through the step-by-step process of testing a subwoofer with a multimeter. We will cover various aspects, including checking impedance, evaluating connectivity, measuring resistance, examining frequency response, inspecting voice coils, verifying power handling capability, and analyzing cone movement. By following these steps, you will gain valuable insights into the performance and quality of your subwoofer.
Before we dive into the testing process, it’s essential to gather the necessary equipment. You will need a multimeter, speaker cables, a 9-volt battery, a test tone CD or audio file, and a pen and paper to record your findings. Once you have everything ready, let’s proceed to the first step of testing your subwoofer.
Step 1: Gathering the necessary equipment
Before you begin testing your subwoofer, you’ll need to gather the necessary equipment. Here’s a list of items you will need:
- Multimeter: This is the primary tool you’ll use to measure the electrical properties of the subwoofer. Make sure you have a multimeter that can handle audio frequency measurements.
- Speaker cables: You will require speaker cables to connect the subwoofer to the multimeter and the audio source.
- 9-volt battery: This will be used to test the connectivity of the subwoofer.
- Test tone CD or audio file: You’ll need a test tone source that provides a consistent frequency to assess the subwoofer’s response.
- Pen and paper: Keeping a record of your measurements and observations will help you track the subwoofer’s performance.
Ensure that your multimeter is set to the appropriate measurement mode (often the resistance or ohms setting) and that it is functioning correctly. Additionally, make sure that your subwoofer is disconnected from the power source before proceeding with the testing process.
Once you have all the necessary equipment, you’re ready to move on to the next step: checking the impedance of the subwoofer.
Step 2: Checking the impedance of the subwoofer
Impedance is a crucial factor when it comes to subwoofer performance. The impedance of a subwoofer, measured in ohms, indicates how much electrical resistance it presents to the amplifier. To check the impedance of your subwoofer, follow these steps:
- Ensure that the subwoofer is disconnected from the power source and any audio devices.
- Take the speaker cables and connect the positive (red) wire to the positive terminal of the subwoofer and the negative (black) wire to the negative terminal.
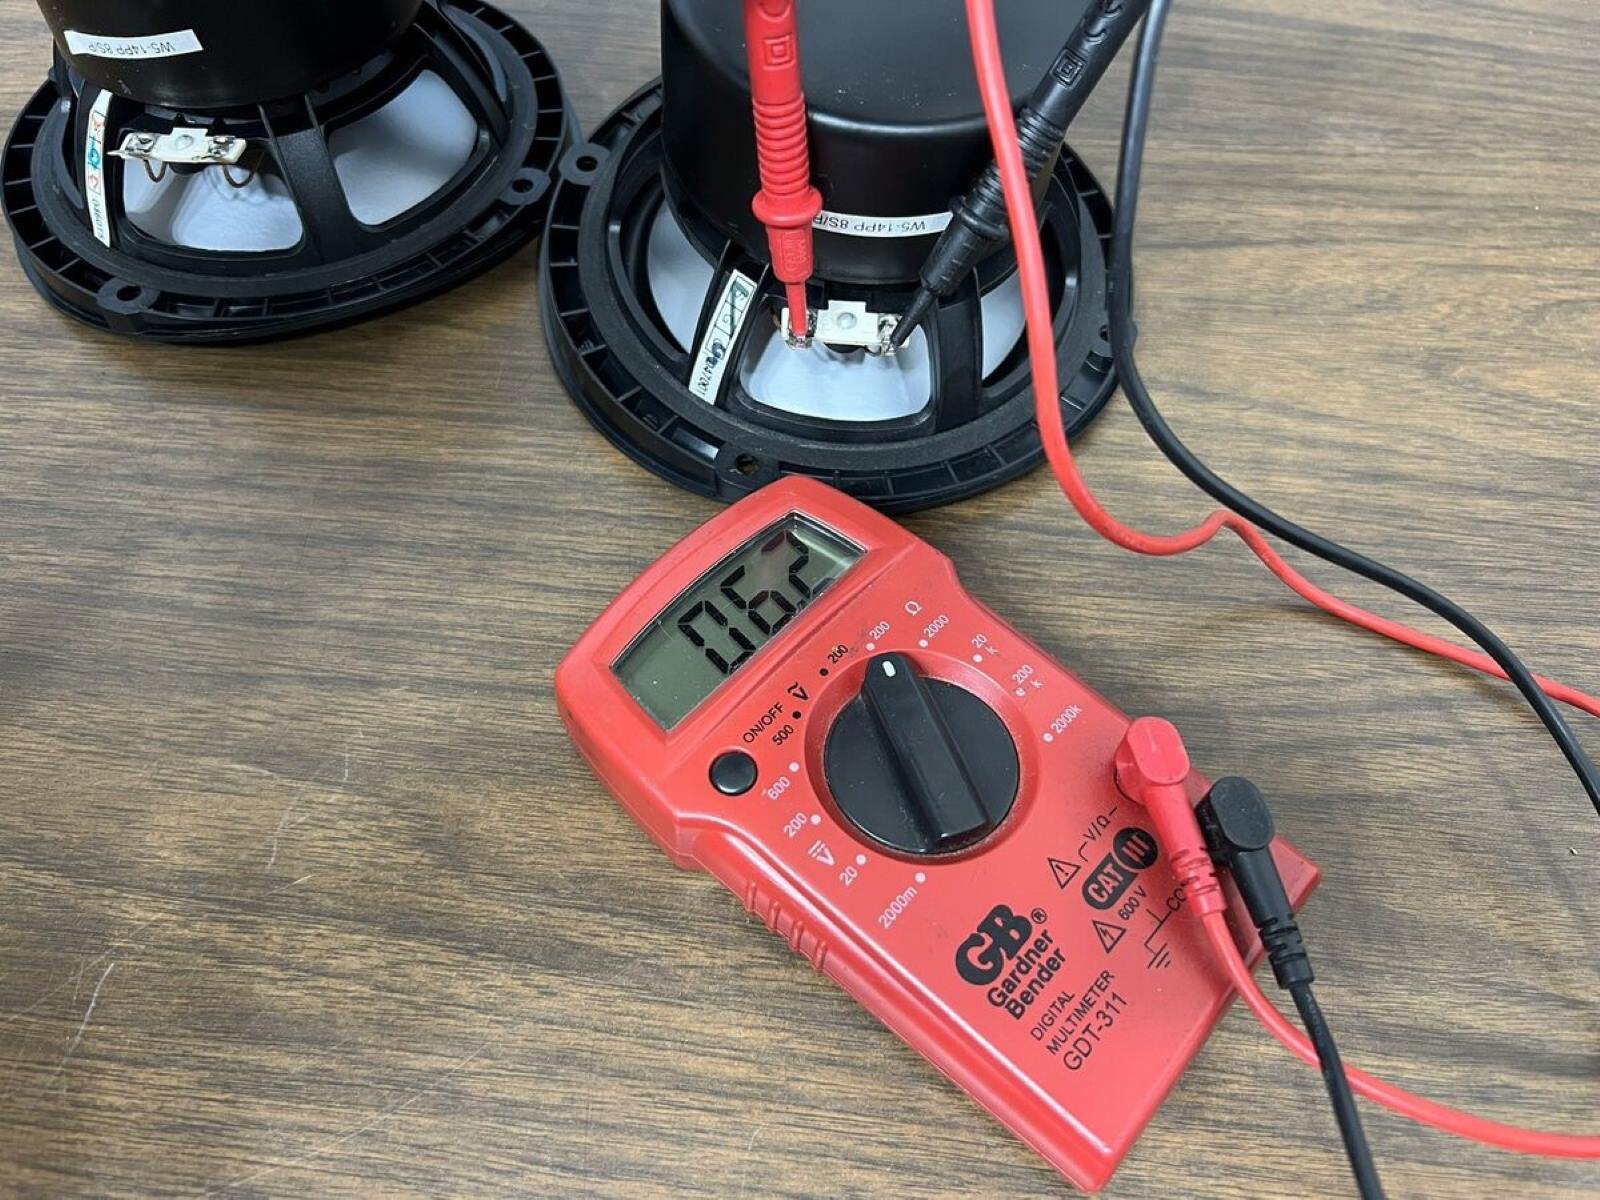
- Set your multimeter to the resistance measurement mode (usually denoted by the omega symbol).
- Touch the multimeter probes to the corresponding speaker cable connectors (red probe to the positive wire, black probe to the negative wire).
- Read the resistance measurement displayed on the multimeter.
The resistance reading you obtain is the impedance of your subwoofer. It should ideally match the specified impedance rating indicated by the manufacturer. If the impedance measurement significantly deviates from the specified rating, it may indicate a problem with the subwoofer’s voice coils or internal wiring.
Remember to record the impedance measurement and compare it to the manufacturer’s specifications. Repeat the process for each voice coil if your subwoofer is a dual voice coil model.
Checking the impedance of your subwoofer provides valuable information about its electrical characteristics and compatibility with your amplifier. If the impedance reading falls within the specified range and matches your amplifier’s requirements, you can proceed to the next step of testing your subwoofer.
Step 3: Testing the connectivity of the subwoofer
Ensuring the proper connectivity of your subwoofer is essential for optimal performance. Testing the connectivity will help identify any potential wiring issues or loose connections. To test the connectivity of your subwoofer, follow these steps:
- Disconnect the subwoofer from the power source and any audio devices.
- Take a 9-volt battery and touch the positive terminal of the battery to the positive wire of the subwoofer, and the negative terminal of the battery to the negative wire.
- Observe the subwoofer cone or listen for a popping sound. If the cone moves outwards or there is a distinct pop sound, it indicates the connectivity is correct.
- Repeat the process for any additional voice coils if your subwoofer is a dual voice coil model.
If there is no noticeable movement of the cone or pop sound, it suggests a connectivity issue. You should check the wiring connections and ensure they are secure and properly attached. Loose or faulty connections can negatively impact the subwoofer’s performance and sound quality.
It’s important to note that the connectivity test with a battery is a basic assessment and doesn’t provide extensive information about the subwoofer’s functionality. If there are concerns about the connectivity, it is advisable to consult a professional or refer to the subwoofer’s user manual for further troubleshooting steps.
Once you have confirmed the proper connectivity of your subwoofer, you can proceed to the next step of testing: measuring the DC resistance.
Step 4: Measuring the DC resistance of the subwoofer
Measuring the DC resistance of your subwoofer provides insight into the health and condition of its voice coils. It allows you to check for any issues such as shorted or open coils. To measure the DC resistance of your subwoofer, follow these steps:
- Ensure that the subwoofer is disconnected from the power source and any audio devices.
- Set your multimeter to the resistance measurement mode (ohms).
- Take the speaker cables and connect the positive (red) probe of the multimeter to the positive terminal of the subwoofer, and the negative (black) probe to the negative terminal.
- Read the resistance measurement displayed on the multimeter. This measurement represents the DC resistance of your subwoofer’s voice coil.
- Repeat the process for any additional voice coils if your subwoofer is a multiple voice coil model.
The DC resistance value you obtain should be within the acceptable range specified by the manufacturer. If the reading is significantly higher or lower than the specified range, it may indicate an issue with the voice coil, such as a short or open circuit. In such cases, further inspection or professional assistance may be required to assess and repair the subwoofer.
Remember to record the DC resistance measurement for future reference. It can be useful for comparison during future tests or troubleshooting.
Measuring the DC resistance of your subwoofer not only helps diagnose potential problems but also provides a baseline for assessing its performance. With the DC resistance measured, you can proceed to the next step: evaluating the frequency response of the subwoofer.
Step 5: Evaluating the frequency response of the subwoofer
The frequency response of a subwoofer indicates its ability to reproduce low-frequency sounds accurately. To evaluate the frequency response of your subwoofer, you’ll need a test tone source that provides consistent frequencies. Here’s how you can assess the frequency response:
- Connect your subwoofer to the audio source using the appropriate cables.
- Play the test tone at various frequencies, starting from the lowest frequency your subwoofer can handle and gradually increasing.
- Observe the performance of the subwoofer, paying attention to the clarity and strength of the bass output. Note any distortions, vibrations, or irregularities in the sound.
- Use your ears to gauge how well the subwoofer reproduces each frequency. Does it produce clean and accurate bass, or does it overemphasize or distort certain frequencies?
By evaluating the frequency response of your subwoofer, you can determine if it produces a tight and balanced bass response across the desired frequency range. Ideally, a good subwoofer should provide deep, powerful bass without muddying or overpowering other frequencies. However, keep in mind that personal preferences may also play a role in how you perceive the sound of your subwoofer.
If you notice any significant issues with the frequency response, it may be worth adjusting the subwoofer’s settings, such as the crossover frequency and gain, to achieve the desired sound. Additionally, experimenting with the placement of the subwoofer within your listening room can also impact its performance.
Record your observations and findings during the evaluation process. This will help you make necessary adjustments or seek professional assistance if required.
Once you have assessed the frequency response of your subwoofer, you can proceed to the next step: inspecting the voice coils.
Step 6: Inspecting the voice coils of the subwoofer
The voice coils of a subwoofer play a crucial role in converting electrical signals into sound. Inspecting the condition of the voice coils can help identify any physical damage or abnormalities that may affect the subwoofer’s performance. To inspect the voice coils, follow these steps:
- Disconnect the subwoofer from the power source and any audio devices.
- Remove the subwoofer from its enclosure or housing, if possible, to gain direct access to the voice coils.
- Visually inspect the voice coils for any signs of damage, such as burnt or melted areas, frayed wires, or disconnection.
- Gently touch the voice coils with your fingers to check for any excessive heat or abnormalities in temperature. The voice coils should not feel excessively hot or cold.
- If your subwoofer is a dual voice coil model, repeat the inspection process for each voice coil.
If you notice any visible damage or unusual physical characteristics, it is essential to address the issue. Damaged voice coils can impact the subwoofer’s performance, leading to distortion, reduced output, or even complete failure.
In some cases, the voice coil damage may be repairable by rewinding or replacing the coils. However, it is recommended to seek professional assistance or consult the manufacturer’s guidelines for the best course of action. Attempting to repair or modify the voice coils without proper knowledge or experience can cause further damage to the subwoofer.
Remember to document your observations and findings during the inspection process. This information can be useful for reference in case of future troubleshooting or repairs.
With the voice coil inspection completed, you can move on to the next step: verifying the power handling capability of the subwoofer.
Step 7: Verifying the power handling capability of the subwoofer
The power handling capability of a subwoofer refers to its ability to handle the power delivered by the amplifier without causing damage. Verifying the power handling capability is essential to ensure that your subwoofer can handle the power output of your audio system. Here’s how you can verify the power handling capability:
- Refer to the specifications provided by the manufacturer to determine the recommended power range for your subwoofer.
- Ensure that the subwoofer is disconnected from the power source and any audio devices.
- Connect the subwoofer to the amplifier using the appropriate cables.
- Gradually increase the volume on the amplifier to a comfortable listening level.
- Monitor the performance of the subwoofer and listen for any signs of distortion, clipping, or strain in the sound.
- If the subwoofer is handling the power smoothly without any noticeable issues or distortion, it indicates that it is operating within its power handling capability.
If you observe any distortion or strain in the sound when the amplifier is at a moderate volume, it may indicate that the subwoofer is being pushed beyond its power handling capability. In such cases, it is advisable to lower the volume to prevent potential damage to the subwoofer’s components.
It’s worth noting that the power handling capability is not solely determined by the subwoofer itself, but also by the amplifier’s output. Matching the power output of the amplifier to the recommended power range of the subwoofer ensures optimal performance and longevity.
Document your observations and note any adjustments made to the amplifier’s volume during the verification process. This will serve as a reference for future use and help maintain the subwoofer’s performance.
Once you have verified the power handling capability of your subwoofer, you can proceed to the next step: analyzing the cone movement.
Step 8: Analyzing the cone movement of the subwoofer
The movement of the cone in a subwoofer is a visual indicator of its performance and can reveal any potential issues. Analyzing the cone movement allows you to assess the subwoofer’s ability to reproduce low-frequency sounds accurately. Here’s how you can analyze the cone movement of your subwoofer:
- Connect your subwoofer to the audio source using the appropriate cables.
- Play a bass-heavy music track or a test tone that emphasizes low frequencies.
- Observe the movement of the subwoofer cone during playback. It should move in and out smoothly, keeping up with the audio signal.
- Pay attention to any irregularities or limitations in the cone movement, such as stiffness, asymmetry, or excessive wobbling.
A subwoofer with proper cone movement will accurately reproduce low-frequency sounds with sufficient excursion and control. The cone should move in accordance with the audio signal, effectively generating the desired bass response. Any irregularities in the cone movement can indicate issues with the subwoofer, such as a damaged voice coil, improper alignment, or a mechanical defect.
If you observe any significant irregularities in the cone movement, it is advisable to consult a professional or refer to the manufacturer’s guidelines for further assessment and potential repairs.
Remember to document your observations and note any specific details regarding the cone movement. This information can be useful for future reference or for troubleshooting any potential issues that may arise.
With the analysis of the cone movement complete, you can proceed to the final step: examining the overall sound quality of the subwoofer.
Step 9: Examining the overall sound quality of the subwoofer
The ultimate goal of testing a subwoofer is to assess its overall sound quality. This step involves listening to the subwoofer in conjunction with the rest of the audio system to evaluate its performance and determine if it meets your expectations. Here’s how you can examine the overall sound quality of your subwoofer:
- Connect your subwoofer to the audio source and ensure that all audio settings are properly configured.
- Play a variety of audio content, including music tracks, movies, or any other media that have prominent bass elements.
- Listen attentively to the subwoofer’s output and assess its performance based on your personal preferences and the desired audio experience.
- Take note of any issues such as distortion, muddiness, or lack of clarity in the bass response.
- Pay attention to how well the subwoofer integrates with the rest of the audio system, ensuring a cohesive and balanced soundstage.
The examination of the sound quality allows you to determine if the subwoofer meets your expectations in terms of bass reproduction, impact, and overall contribution to the audio experience. It should blend seamlessly with the other speakers, enhancing the low-frequency content without overpowering or dominating the sound. The bass should be deep, detailed, and well-defined, adding depth and immersion to the audio content.
If you encounter any issues or inconsistencies in the sound quality, considering adjustments to the subwoofer settings, such as the crossover frequency, phase, or equalization, may help achieve the desired performance. Additionally, experimenting with the positioning and placement of the subwoofer within your listening environment can also impact its sound quality.
Document your observations and take note of any adjustments made during the examination process. This information will serve as a reference for future use and help in troubleshooting or fine-tuning the subwoofer’s performance.
With the examination of the overall sound quality complete, you have now thoroughly tested and assessed your subwoofer. By following these steps, you can ensure optimal performance and enjoy a remarkable audio experience.
Congratulations! You are now equipped with the knowledge and skills to test and evaluate your subwoofer effectively.
Disclaimer: It’s important to exercise caution and follow safety procedures while testing your subwoofer. If you have any concerns or are unsure about any aspect of the testing process, it’s always recommended to consult a professional.
Conclusion
Testing a subwoofer with a multimeter is an essential process to ensure that it is functioning properly and delivering optimal sound quality. By following the step-by-step guide outlined in this article, you can effectively assess various aspects of your subwoofer, from impedance and connectivity to resistance, frequency response, voice coil condition, power handling capability, cone movement, and overall sound quality.
Through the testing process, you can identify any issues or abnormalities that may be affecting your subwoofer’s performance. Whether it’s a wiring problem, damaged voice coils, or improper settings, the tests outlined in this article will help you identify and address these issues appropriately.
Additionally, testing and evaluating your subwoofer allow you to make necessary adjustments to achieve the desired bass response, sound balance, and integration with your audio system. It ensures that your subwoofer is delivering the deep and powerful bass that enhances your listening experience, whether you’re enjoying music, watching movies, or immersing yourself in any other audio content.
Remember to document your findings and observations during the testing process. This documentation serves as a reference for future troubleshooting and fine-tuning, enabling you to maintain your subwoofer’s performance over time.
Now that you have a comprehensive understanding of how to test your subwoofer with a multimeter, you can confidently assess its electrical properties, physical condition, and overall sound quality. By taking the time to properly test and evaluate your subwoofer, you will be able to identify any issues, make necessary adjustments, and fully enjoy the immersive audio experience it provides.
Keep in mind that if you encounter any complex problems or are unsure about any aspect of the testing process, it is always advisable to seek professional assistance for a thorough assessment and proper resolution.