Home>Devices & Equipment>Turntable>Dual 510 Belt Drive Turntable How To Open
Turntable
Dual 510 Belt Drive Turntable How To Open
Published: January 19, 2024
Learn how to open and access the Dual 510 Belt Drive Turntable with ease. Explore step-by-step instructions and tips to optimize your turntable experience.
(Many of the links in this article redirect to a specific reviewed product. Your purchase of these products through affiliate links helps to generate commission for AudioLover.com, at no extra cost. Learn more)
Table of Contents
Introduction
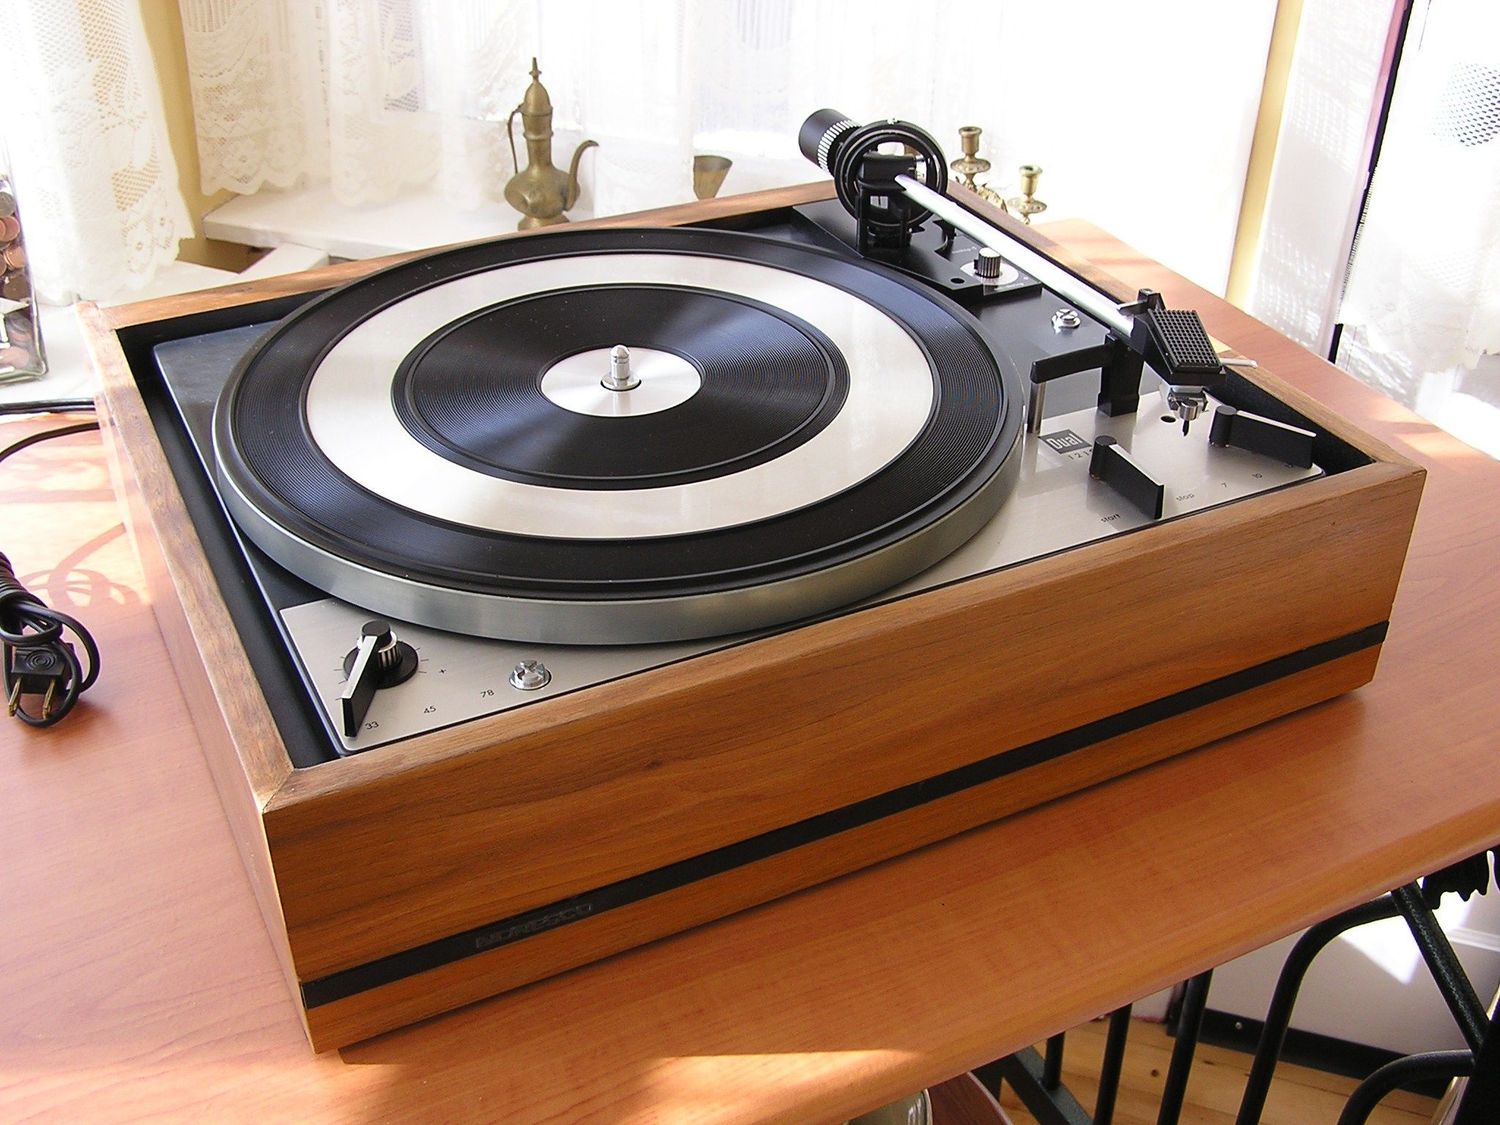
Welcome to our comprehensive guide on how to open a Dual 510 Belt Drive Turntable. The Dual 510 is a classic turntable loved by audiophiles and vintage audio enthusiasts alike. Whether you are looking to perform routine maintenance or need to make repairs, knowing how to open the turntable is essential.
The Dual 510 turntable is known for its reliable belt drive system, smooth operation, and excellent sound quality. However, over time, it may require cleaning, lubrication, or even replacing certain components. By following the steps outlined in this guide, you will be able to safely open the turntable and access the belt drive mechanism, tonearm, and other components for maintenance or repair purposes.
Before we delve into the step-by-step instructions, it is important to note that opening the Dual 510 turntable should only be done by those with some experience in working with audio equipment. If you are uncomfortable or uncertain about handling delicate electronic components, it is recommended to seek the assistance of a qualified technician or professional audio repair service.
Now, let’s get started with the necessary tools and preparations you’ll need for successfully opening the Dual 510 turntable.
Step 1: Gather the Necessary Tools
Before you begin opening your Dual 510 Belt Drive Turntable, it’s important to gather all the necessary tools and equipment. Having everything prepared in advance will make the process smoother and minimize the risk of damage to the turntable. Here are the tools you’ll need:
- Screwdriver set: You’ll need a set of screwdrivers with different sizes and types, such as Phillips and flat-head, to remove screws holding the turntable’s cover or components in place.
- Tweezers: A pair of fine-point tweezers will come in handy for delicate tasks, such as removing small screws or positioning wires.
- Lubricant: Depending on your specific maintenance needs, you may require a suitable oil or lubricant to ensure smooth operation of the turntable’s moving parts.
- Cleaning materials: It’s a good idea to have lint-free cloths or microfiber towels, along with a gentle cleaning solution, to remove dust, dirt, or debris from the turntable’s surfaces.
- Anti-static brush: An anti-static brush or record cleaning brush will help remove static electricity and dust from your records, ensuring optimal playback performance.
- Multi-purpose tool: A multi-purpose tool with pliers, wire cutters, and other useful functions can be handy for any unexpected situations or specific repairs that may arise during the process.
By having these tools ready, you’ll be well-prepared to tackle the process of opening your Dual 510 turntable. It’s always a good idea to ensure that the tools you choose are in good condition and suited for the specific task at hand. This will help you complete the process more efficiently and without causing any inadvertent damage to the turntable.
Now that you have the necessary tools, let’s move on to preparing the workspace for opening the Dual 510 turntable.
Step 2: Prepare the Workspace
Before you begin opening your Dual 510 Belt Drive Turntable, it’s essential to set up a suitable workspace. Creating a clean and organized workspace will ensure that you have enough room to work comfortably and reduce the risk of accidentally damaging any components. Here are some steps to follow when preparing your workspace:
- Clean the surface: Start by clearing the area where you’ll be working. Remove any clutter or debris from the surface to create a clean space to lay out your tools and the turntable itself.
- Use a soft, padded surface: To protect both the turntable and your workspace, consider placing a soft and padded surface, such as a felt mat or a thick towel, on the table or workbench. This will provide cushioning and prevent any scratches or damage to the turntable surface.
- Ensure proper lighting: Adequate lighting is crucial when working with small components or delicate mechanisms. Position a desk lamp or utilize natural light sources to ensure you can see clearly while working on the turntable.
- Organize your tools: Lay out your tools and equipment in an organized manner within easy reach. This will help you stay focused and avoid searching for specific tools in the middle of the process.
- Have a clean, lint-free cloth nearby: Keep a clean, lint-free cloth within reach to wipe any dust or debris from your hands or the turntable during the process. This will prevent any contaminants from entering the internal components of the turntable.
- Minimize distractions: Ensure that you’re working in a quiet and distraction-free environment. Turn off any unnecessary electronics or devices that may interfere with your concentration or cause accidents.
By following these steps, you’ll create an ideal workspace that is clean, well-lit, and organized. This will provide a conducive environment for opening your Dual 510 turntable and working on its components without any hindrances.
With your workspace prepared, it’s now time to move on to the next step: removing the platter from the turntable.
Step 3: Remove the Platter
After setting up your workspace, the next step in opening your Dual 510 Belt Drive Turntable is to remove the platter. The platter is the rotating disc where you place your vinyl records for playback. Here’s how you can safely remove the platter:
- Power off and unplug the turntable: Before you begin, make sure the turntable is turned off and unplugged from the power source. This will prevent any electrical accidents or damage during the process.
- Locate the platter: Identify the platter on the turntable. It usually sits on top of the motor and rotates when the turntable is in operation.
- Remove the dust cover: If your Dual 510 has a dust cover, lift it up and remove it from the turntable. This will provide you with better access to the platter.
- Locate the platter retaining clip or screw: Depending on the model of your Dual 510, there may be a retaining clip or screw holding the platter in place. Look for a small metal clip or a screw near the center spindle of the turntable.
- Remove the retaining clip or screw: Use your fingers or an appropriate tool, such as a screwdriver, to carefully remove the retaining clip or unscrew the screw. Be gentle and make sure not to damage any surrounding components.
- Lift off the platter: Once the retaining clip or screw is removed, gently lift the platter straight up from the turntable. It may require a bit of upward force, but be cautious not to apply excessive pressure that could cause any damage.
By following these steps, you will successfully remove the platter from your Dual 510 turntable. Remember to handle the platter with care as it is a delicate component. Place the platter on a stable and clean surface to prevent any scratches or damage.
Now that the platter is removed, we can move on to the next step: accessing the belt drive mechanism of the Dual 510 turntable.
Step 4: Access the Belt Drive Mechanism
With the platter removed, you can now access the belt drive mechanism of your Dual 510 Belt Drive Turntable. The belt drive system is responsible for turning the platter and providing the rotational motion for playing your vinyl records. Here’s how you can access the belt drive mechanism:
- Inspect the belt: Take a moment to inspect the condition of the belt. Look for signs of wear, such as cracks or stretching. If the belt appears to be damaged or worn, it may need to be replaced.
- Locate the motor pulley: On the underside of the turntable, you’ll find the motor pulley. This is the component that connects to the belt to drive the platter’s movement.
- Remove the belt: Carefully lift the belt off the motor pulley. If the belt is still in good condition, you can simply set it aside. However, if the belt needs to be replaced, remember to note its positioning and size for proper replacement.
- Inspect the motor pulley: Take a moment to check the motor pulley for any dirt, dust, or debris. If necessary, use a gentle cleaning solution and a lint-free cloth to clean the pulley. This will ensure smooth operation when you reassemble the turntable.
By following these steps, you’ll be able to access the belt drive mechanism of your Dual 510 turntable. This will allow you to inspect the condition of the belt and clean the motor pulley if necessary. If you need to replace the belt, take note of the specific size and type required for your turntable model.
Now that you have accessed the belt drive mechanism, let’s move on to the next step: opening the Dual 510 turntable itself.
Step 5: Open the Dual 510 Turntable
Now that you have prepared the workspace, removed the platter, and accessed the belt drive mechanism, it’s time to open the Dual 510 turntable itself. This step will allow you to gain access to the internal components for maintenance or repairs. Here’s how you can open the Dual 510 turntable:
- Identify the screws: Look for the screws securing the turntable’s cover. These screws are typically located on the sides or bottom of the turntable. They may be Phillips or flat-head screws, so make sure you have the correct screwdriver to remove them.
- Remove the screws: Carefully unscrew each screw and set them aside in a safe place. It’s helpful to keep track of where each screw belongs, as different screws may have different lengths or thread types.
- Lift off the cover: Once all the screws are removed, gently lift the cover straight up from the turntable. Take care not to force it or apply excessive pressure, as there may be delicate components inside.
- Set aside the cover: Place the removed cover in a secure and clean location, ensuring it is protected from any potential damage or scratches.
By following these steps, you will successfully open your Dual 510 turntable and gain access to the internal components. This will allow you to perform maintenance tasks, such as cleaning or lubricating parts, or to carry out repair work if needed.
Now that the turntable is open, you can proceed to the next step: performing necessary maintenance or repairs on the Dual 510 turntable.
Step 6: Perform Necessary Maintenance or Repairs
With the Dual 510 turntable open, you have the opportunity to perform necessary maintenance or repairs to keep your turntable in optimal working condition. Here are some common maintenance tasks you can perform:
- Clean the internal components: Use a soft, lint-free cloth or a gentle cleaning solution to wipe away any dust, dirt, or debris from the internal parts of the turntable. Be careful not to use excessive force or harsh chemicals that could damage the delicate components.
- Lubricate moving parts: Apply a suitable lubricant to the moving parts, such as the tonearm pivot or the motor spindle, to ensure smooth operation. Use only lubricants specifically recommended for turntable use and follow the manufacturer’s instructions.
- Inspect and replace worn parts: Check for any worn or damaged parts that may need to be replaced, such as the stylus or cartridge. Replace these parts with compatible ones to maintain the performance and quality of your turntable.
- Check connections and wiring: Ensure that all wiring connections are secure and inspect them for any signs of damage or wear. Tighten loose connections and replace any damaged cables to ensure proper audio signal transmission.
- Calibrate the tonearm: If necessary, calibrate the tonearm using the turntable’s built-in adjustment mechanisms. This will ensure accurate tracking and prevent any skipping or distortion during playback.
It’s important to note that if you are not confident in your ability to perform intricate repairs, it’s best to seek the assistance of a qualified technician or professional audio repair service. They have the knowledge and expertise to handle complex repairs and ensure the longevity of your turntable.
Once you have completed the necessary maintenance or repairs, you can proceed to the final step: reassembling the Dual 510 turntable.
Step 7: Reassemble the Turntable
After performing the necessary maintenance or repairs on your Dual 510 turntable, it’s time to reassemble the components and put everything back together. Here’s how you can reassemble your turntable:
- Retrieve the turntable cover: Take the cover that you set aside during the opening process and position it above the turntable.
- Align the cover: Carefully align the screw holes on the cover with the corresponding holes on the turntable. Make sure the cover is positioned correctly and evenly over the internal components.
- Insert and tighten the screws: Insert the screws previously removed and tighten them firmly, but not excessively. Start with one screw and gradually work your way around, tightening each screw until all are secure.
- Test the turntable: Once the cover is securely in place, plug in the turntable and power it on. Test all the functions and ensure that everything is working properly.
- Replace the platter: Place the platter back onto the turntable, aligning it with the spindle. If you removed the belt, make sure to position it correctly onto the motor pulley.
- Replace the dust cover: If you removed the dust cover, carefully position it back onto the turntable, ensuring a proper fit.
- Final cleaning: Use a clean, lint-free cloth to wipe any dust or fingerprints from the external surfaces of the turntable, including the cover and dust cover.
By following these steps, you will successfully reassemble your Dual 510 turntable after performing maintenance or repairs. Take your time and ensure that everything is aligned properly and securely fastened. This will help maintain the integrity of the turntable and ensure optimal performance.
With the turntable reassembled, you can now sit back and enjoy your vinyl collection once again. Remember to follow proper care and maintenance practices to keep your Dual 510 Belt Drive Turntable in excellent condition for years to come.
Now that you’ve completed the reassembly process, you can conclude the procedure for opening and maintaining your Dual 510 turntable.
Conclusion
In conclusion, knowing how to open and maintain your Dual 510 Belt Drive Turntable is essential for keeping it in excellent working condition. By following the step-by-step instructions provided in this comprehensive guide, you can confidently undertake routine maintenance tasks or perform necessary repairs.
We began by emphasizing the importance of gathering the necessary tools and preparing a suitable workspace. Having the right tools and a clean, organized workspace sets the stage for a successful maintenance or repair process.
We then outlined the steps for removing the platter, accessing the belt drive mechanism, opening the turntable itself, performing maintenance or repairs, and reassembling the components. Each step is crucial in ensuring a systematic and effective process.
Throughout the guide, we emphasized the importance of caution, precision, and seeking professional help if needed. Opening and working on delicate audio equipment requires a certain level of expertise, and it’s always wise to consult a qualified technician when in doubt.
By keeping your Dual 510 turntable in excellent condition, you can enjoy high-quality sound reproduction and prolong the lifespan of this classic piece of audio equipment. Remember to perform routine maintenance regularly and address any issues promptly to maximize the performance of your turntable.
We hope this guide has provided you with the necessary knowledge and guidance to open your Dual 510 turntable and effectively maintain or repair it. Now, it’s time for you to apply these steps and unleash the full potential of your Dual 510 Belt Drive Turntable!