Home>Events & Info>Playback>How To Start Playback From Any Place In Musescore Score
Playback
How To Start Playback From Any Place In Musescore Score
Modified: January 22, 2024
Learn how to start playback from any specific place in your Musescore score with this easy step-by-step guide. Enhance your music playback experience.
(Many of the links in this article redirect to a specific reviewed product. Your purchase of these products through affiliate links helps to generate commission for AudioLover.com, at no extra cost. Learn more)
Table of Contents
Introduction
Welcome to the world of Musescore, a versatile and powerful music notation software that allows you to create, edit, and playback musical scores. Whether you are a composer, arranger, or musician, Musescore provides you with the tools you need to bring your musical ideas to life.
One of the key features of Musescore is its playback function, which allows you to listen to your score as if it were being performed by a live musician. While starting playback from the beginning of a score is straightforward, you may sometimes want to begin playback from a specific point in the score. In this article, we will explore how to start playback from any place in a Musescore score.
Starting playback from a specific point in the score is useful in various situations. Perhaps you want to focus on a particular section or measure to analyze its musical nuances. Maybe you want to practice a challenging part of the score repeatedly. Or, you might want to hear how a specific passage sounds in the context of the entire piece without having to listen to the entire score from the beginning.
Whatever your reason may be, Musescore offers a range of features that allow you to easily navigate to any point in your score and initiate playback from that spot. In the following steps, we will guide you through the process.
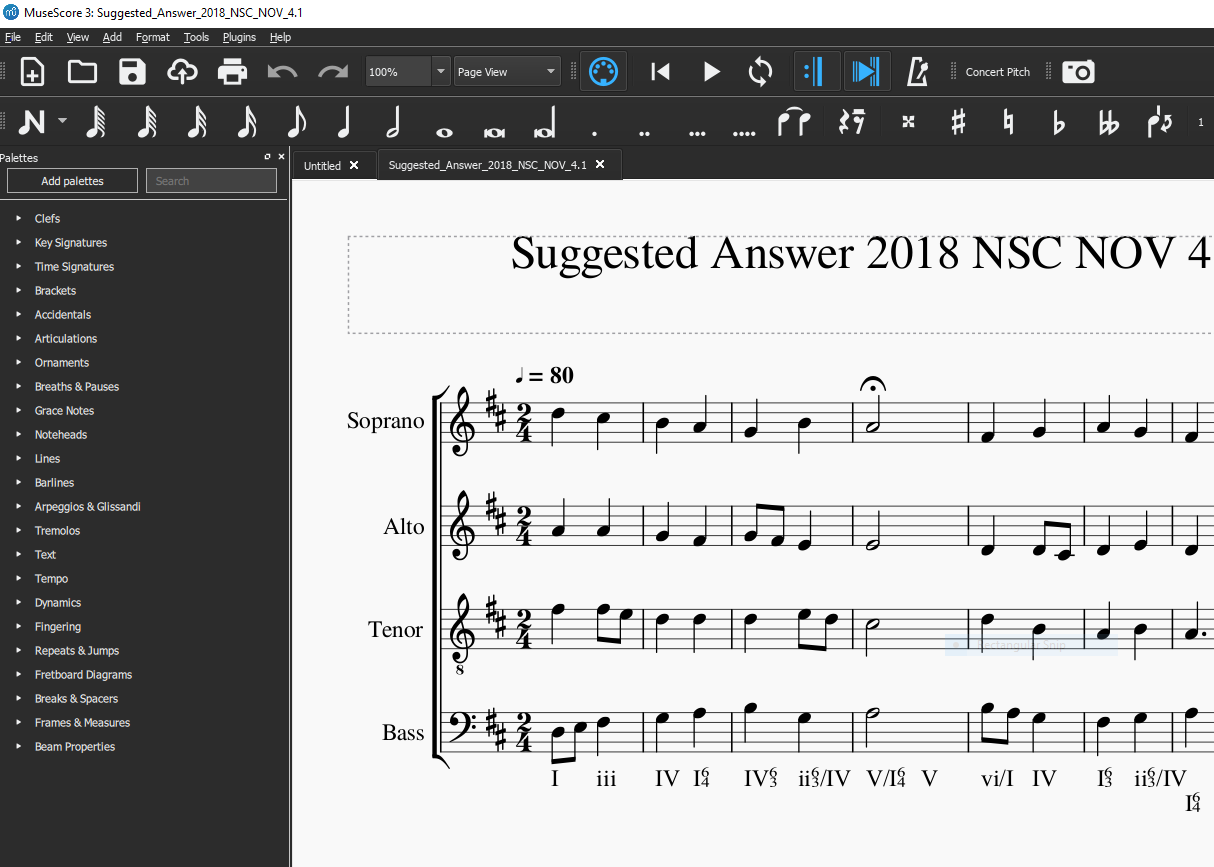
Step 1: Opening the Musescore Score
Before you can start playback from any place in a Musescore score, you need to open the score in the software. If you don’t already have Musescore installed on your computer, you can download it for free from the official Musescore website.
Once you have Musescore installed, follow these steps to open your score:
- Launch the Musescore software by double-clicking the application icon on your desktop or searching for it in your computer’s programs or applications menu.
- In the Musescore interface, click on the “File” menu located in the top left corner of the window.
- From the drop-down menu, select “Open” to browse and select the Musescore score file you wish to open.
- Navigate to the location where your score file is saved and click on it to select it.
- Finally, click on the “Open” button to load the selected score into Musescore.
Once the score is opened in Musescore, you will see the musical notation displayed on the screen. You can now proceed to the next step to learn how to navigate to the desired starting point in the score.
Step 2: Navigating to the Desired Starting Point
Now that you have your Musescore score open in the software, it’s time to navigate to the specific spot in the score from which you want to begin playback. Musescore provides various tools and methods to help you easily locate the desired starting point. Follow these steps:
- Identify the measure or section in the score where you want the playback to begin. You can do this by looking at the musical notation displayed on the screen.
- Use the navigation controls provided by Musescore to scroll through the score and find the desired starting point. These controls typically include options such as scrolling vertically or horizontally, jumping to specific pages or measures, and zooming in or out to adjust the level of detail shown.
- If you know the measure number of the starting point, you can use the measure number box in the Musescore interface to directly input the measure number you want to jump to.
- You can also use keyboard shortcuts to navigate through the score quickly. For example, pressing the “Home” key will take you to the beginning of the score, while pressing the “End” key will take you to the end of the score. Additionally, using the arrow keys allows you to move one measure at a time in the desired direction.
- Take advantage of the “Follow Playback” feature in Musescore, which automatically scrolls the score to keep the currently playing measure in view. This can be especially helpful when you want to hear the music while simultaneously viewing the notation.
By using these navigation tools and techniques, you can easily find the specific spot in your score where you want the playback to start. Once you have reached the desired starting point, you are ready to move on to the next step and adjust the playback settings.
Step 3: Adjusting the Playback Settings
Before initiating playback from the desired starting point in your Musescore score, it’s important to ensure that the playback settings are adjusted to your preferences. Musescore offers several playback options that you can customize to enhance your listening experience. Follow the steps below to adjust the playback settings:
- Click on the “View” menu in the Musescore interface, located at the top of the window.
- From the drop-down menu, select “Synthesizer” to open the Synthesizer window.
- In the Synthesizer window, you can choose your preferred sound font or instrument for playback. Musescore provides a variety of sound font options, allowing you to select different instruments or customize the sound to your liking.
- Adjust the volume settings by moving the volume sliders for each instrument or section. This enables you to control the relative loudness of different instrument parts during playback.
- Furthermore, you can enable or disable specific playback features like percussion, tremolo, and glissando, depending on your score’s requirements.
- Make any additional adjustments to the playback settings based on your preferences. For example, you can choose to enable or disable the metronome sound or adjust the tempo.
By customizing the playback settings in Musescore, you can create a more personalized and optimized playback experience. Once you are satisfied with the settings, you are ready to move on to the next step and initiate playback from the desired starting point in your score.
Step 4: Initiating Playback from Any Place in the Score
Now that you have reached the desired starting point in your Musescore score and adjusted the playback settings, it’s time to initiate playback from that spot. Musescore provides multiple methods for starting playback from any place in the score. Follow these steps:
- Click on the measure or section where you want the playback to begin. This will select that measure or section in the score.
- Next, navigate to the “Play” menu located at the top of the Musescore window.
- From the drop-down menu, select “From Selection”. This option tells Musescore to initiate playback from the selected measure or section.
- You can also use the keyboard shortcut “Ctrl + Space” (on Windows/Linux) or “Cmd + Space” (on Mac) to quickly start playback from the selection.
- If you have set up a loop or repeat section in your score, you can choose the “Play Loop” option from the “Play” menu to play only the selected section in a continuous loop.
Once you have initiated playback from the desired starting point, Musescore will begin playing the score from that spot, using the playback settings you have customized. You can listen to the music as it progresses through the score, whether it’s a single measure, a section, or a looped section.
During playback, you can follow along with the musical notation on the screen, allowing you to visualize the music while you listen. It’s a great way to analyze and study the score, practice a specific section, or simply enjoy the music.
If you want to make further adjustments or stop the playback, proceed to the next step.
Step 5: Pausing or Stopping Playback
While playback is in progress in Musescore, you have the flexibility to pause or stop the playback whenever you desire. Whether you need to take a break, make adjustments, or simply end the playback, follow these steps:
- To pause the playback, click on the “Pause” button located in the playback controls at the top of the Musescore window. Alternatively, you can use the keyboard shortcut “Spacebar” to pause and resume the playback.
- If you wish to stop the playback completely, click on the “Stop” button in the playback controls. This will halt the playback and return the playback position to the starting point.
Pausing or stopping the playback allows you to take a moment to reflect on the music, make any necessary adjustments, or shift your focus to a different part of the score. It provides you with full control over your listening experience.
Additionally, you can use the playback controls to navigate through the score while the playback is paused. You can manually move the playback position to any measure or section by clicking on that point in the score or by using the measure number box in the Musescore interface.
Feel free to experiment with different sections, listen to specific passages repeatedly, or explore the score at your own pace using the playback controls. Musescore offers a user-friendly interface that makes it easy to navigate and control playback, ensuring a seamless musical experience.
Now that you know how to pause or stop the playback, let’s move on to some additional tips and tricks to enhance your Musescore experience.
Step 6: Additional Tips and Tricks
Now that you are familiar with the basics of starting playback from any place in a Musescore score, let’s explore some additional tips and tricks to enhance your experience:
- Use the playback speed options in Musescore to adjust the tempo of the playback. You can slow down or speed up the music to suit your preferences or practice needs.
- Experiment with different playback techniques, such as using dynamics, articulations, and phrasing to bring your score to life. You can customize these elements in Musescore to achieve the desired musical expression.
- Take advantage of the mixer feature in Musescore, which allows you to adjust the volume levels of individual instruments or sections during playback. This can help you balance the sound and highlight specific parts of your score.
- Explore the playback options available in Musescore, such as repeat signs, D.C./D.S. al Coda markings, and segnos. These features enable you to create complex and realistic playback scenarios.
- Consider utilizing plugins or extensions in Musescore to expand the playback capabilities. These plugins can add additional instrument sounds, effects, or even provide advanced playback features.
- If you’re working on a collaborative project or want to share your score with others, export it as an audio file in Musescore. This allows you to share your music with others who may not have the software installed.
By utilizing these additional tips and tricks, you can further enhance your playback experience in Musescore. Whether you are composing, arranging, studying a score, or practicing a musical instrument, Musescore provides an array of features and options to make your musical journey more enjoyable and productive.
Remember to always save your progress as you work on your score and take advantage of the various tools and features that Musescore offers to unleash your creativity and bring your musical ideas to life.
With these comprehensive steps, you are now equipped to start playback from any place in a Musescore score. So, go ahead, dive into your score, and let the music play!
Conclusion
Starting playback from any place in a Musescore score opens up a world of possibilities for composers, musicians, and music enthusiasts. With the ability to easily navigate to specific points in the score and adjust playback settings, Musescore provides a versatile and immersive musical experience.
By following the steps outlined in this article, you have learned how to open a Musescore score, navigate to the desired starting point, adjust playback settings, initiate playback from any spot, and pause or stop playback. These techniques give you full control over your listening experience, allowing you to focus on specific sections, study intricate musical details, or simply enjoy the music at your own pace.
Moreover, the additional tips and tricks provided further enhance your Musescore journey. From customizing playback speed and dynamics to utilizing mixer controls and exploring plugins, you have the tools to bring your musical vision to life and create captivating renditions of your compositions.
As you continue to use Musescore to compose, arrange, or study music, don’t be afraid to experiment and explore the vast possibilities that the software offers. Take advantage of its features, immerse yourself in your scores, and let your creativity flourish.
Remember to save your progress, make use of shortcuts and keyboard commands, and seek inspiration from the vibrant Musescore community. With dedication and practice, you can unlock new levels of musical expression and achieve remarkable results in your musical endeavors.
So, go ahead and embark on your journey with Musescore. Let the power of playback take you to new heights of musicality and bring your compositions to life like never before.