Home>Events & Info>Podcast>How To Make A Podcast On Garageband

Podcast
How To Make A Podcast On Garageband
Modified: January 22, 2024
Learn how to create your own podcast on Garageband with this step-by-step guide. Discover the tools and techniques to produce professional-quality podcasts.
(Many of the links in this article redirect to a specific reviewed product. Your purchase of these products through affiliate links helps to generate commission for AudioLover.com, at no extra cost. Learn more)
Table of Contents
Introduction
Welcome to the world of podcasting! Podcasting has become a popular medium for individuals and businesses to share their ideas, stories, and expertise with a global audience. Whether you want to start your own podcast as a hobby, to promote your brand, or to become a thought leader in your industry, creating a podcast is an exciting journey that begins with great content and a reliable platform.
In this article, we’ll guide you through the process of creating a podcast using Garageband, a powerful and user-friendly digital audio workstation available on Apple devices. Whether you’re a beginner or have some experience with audio editing, Garageband provides all the necessary tools to record, edit, and produce professional-quality podcasts.
But before we dive into the technical details, let’s discuss the key requirements for making a podcast on Garageband:
- An Apple device (Mac, iPhone, or iPad) with Garageband installed
- A good quality microphone
- Headphones
- A quiet recording environment
- A topic or theme for your podcast
- Engaging content and a unique perspective
- A podcast hosting platform to publish and distribute your episodes
With these requirements in place, you’re ready to embark on your podcasting journey. So, let’s dive into the steps of creating a podcast using Garageband!
Requirements
Before you start creating your podcast, there are a few key requirements that you need to fulfill:
1. An Apple Device: Garageband is a software developed by Apple and is only available on their devices. You can use Garageband on a Mac, iPhone, or iPad. Make sure you have one of these devices before proceeding with the podcast creation process.
2. Garageband Installed: Garageband is a free software that comes pre-installed on most Apple devices. If you don’t have it installed, you can easily download it from the App Store.
3. Good Quality Microphone: To ensure professional audio quality for your podcast, invest in a good quality microphone. USB microphones are a popular choice for podcasters as they offer ease of use and decent sound quality. Some recommended options include the Blue Yeti, Audio-Technica ATR2100x, and Rode NT-USB.
4. Headphones: It’s crucial to use headphones while recording and editing your podcast. This allows you to monitor the audio and catch any background noise or recording issues. Closed-back headphones are preferred as they provide better sound isolation and prevent audio bleed into the microphone.
5. Quiet Recording Environment: Find a quiet space to record your podcast episodes. Avoid areas with background noise, echo, or distractions that can negatively impact the audio quality. Consider using soundproofing techniques or a portable isolation booth to minimize unwanted noise.
6. Podcast Theme and Content: Determine the theme or topic for your podcast. Consider your interests, areas of expertise, or the audience you want to target. It’s important to have a clear vision for your podcast and create engaging content that will resonate with your listeners.
7. Podcast Hosting Platform: Once your podcast episodes are ready, you’ll need a podcast hosting platform to publish and distribute them. Popular podcast hosting platforms include Libsyn, Podbean, and Anchor. These platforms provide features like RSS feed generation, episode scheduling, and analytics to help you manage and grow your podcast.
By fulfilling these requirements, you’ll be well-prepared to dive into the world of podcasting using Garageband. So, gather your equipment, brainstorm some engaging content ideas, and let’s get ready to create an amazing podcast!
Step 1: Setting up Garageband
Once you have all the necessary requirements in place, it’s time to set up Garageband on your Apple device. Follow these steps to get started:
1. Open Garageband: Locate the Garageband app on your device and open it. You’ll be greeted with a welcome screen and various project templates.
2. Choose a Podcast Template: Garageband offers pre-designed templates specifically tailored for podcasting. Click on “New Podcast Episode” or a similar template to begin creating your podcast project.
3. Select the Track Type: Garageband allows you to choose between two track types: “Voice” and “Jingles & Stings”. For the main content of your podcast, select the “Voice” track type. If you plan to add intro or outro music, select the “Jingles & Stings” track type as well.
4. Customize Your Project: Give your podcast project a name and choose the location where you want to save it. You can also set the tempo and time signature based on your preference, although these settings are not crucial for podcasting.
5. Enable Advanced Tools: To access additional features and settings in Garageband, go to the main menu, click on “Garageband,” and select “Preferences”. In the preferences window, click on the “Advanced” tab and make sure the box next to “Show Advanced Tools” is checked.
6. Configure Audio Settings: It’s important to configure the audio settings properly to ensure optimal recording quality. In Garageband, navigate to the main menu and select “Preferences”. Then, click on the “Audio/MIDI” tab to adjust the input and output settings. Select your microphone as the input device and set the desired output device for monitoring your recordings.
7. Test Your Setup: Before you start recording your podcast, it’s a good idea to perform a quick test. Plug in your microphone, put on your headphones, and speak into the microphone to ensure that Garageband is properly detecting your audio input. Adjust the input gain if needed to ensure a clean and clear recording.
By following these steps, you’ll have Garageband set up and ready to start recording your podcast. In the next step, we’ll dive into creating a new podcast project within Garageband.
Step 2: Creating a New Podcast Project
Now that you have Garageband set up on your Apple device, let’s move on to creating a new podcast project. Follow these steps to get started:
1. Launch Garageband: Open the Garageband app on your device. You will be presented with a welcome screen and various project templates.
2. Choose a Podcast Template: Garageband offers pre-designed templates specifically for podcasting. Click on “New Podcast Episode” or a similar template to begin creating your podcast project. If you prefer, you can also start with a blank project and customize it according to your needs.
3. Give the Project a Name: Provide a name for your podcast project. Choose a descriptive and catchy name that reflects the theme or focus of your podcast. This will help you stay organized if you plan to create multiple podcast episodes.
4. Select the Project File Location: Choose the location on your device where you want to save the project file. It’s a good practice to create a dedicated folder for your podcast projects to keep everything organized.
5. Set the Tempo and Time Signature: Garageband allows you to set the tempo and time signature for your project. While these settings are not essential for podcasting, you can adjust them according to your preferences. For most podcast recordings, the default settings should suffice.
6. Determine the Length of Your Podcast Episode: Decide on the desired length of your podcast episode. This will help you structure and plan your content accordingly. Typical podcast episodes range from 30 minutes to one hour, but the length ultimately depends on your content and audience preferences.
7. Create Tracks: In the Garageband interface, you will see the timeline and the tracks area. To start creating your podcast, you’ll need to add tracks to the project. Click on the “+” button in the tracks area and choose the “Real Instrument” option. Select “Voice” to create a track where you can record your voice for the main content of your podcast.
8. Set Track Parameters: After adding the voice track, you can adjust its parameters. Click on the “Info” button (i) on the track header to access the track settings. Here, you can rename the track, select the appropriate microphone input, and set the input level. Ensure that the correct microphone is selected and adjust the input level to avoid distortion or clipping.
By following these steps, you will have created a new podcast project in Garageband. In the next step, we’ll explore how to set up the tracks for recording your podcast episode.
Step 3: Setting up the Tracks
Now that you have created a new podcast project in Garageband, it’s time to set up the tracks for recording your podcast episode. Follow these steps to get your tracks ready:
1. Understand the Tracks Area: The tracks area in Garageband is where you can view and manage all the tracks in your project. It allows you to visualize the audio waveform, adjust volume levels, and apply additional effects or edits.
2. Arrange the Tracks: Depending on your podcast format and content, you may need to add additional tracks for music, sound effects, or guest interviews. To add a new track, click on the “+” button in the tracks area and choose the appropriate track type (Real Instrument for voice, Software Instrument for music, etc.). Arrange the tracks in the order you want them to appear in the final podcast episode.
3. Name and Label the Tracks: To keep your project organized, it’s helpful to give each track a descriptive name and label. Double-click on a track header to rename it, and use color labels to differentiate between different types of tracks or segments of your podcast.
4. Adjust Track Volume: Each track has individual volume controls that allow you to adjust the audio level. Click on the volume slider for a specific track in the tracks area and drag it to the desired level. Ensure that your voice track is set to an appropriate volume to maintain clarity and balance with other tracks.
5. Enable Monitoring: It’s crucial to enable monitoring to hear yourself while recording. This helps in maintaining consistent audio levels and detecting any recording issues in real-time. Click on the “Monitor” button (headphone icon) for your voice track to enable monitoring. Ensure that your headphones are connected and working properly.
6. Consider Using Markers: Markers are useful for indicating notable sections or segments in your podcast episode. They can be helpful during editing or when referring to specific points while recording. To add a marker, simply click on the marker button in the toolbar at the top of the Garageband interface.
7. Save Your Project: As you set up your tracks and make adjustments, it’s important to periodically save your project to avoid losing any progress. Click on “File” in the menu bar and select “Save” or use the keyboard shortcut (Command + S) to save your project.
By following these steps, you will have successfully set up the tracks in Garageband for recording your podcast episode. In the next step, we’ll dive into the process of recording audio for your podcast.
Step 4: Recording Audio
With your tracks set up in Garageband, it’s time to start recording the audio for your podcast episode. Follow these steps to ensure a smooth recording process:
1. Test Your Levels: Before you start recording, check your microphone level to ensure it’s not too low or too high. Speak into the microphone and adjust the input level on your voice track. Aim for a clear and balanced audio level without any distortion or clipping.
2. Set Your Recording Preferences: Garageband provides several recording preferences that you can customize based on your requirements. To access the recording preferences, go to “Garageband” in the menu bar and select “Preferences”. Here, you can choose the recording format, sample rate, and bit depth for optimal audio quality.
3. Activate Count-In and Metronome (Optional): If you prefer to have a count-in before starting your recording or want to use a metronome as a reference, you can enable these features in Garageband. Go to “Control” in the menu bar, select “Count-in” and “Metronome” to enable them.
4. Position Yourself Correctly: Find a comfortable position in front of the microphone. Maintain a consistent distance from the microphone to ensure consistent audio levels throughout your recording. Position yourself in a way that minimizes background noise and maximizes the clarity of your voice.
5. Clear Your Throat and Take a Deep Breath: Before you hit the record button, clear your throat and take a deep breath. This helps in reducing mouth noises and allows you to start the recording with a fresh and clear voice.
6. Start Recording: Once you’re prepared, click on the red record button in Garageband to start recording. Speak clearly and confidently as you deliver your content. Take pauses and breaks whenever necessary, and don’t hesitate to redo sections if you stumble or make mistakes.
7. Use Markers (Optional): If you want to mark specific points or sections in your recording, you can use markers during the recording process. Simply click on the marker button in the toolbar at the top of the Garageband interface to add markers at desired locations.
8. Monitor Your Recording: While recording, it’s important to monitor the audio through your headphones to ensure everything is being captured correctly. Pay attention to the volume levels, any unwanted background noise, or any clipping/distortion issues. Make adjustments as needed during the recording process.
9. Take Breaks and Save Your Progress: If you’re recording a long podcast episode, it’s recommended to take breaks between segments or chapters to give yourself some rest. Additionally, remember to save your project periodically to avoid losing any recorded audio. Click on “File” in the menu bar and select “Save” or use the shortcut (Command + S) to save your project regularly.
By following these steps, you’ll be able to record your podcast audio effectively using Garageband. In the next step, we’ll explore how to edit your podcast and refine the recorded audio.
Step 5: Editing Your Podcast
Once you have finished recording your podcast episode, it’s time to edit and refine the audio using the editing features in Garageband. Follow these steps to ensure a polished podcast episode:
1. Review Your Recording: First, listen to your entire recording from start to finish. Take note of any sections that need editing, such as mistakes, pauses, or background noise that you want to remove or adjust.
2. Trim Unwanted Sections: To remove unwanted sections, click and drag the yellow handles at the beginning and end of the audio waveform on your voice track. By selecting the unwanted portion and pressing the delete key, you can easily remove those segments.
3. Smooth Out Transitions: If you have pauses, breaths, or abrupt transitions between different segments or sentences, you can make the edits appear seamless. Use the “Split” tool to cut the audio at the desired points and delete or adjust the sections as needed.
4. Arrange and Rearrange Segments: Arrange the segments of your podcast to create a logical flow. This includes the intro, main content, outro, and any guest interviews or additional tracks. Use the drag-and-drop feature in Garageband to rearrange the segments in the order you prefer.
5. Apply Fade-Ins and Fade-Outs: To create smooth transitions at the beginning and end of your podcast episode, you can apply fade-ins and fade-outs. Select the desired portion of the audio waveform and go to “Edit” in the menu bar. Choose “Fade-In” or “Fade-Out” to gradually adjust the volume at the beginning or end of the selected section.
6. Clean Up Background Noise: If there are background noises or unwanted sounds in your recording, you can reduce or remove them using noise reduction tools. Garageband offers built-in noise reduction features that can help improve the overall audio quality. Experiment with the settings to find the right balance between noise reduction and maintaining the vocal clarity.
7. Add Music or Sound Effects (Optional): If you want to enhance your podcast with music or sound effects, you can import them into Garageband. Simply click on the media browser button in the toolbar, select the desired audio file, and drag it onto a separate track. Adjust the volume levels and position it accordingly within your podcast episode.
8. Fine-Tune Audio Levels: Throughout the editing process, make sure to fine-tune the audio levels to ensure a balanced and consistent sound. Adjust the volume levels of individual tracks to maintain clarity and avoid any parts being too loud or too soft.
9. Listen and Review: After making all the necessary edits, take the time to listen to the final edited version of your podcast episode. Pay attention to any remaining issues, such as pops, clicks, or uneven audio levels. Make additional adjustments as needed.
By following these steps, you’ll be able to edit your podcast episode effectively using Garageband. In the next step, we’ll explore how to add background music to elevate the overall listening experience of your podcast.
Step 6: Adding Background Music
Adding background music to your podcast can enhance the overall listening experience and set the mood for your content. Follow these steps to add background music to your podcast using Garageband:
1. Choose the Right Music: Select background music that complements the theme and tone of your podcast. You can use royalty-free music from websites like Epidemic Sound, SoundCloud, or YouTube Audio Library. Ensure that you have the appropriate licenses or permissions to use the music in your podcast.
2. Import the Music Track: Download or save the music track you want to use to your computer. In Garageband, click on the media browser button in the toolbar (looks like a music note). Navigate to the location where the music track is saved and drag it into Garageband’s timeline.
3. Position the Music Track: Drag and drop the music track onto a separate track in the Garageband timeline, below your existing podcast tracks. Position the music track in the desired location, such as at the beginning, during transitions, or at the end of your podcast episode.
4. Adjust the Music Volume: Use Garageband’s volume controls to adjust the volume level of the music track. Ensure that it doesn’t overpower your voice or other podcast tracks. You can click on the volume automation line in the music track to create gradual volume changes or fade-ins and fade-outs.
5. Edit the Music Track: If necessary, you can make edits to the music track to fit the length or mood of your podcast episode. Use the trim tool to remove any unwanted sections or apply fade-ins/fade-outs to create smooth transitions. Be mindful of copyright restrictions if you make significant changes to the music track.
6. Create Segments with Music: Consider using the music track to create segments or breaks within your podcast episode. For example, you can fade the music in and out between different topics or segments. This helps in keeping the listener engaged and adds a professional touch to your podcast.
7. Preview and Adjust: Once you have added background music, listen to your podcast episode in its entirety to ensure that the music blends well with your voice and content. Make any necessary adjustments to the volume levels or timing of the music track to achieve the desired effect.
8. Consider Copyright and Licensing: It’s crucial to respect copyright laws when using background music in your podcast. Make sure you have the necessary licenses or permissions to use the music, or choose royalty-free tracks that are explicitly designated for podcast use.
By following these steps, you can add background music to your podcast using Garageband. In the next step, we’ll explore how to adjust volume levels and apply effects to bring your podcast to life.
Step 7: Adjusting Volume and Effects
Adjusting volume levels and applying effects can greatly enhance the overall quality and impact of your podcast. Follow these steps to fine-tune the volume levels and add effects to your podcast using Garageband:
1. Volume Control: Garageband allows you to adjust the volume levels of individual tracks to achieve a balanced mix. Click on the volume slider for each track in the tracks area and drag it to adjust the volume level. Ensure that your voice track remains clear and audible without being too overpowering or drowned out by other tracks.
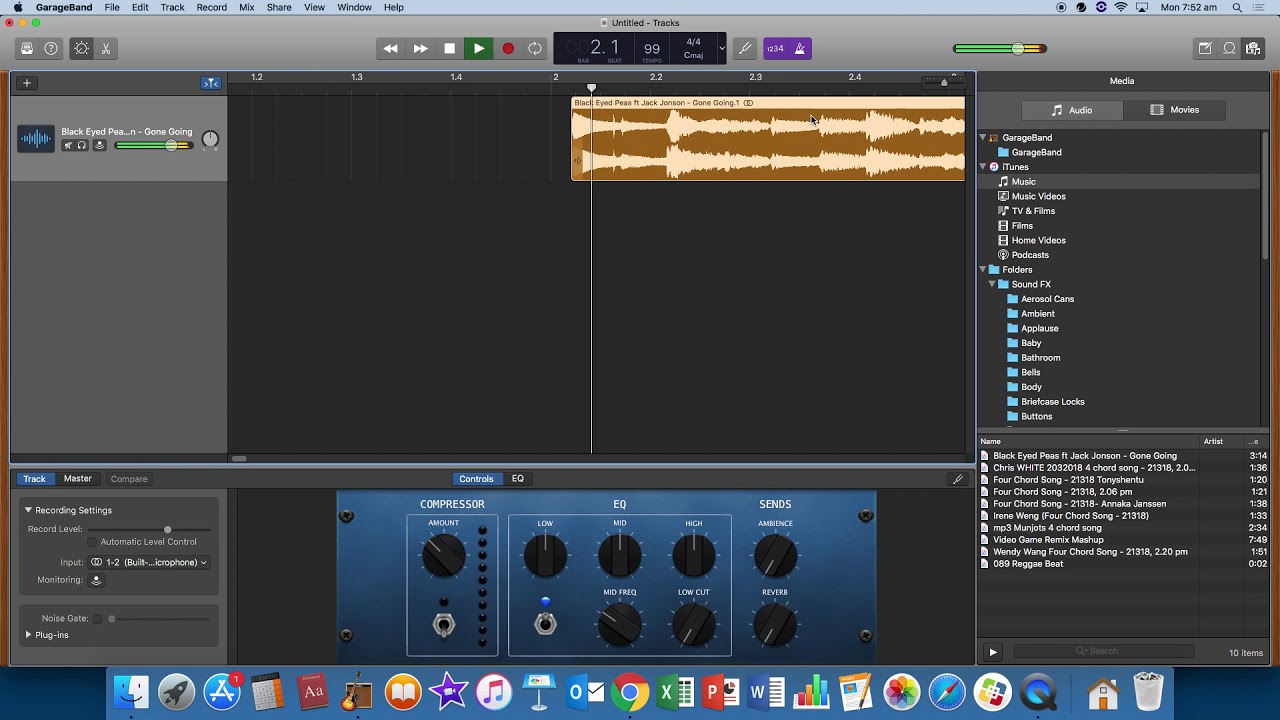
2. Compressor Effect: The compressor effect helps to even out the volume levels of your audio. It reduces the dynamic range, making softer sounds more audible and louder sounds more controlled. Select your voice track and go to the “Smart Controls” panel. Click on the “Track” tab, and you’ll find the compressor effect. Adjust the settings to achieve a smooth and consistent sound.
3. EQ (Equalizer): The EQ tool in Garageband allows you to adjust the frequency levels of your audio to improve clarity and balance. Experiment with the EQ settings to enhance the richness of your voice and reduce any unwanted frequencies. Focus on the key frequencies, such as the lower frequencies for warmth and the higher frequencies for clarity.
4. Noise Gate: If you have any background noise or unwanted sounds between your speech, the noise gate effect can help reduce them. It cuts off the audio below a certain threshold, effectively eliminating low-level noise. Select your voice track and navigate to the “Smart Controls” panel. Look for the noise gate effect and adjust the settings until the unwanted noise is adequately suppressed without affecting the main speech.
5. Adding Reverb: Reverb can provide a sense of space and depth to your voice, making it sound more professional. Garageband offers various reverb effects that simulate different room sizes and environments. Experiment with the reverb settings to find the right balance that suits the style and tone of your podcast.
6. Panning: Panning allows you to position the audio between the left and right stereo channels. If you have multiple tracks in your podcast, you can use panning to create a sense of spatial separation. For example, you can pan your voice track slightly to the center, while background music or sound effects can be panned wider to provide a fuller sound.
7. Preview and Adjust: After applying volume adjustments and effects, listen to your podcast episode attentively. Pay attention to the overall balance, clarity, and impact of the audio. Make any necessary adjustments to ensure a well-balanced mix and a polished final product.
8. Save Your Project: As you make volume adjustments and apply effects, remember to save your project regularly to avoid losing any progress. Click on “File” in the menu bar and select “Save” or use the keyboard shortcut (Command + S) to save your project as you work.
By following these steps, you can adjust volume levels, add effects, and optimize the sound quality of your podcast using Garageband. In the next step, we’ll explore how to export and share your podcast with the world.
Step 8: Exporting and Sharing Your Podcast
Once you have completed editing and fine-tuning your podcast in Garageband, it’s time to export and share your episode with the world. Follow these steps to export and distribute your podcast:
1. Finalize Your Project: Before exporting, take one last listen to your podcast episode to ensure everything is in order. Make any final adjustments or edits if needed.
2. Choose Export Settings: In Garageband, go to the “Share” menu in the menu bar and select “Export Song to Disk”. Choose the format you want to export your podcast in, such as MP3 or WAV. MP3 is widely supported and ideal for podcast distribution.
3. Set Quality and Bitrate: In the export dialog box, set the desired quality and bitrate for your podcast episode. Typically, a bitrate of 128 kbps is sufficient for good audio quality while keeping the file size manageable. However, you can adjust the bitrate based on your specific requirements and the hosting platform’s recommendations.
4. Add Episode Metadata: Fill in the necessary metadata for your podcast episode, including the episode title, artist, album, genre, and any other relevant information. This metadata is used by podcast directories and listeners to identify and categorize your episode.
5. Choose File Location: Select the location on your computer where you want to save the exported podcast episode. Create a dedicated folder to keep all your podcast episodes organized.
6. Export the Episode: Click “Export” to start exporting your podcast episode. The exporting process may take a few moments, depending on the length of your episode and your computer’s processing power.
7. Upload to Podcast Hosting Platform: Once your podcast episode is exported, you can upload it to your chosen podcast hosting platform. Most hosting platforms provide user-friendly interfaces for uploading and managing podcast episodes. Follow the instructions provided by your hosting platform to upload your episode, add episode descriptions, and set release dates.
8. Submit to Podcast Directories: To reach a wider audience, submit your podcast to popular podcast directories like Apple Podcasts, Spotify, Google Podcasts, and others. Each directory has its own process for submission, so follow their guidelines and provide the necessary information to make your podcast discoverable.
9. Promote and Share: After publishing your podcast, promote it through your website, social media accounts, and relevant online communities. Encourage your listeners to review and share your episodes to expand your reach. Engage with your audience and create a community around your podcast.
10. Monitor Analytics: Use the analytics provided by your podcast hosting platform to track the performance of your podcast episodes. Monitor downloads, listener demographics, and engagement metrics to gain insights and improve your podcast over time.
By following these steps, you can export and share your podcast episode with the world using Garageband. Remember, consistency, quality content, and effective promotion are key to growing your podcast audience and building a successful podcast brand.
Conclusion
Congratulations! You have now completed the process of creating a podcast using Garageband. Throughout the journey, you have learned how to set up Garageband, create a new podcast project, record and edit your podcast episode, add background music and effects, and finally, export and share your podcast with the world.
Podcasting is a powerful medium that allows you to connect with a global audience, share your knowledge and insights, and build a community around your brand or passion. With Garageband, you have access to a user-friendly and feature-rich tool to create professional-quality podcasts.
Remember that creating a successful podcast takes time, effort, and consistent dedication. Along the way, continue refining your podcasting skills, experimenting with different formats and styles, and engaging with your audience.
Here are a few key takeaways to ensure your podcasting journey is a success:
- Invest in a good quality microphone and headphones for optimal audio quality.
- Plan your podcast episodes by selecting engaging topics and structuring the content.
- Edit your podcast episodes to remove any flaws, improve clarity, and maintain a smooth flow.
- Use background music and effects strategically to enhance the listening experience.
- Optimize volume levels and apply effects to ensure a balanced and professional sound.
- Export your podcast episodes in a popular format and distribute them through podcast hosting platforms.
- Promote your podcast through various channels to attract new listeners and grow your audience.
- Engage with your listeners, address their feedback, and create a community around your podcast.
Remember to enjoy the process and have fun with podcasting! It’s a great opportunity to share your passion, connect with others, and make an impact through your voice.
Now, armed with the knowledge and skills you’ve gained, it’s time to unleash your creativity and launch your podcast into the world. Happy podcasting!

