Home>Instruments>Bass>How To Turn Up Bass On Spotify Pc
Bass
How To Turn Up Bass On Spotify Pc
Published: November 29, 2023
Learn how to enhance the bass on Spotify PC and enjoy deep, rich tones in your favorite music. Step-by-step guide to optimize your audio experience!
(Many of the links in this article redirect to a specific reviewed product. Your purchase of these products through affiliate links helps to generate commission for AudioLover.com, at no extra cost. Learn more)
Table of Contents
Introduction
Welcome to the world of music! Whether you’re a casual listener or a die-hard enthusiast, there’s nothing quite like the feeling of immersing yourself in the beats, rhythm, and melodies of your favorite songs. And for those who love a deep and booming bass, it adds an extra layer of intensity and power to the music.
Spotify, one of the leading music streaming platforms, offers a vast collection of songs across various genres. While it provides excellent sound quality by default, sometimes we may want to customize the sound to suit our preferences. If you’re using Spotify on your PC and looking to turn up the bass for a more immersive listening experience, you’ve come to the right place! In this article, we’ll guide you through the steps to enhance the bass on Spotify for PC.
Whether you’re using external speakers, headphones, or the built-in speakers on your computer, adjusting the bass settings can make a significant difference in how you perceive the music. You can bring out the depth and richness of the low-frequency sounds, adding more punch and impact to your favorite tracks.
Now, let’s dive into the step-by-step process of how to turn up the bass on Spotify for PC and elevate your music listening experience to a whole new level!
Step 1: Opening Spotify on your PC
The first step towards turning up the bass on Spotify for PC is to open the Spotify application on your computer. If you haven’t already downloaded and installed Spotify, you can visit the Spotify website (https://www.spotify.com) and follow the instructions to download and install the software.
Once you have Spotify installed, locate the Spotify icon on your desktop or in your list of programs and double-click it to open the application. Alternatively, you can search for “Spotify” in the Windows search bar and click on the Spotify app from the search results.
After launching the application, you will be prompted to log in to your Spotify account. If you already have an account, enter your login credentials (email address and password) and click on the “Log In” button. If you don’t have an account, you can quickly create one by clicking on the “Sign Up” link and following the on-screen instructions.
Once you’re logged in, the Spotify application will open, and you’ll be greeted with the home screen, where you can explore and discover music, playlists, and podcasts.
Now that you have Spotify open and ready to go, let’s move on to the next step to adjust the bass settings and enhance your listening experience.
Step 2: Navigating to the Settings menu
To turn up the bass on Spotify for PC, you’ll need to access the Settings menu, where you can make adjustments to various audio settings, including the equalizer. Follow the steps below to navigate to the Settings menu:
- Look for the menu icon, which is represented by three horizontal lines, located in the top-left corner of the Spotify application. Click on the icon to open the menu dropdown.
- In the dropdown menu, scroll down and locate the “Settings” option. Click on it to access the Spotify settings.
- Once you’re in the Settings menu, you’ll see a list of different options and categories, such as Account, Social, Display, and more.
- Scroll down until you find the “Playback” category, which is where you’ll find the audio-related settings.
- Click on the “Playback” category to expand it and reveal the additional options within.
Great! You’ve now successfully navigated to the Settings menu in Spotify on your PC. Next, we’ll move on to the next step where you’ll find the equalizer option, which allows you to adjust the bass and other audio frequencies.
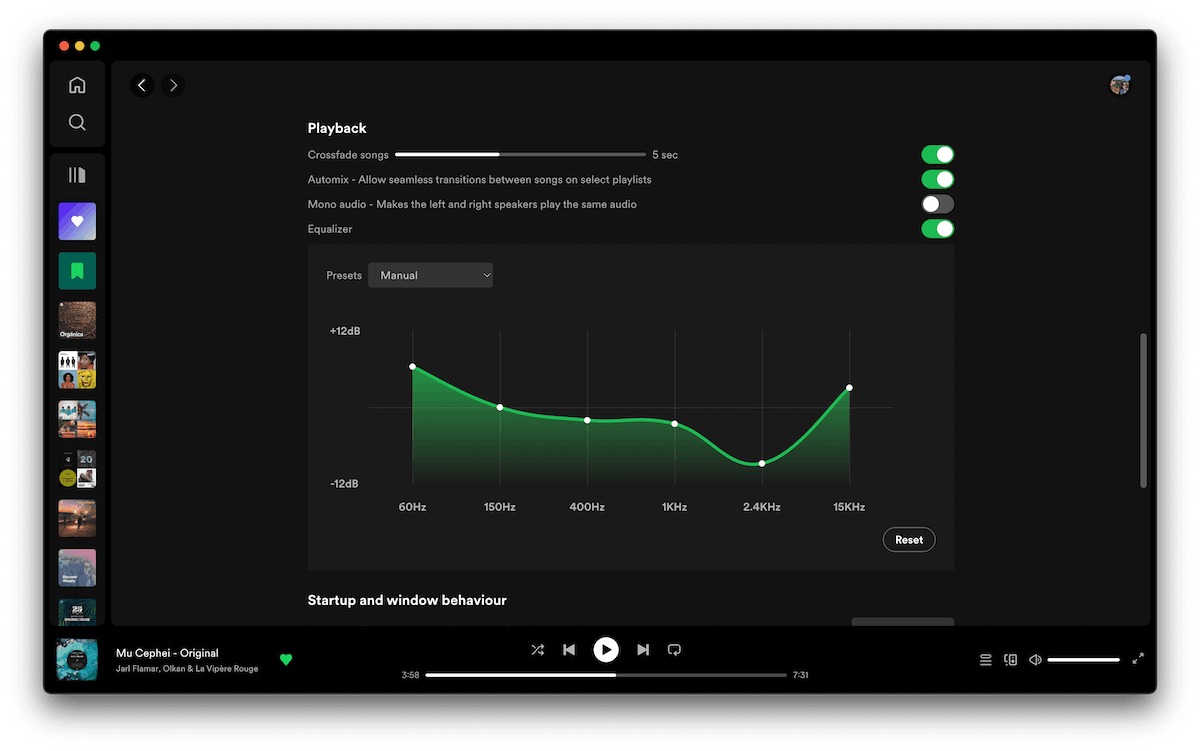
Step 3: Locating the Equalizer option
Now that you’re in the Settings menu of Spotify, it’s time to locate the Equalizer option. The Equalizer allows you to fine-tune the audio frequencies, including the bass, to suit your preferences. Follow these steps to find the Equalizer:
- Look for the “Playback” category in the Settings menu list. If it’s not expanded, click on it to reveal the options within.
- Scroll down until you find the “Equalizer” option. This is the setting that controls the audio frequencies, including the bass.
- Click on the “Equalizer” option to access the Equalizer settings.
Once you’ve located and clicked on the “Equalizer” option, you’ll be presented with a visual representation of different audio frequencies. The equalizer allows you to adjust the sliders corresponding to each frequency, including the bass, to increase or decrease their intensity.
The Equalizer feature in Spotify provides you with a range of preset options such as “Acoustic,” “Rock,” “Bass Boost,” and more. You can select a preset that enhances the bass frequencies or customize the settings manually according to your preferences.
Now that you’ve found the Equalizer option, let’s proceed to the next step, where you’ll learn how to adjust the bass settings to amplify the low-end frequencies and enhance your listening experience.
Step 4: Adjusting the bass settings
Now that you’ve located the Equalizer option in Spotify on your PC, it’s time to adjust the bass settings to enhance your listening experience. Follow these steps to fine-tune the bass:
- Within the Equalizer settings, you’ll see a series of sliders representing different audio frequencies.
- Locate the slider that corresponds to the bass frequencies. In most cases, it’s labeled as “Bass” or “Low-End.”
- Drag the bass slider upwards to increase the intensity of the bass. Moving it towards the left side reduces the bass.
- Play around with the bass slider and find the sweet spot that suits your preferences. Remember, everyone’s taste in bass may differ, so adjust it according to what sounds best to you.
- If you prefer a more pronounced bass, you can also adjust the sliders for other low-end frequencies, such as “Sub-Bass” or “Lower Midrange.”
As you adjust the bass settings, you’ll immediately notice the change in the audio output. The low-end frequencies will become more prominent, adding depth and richness to the music.
Additionally, remember that you can experiment with the other sliders in the Equalizer settings to fine-tune the overall audio balance. Feel free to adjust the midrange and treble frequencies to complement the bass and create a well-balanced sound that suits your taste.
Once you’re satisfied with the bass and overall audio settings, you’re ready to move on to the next and final step, where you’ll test and save your changes.
Step 5: Testing and saving your changes
After adjusting the bass settings in the Equalizer on Spotify for PC, it’s time to test your changes and ensure that the desired effect has been achieved. Follow these steps to test and save your bass adjustments:
- Select a song or playlist that you want to listen to.
- Click on the play button to start playing the selected track or playlist.
- Listen closely to the audio and pay attention to the bass frequencies.
- If you’re satisfied with the changes, you can move on to the next step. If not, go back to the Equalizer settings and make further adjustments until you achieve the desired bass level.
- To save your bass settings and ensure that they’re applied to all future songs and playlists, click on the “Apply” or “Save” button within the Equalizer settings. This will save your customized equalizer settings.
By saving your changes, you won’t have to readjust the bass settings every time you launch Spotify. The customized equalizer settings will be automatically applied to your music playback.
It’s important to note that the Equalizer settings in Spotify may vary slightly depending on the version and platform you’re using. Some versions may have a more advanced equalizer with additional options to fine-tune the bass and other frequencies.
Now that you’ve tested and saved your changes, you can sit back, relax, and enjoy your favorite music with an enhanced bass experience on Spotify for PC.
Conclusion
Congratulations! You’ve successfully learned how to turn up the bass on Spotify for PC, allowing you to elevate your music listening experience and enjoy a deeper, more powerful sound. By following the steps outlined in this guide, you were able to navigate to the settings menu, locate the Equalizer option, adjust the bass settings, and test and save your changes.
Customizing the bass settings in Spotify gives you the flexibility to tailor the audio output to your personal preferences. Whether you prefer a subtle boost or a more pronounced bass, the Equalizer allows you to fine-tune the low-end frequencies to match your taste and the style of music you’re listening to.
Remember to experiment and try different settings to find the perfect balance that suits your ears. The beauty of Spotify’s Equalizer is that you can always go back and make further adjustments as you explore new genres and discover new artists. It’s a dynamic tool that empowers you to shape your musical experience.
So, fire up Spotify on your PC, find your favorite songs, and immerse yourself in the power and depth of an enhanced bass experience. Whether you’re enjoying a laid-back playlist, getting pumped up for a workout, or simply relaxing with some soothing tunes, the increased bass will bring your music to life like never before.
Now, it’s time to crank up the volume, feel the bass reverberate through your body, and lose yourself in the rhythm of the music. Enjoy!