Home>Instruments>Synthesizer>How To Create A Patch On A Synthesizer
Synthesizer
How To Create A Patch On A Synthesizer
Published: December 11, 2023
Learn how to create a patch on a synthesizer and enhance your sound manipulation skills. Discover tips and techniques for experimenting with different sound effects on your synthesizer.
(Many of the links in this article redirect to a specific reviewed product. Your purchase of these products through affiliate links helps to generate commission for AudioLover.com, at no extra cost. Learn more)
Table of Contents
Introduction
Welcome to the world of synthesizers! If you’re a musician, sound designer, or just an enthusiast, you probably know the joy of creating unique and captivating sounds on a synthesizer. One of the most exciting aspects of synthesizer programming is the ability to create and modify patches, which are the building blocks of sound creation.
Whether you have a hardware synthesizer or a software plugin, understanding how to create and manipulate patches is essential. A patch is essentially a collection of parameters that shape the sound produced by a synthesizer. These parameters include oscillators, filters, envelopes, and effects, among others. By adjusting these parameters, you can sculpt the sound to your liking, whether you want a warm and smooth pad, a sharp and biting lead, or a rich and pulsating bass.
In this article, we will explore the process of creating a patch on a synthesizer. We’ll discuss the various parameters that contribute to the sound and how to modify them to achieve your desired sonic result. Whether you’re a beginner looking to learn the basics or an experienced synthesist wanting to dive deeper into sound design, this article will provide you with valuable insights and techniques to help you create your own unique patches.
So, let’s get started and embark on a journey into the fascinating world of synthesizer patches. Get ready to unleash your creativity and shape soundscapes that will mesmerize and captivate your listeners!
Overview of Synthesizer Patches
Before we delve into the process of creating a patch, let’s take a moment to understand what a patch actually is. A patch, in the context of synthesizers, refers to a preset or a custom-made configuration of parameters that define how the synthesizer generates sound.
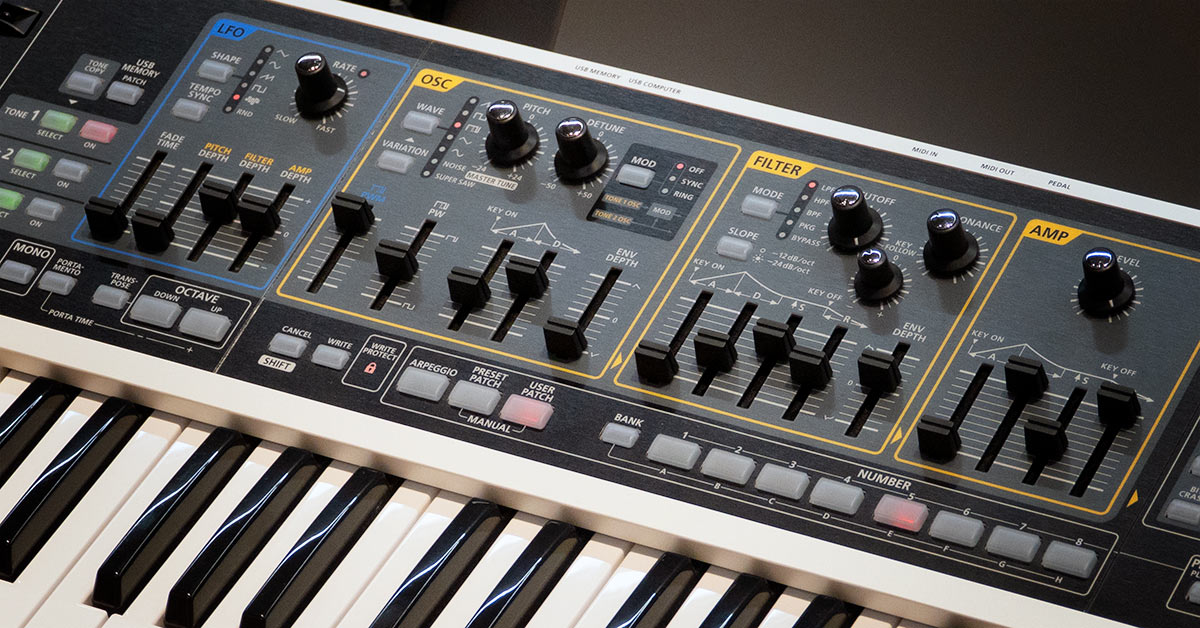
Think of a patch as a recipe for a specific sound. Just like a chef uses different ingredients and techniques to create a delicious dish, a sound designer uses various parameters to craft a unique sound. These parameters include oscillators, filters, envelopes, LFOs (low frequency oscillators), and effects.
Each synthesizer has its own set of parameters that can be adjusted to create a wide range of sounds. Some synthesizers offer a vast library of pre-built patches covering various genres and styles, while others provide a blank canvas for you to start from scratch.
When selecting or creating a patch, it’s important to understand the basic components and how they contribute to the overall sound. Let’s briefly explore these components:
- Oscillators: These are the sound generators of a synthesizer. They produce the fundamental waveform, such as a sine, square, triangle, or sawtooth wave. Oscillators determine the basic tone and character of the sound.
- Filters: Filters shape the frequency content of the sound by selectively attenuating or boosting certain frequencies. Common filter types include low-pass, high-pass, band-pass, and notch filters. Filters are great for adding warmth, removing unwanted frequencies, or adding movement to the sound.
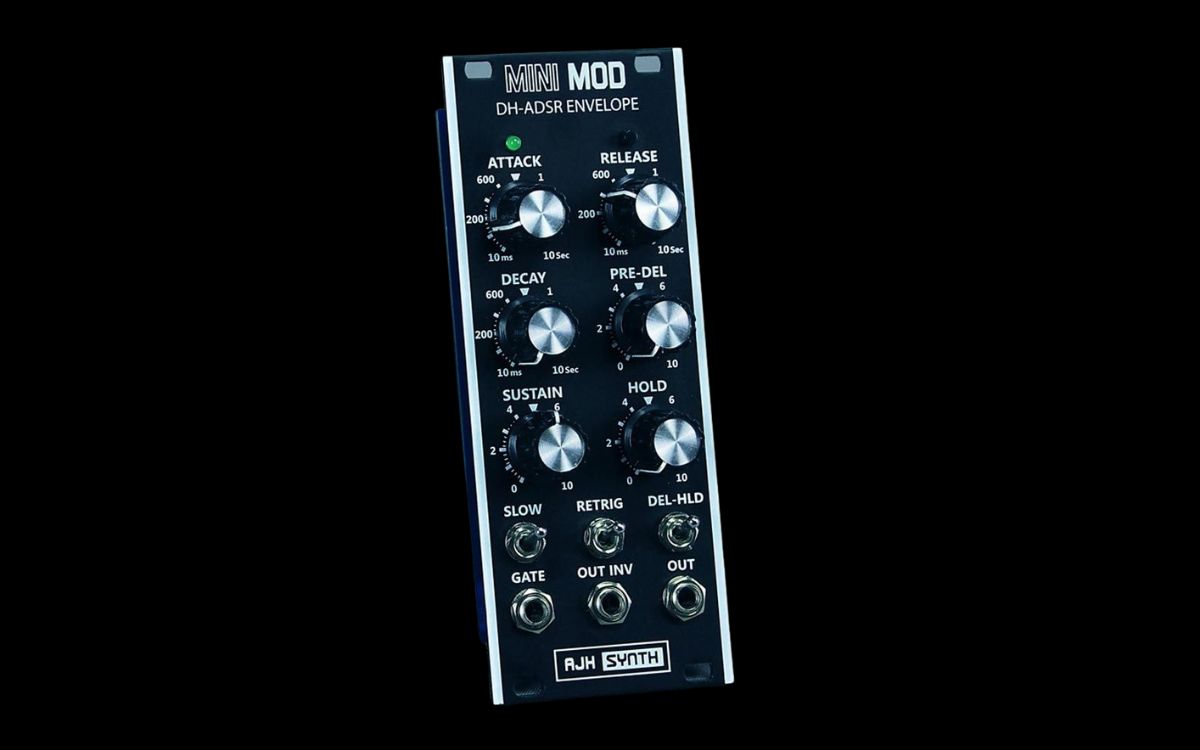
- Envelopes: Envelopes control how the different parameters of a sound evolve over time. They typically consist of four stages: attack, decay, sustain, and release. Envelopes shape the volume, pitch, filter cutoff, and other parameters to create dynamic and expressive sounds.
- LFOs (Low Frequency Oscillators): LFOs are similar to oscillators but operate at a much lower frequency. They can be routed to various parameters to create cyclic modulation effects such as vibrato, tremolo, or rhythmic modulation.
- Effects: Effects such as reverb, delay, chorus, and distortion can be applied to the sound to add depth, space, and character. Effects can significantly enhance the sonic possibilities of a patch.
Understanding these components will give you a solid foundation for creating and modifying patches on your synthesizer. Now that we have a grasp of the basics, let’s dive deeper into the process of selecting and creating a patch in the next sections.
Understanding Patch Parameters
When it comes to creating or modifying a synthesizer patch, it’s essential to have a good understanding of the different parameters available to you. These parameters are what enable you to shape and sculpt the sound to your liking.
Let’s take a closer look at some common patch parameters you’ll encounter:
- Oscillators: Oscillators generate the primary waveform of the sound. They determine the tone and character of the sound and often have controls for selecting wave shapes, adjusting pitch, and adding detuning or modulation.
- Filters: Filters shape the frequency content of the sound by attenuating or boosting specific frequencies. Common filter types include low-pass, high-pass, band-pass, and notch filters. The cutoff frequency and resonance controls allow you to adjust the range and intensity of the filter effect.
- Envelopes: Envelopes control how various sound parameters evolve over time. Typically, an envelope consists of four stages: attack, decay, sustain, and release. The attack determines how quickly the sound reaches its maximum level, the decay controls the duration from the attack level to the sustain level, the sustain sets the level at which the sound is held, and the release determines how long it takes for the sound to fade out once the note is released.
- LFOs (Low Frequency Oscillators): LFOs generate cyclic waveforms at a slower rate than the oscillators. They are often used for modulation effects such as vibrato, tremolo, or rhythmic modulation. LFO parameters include rate, depth, and waveform shape.
- Effects: Effects add additional processing to the sound. Common effects include reverb, delay, chorus, and distortion. Effects parameters vary depending on the type of effect but may include controls for wet/dry mix, feedback, decay, delay time, and modulation depth.
By understanding how these parameters work, you’ll be able to manipulate them effectively to shape your desired sound. Experimenting with different combinations and settings can lead to exciting and unique patches. It’s important to note that the specific parameters available to you may vary depending on the synthesizer you’re using, so it’s always a good idea to consult the manual or explore the synthesizer’s interface to familiarize yourself with the available options.
Now that we have a solid understanding of the patch parameters, let’s move on to the next section, where we’ll discuss the process of selecting a synthesizer patch.
Selecting a Synthesizer Patch
When you’re starting out with synthesizer programming or looking for inspiration, selecting a pre-built patch can be a great way to explore different sounds and understand how various parameters work together. Most synthesizers come with a vast library of patches covering a wide range of genres and styles. Here are some tips for selecting the right patch:
- Genre or Style: Consider the genre or style of music you’re working on. Synthesizers usually categorize patches by genres like pop, rock, electronic, ambient, etc. Selecting a patch from the relevant genre can give you a good starting point.
- Sound Character: Think about the desired sound character. Do you want something warm and mellow, or bright and cutting? Pay attention to the descriptions or names of the patches to get an idea of their sonic qualities.
- Instrument Emulation: Many synthesizers offer preset patches that aim to emulate real-life instruments like pianos, strings, brass, or even specific vintage synthesizers. If you’re looking for a particular instrument sound, try browsing through these options.
- Sound Layering: Some synthesizers allow you to layer multiple patches or sounds together. This can add depth and richness to your sound. Look for patches specifically designed for layering or try combining complementary patches to create unique textures.
- Effects Usage: If you want a patch that already includes effects processing like reverb, delay, or modulation, search for patches that have those effects built-in. This can save you time and allow you to focus on the musical aspect rather than tweaking individual effects.
Remember, selecting a patch is just the starting point. Once you’ve chosen a patch, you can further modify its parameters to suit your taste and fit your specific musical context. Don’t be afraid to experiment and make it your own.
Now that we’ve explored the concept of selecting a patch, it’s time to move on to the exciting part—creating a new patch from scratch! This allows you to unleash your creativity and develop sounds that are truly unique to your artistic vision. In the next section, we’ll discuss the process of creating a new patch on a synthesizer.
Creating a New Patch
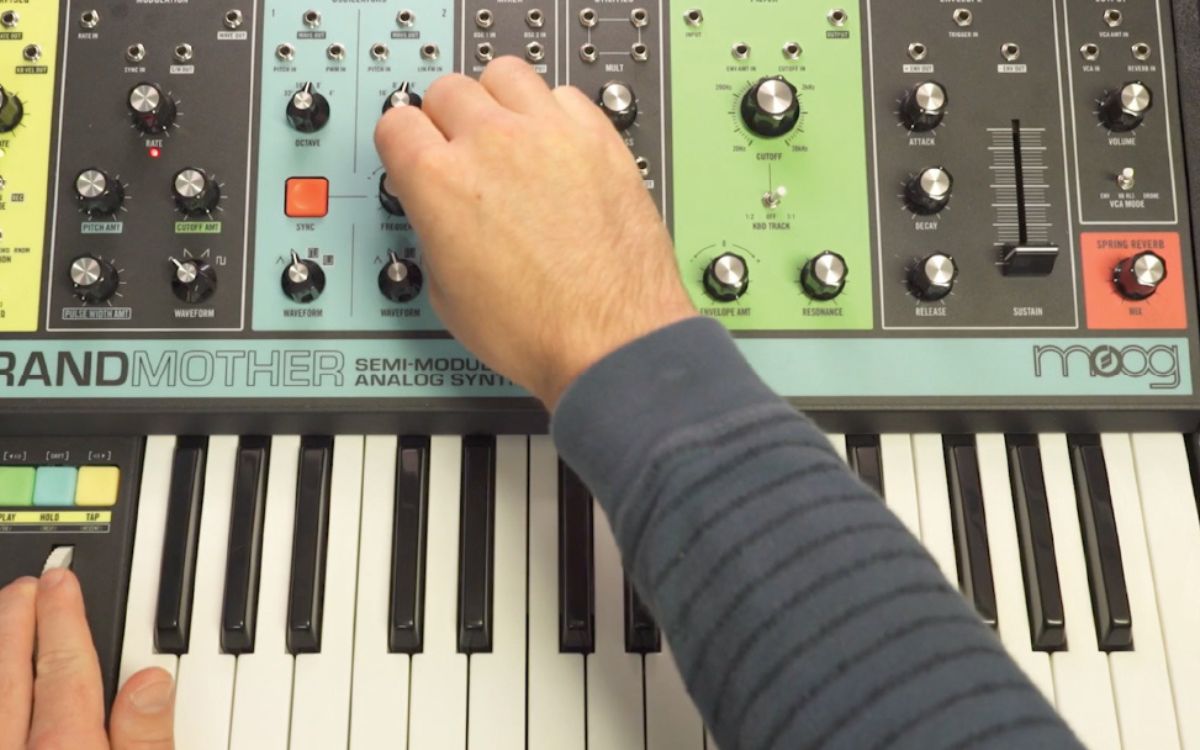
Creating a new patch from scratch on a synthesizer opens up a world of possibilities for sound design and expression. It allows you to shape and mold the sound to match your artistic vision. While the specific steps may vary depending on the synthesizer you’re using, the general process involves the following:
- Initialize the Patch: Start by selecting a blank patch or initializing the synthesizer to its default settings. This provides a clean slate to work with.
- Choose the Basic Waveform: Select the primary waveform for your sound. This could be a sine wave, square wave, triangle wave, or sawtooth wave. Experiment with different waveforms to find the base character of your sound.
- Adjust Oscillator Parameters: Modify the parameters of the oscillator(s) to further shape the sound. This may include adjusting the pitch, detuning multiple oscillators, or applying modulation for movement and complexity.
- Apply Filters: Add filters to sculpt the frequency content of the sound. Experiment with different filter types, such as low-pass, high-pass, or band-pass filters, to reshape and color the sound.
- Shape the Envelopes: Customize the envelope settings for amplitude, filter cutoff, or any other parameters available on your synthesizer. This allows you to control the dynamics of different aspects of the sound over time.
- Add Modulation: Explore modulation by using LFOs or other modulation sources. Apply modulation to parameters like pitch, filter cutoff, or oscillator intensity to create movement, vibrato, or rhythmic effects.
- Experiment with Effects: Apply effects such as reverb, delay, chorus, or distortion to enhance the sound. Experiment with different effect settings to add depth, space, and character.
Creating a new patch is a journey of exploration and experimentation. Don’t be afraid to try different combinations of parameters and trust your ears. Stay open to happy accidents—sometimes a small tweak can lead to an unexpected and captivating sound.
Remember to save your patch once you’ve created something you like. This way, you can recall and use it in your compositions or performances later on.
Now that you’ve learned the basics of creating a new patch, let’s move on to exploring the specific parameters you can adjust to shape your sound. In the following sections, we’ll dive deeper into adjusting oscillators, modifying filters, manipulating envelopes, and applying effects to create unique and captivating patches on your synthesizer.
Adjusting Oscillators
Oscillators play a crucial role in shaping the core tone and character of a synthesizer patch. They generate the primary waveforms that form the basis of the sound. Adjusting the parameters of the oscillators allows you to create a wide range of timbres and textures. Here are some key parameters to consider when working with oscillators:
- Waveform Selection: Most synthesizers offer different wave shapes, such as sine, square, triangle, and sawtooth. Each waveform has a unique sonic character, from smooth and mellow to sharp and cutting. Experiment with different waveforms to find the desired tonal quality of your sound.
- Pitch Control: Adjusting the pitch of the oscillator(s) helps create melodies, harmonies, and chords. You can set the pitch in a specific musical interval, such as octaves or semitones, or fine-tune it for microtonal or detuned effects.
- Detuning: Detuning involves slightly altering the pitch of multiple oscillators to create a richer, thicker sound. By detuning oscillators, you can achieve a chorus-like effect or create dissonance for experimental or atmospheric sounds.
- Modulation: Some synthesizers allow you to apply modulation to oscillators, which introduces movement and complexity to the sound. Modulation sources like LFOs or envelopes can be routed to parameters such as oscillator pitch or wavetable position, resulting in vibrato, tremolo, or evolving timbres.
- Waveform Morphing or Wavetables: Advanced synthesizers often offer features like waveform morphing or wavetable synthesis. These techniques allow you to smoothly transition between different waveforms or cycle through a sequence of different waveforms, creating evolving and dynamic sounds.
When adjusting oscillators, it’s important to trust your ears and experiment with different combinations. Small changes in waveform, pitch, or detuning can significantly alter the overall character and mood of your sound. Consider the context in which your patch will be used and aim for a balance that complements the rest of your composition or performance.
Remember, there are no right or wrong settings when it comes to adjusting oscillators. The goal is to explore and discover unique sounds that inspire you. Take your time to familiarize yourself with the oscillator parameters on your synthesizer and let your creative instincts guide you.
Now that we’ve covered the basics of adjusting oscillators, let’s move on to the next section, where we’ll explore the process of modifying filters to further shape the sound of your synthesizer patch.
Modifying Filters
Filters are an essential component of synthesizer patches, allowing you to shape the frequency content of your sound. They can drastically transform the timbre and character of your patch, adding warmth, brightness, or a sense of movement. Here are key considerations when modifying filters:
- Filter Types: Synthesizers offer various filter types, such as low-pass, high-pass, band-pass, and notch filters. Each type attenuates or allows specific frequency ranges to pass through. Experimenting with different filter types can significantly impact the tonal qualities of your sound.
- Cutoff Frequency: The cutoff frequency determines the point at which the filter starts affecting the sound. Lower cutoff frequencies result in darker, bass-heavy sounds, while higher cutoff frequencies yield brighter and more treble-focused timbres. Adjusting the cutoff frequency allows you to shape the overall brightness and presence of the sound.
- Resonance: Resonance emphasizes frequencies near the cutoff point, creating a peak or boosting effect. Increasing the resonance parameter can make the sound more resonant and intense. By adjusting the resonance, you can create sharper and more expressive filter sweeps or resonance effects typical in electronic music genres.
- Filter Envelope: Some synthesizers offer a filter envelope, which allows you to control the filter cutoff over time. By shaping the envelope’s attack, decay, sustain, and release stages, you can sculpt the dynamic evolution of the filter effect, adding movement and expressiveness to your sound.
- Filter Modulation: Many synthesizers provide modulation options for filters. You can use LFOs, envelopes, or other modulation sources to modulate the cutoff frequency, creating effects like filter sweeps or rhythmic filter modulation. This adds rhythmic or evolving texture to your sound.
When modifying filters, it’s important to listen carefully to the changes you make. Subtle adjustments can have a significant impact on your sound, while extreme settings can produce dramatic and experimental effects. Find the sweet spots that complement your composition and evoke the desired mood or atmosphere.
Combining filter adjustments with other parameters like oscillators and envelopes can lead to even more complex and dynamic sounds. Don’t be afraid to experiment with different filter settings and explore how they interact with other elements of your patch.
As always, trust your ears and let your creativity guide you. The journey of modifying filters is an exploration of possibilities, where the only limit is your imagination. Now that we’ve covered the essentials of modifying filters, let’s move on to manipulating envelopes to further shape the characteristics of your sound in the next section.
Manipulating Envelopes
Envelopes are powerful tools that allow you to shape the dynamic evolution of your sound over time. By controlling parameters like amplitude, filter cutoff, or pitch, envelopes determine how a sound starts, develops, sustains, and ends. Understanding how to manipulate envelopes opens up a whole range of expressive possibilities for your synthesizer patches. Here are key considerations for manipulating envelopes:
- Attack: The attack stage determines how quickly the sound reaches its maximum level after a note is triggered. A shorter attack creates a more immediate and percussive sound, while a longer attack produces a gradual buildup and smoother transition.
- Decay: The decay stage controls how long it takes for the sound to reach the sustain level once the attack phase is complete. A shorter decay produces a snappier sound, while a longer decay allows for more sustain and a gradual decrease in volume.
- Sustain: The sustain level determines the volume or parameter value that the sound maintains after the attack and decay stages. It determines the sound’s sustaining portion, whether it’s a sustained note or a held parameter value. Higher sustain levels result in a longer-lasting sound.
- Release: The release stage determines how long it takes for the sound to fade out after a note is released. A shorter release produces a quicker fade-out, while a longer release allows for a more gradual and sustained decay of the sound.
- Envelope Modulation: Some synthesizers offer the ability to modulate various parameters with the envelope. This allows for dynamic changes in parameters such as filter cutoff or pitch based on the envelope’s stages, resulting in evolving and expressive sound variations.
By manipulating envelopes, you can create a wide range of expressive sounds, from sharp plucked sounds to swelling pads or percussive effects. It’s important to experiment with different envelope settings and listen to the results in the context of your composition or performance.
Envelopes can also be used creatively beyond shaping the volume or filter parameters. For example, you can use envelopes to control parameters like oscillator pitch, wavetable position, or effect parameters. This opens up even more possibilities for dynamic and evolving sound design.
Remember to consider the overall musical context and the emotional quality you want to convey through your sound as you manipulate envelopes. Subtle changes can add depth and nuance, while drastic adjustments can create bold and attention-grabbing effects.
Now that we have explored the essentials of manipulating envelopes, let’s move on to applying effects and discovering how they can further enhance your synthesizer patches.
Applying Effects
Applying effects to your synthesizer patch is a fantastic way to add depth, character, and complexity to your sound. Effects shape the spatial and textural qualities, enhancing the overall sonic experience. Here are some common effects and considerations when applying them:
- Reverb: Reverb simulates the acoustic environment, adding a sense of space and depth to your sound. It can range from small and intimate room-like reverberations to large and expansive cathedral-like reverbs. Adjust parameters like decay time, pre-delay, and diffusion to tailor the size and character of the reverb.
- Delay: Delay creates echoes or repetitions of your sound, adding rhythmic and temporal interest. You can adjust parameters like delay time, feedback, and filter to control the timing and tone of the delays. This effect can create everything from subtle repeating textures to cascading rhythmic patterns.
- Chorus: Chorus thickens the sound by creating multiple, slightly detuned copies of the original signal. This effect can add depth and movement, making the sound wider and more vibrant. Parameters like speed, depth, and feedback control the modulation and intensity of the chorus effect.
- Distortion: Distortion introduces harmonically rich overtones and saturation to the sound. It can range from subtle warmth to gritty and aggressive timbres. Adjust parameters like gain, tone, and drive to achieve the desired level of distortion. Distortion effects work particularly well for creating powerful basslines or edgy lead sounds.
- Modulation: Modulation effects like phaser, flanger, and tremolo can add movement and modulation to your sound. They create swirling, sweeping, or pulsating textures, adding rhythmic and dynamic interest. Experiment with different modulation parameters to find the right balance and speed for your sound.
When applying effects, it’s essential to consider the desired musical context and the relationship between the effects and other elements of your composition. Effects should enhance the sound and convey the intended emotion or atmosphere.
Remember that subtlety is often key when using effects. Small adjustments can make a big difference in the overall mix, so listen carefully and find the right balance between the dry signal and the effect processing.
Furthermore, the order of the effects in the signal chain can impact the overall sound. Experiment with different routing options to achieve the desired sonic result. Some synthesizers also offer the option to apply effects independently to individual oscillators or layers, allowing for even more creative possibilities.
Now that we have explored the realm of applying effects, it’s time to learn how to save and recall your precious patch settings. This way, you can easily access and use them in your compositions or performances. We’ll cover this process in detail in the next section.
Saving and Recalling Patch Settings
Once you’ve crafted the perfect synthesizer patch, it’s important to save your settings so you can easily recall and use them later. Saving and recalling patches allows you to quickly access your favorite sounds, ensuring consistency and efficiency in your creative process. Here’s how to save and recall patch settings:
1. Saving a Patch:
To save a patch, follow these general steps:
- Locate the “Save” or “Store” button/function on your synthesizer.
- Press the “Save” button and choose an available slot or give the patch a name.
- Confirm the save operation, and the patch will be stored in the selected slot or under the given name.
Some synthesizers allow you to organize patches into banks or categories to keep them organized and easily accessible. Make sure to follow the specific instructions provided by your synthesizer manual or interface.
2. Recalling a Patch:
To recall a saved patch, follow these general steps:
- Access the patch or preset management section on your synthesizer.
- Using the provided navigation controls, locate the saved patch you want to recall.
- Select the patch, and it will be loaded onto your synthesizer, restoring all saved settings and parameters associated with that patch.
Some synthesizers also offer the ability to browse and load patches directly from a computer or external storage device. This can be useful when managing a large library of patches or when sharing patches with others.
Remember to keep backup copies of your important patches. This provides an extra layer of protection in case of accidental deletion or hardware/software issues. You can use external storage devices or computer backups to safeguard your patch library.
Saving and recalling patch settings gives you the freedom to explore different sounds, switch between patches during live performances, and streamline your workflow. It also allows you to document and share your unique creations with others.
Now that you’ve learned how to save and recall patch settings, we can conclude our journey through synthesizer patch creation. Feel free to experiment, discover new sounds, and continue honing your skills in sound design. Happy patching!
Conclusion
Creating and manipulating patches on a synthesizer is an exhilarating journey into the realm of sound design. By understanding the various parameters, such as oscillators, filters, envelopes, and effects, you have the power to shape and sculpt unique and captivating sounds. Whether you’re a musician, a sound designer, or simply an enthusiast, delving into the world of synthesizer patches opens up a world of sonic possibilities.
Throughout this article, we explored the fundamentals of synthesizer patches, from selecting pre-built patches to crafting your own from scratch. Understanding the roles of oscillators, filters, envelopes, and effects gave us the tools to create a wide range of timbres and textures, from warm and mellow to cutting and complex.
We also learned the importance of trusting our ears, experimenting with different settings, and embracing our own creativity. Synthesizer programming is a journey of exploration and discovery, where there are no right or wrong answers. It’s about finding our unique voice and expressing our musical visions through sound.
Additionally, we discussed the significance of saving and recalling patch settings, allowing us to easily access our favorite sounds and maintain consistency in our productions and performances.
As you continue your journey with synthesizers, remember to continuously learn and evolve. Explore different synthesizers, experiment with new techniques, and listen to a wide range of music to expand your sonic horizons.
With every patch you create, you enhance your understanding of sound synthesis and unlock new possibilities for musical expression. Whether you’re crafting lush soundscapes, driving basslines, or soaring leads, synthesizer patches are the building blocks that bring your music to life.
So, embrace the power of synthesis, unleash your creativity, and let your imagination run wild. The world of synthesizers awaits, ready to be shaped by your inventive designs. Happy patching!