Home>Instruments>Synthesizer>How To Build A Synthesizer
Synthesizer
How To Build A Synthesizer
Published: December 11, 2023
Learn how to build a synthesizer from scratch and create unique electronic soundscapes. Master the art of synthesis with our step-by-step guide.
(Many of the links in this article redirect to a specific reviewed product. Your purchase of these products through affiliate links helps to generate commission for AudioLover.com, at no extra cost. Learn more)
Table of Contents
Introduction
Welcome to the world of synthesizers! Synthesizers have become a staple in the music industry, allowing musicians and producers to create a wide range of sounds and effects. Whether you are a beginner or a seasoned enthusiast, building your own synthesizer can be an exciting and rewarding journey.
By building a synthesizer from scratch, you have the freedom to customize it to suit your preferences and experiment with different components and circuit designs. This hands-on approach not only expands your knowledge of electronic components and circuitry, but also deepens your understanding of how synthesizers generate sound.
In this article, we will guide you through the process of building your own synthesizer. We will cover the basics of synthesizer architecture, discuss the essential components you will need, and provide step-by-step instructions on assembling and wiring your synthesizer. We will also explore the programming and customization aspects to help you create a unique and personalized instrument.
Whether you are interested in creating lush pads, driving basslines, or atmospheric effects, building your own synthesizer gives you the flexibility to shape and mold your sound to fit your artistic vision. Not only that, but it can also be a fun and educational project that deepens your understanding of music technology.
So, if you are ready to embark on this adventure, let’s dive into the world of synthesizer building and unleash your creativity!
Understanding the Basics
Before we dive into the intricacies of building a synthesizer, it’s important to have a basic understanding of how they work. At its core, a synthesizer is an electronic musical instrument that generates and manipulates sound waves.
There are several key components that make up a synthesizer:
- Oscillators: These generate the raw sound waves that form the basis of your synthesizer’s sound. Common waveforms include sine, sawtooth, square, and triangle.
- Filters: Filters allow you to modify the frequency content of your sound. They can remove or emphasize certain frequencies, giving you control over the timbre of your synthesizer.
- Amplifiers: Amplifiers control the volume and dynamics of your sound. They allow you to shape the attack, sustain, decay, and release of each note.
- Modulators: Modulators add movement and variation to your sound. They can introduce effects such as vibrato, tremolo, or modulation of parameters like frequency or amplitude.
- Control Interfaces: These are the knobs, sliders, buttons, and other physical controls that allow you to interact with and manipulate the sound. They give you control over parameters like pitch, filter cutoff, and amplitude.
- Microcontrollers: Microcontrollers are the brains of your synthesizer. They handle tasks such as generating control voltages, reading input from control interfaces, and communicating with other modules.
Understanding these basic components will give you a foundation to build upon as you start assembling your synthesizer. It’s important to note that there are many variations and possibilities when it comes to synthesizer design, and different synthesizers may have additional features or components based on their intended use or style.
By familiarizing yourself with the basics of synthesizer architecture, you can begin to conceptualize and plan your own unique instrument. In the next section, we will explore how to choose the right components for your build.
Choosing Components
When it comes to building a synthesizer, selecting the right components is crucial to achieving the sound and functionality you desire. There are a wide range of options available, so it’s important to consider your goals, budget, and technical skill level before making your choices.
Here are some key considerations when choosing components for your synthesizer:
- Oscillators: The type of oscillator you choose will have a significant impact on the character of your sound. Consider factors such as waveform options, frequency range, and stability.
- Filters: Filters come in various types, including low-pass, high-pass, and band-pass. Each type has its unique sound and characteristics. Consider whether you want a voltage-controlled filter (VCF) or a digitally controlled filter (DCF).
- Amplifiers: The choice of amplifier will determine the dynamic range and how your sound responds to modulation and envelope shaping. Look for options that offer precise control over attack, decay, sustain, and release (ADSR).
- Modulators: Modulators add movement and complexity to your sound. Choose modulators that suit your creative vision, such as LFOs (low-frequency oscillators), envelop generators, or modulation sequencers.
- Control Interfaces: The control interfaces you choose will determine how you interact with your synthesizer. Consider the number and types of knobs, sliders, buttons, and touch-sensitive pads you need.
- Microcontrollers: Select a microcontroller that supports the features and capabilities you require. Consider factors such as processing power, memory, and connectivity options.
It’s also important to consider compatibility between components. Some components may require specific voltage levels or control voltages, so ensure that the components you choose are compatible and can work together seamlessly.
Additionally, consider the availability and support for the components you choose. It’s helpful to select components that have ample documentation, community support, and readily available resources such as libraries or example projects.
Finally, don’t forget to keep an eye on your budget. Building a synthesizer can involve significant costs depending on the components you choose. It’s important to strike a balance between your desired functionality and affordability.
By carefully considering these factors and making informed choices, you can ensure that your synthesizer build meets your expectations and allows for future expansion and customization. In the next section, we will dive into the process of assembling the circuit board for your synthesizer.
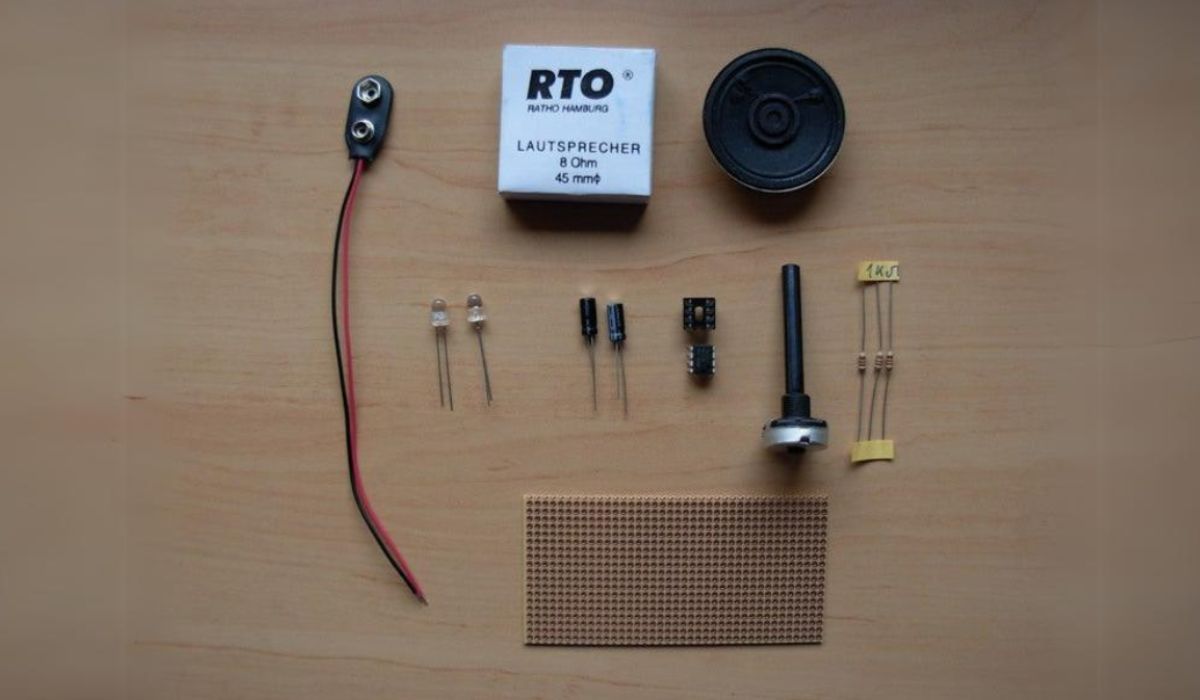
Assembling the Circuit Board
Assembling the circuit board is a critical step in building your synthesizer. This is where you will bring together all the components and create the electronic backbone of your instrument. Follow these steps to ensure a successful assembly process:
- Prepare the circuit board: Start by gathering all the necessary tools and materials, including your circuit board, soldering iron, solder, and components. Ensure that the circuit board is clean and free from any dust or debris.
- Refer to the schematic: The schematic is a visual representation of how all the components in your synthesizer connect together. Using the schematic as a guide, identify the placement and orientation of each component on the circuit board.
- Begin with the low-profile components: Start by soldering the low-profile components, such as resistors and capacitors, onto the circuit board. Be careful to align the components correctly and solder them securely.
- Move on to integrated circuits (ICs): Next, solder the ICs onto the circuit board. These are delicate components, so take care to prevent any damage. Pay attention to the correct orientation and alignment of the ICs before soldering.
- Continue with larger components: Once the low-profile components and ICs are in place, move on to the larger components such as connectors, switches, and potentiometers. Again, ensure proper alignment and soldering for each component.
- Check for any errors: After all the components are soldered onto the circuit board, thoroughly inspect the board for any solder bridges, cold solder joints, or misplaced components. Use a magnifying glass if needed to ensure accuracy.
- Test the connections: Once you are satisfied with the assembly, it’s time to test the connections. Use a multimeter to check for continuity and ensure that all components are properly connected.
Remember to take your time during the assembly process, paying close attention to detail. It’s important to have a clean and reliable soldering technique to ensure strong connections and minimize the risk of any electrical issues.
Additionally, following proper safety precautions is crucial. Work in a well-ventilated area, wear safety glasses, and avoid touching hot components or inhaling soldering fumes.
Once you have successfully assembled the circuit board, you are one step closer to having a fully functional synthesizer. In the next section, we will explore how to wire and connect the components to finalize the electronic connections of your synthesizer.
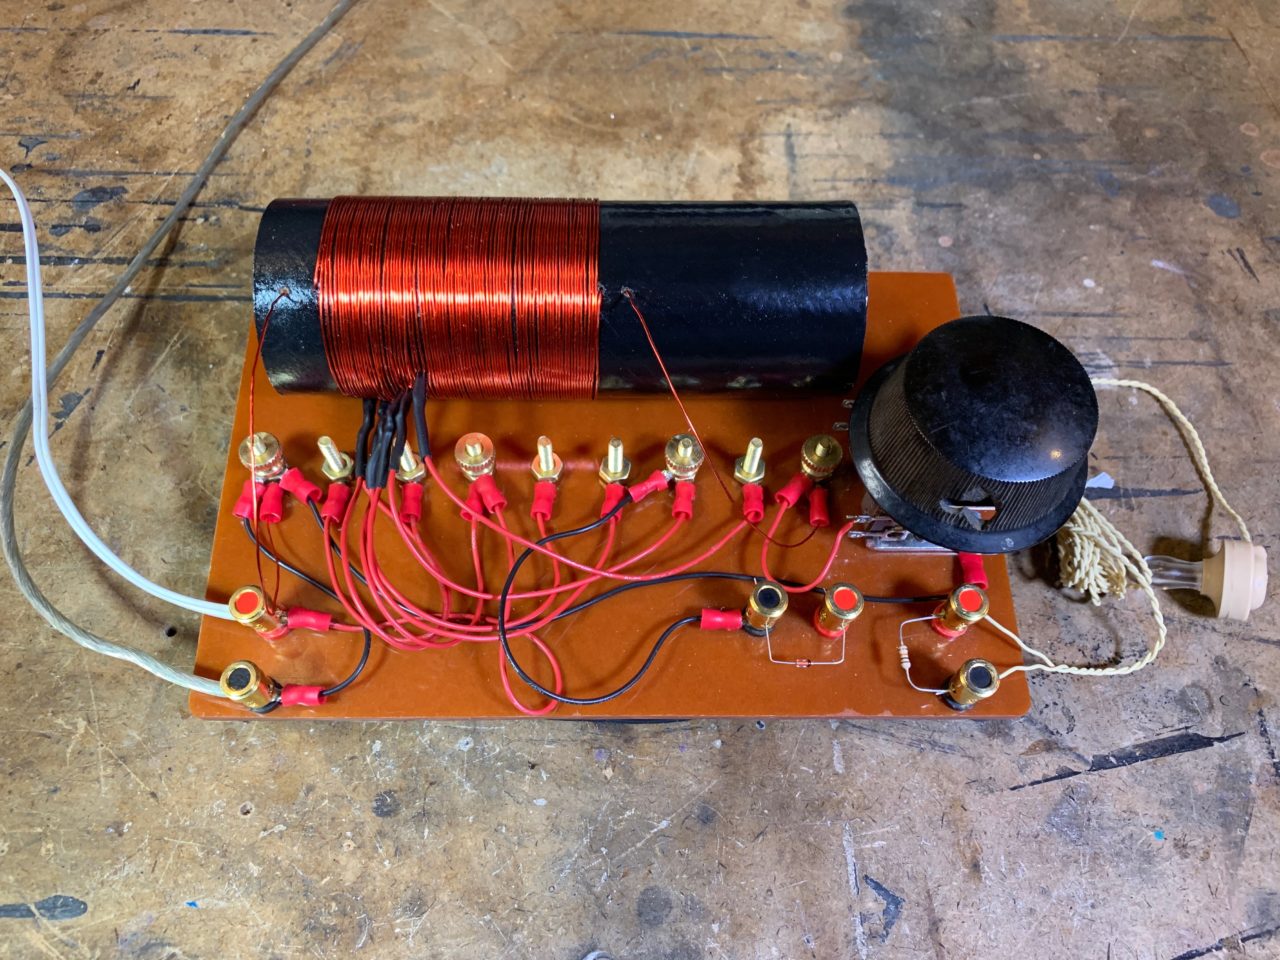
Wiring and Connecting the Components
Now that you have completed the assembly of the circuit board, it’s time to wire and connect the components to establish the electronic connections necessary for your synthesizer to function. Follow these steps to ensure a proper and organized wiring process:
- Plan your wiring layout: Before you start wiring, take a moment to plan the layout of your components and their interconnections. Consider factors such as signal flow, proximity of components, and ease of accessibility.
- Start with power connections: Begin by wiring the power connections. Identify the power input points on the circuit board and connect them to the appropriate power source. Ensure that you follow the correct polarity and voltage requirements.
- Wire the audio connections: Next, wire the audio connections. This includes routing the outputs of the oscillators, filters, and amplifiers to the appropriate audio output points. Consider using shielded cables to minimize noise and interference.
- Connect the control interfaces: Wire the control interfaces, such as knobs, sliders, and buttons, to their respective control input points on the circuit board. Pay attention to proper connection orientation and follow any specific wiring instructions provided by the component manufacturer.
- Establish the control voltage connections: Synthesizers often rely on control voltages (CV) to modulate various parameters. Connect the control voltage outputs and inputs between the relevant components, such as oscillators, filters, and modulation sources.
- Double-check the connections: Once all the wiring is done, double-check the connections to ensure they are secure and properly soldered. Inspect for any potential shorts or loose wires that may cause electrical issues.
- Perform a continuity test: Use a multimeter to perform a continuity test to verify that all the connections are properly established. This will help identify any potential wiring errors or faulty connections that need to be fixed.
Throughout the wiring process, it’s important to keep your workspace neat and organized. Use zip ties, cable management clips, or wire looms to keep the wires organized and prevent tangling or accidental disconnections.
Once you have completed the wiring and connectivity of the components, you are ready to move on to the next step: installing and programming the microcontroller. This will bring your synthesizer to life and allow you to control its functionality. We’ll explore this process in the next section.
Installing and Programming the Microcontroller
The microcontroller is the brain of your synthesizer, responsible for controlling its various functions and generating control signals. Installing and programming the microcontroller is a crucial step in bringing your synthesizer to life. Follow these steps to successfully install and program the microcontroller:
- Choose a microcontroller: Select a microcontroller that best suits your needs and is compatible with your synthesizer design. Consider factors such as processing power, memory capacity, and the availability of development tools and libraries.
- Prepare the microcontroller board: If your microcontroller comes on a separate board, prepare it by soldering any necessary headers or connectors. Ensure that the board is clean and free from any dust or debris.
- Mount the microcontroller: Place the microcontroller onto the designated socket on your circuit board, aligning the pins correctly. Make sure the microcontroller is securely mounted and properly seated to ensure reliable connections.
- Connect programming tools: Connect the appropriate programming tools to your microcontroller board. This may include a USB programmer, debug adapter, or dedicated programmer. Follow the manufacturer’s instructions for proper connections.
- Write or upload the firmware: Develop or obtain the firmware code that will run on the microcontroller. This code will determine the behavior and functionality of your synthesizer. Use an integrated development environment (IDE) or programming software to write or upload the firmware to the microcontroller.
- Verify functionality: Once the firmware is uploaded, verify the functionality of your microcontroller by performing basic tests. This may include checking control voltage outputs, responding to control inputs, and generating audio signals.
- Refine and optimize the firmware: As you test the functionality of your microcontroller, you may discover areas that need refinement or optimization. Make any necessary changes to the firmware code to improve performance or add additional features.
It’s important to follow the manufacturer’s instructions and guidelines for programming the specific microcontroller you are using. Consult the datasheet, documentation, or online resources for support if needed.
Additionally, consider implementing safety features in your firmware to protect your circuit and components from potential electrical issues. This includes features such as voltage clamping, temperature monitoring, or error handling.
Once your microcontroller is installed and programmed, you’re ready to move on to the next step: adding control interfaces to your synthesizer. This will enable you to interact with and manipulate the sound in exciting ways. We’ll explore this process in the next section.
Adding Control Interfaces
Control interfaces are an essential component of any synthesizer as they allow you to interact with and shape the sound. Adding control interfaces to your synthesizer will provide you with hands-on control over parameters such as pitch, modulation, and filter cutoff. Follow these steps to incorporate control interfaces into your synthesizer:
- Assess your control needs: Determine the specific control interfaces you want to include in your synthesizer. This could include knobs, sliders, buttons, touch-sensitive pads, or even MIDI or USB connectivity.
- Choose the right components: Select control interface components that are suitable for your needs and compatible with your synthesizer design. Consider factors such as resistance values for potentiometers, button types, or touch sensors.
- Position and mount the control interfaces: Decide on the layout and positioning of the control interfaces on your synthesizer. Mark their locations on the front panel or enclosure and prepare mounting holes or slots for the components.
- Solder connections: Connect the control interfaces to the appropriate control input points on your circuit board. Use wires or ribbon cables to establish the necessary connections. Ensure a secure and reliable soldering technique.
- Test and calibrate: Once the control interfaces are connected, test each interface to ensure proper functionality. Calibrate the control range as needed to match the desired parameter values.
- Consider ergonomics: Pay attention to the arrangement and labeling of the control interfaces to ensure user-friendly operation. Group related controls together and provide clear labeling or markings for easy identification.
- Additional control options: If desired, you can also explore incorporating external control options such as MIDI or USB connectivity. This allows for expanded control possibilities and integration with other devices.
Adding control interfaces to your synthesizer gives you the ability to manipulate the sound in real-time, adding a layer of expressiveness and creativity to your music-making process.
Consider the user experience when designing your control interface layout. Ensure that the controls are easily accessible and intuitive to use, allowing for smooth and effortless sound shaping during live performances or studio sessions.
Once you have successfully added the control interfaces to your synthesizer, you are ready to move on to the next step: testing and troubleshooting. This will ensure that your instrument is functioning correctly and producing the desired sound. Let’s explore this process in the next section.
Testing and Troubleshooting
Testing and troubleshooting are essential steps in the process of building a synthesizer. They ensure that your instrument functions correctly, producing the desired sound and responding accurately to control inputs. Follow these steps to effectively test and troubleshoot your synthesizer:
- Power-on testing: Start by powering on your synthesizer and checking for any signs of life. Look for indicator lights, sound output, and any initial response from the control interfaces.
- Signal testing: Test each section of your synthesizer to ensure the proper generation and routing of signals. Check the oscillators, filters, amplifiers, and modulation sources individually to verify that they are producing the expected signals.
- Input testing: Next, test the input section. Verify that the control interfaces are producing the intended control voltages or data and that they are properly influencing the sound parameters.
- Functionality testing: Test the overall functionality of your synthesizer by exploring its various features and capabilities. Experiment with different settings, modulation sources, and control inputs to ensure that everything is working as expected.
- Audio output testing: Listen to the audio output of your synthesizer and assess the sound quality, clarity, and consistency. Make adjustments to the components or circuitry if any issues such as noise, distortion, or imbalance are present.
- Troubleshooting: If you encounter any issues during testing, begin the troubleshooting process. Use deductive reasoning, follow signal paths, and refer to the schematic to identify the source of the problem. Check for loose connections, damaged components, or incorrect wiring.
- Fixing and retesting: Once you have identified the problem, make the necessary fixes, such as resoldering connections, replacing faulty components, or adjusting settings. Retest the affected section to ensure proper functionality.
- Iterate and refine: As you test and troubleshoot your synthesizer, you may discover areas that require refinement or further optimization. Adjust the firmware, component values, or circuit configuration to improve the performance and sound quality.
Take your time during the testing and troubleshooting process. Be patient and thorough in your approach, as it will help rectify any issues and ensure a fully functional and reliable synthesizer.
Document any modifications or fixes you make during the troubleshooting process. This will serve as a reference for future maintenance or upgrades and help others who may encounter similar issues with their own builds.
Once you have successfully tested and troubleshooted your synthesizer, you can proceed to the final section: customizing and enhancing your instrument. We’ll explore this exciting aspect in the next section.
Customizing and Enhancing the Synthesizer
Now that you have built a functional synthesizer, it’s time to let your creativity shine by customizing and enhancing your instrument. Customization allows you to make your synthesizer truly unique and tailored to your preferences, while enhancements can improve its functionality or expand its capabilities. Here are some ways you can customize and enhance your synthesizer:
- Enclosure design: Consider the aesthetic appeal of your synthesizer by customizing the enclosure. You can paint or apply graphics to the front panel, add backlighting, or even create a custom 3D-printed or laser-cut enclosure for a professional look.
- Control interface modifications: Customize the layout or appearance of the control interfaces to suit your playing style or visual preferences. You can modify knobs, add custom labels, or even incorporate touch-sensitive pads or pressure-sensitive strips for expressive control.
- Expanded connectivity: Add additional input or output options to your synthesizer. This can include MIDI or USB connectivity for integration with other devices or external control interfaces, or audio input for processing external audio sources alongside the synthesizer’s sound generation.
- Effect modules: Enhance your sound by integrating effect modules into your synthesizer. This could include modules for delay, reverb, chorus, or distortion, allowing you to add depth and texture to your sound.
- Modular compatibility: Consider making your synthesizer modular-compatible, allowing you to expand its capabilities by integrating modules from other manufacturers or DIY projects. This opens up a world of possibilities for exploring new soundscapes and sonic textures.
- User presets and memory: Create a memory system that allows you to save and recall your favorite settings or presets. This will make it easier to reproduce specific sounds and streamline your creative workflow.
- Software updates and optimizations: Continuously refine and improve your synthesizers’ firmware by implementing software updates or optimizations. This can include bug fixes, new features, or improved performance based on user feedback and your own experimentation.
Take into consideration the skills, resources, and equipment at your disposal when customizing and enhancing your synthesizer. It’s important to balance your desires with practicality and feasibility. Start with small modifications and gradually work your way up to more complex enhancements as you gain experience and confidence.
Remember, customization and enhancement are ongoing processes. As you explore and experiment with your synthesizer, you may discover additional ways to personalize and improve it. Embrace the opportunity to create an instrument that truly reflects your artistic vision and sonic preferences.
Now that you have customized and enhanced your synthesizer to your satisfaction, it’s time to unleash your creativity and start making music. Enjoy the journey of exploring new sonic territories and pushing the boundaries of sound with your unique instrument.
Congratulations on building your own synthesizer and happy synthesizing!
Conclusion
Building your own synthesizer is a fulfilling and exciting endeavor that allows you to dive into the world of electronic music and sound design. Throughout this article, we have explored the various steps involved in creating a synthesizer, from understanding the basics to customizing and enhancing the instrument to suit your preferences.
By gaining a solid understanding of the components that make up a synthesizer, you can make informed choices when selecting and assembling your own instrument. Careful planning, attention to detail, and following proper techniques during the building process are key to achieving a functional and reliable synthesizer.
Once you have completed the assembly, wiring, and testing, the fun truly begins. Personalize your synthesizer by customizing the enclosure, control interfaces, and firmware to make it uniquely yours. Additionally, consider enhancing its capabilities through expanded connectivity, effect modules, modular compatibility, or software updates.
Remember that building a synthesizer is not just about the end result, but also about the journey. Embrace experimentation and exploration as you discover new sounds and possibilities with your instrument. Enjoy the process of refinement and continuous learning as you create music with your one-of-a-kind synthesizer.
Whether you are a beginner exploring the world of synthesizers or an experienced enthusiast looking to expand your sonic palette, building your own synthesizer is a rewarding and empowering experience. It allows you to understand the inner workings of these powerful musical tools and opens up a world of creativity and self-expression.
So, what are you waiting for? Let your passion for music and technology drive you to embark on the exhilarating journey of building your own synthesizer. Unleash your creativity, push the boundaries of sound, and make music that is uniquely yours!