Home>Production & Technology>Background Music>How To Fade Background Music In Powerpoint If Play Video
Background Music
How To Fade Background Music In Powerpoint If Play Video
Published: October 28, 2023
Learn how to fade background music in Powerpoint when playing a video. Enhance your presentations by adjusting the volume of the background music seamlessly.
(Many of the links in this article redirect to a specific reviewed product. Your purchase of these products through affiliate links helps to generate commission for AudioLover.com, at no extra cost. Learn more)
Table of Contents
Introduction
Background music is an essential element for creating engaging and impactful presentations in PowerPoint. It helps to set the mood, enhance the message, and captivate the audience. However, there may be times when you want to fade the background music to create a more seamless audio experience, especially when incorporating videos into your slides.
Fading background music in PowerPoint allows you to smoothly transition from a background track to the audio of a video, without an abrupt interruption or the need to manually adjust the volume during the presentation. This technique not only adds a professional touch to your slides but also enables you to deliver a more polished and immersive multimedia experience.
In this tutorial, we will walk you through the step-by-step process of fading the background music in PowerPoint when playing a video. Whether you’re a seasoned presenter or new to creating PowerPoint presentations, you’ll find this guide helpful in enhancing your audiovisual presentations and delivering a seamless narrative flow.
Step 1: Inserting the video in PowerPoint
The first step in fading the background music in PowerPoint is to insert the video into your slide. Here’s how you can do it:
- Open your PowerPoint presentation and navigate to the slide where you want to insert the video.
- Click on the “Insert” tab in the menu bar at the top of the screen.
- In the “Media” section, click on the “Video” button and select either “Online Video” or “Video on My PC” depending on the source of your video file.
- If you choose “Online Video,” you can search for videos on popular platforms like YouTube or Vimeo by entering keywords in the search bar provided. Once you find the desired video, click on it and then click on the “Insert” button to add it to your slide.
- If you choose “Video on My PC,” navigate to the location on your computer where the video file is saved. Select the file and click on the “Insert” button to add it to your slide.
Once the video is inserted, you can resize and reposition it on the slide as necessary. PowerPoint allows you to adjust the size, position, and other video formatting options by selecting the video and accessing the “Format” and “Video Tools” tabs in the menu bar. Take some time to align the video with the rest of your slide content for a visually appealing presentation.
Remember to ensure that the video you choose is relevant to your presentation and adds value to your message. A well-selected video can help engage your audience and reinforce key points, while an irrelevant or distracting video can detract from your presentation’s effectiveness.
Step 2: Accessing the video playback options
After inserting the video into your PowerPoint slide, the next step is to access the video playback options. These options will allow you to adjust the volume and apply the fade effect to the background music. Here’s how you can access the video playback options:
- Select the video on your slide by clicking on it. You’ll notice that a new tab called “Playback” appears on the menu bar.
- Click on the “Playback” tab to access the video playback options.
- In the “Video Options” group, click on the “Playback” button to open the playback settings.
By accessing the video playback options, you can control various aspects of the video, including the play settings, loop options, and volume adjustment.
Now that you have accessed the video playback options, you’re ready to proceed to the next step, which involves adjusting the volume level of the background music to create a seamless audio experience when playing the video.
Step 3: Adjusting the volume level
Once you have accessed the video playback options in PowerPoint, you can now adjust the volume level of the background music to ensure a smooth audio transition when playing the video. Here’s how you can do it:
- Select the video on your slide by clicking on it.
- Navigate to the “Playback” tab on the menu bar.
- In the “Video Options” group, locate the “Volume” slider.
- Drag the volume slider to the left to decrease the volume or to the right to increase the volume.
As you adjust the volume level, pay attention to how it blends with the background music. The aim is to find the right balance where the video’s audio does not overpower the background music and meshes seamlessly with it. It’s recommended to conduct a test run of the presentation and listen to the audio to ensure the desired effect is achieved.
Keep in mind that the volume adjustment applies to the entire video clip, so it’s important to consider the audio levels of the video itself. If the video has its own audio that you want to preserve, you may need to adjust the volume of the background music accordingly to create a harmonious blend.
Remember to make subtle adjustments to avoid jarring transitions in audio levels. The goal is to create a smooth and natural fade effect that enhances the overall audio experience of your presentation.
Now that you have adjusted the volume level, you can proceed to the next step, which involves applying the fade effect to the background music to seamlessly transition between the video and the presentation.
Step 4: Fading the background music
Applying a fade effect to the background music ensures a smooth and gradual transition when playing the video in PowerPoint. This technique prevents any sudden or jarring changes in the audio and creates a seamless audio experience for your audience. Here’s how you can fade the background music in PowerPoint:
- Select the slide where the video will play.
- Go to the “Playback” tab on the menu bar.
- In the “Video Options” group, click on the “Fade In” or “Fade Out” button depending on which effect you want to apply.
- Choose the desired duration for the fade effect from the available options, or click on “Custom” to specify a specific duration.
The “Fade In” effect gradually increases the volume of the background music at the beginning of the video, while the “Fade Out” effect slowly decreases the volume as the video ends. By applying these fade effects, you can seamlessly blend the audio of the video with the background music, creating a more professional and polished presentation.
Experiment with different durations to find the right balance that suits your presentation. Keep in mind that shorter durations may result in a more subtle fade effect, while longer durations may create a more noticeable transition. Adjust the fade effect as needed to achieve the desired audio experience for your specific presentation.
With the background music now appropriately faded, your PowerPoint presentation is almost ready for a seamless audiovisual experience. The next step involves previewing the slide to ensure that the background music blends smoothly with the video and the rest of the presentation.
Step 5: Previewing the slide with faded background music
Before finalizing your PowerPoint presentation, it’s important to preview the slide that contains the faded background music and the video. This step allows you to ensure that the audio transition is seamless and that the overall effect is aligned with your intentions. Here’s how you can preview the slide:
- Go to the slide that contains the video and the background music.
- Click on the “Slide Show” tab in the menu bar.
- Click on the “From Current Slide” button to start the slide show from the current slide.
During the slide show, pay close attention to the audio transition as the video starts and ends. Listen for any abrupt changes in volume or noticeable disruptions in the fade effect. If you encounter any issues, you may need to adjust the volume levels or the fade duration to achieve a seamless audio experience.
Take this opportunity to identify any other potential audio or visual glitches in your presentation. Look for any synchronization issues between the video and any accompanying visual elements, as well as any inconsistencies in the overall flow of the slide.
If everything appears to be in order and the slide transitions smoothly, congratulations! You have successfully faded the background music and created a more seamless audiovisual experience for your PowerPoint presentation.
However, if you encounter any issues or feel that adjustments are needed, you can go back to the respective steps and make the necessary changes. It’s important to iterate and fine-tune your presentation until you’re satisfied with the overall result.
Once you’re happy with the preview, you can continue to the final step – adding any additional video effects, if desired.
Step 6: Adding additional video effects (optional)
In addition to fading the background music and ensuring a seamless audio transition, PowerPoint offers various additional video effects that you can apply to enhance the visual impact of your presentation. While this step is optional, it can add an extra layer of creativity and engagement to your slides. Here are some optional video effects you can consider:
- Video Styles: PowerPoint provides a range of video styles, such as borders, filters, and frames, that can be applied to your video. These styles can help to emphasize specific aspects of your video, add a touch of professionalism, or align the visual aesthetic with the overall theme of your presentation.
- Animations: You can animate your video to make it more dynamic and eye-catching. PowerPoint offers a variety of animation effects, such as entrance animations or motion paths, which can bring your video to life and make it more engaging for your audience.
- Transitions: Consider adding transition effects between slides that contain videos. This can help create a smooth flow from one video to another or from a video slide back to your regular presentation slides. Experiment with different transition effects to find the one that best complements the content and style of your presentation.
- Captions and Subtitles: If your video contains dialogue or narration, you can add captions or subtitles to make the content more accessible to your audience. PowerPoint allows you to insert captions either using built-in options or by uploading a subtitle file (such as an .SRT file).
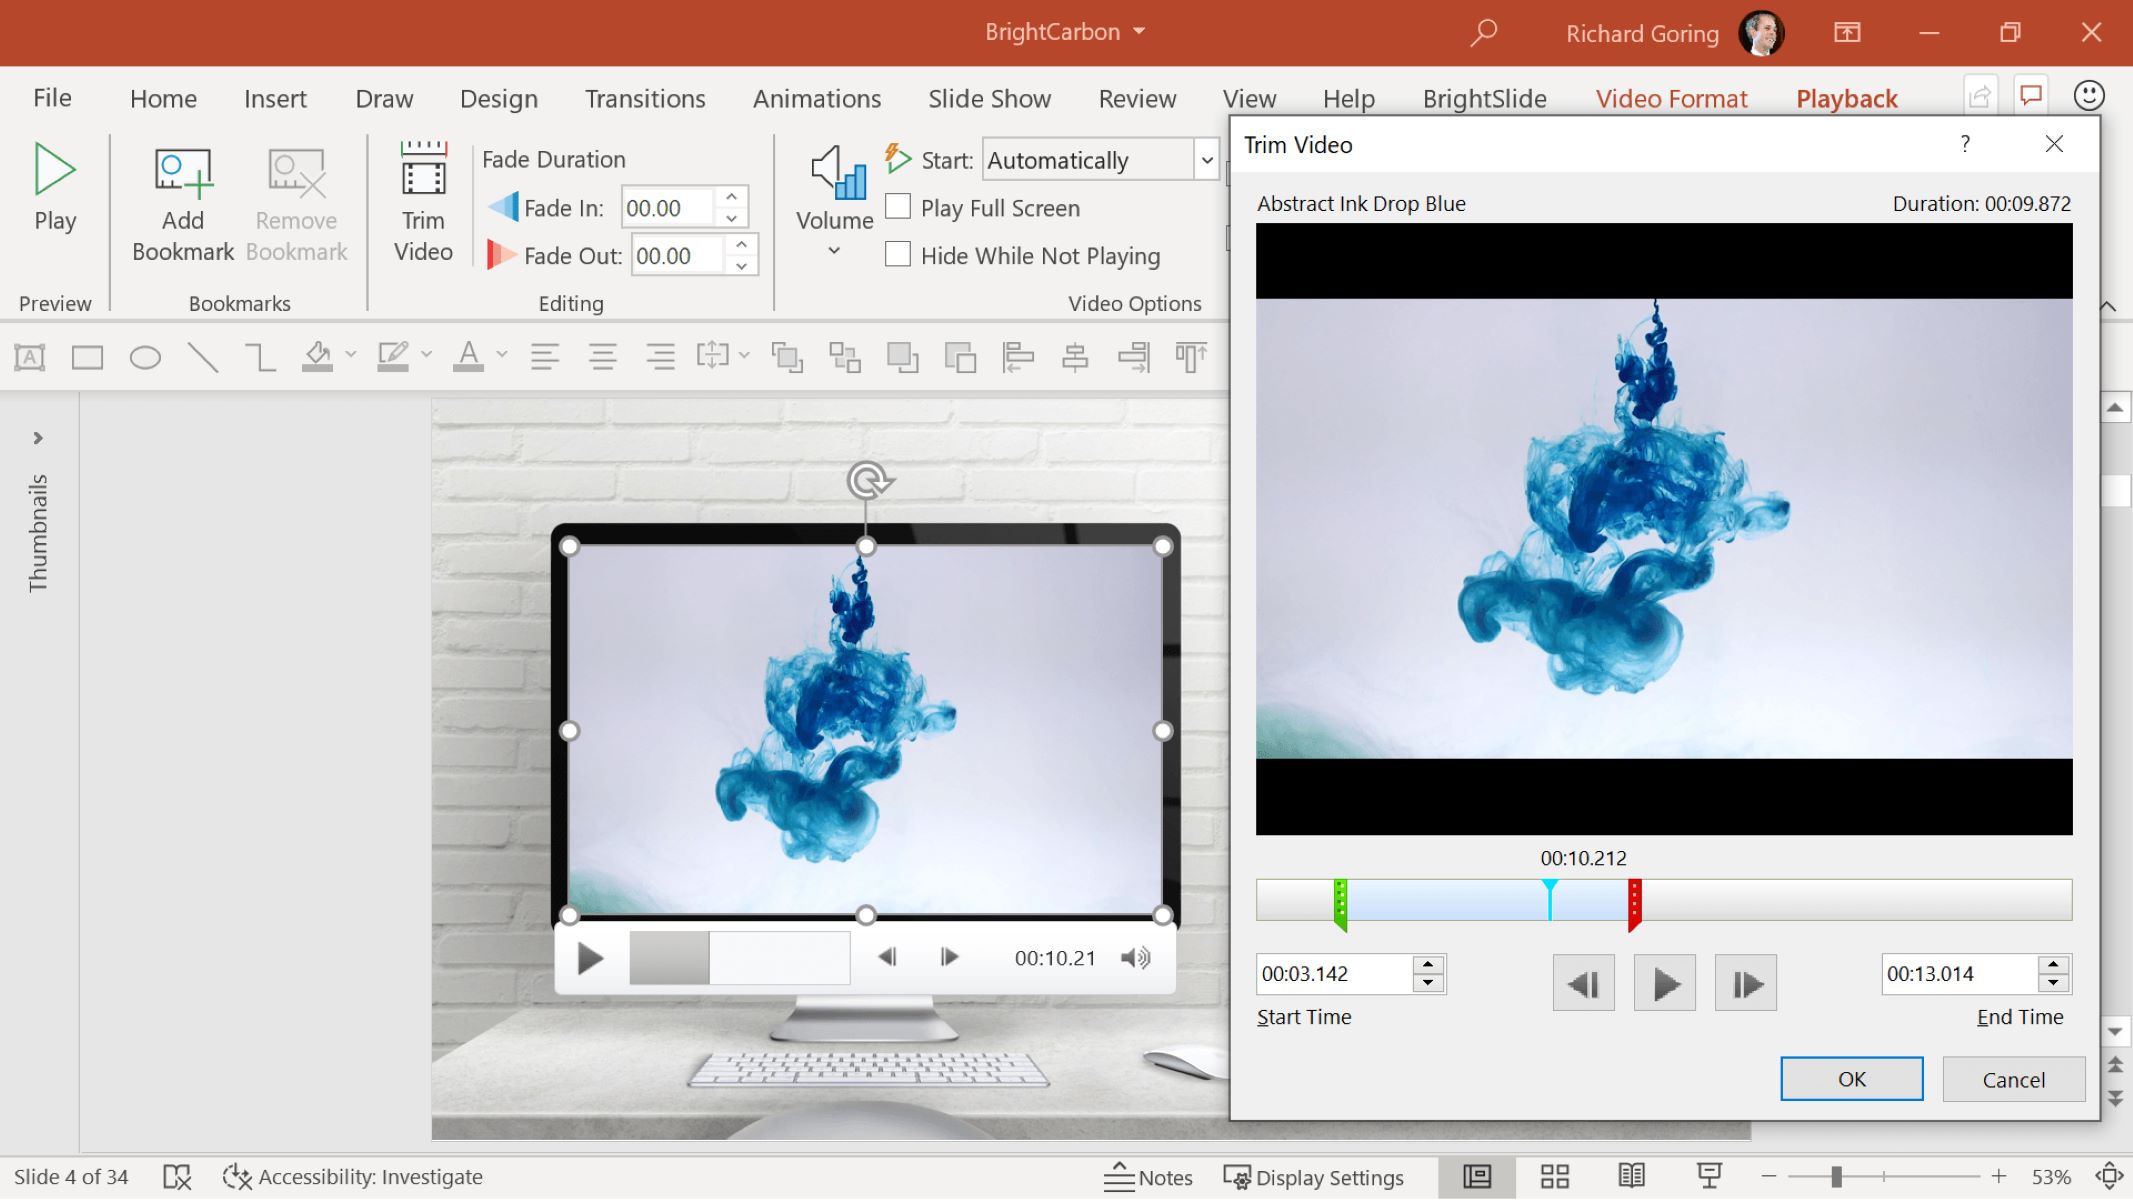
- Video Trim and Crop: PowerPoint offers basic video editing features, allowing you to trim the video duration or crop the video frame to remove any unwanted portions. This can come in handy if you need to focus on a specific part of the video or shorten its length to fit within a specific time constraint.
Remember, while these additional video effects can enhance the visual appeal and engagement of your presentation, it’s important to use them judiciously and consider their relevance to your content. Avoid overusing effects that may distract the audience or undermine the effectiveness of your message.
After applying any desired additional video effects, make sure to preview the slide once again to ensure that the overall presentation flows smoothly and that the effects enhance the intended impact. Once you’re satisfied with the final result, you’re ready to deliver your PowerPoint presentation with confidence!
Conclusion
Fading the background music in PowerPoint when playing a video is a valuable technique that can elevate the audiovisual experience of your presentations. By seamlessly transitioning between the background music and the video’s audio, you can create a polished and professional presentation that engages your audience.
In this tutorial, we covered the step-by-step process of fading the background music in PowerPoint:
- Inserting the video in PowerPoint
- Accessing the video playback options
- Adjusting the volume level
- Fading the background music
- Previewing the slide with faded background music
- Adding additional video effects (optional)
We emphasized the importance of finding the right balance between the volume levels of the background music and the video, as well as adjusting the fade duration to achieve a smooth audio transition. We also discussed optional video effects that can enhance the visual impact of your presentation.
Remember to preview your slides, paying close attention to the audio transition, and make any necessary adjustments to ensure a seamless experience. Additionally, use additional video effects sparingly and with intention to complement your content and engage your audience effectively.
Now that you have a comprehensive understanding of how to fade background music in PowerPoint when playing a video, you can confidently create captivating presentations that seamlessly blend audio and visual elements. With practice and experimentation, you can refine your skills and create powerful multimedia presentations that leave a lasting impression on your audience.
So, go ahead and incorporate the fading technique into your PowerPoint presentations, and watch as your audience is captivated by the seamless audio experience you create!