Home>Production & Technology>MIDI>How To Fix MIDI Keyboard Keys
MIDI
How To Fix MIDI Keyboard Keys
Published: February 22, 2024
Learn how to fix MIDI keyboard keys with our step-by-step guide. Get your MIDI keyboard working like new again with these easy troubleshooting tips.
(Many of the links in this article redirect to a specific reviewed product. Your purchase of these products through affiliate links helps to generate commission for AudioLover.com, at no extra cost. Learn more)
Table of Contents
Introduction
MIDI keyboards are essential tools for musicians, producers, and enthusiasts, offering a versatile platform for creating and performing music. However, encountering issues with MIDI keyboard keys can disrupt the creative process and hinder musical expression. Whether you're a seasoned musician or a novice, understanding how to troubleshoot and fix MIDI keyboard key issues is invaluable.
In this comprehensive guide, we will explore practical steps to address common problems related to MIDI keyboard keys. From physical damage to sensitivity adjustments and software updates, we'll cover a range of troubleshooting techniques to help you restore your MIDI keyboard to optimal functionality. By following these steps, you can regain the full potential of your MIDI keyboard and continue making music with confidence and ease.
Let's delve into the essential methods for diagnosing and resolving MIDI keyboard key issues, empowering you to overcome technical obstacles and keep the music flowing. Whether you're dealing with unresponsive keys, uneven sensitivity, or erratic behavior, this guide will equip you with the knowledge and tools to address these challenges effectively. Let's embark on this journey to unlock the potential of your MIDI keyboard and ensure a seamless music-making experience.
Check for Physical Damage
Before delving into software or internal issues, it's crucial to conduct a thorough examination for physical damage. Even minor physical damage can significantly impact the performance of MIDI keyboard keys. Here's a detailed approach to check for physical damage and potential solutions:
-
Visual Inspection: Begin by visually inspecting the keys and surrounding areas for any visible signs of damage. Look for cracks, chips, or misalignments in the keys, as well as any debris or foreign objects lodged between the keys.
-
Key Alignment: Gently press each key and observe if any of them feel loose or misaligned. In some cases, keys may become misaligned due to accidental impact or excessive force during use.
-
Key Sticking: Test for keys that stick or do not return to their original position after being pressed. Sticky keys can hinder smooth playability and may indicate underlying mechanical issues.
-
External Casing: Inspect the external casing of the MIDI keyboard for any visible damage, such as dents, scratches, or structural deformities. Damage to the casing can sometimes impact the internal components, including the keys.
-
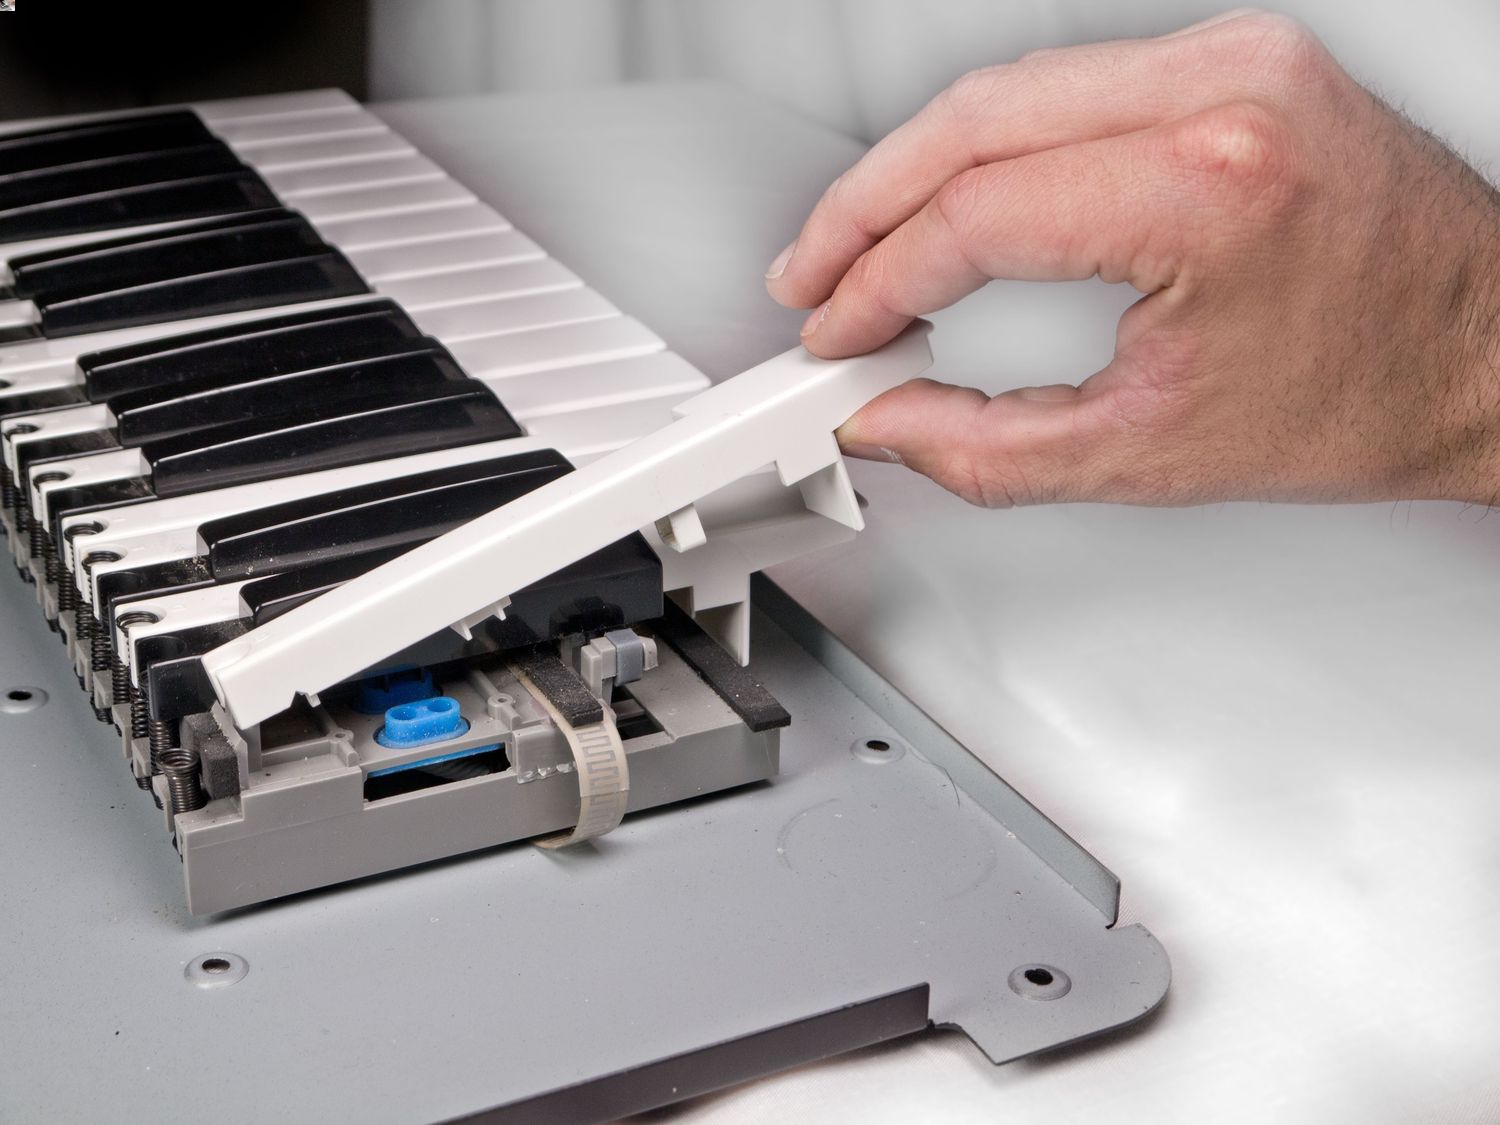
Key Springs and Mechanisms: If possible, carefully remove the keybed or access the internal mechanisms of the keys to inspect the springs and key action mechanisms. Look for any broken or dislodged components that may impede the proper functioning of the keys.
-
Cleaning: While inspecting for physical damage, take the opportunity to clean the keys and the keybed. Dust, dirt, and debris can accumulate over time and affect the responsiveness of the keys.
If physical damage is identified during the inspection, it's essential to address the issues promptly. Depending on the nature of the damage, solutions may include repairing or replacing damaged keys, realigning misaligned keys, or addressing internal mechanical issues. Additionally, thorough cleaning of the keys and internal components can often improve the overall performance of the MIDI keyboard.
By meticulously checking for physical damage and promptly addressing any issues, you can ensure that your MIDI keyboard is in optimal condition for seamless and enjoyable music production and performance.
Clean the Keys
Proper maintenance of MIDI keyboard keys is essential for ensuring optimal performance and longevity. Over time, dust, dirt, and debris can accumulate between the keys, affecting their responsiveness and playability. Cleaning the keys regularly not only enhances the tactile experience but also helps prevent potential issues that may arise from debris buildup. Here's a comprehensive guide on how to effectively clean the keys of your MIDI keyboard:
Materials Needed:
- Soft, lint-free microfiber cloth
- Isopropyl alcohol (70% concentration or higher)
- Compressed air duster (optional)
- Key puller tool (if available)
Step-by-Step Cleaning Process:
-
Power Off and Disconnect: Before initiating the cleaning process, power off the MIDI keyboard and disconnect it from any external power source or computer connection to prevent accidental damage.
-
Remove Keycaps (If Applicable): Some MIDI keyboards allow for the removal of individual keycaps for thorough cleaning. If your keyboard permits this, carefully remove the keycaps using a key puller tool to access the area beneath the keys.
-
Dust Removal: Use a compressed air duster to gently blow away loose dust and debris from the keybed and surrounding areas. This step helps dislodge and remove surface-level particles that may hinder the cleaning process.
-
Cleaning Solution Preparation: Dilute isopropyl alcohol with water, aiming for a solution with a concentration of 70% or higher. Dampen a soft, lint-free microfiber cloth with the prepared solution. Avoid using excessive liquid to prevent it from seeping into the internal components of the keyboard.
-
Wipe the Keys: Gently wipe each key and the surrounding keybed with the dampened cloth, ensuring thorough coverage while being cautious not to saturate the keys. Pay attention to areas where debris may accumulate, such as the spaces between the keys and around the key edges.
-
Dry and Reassemble: Allow the keys to air dry completely before reassembling the keycaps, if they were removed. Ensure that no residual moisture remains before powering on the MIDI keyboard.
By incorporating regular key cleaning into your maintenance routine, you can uphold the playability and longevity of your MIDI keyboard. This simple yet effective practice contributes to a more enjoyable and responsive playing experience, allowing you to focus on creating music without the distraction of unclean or unresponsive keys.
Adjust the Key Sensitivity
The sensitivity of MIDI keyboard keys plays a pivotal role in shaping the expressive nuances and dynamics of musical performance. Adjusting the key sensitivity settings can significantly impact the responsiveness and feel of the keys, catering to the preferences and playing style of the musician. Whether you prefer a light touch for delicate passages or a more robust response for powerful performances, fine-tuning the key sensitivity can elevate the overall playability of the MIDI keyboard.
Understanding Key Sensitivity Modes
Most modern MIDI keyboards offer multiple sensitivity modes, allowing users to customize the key response according to their playing dynamics. The two primary sensitivity modes commonly found in MIDI keyboards are:
-
Velocity Sensitivity: This mode determines the relationship between the velocity of key presses and the resulting MIDI note velocity. Higher velocities produce louder notes, while lower velocities yield softer notes, mirroring the dynamics of acoustic instruments. Adjusting the velocity sensitivity influences the dynamic range and expression achievable with the keys.
-
Aftertouch Sensitivity: Aftertouch, also known as pressure sensitivity, enables additional expressive control after a key has been pressed. By varying the pressure applied to a sustained key, musicians can modulate parameters such as vibrato, pitch bend, or filter cutoff, adding depth and character to their performances.
Customizing Sensitivity Settings
To adjust the key sensitivity of your MIDI keyboard, follow these general steps:
-
Accessing the Sensitivity Settings: Depending on the model of your MIDI keyboard, sensitivity settings can typically be accessed through the keyboard's control panel, dedicated software interface, or MIDI mapping software. Refer to the user manual or online resources specific to your keyboard for detailed instructions on accessing sensitivity settings.
-
Velocity Curve Adjustment: Many MIDI keyboards offer velocity curve settings, allowing users to modify the response curve of the keys. This feature enables customization of the relationship between key velocity and MIDI note velocity, catering to individual playing dynamics and preferences. Experiment with different velocity curves to find the one that best suits your playing style.
-
Aftertouch Calibration: If your MIDI keyboard supports aftertouch, explore the aftertouch sensitivity settings to calibrate the pressure response according to your desired level of expressiveness. Fine-tuning aftertouch sensitivity can enhance the subtlety and nuance achievable through pressure modulation during performance.
By customizing the key sensitivity settings to align with your musical expression and playing technique, you can unlock the full potential of your MIDI keyboard, fostering a more intuitive and personalized playing experience. Whether you're crafting intricate melodies, unleashing dynamic rhythms, or sculpting emotive performances, the tailored key sensitivity settings empower you to articulate your musical vision with precision and authenticity.
Update MIDI Keyboard Drivers
Ensuring that your MIDI keyboard drivers are up to date is a crucial step in maintaining optimal performance and compatibility with your computer system. MIDI keyboard drivers serve as the communication bridge between the hardware of the MIDI keyboard and the operating system, facilitating seamless interaction and accurate translation of musical input. By updating the drivers, you can address potential compatibility issues, enhance overall stability, and access the latest features and improvements offered by the manufacturer.
Importance of Driver Updates
Outdated MIDI keyboard drivers can lead to various issues, including latency problems, erratic behavior of keys, and incompatibility with music production software. As operating systems evolve and music production technology advances, updated drivers are essential to ensure that your MIDI keyboard functions harmoniously within the contemporary software and hardware ecosystem. By keeping the drivers current, you mitigate the risk of performance bottlenecks and compatibility conflicts, allowing for a smoother and more reliable music production experience.
Steps to Update MIDI Keyboard Drivers
-
Identify the Manufacturer's Website: Visit the official website of the MIDI keyboard manufacturer to locate the dedicated support or downloads section. Manufacturers often provide driver updates, firmware upgrades, and software utilities specific to their products.
-
Check for Driver Updates: Navigate to the support or downloads section and search for the latest MIDI keyboard driver corresponding to your specific model and operating system. Manufacturers frequently release driver updates to address performance optimizations, bug fixes, and compatibility enhancements.
-
Download and Install the Latest Driver: Once you've identified the appropriate driver update for your MIDI keyboard, download the file and follow the provided instructions for installation. It's advisable to closely adhere to the installation steps outlined by the manufacturer to ensure a seamless update process.
-
Restart the System: After successfully installing the updated MIDI keyboard driver, restart your computer to finalize the driver integration. A system restart helps ensure that the updated driver configurations take effect and establish stable communication between the MIDI keyboard and the operating system.
Benefits of Updating Drivers
By proactively updating your MIDI keyboard drivers, you stand to gain several benefits:
-
Enhanced Compatibility: Updated drivers are designed to align with the latest operating systems and music production software, fostering seamless compatibility and integration.
-
Improved Performance: Driver updates often include performance optimizations, addressing latency issues and enhancing the overall responsiveness of the MIDI keyboard.
-
Access to New Features: Manufacturers may introduce new features, functionality, or customization options through driver updates, enriching the capabilities of your MIDI keyboard.
-
Stability and Reliability: Updated drivers contribute to a more stable and reliable performance, reducing the likelihood of unexpected errors or malfunctions during music production sessions.
By prioritizing the regular update of MIDI keyboard drivers, you can safeguard the functionality and longevity of your musical instrument, ensuring that it remains in sync with evolving technology and software environments. This proactive approach empowers you to harness the full potential of your MIDI keyboard, fostering a seamless and productive music-making journey.
Test the Keys
After performing physical inspections, cleaning, and sensitivity adjustments, it's essential to conduct comprehensive testing to ensure that the MIDI keyboard keys are functioning optimally. Testing the keys involves assessing their responsiveness, consistency, and accuracy across the entire keybed, allowing you to identify and address any lingering issues that may impact performance. Here's a detailed guide on how to effectively test the keys of your MIDI keyboard:
Individual Key Response
Begin by systematically testing each individual key to evaluate its responsiveness and consistency. Play each key at varying velocities, from gentle taps to firm strikes, observing how the MIDI keyboard translates the key presses into MIDI note data. Take note of any keys that exhibit inconsistent velocity tracking, unresponsiveness, or irregular triggering, as these observations can indicate underlying mechanical or electronic issues.
Chord and Scale Playability
Next, assess the playability of chords and scales across the keybed to ensure uniform responsiveness and accurate note recognition. Play common chord progressions, arpeggios, and scales spanning the entire range of the MIDI keyboard, paying attention to the fluidity and accuracy of note triggering. Verify that all keys register consistently and accurately, without any noticeable discrepancies in volume or timing.
Aftertouch and Modulation
If your MIDI keyboard supports aftertouch or modulation capabilities, test these expressive features to gauge their responsiveness and precision. Apply varying levels of pressure and modulation to sustained notes, observing how the MIDI keyboard translates these nuanced gestures into expressive musical control. Ensure that aftertouch and modulation responses are uniform and predictable across the keybed, allowing for expressive articulation and dynamic shaping of musical phrases.
Pitch Bend and Modulation Wheels
If your MIDI keyboard is equipped with pitch bend and modulation wheels, thoroughly test these components to confirm their smooth operation and accurate parameter control. Manipulate the pitch bend wheel to produce gradual pitch variations, and engage the modulation wheel to modulate assigned parameters such as vibrato or filter cutoff. Verify that the wheels respond smoothly and accurately, facilitating expressive pitch and timbral modulation during performance.
External Controller Integration
If your MIDI keyboard features additional control elements such as knobs, sliders, or pads, verify their integration and functionality by testing their responsiveness and mapping accuracy. Ensure that external controllers transmit MIDI data reliably and accurately, allowing for seamless integration with music production software and hardware instruments.
By meticulously testing the keys and associated performance features of your MIDI keyboard, you can ascertain its overall functionality and identify any remaining issues that require attention. This thorough evaluation empowers you to address any anomalies or inconsistencies, ultimately ensuring that your MIDI keyboard is primed for seamless and expressive music production.
Conclusion
In conclusion, the proper maintenance and troubleshooting of MIDI keyboard keys are essential for preserving the functionality and playability of these versatile musical instruments. By following the comprehensive steps outlined in this guide, you can effectively address common issues related to MIDI keyboard keys, empowering you to maintain an optimal playing experience and unleash your musical creativity with confidence.
From conducting meticulous physical inspections to identifying and addressing potential damage, to performing thorough key cleaning to ensure consistent responsiveness, each step contributes to the overall maintenance and enhancement of the MIDI keyboard. Additionally, the customization of key sensitivity settings allows for a personalized playing experience, aligning the key response with individual preferences and expressive nuances.
Moreover, the significance of updating MIDI keyboard drivers cannot be overstated, as it ensures seamless compatibility, enhanced performance, and access to the latest features and improvements. By staying proactive in updating drivers, you can mitigate potential compatibility issues and enjoy a stable and reliable music production environment.
The comprehensive testing of MIDI keyboard keys serves as the final checkpoint, allowing you to verify the effectiveness of the troubleshooting and maintenance efforts. Through systematic testing of individual keys, chord playability, aftertouch, modulation, pitch bend, and external controller integration, you can ascertain the overall functionality and responsiveness of the MIDI keyboard, ensuring a consistent and expressive playing experience.
By integrating these maintenance and troubleshooting practices into your routine, you can prolong the longevity of your MIDI keyboard, ensuring that it remains a reliable and expressive tool for music creation and performance. Whether you're a professional musician, a passionate hobbyist, or a budding producer, the ability to diagnose and address MIDI keyboard key issues empowers you to focus on your musical endeavors without the distraction of technical hindrances.
Ultimately, by equipping yourself with the knowledge and techniques presented in this guide, you can navigate the intricacies of MIDI keyboard maintenance and troubleshooting with confidence, fostering a seamless and enjoyable music-making journey. Embracing a proactive approach to MIDI keyboard care and maintenance allows you to fully harness the creative potential of these remarkable instruments, enabling you to express yourself musically with precision and authenticity.