Home>Production & Technology>Noise Cancellation>How To Turn On Noise Cancellation On Plantronics Earpiece
Noise Cancellation
How To Turn On Noise Cancellation On Plantronics Earpiece
Modified: January 22, 2024
Learn how to easily activate noise cancellation on your Plantronics earpiece and enjoy a more immersive and uninterrupted audio experience.
(Many of the links in this article redirect to a specific reviewed product. Your purchase of these products through affiliate links helps to generate commission for AudioLover.com, at no extra cost. Learn more)
Table of Contents
- Introduction
- Why Use Noise Cancellation on Plantronics Earpiece?
- Step 1: Check Compatibility
- Step 2: Turn on the Plantronics Earpiece
- Step 3: Access the Settings Menu
- Step 4: Locate the Noise Cancellation Option
- Step 5: Enable Noise Cancellation
- Step 6: Adjust Noise Cancellation Levels
- Step 7: Test and Fine-tune the Settings
- Conclusion
Introduction
Noise cancellation has become an increasingly sought-after feature in the world of audio devices, offering a solution to the constant noise distractions in our daily lives. One company that has mastered this technology is Plantronics, a renowned manufacturer of earpieces. Their earpieces are not only known for their excellent sound quality, but also their ability to block out unwanted background noise.
Whether you’re looking to immerse yourself in music, enjoy a phone call without any interruptions, or simply find some tranquility in a noisy environment, turning on noise cancellation on your Plantronics earpiece can make a world of difference. In this article, we will guide you through the steps to enable noise cancellation on your Plantronics earpiece, ensuring a more enjoyable and uninterrupted audio experience.
Before we dive into the step-by-step process, let’s take a moment to understand why noise cancellation is such a valuable feature.
Note: The specific steps may vary depending on the model of your Plantronics earpiece. Please refer to the user manual or manufacturer’s instructions for your specific device.
Why Use Noise Cancellation on Plantronics Earpiece?
There are several compelling reasons to use noise cancellation on your Plantronics earpiece. Here are a few key benefits:
- Enhanced Audio Quality: Noise cancellation technology helps to block out external sounds, allowing you to hear your audio content with greater clarity and detail. Whether you’re listening to your favorite music, participating in a conference call, or watching a movie, noise cancellation can significantly enhance your overall audio experience.
- Improved Concentration: In environments with high levels of ambient noise, it can be challenging to concentrate on your tasks or conversations. Noise cancellation helps create a more focused and distraction-free listening experience, enabling you to stay engaged without being interrupted by external sounds.
- Reduced Fatigue and Stress: Constant exposure to background noise can lead to increased fatigue and stress levels. By activating noise cancellation on your Plantronics earpiece, you can create a calmer and more relaxing environment, reducing the negative impacts of noise pollution on your well-being.
- Privacy and Confidentiality: Noise cancellation not only enhances the audio quality for you but also ensures that your conversations remain private and confidential. With background noise effectively blocked out, you can have private phone conversations or participate in sensitive discussions without worrying about unintended listeners.
- Travel Companion: If you frequently travel or commute, a Plantronics earpiece with noise cancellation can be your perfect travel companion. It helps to minimize the noise of engines, crowds, or public transportation, allowing you to enjoy your audio content without being disturbed by external sounds.
Overall, noise cancellation on your Plantronics earpiece offers a range of benefits, including enhanced audio quality, improved concentration, reduced fatigue and stress, privacy, and a more enjoyable travel experience. Now that we understand the advantages, let’s dive into the step-by-step process of turning on noise cancellation on your Plantronics earpiece.
Step 1: Check Compatibility
Before you can enable noise cancellation on your Plantronics earpiece, it’s important to ensure that your device is compatible with this feature. Although most modern Plantronics earpieces come equipped with noise cancellation technology, it’s still wise to double-check.
To determine if your Plantronics earpiece supports noise cancellation, you can refer to the product specifications provided by the manufacturer. This information can usually be found on the packaging, in the user manual, or on the official Plantronics website.
If you’re unsure about the compatibility of your specific model, you can also contact customer support or refer to online forums and communities dedicated to Plantronics products. Fellow users or experts can help clarify any doubts and provide valuable insights based on their own experiences.
Keep in mind that noise cancellation options may vary depending on the model of your Plantronics earpiece. Some models might have dedicated noise cancellation buttons or switches, while others might offer noise cancellation settings that can be adjusted through a companion mobile app or a control panel on your device.
Once you have confirmed that your Plantronics earpiece supports noise cancellation, you can proceed to the next step and learn how to activate this feature.
Step 2: Turn on the Plantronics Earpiece
Before you can access the settings to enable noise cancellation on your Plantronics earpiece, you need to ensure that the device is turned on and ready for use. Follow these simple steps to turn on your Plantronics earpiece:
- Locate the power button on your Plantronics earpiece. It is usually located on the earpiece itself or on the control module if your earpiece has one.
- Press and hold the power button for a few seconds until you see or hear a power-on indication. This indication may differ depending on the model of your earpiece, but you might see an LED light or hear a tone to confirm that the device is turned on.
- Once the earpiece is turned on, wait for it to enter pairing mode or establish a connection with your device. The LED light might flash or change color, indicating that the earpiece is ready to be paired.
- Ensure that your smartphone, tablet, or other audio playback device has Bluetooth enabled and is within the earpiece’s Bluetooth range.
- Follow the manufacturer’s instructions to connect your Plantronics earpiece to your device via Bluetooth. This process may involve searching for available devices, selecting your earpiece from the list, and confirming the pairing request.
Once your Plantronics earpiece is turned on and successfully connected to your device, you can proceed to the next step and navigate to the settings menu to enable noise cancellation.
Step 3: Access the Settings Menu
Now that your Plantronics earpiece is turned on and paired with your device, it’s time to access the settings menu. The process of accessing the settings menu may vary depending on the model of your earpiece and the device you are using. However, here are some general steps to help you get started:
- On your smartphone or tablet, locate and open the “Settings” app. This app is usually represented by a gear icon and can typically be found on the home screen or in the app drawer.
- Within the “Settings” app, look for options such as “Bluetooth”, “Connected devices”, or “Connections”. The exact name may vary depending on your device’s manufacturer and operating system.
- Tap on the relevant option to access the list of connected Bluetooth devices.
- Identify your Plantronics earpiece from the list of connected devices. The name of your earpiece should be displayed next to its Bluetooth symbol or icon.
- Tap on your Plantronics earpiece to access its specific settings menu.
In some cases, the settings for your Plantronics earpiece may be accessed through a dedicated mobile app provided by the manufacturer. If this is the case, you can locate and open the app on your device to access the earpiece settings directly.
Once you have successfully accessed the settings menu for your Plantronics earpiece, you’re ready to proceed to the next step and locate the noise cancellation option.
Step 4: Locate the Noise Cancellation Option
Now that you have accessed the settings menu for your Plantronics earpiece, it’s time to locate the noise cancellation option. The exact location of this option may vary depending on the model of your earpiece and the user interface of your device. Here are some general guidelines to help you find the noise cancellation setting:
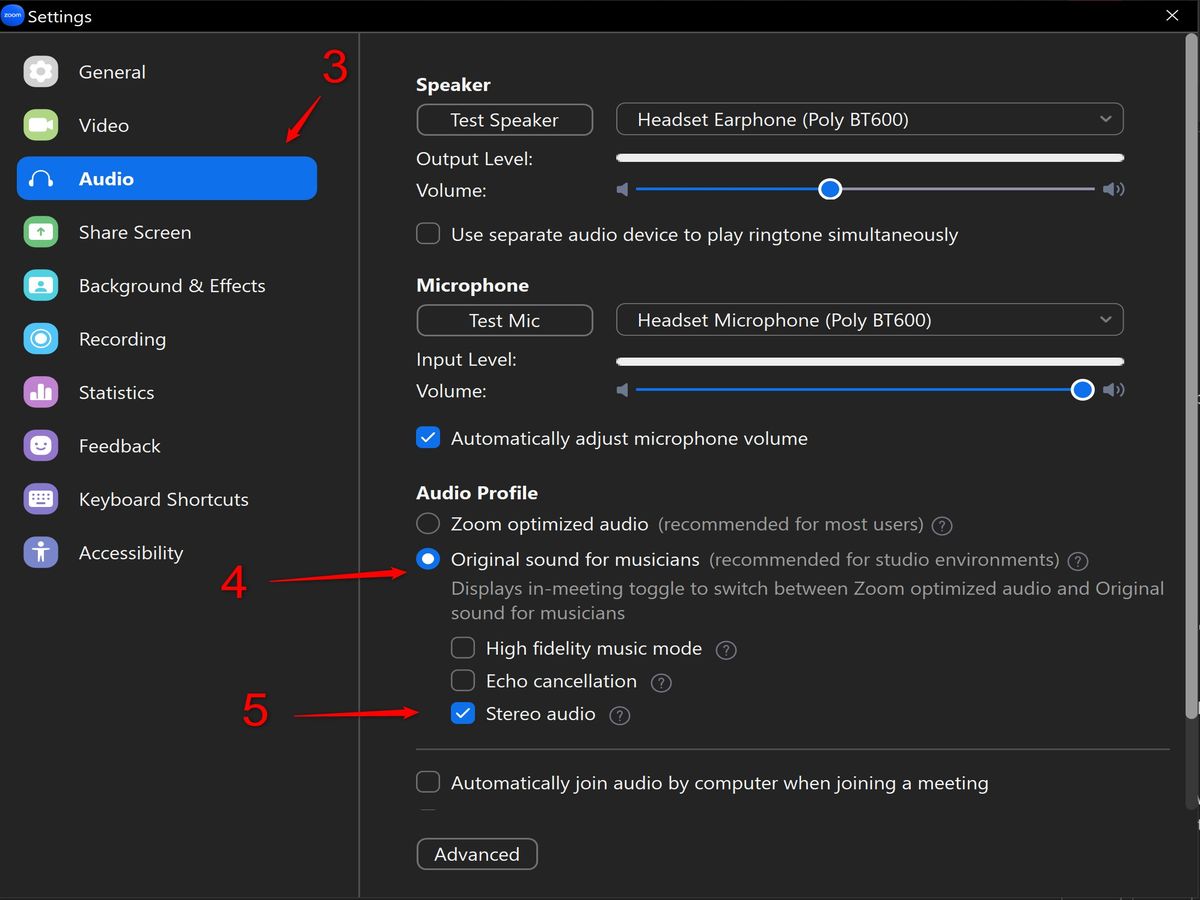
- Look for a section or category within the settings menu that is related to sound, audio, or headphone settings. It may be labeled as “Audio”, “Sound”, “Headphones”, or something similar.
- Navigate through the menu options within the sound or audio settings until you find the specific settings for your Plantronics earpiece.
- Scan through the available options and look for any mention of noise cancellation or ambient noise reduction. It might be labeled as “Noise Cancellation”, “ANC” (Active Noise Cancellation), or something similar.
- If you’re unable to locate the noise cancellation option within the sound settings, try checking under a separate sub-menu or advanced settings section. Some earpiece models may have more extensive settings menus with additional customization options.
If you’re still having trouble finding the noise cancellation option, consult the user manual or online resources provided by Plantronics. They may offer specific instructions or illustrations for your particular earpiece model.
Once you have successfully located the noise cancellation option, you’re ready to move on to the next step and enable this feature.
Step 5: Enable Noise Cancellation
Now that you’ve located the noise cancellation option on your Plantronics earpiece, it’s time to enable this feature. The method for enabling noise cancellation may vary depending on your earpiece model and the settings interface of your device. Follow these general steps to enable noise cancellation:
- Access the noise cancellation option within the settings menu of your Plantronics earpiece. This may require navigating through different sub-menus or tabs until you find the specific option.
- Once you’ve found the noise cancellation option, you’ll typically see a toggle switch or a checkbox next to it.
- Tap or click on the toggle switch or checkbox to enable noise cancellation. It may switch from an “off” position to an “on” position or be marked with a checkmark.
- Depending on your earpiece model, there might be additional settings or levels associated with noise cancellation. If available, you can adjust these settings based on your preferences.
- Once you’ve enabled noise cancellation, exit the settings menu of your Plantronics earpiece.
It’s important to note that while noise cancellation can greatly reduce background noise, it may not completely eliminate all sounds. The effectiveness of noise cancellation can vary depending on the type and intensity of the noise, as well as the quality and capabilities of your Plantronics earpiece.
Now that you’ve successfully enabled noise cancellation on your Plantronics earpiece, you’re ready to move on to the next step and fine-tune the noise cancellation levels to suit your preferences.
Step 6: Adjust Noise Cancellation Levels
After enabling noise cancellation on your Plantronics earpiece, you have the option to further customize and adjust the noise cancellation levels to optimize your listening experience. The ability to adjust these levels may vary depending on your earpiece model and the available settings. Follow these steps to adjust the noise cancellation levels:
- Access the settings menu for your Plantronics earpiece. This can typically be done by following the steps mentioned earlier.
- Look for an option related to noise cancellation settings or levels within the settings menu.
- If available, you might see a slider or a range of options that allow you to adjust the intensity or strength of the noise cancellation feature. Move the slider or select the desired level to suit your preferences.
- Some earpiece models might offer different presets or modes for noise cancellation, such as “High”, “Medium”, or “Low”. Choose the preset that best fits your current environment or personal preference.
- If your Plantronics earpiece utilizes a companion app on your smartphone, open the app and navigate to the noise cancellation settings section. Here, you can also adjust the noise cancellation levels or select different presets.
- Once you have adjusted the noise cancellation levels to your liking, exit the settings menu or companion app.
Experiment with different noise cancellation levels to find the right balance between blocking out unwanted noise and preserving the quality of your audio content. Keep in mind that the optimal noise cancellation level may vary depending on your surroundings and personal preferences.
Now that you’ve adjusted the noise cancellation levels, you’re ready to move on to the final step: testing and fine-tuning the settings.
Step 7: Test and Fine-tune the Settings
After enabling and adjusting the noise cancellation settings on your Plantronics earpiece, it’s important to test the effectiveness of the feature and make any necessary fine-tuning adjustments. Follow these steps to test and fine-tune the noise cancellation settings:
- Put on your Plantronics earpiece and start playing audio content, such as music or a podcast, on your connected device.
- Move to a noisy environment, such as a crowded street or a busy café, where background noise is prevalent.
- Pay attention to how well the noise cancellation feature blocks out the background noise. Notice if there are any residual sounds or if the desired audio is still audible.
- If you find that the background noise is still too prominent, revisit the noise cancellation settings on your earpiece or device.
- Adjust the noise cancellation levels or presets, if available, to increase or decrease the intensity of the noise cancellation feature.
- Repeat the test in different environments to further evaluate the performance of the noise cancellation and make any necessary adjustments.
- Continue fine-tuning the settings until you find the right balance between reducing background noise and maintaining the desired audio quality.
Keep in mind that the effectiveness of noise cancellation can vary depending on the specific circumstances and the capabilities of your Plantronics earpiece. It may not completely eliminate all sounds, particularly sudden or high-pitched noises. However, with proper calibration, you can tailor the noise cancellation settings to create a more immersive and distraction-free audio experience.
Once you have successfully tested and fine-tuned the noise cancellation settings to your satisfaction, you’re ready to enjoy a more serene and enjoyable audio experience with your Plantronics earpiece.
Conclusion
Noise cancellation technology has become an invaluable feature in audio devices, and Plantronics earpieces are known for their exceptional sound quality and ability to block out unwanted background noise. By following the steps outlined in this guide, you can easily enable and customize the noise cancellation feature on your Plantronics earpiece to enhance your audio experience.
We first discussed the benefits of using noise cancellation on your Plantronics earpiece, including improved audio quality, enhanced concentration, reduced fatigue and stress, increased privacy, and a more pleasant travel experience. Understanding these advantages helps justify the importance of enabling noise cancellation on your device.
We then walked through a step-by-step process starting with checking compatibility, turning on the Plantronics earpiece, accessing the settings menu, locating the noise cancellation option, enabling noise cancellation, adjusting the noise cancellation levels, and testing and fine-tuning the settings.
By following these steps, you can optimize the noise cancellation settings on your Plantronics earpiece to suit your preferences and create a more immersive and uninterrupted audio experience. Whether you’re listening to music, making phone calls, or enjoying multimedia content, noise cancellation helps you focus on what matters most while minimizing distractions.
Remember to consult the user manual or manufacturer’s instructions specific to your Plantronics earpiece model for more detailed information and any model-specific guidelines.
With noise cancellation engaged, you can enjoy crystal-clear audio, excellent call quality, and a peaceful audio experience, no matter what environment you may find yourself in.
So go ahead, turn on the noise cancellation on your Plantronics earpiece and immerse yourself in a world of pure, uninterrupted sound.