Home>Production & Technology>Sound Bar>How Do You Connect A Vizio Sound Bar
Sound Bar
How Do You Connect A Vizio Sound Bar
Modified: January 22, 2024
Learn how to connect a Vizio Sound Bar and enhance your audio experience. Find step-by-step instructions and troubleshooting tips in this informative guide.
(Many of the links in this article redirect to a specific reviewed product. Your purchase of these products through affiliate links helps to generate commission for AudioLover.com, at no extra cost. Learn more)
Table of Contents
- Introduction
- Step 1: Check Sound Bar Compatibility
- Step 2: Gather Necessary Cables and Accessories
- Step 3: Power on the Sound Bar and TV
- Step 4: Connect the Sound Bar to the TV using HDMI ARC
- Step 5: Connect the Sound Bar to the TV using an Optical Cable
- Step 6: Connect the Sound Bar to the TV using RCA Cables
- Step 7: Adjust Audio Settings on the TV
- Step 8: Test the Sound Bar Connection
- Conclusion
Introduction
Welcome to our guide on how to connect a Vizio sound bar. If you have recently purchased a Vizio sound bar or are considering adding one to your home theater setup, you may be wondering how to properly connect it to your TV. Sound bars are a popular choice for enhancing audio quality and providing an immersive experience while watching movies, TV shows, or playing video games.
Vizio is a reputable brand that offers a wide range of sound bars with different features and connectivity options. Regardless of the specific model you own, the process of connecting a Vizio sound bar to your TV is quite straightforward. In this guide, we will walk you through the steps to ensure a seamless connection between your Vizio sound bar and TV.
Before we delve into the step-by-step instructions, it’s important to note that the connection method you choose may depend on the available ports on your TV and sound bar. The most common connection options include HDMI ARC (Audio Return Channel), optical cable, and RCA cables. We will cover all these methods to ensure you can find the one that suits your setup best.
So, if you’re ready to elevate your audio experience and unlock the full potential of your Vizio sound bar, let’s get started with the connection process!
Step 1: Check Sound Bar Compatibility
Before you begin the process of connecting your Vizio sound bar, it’s important to ensure that your sound bar is compatible with your TV. This will ensure that you can establish a successful connection between the two devices.
Start by checking the user manual or specification sheet of your Vizio sound bar to determine the supported connection methods. Look for compatibility with HDMI ARC, optical cable, or RCA cables, depending on the available ports on your TV.
Next, identify the available ports on your TV. Check if your TV has an HDMI ARC port, an optical audio output, or RCA audio outputs. Ideally, you should use the HDMI ARC port as it provides the best audio quality and offers additional features such as volume control with your TV remote. However, if your TV does not have an HDMI ARC port, you can still connect using an optical cable or RCA cables, though the audio quality may be slightly compromised.
If you are unsure about the compatibility of your sound bar with your TV, you can also consult Vizio’s customer support or visit their website for more information. They may have a list of compatible TVs or provide specific instructions for connecting your Vizio sound bar to different TV models.
Additionally, make sure that both your sound bar and TV are powered off before proceeding with the connection process. This will prevent any potential damage to the devices and ensure a safe and proper connection.
By checking the compatibility between your sound bar and TV, you can avoid any compatibility issues and proceed with confidence to the next steps in connecting your Vizio sound bar.
Step 2: Gather Necessary Cables and Accessories
Now that you have confirmed the compatibility between your Vizio sound bar and TV, it’s time to gather the necessary cables and accessories for the connection process. The specific cables you will need depend on the available ports on both devices.
If your TV has an HDMI ARC port and your sound bar supports HDMI ARC, you will need an HDMI cable that supports ARC. Make sure to choose a high-speed HDMI cable to ensure optimal audio and video transmission. If you don’t have an HDMI ARC port on your TV, you can skip this step.
If your TV has an optical audio output and your sound bar has an optical input, you will need an optical cable. Look for a TOSLINK optical cable, which is the standard for digital audio transmission. Ensure that the cable is long enough to reach between your TV and sound bar.
If your TV and sound bar have RCA audio outputs and inputs, respectively, you will need a set of RCA cables. These cables have two connectors at each end—one for the left audio channel (usually colored white) and one for the right audio channel (usually colored red). Ensure that the cables are long enough to comfortably reach between your TV and sound bar.
In addition to the cables, you may need certain accessories depending on your particular setup. This may include a power adapter for the sound bar if it is not powered by USB or if you need to connect it to a power outlet. Some sound bars may also come with mounting brackets or other hardware for wall mounting, so ensure that you have those available if necessary.
By gathering the necessary cables and accessories before starting the connection process, you can proceed smoothly without any interruptions or delays.
Step 3: Power on the Sound Bar and TV
Before you proceed with the physical connection between your Vizio sound bar and TV, it’s important to power on both devices. This will ensure that they are ready to establish a connection and receive audio signals.
Start by plugging in your Vizio sound bar to a power source, either by connecting it to a power outlet using the provided power adapter or by using a USB cable if your sound bar supports USB power. Make sure that the power cable is securely connected and that the sound bar is receiving power.
Next, turn on your TV using either the remote control or the power button on the TV itself. Wait for the TV to fully power on and reach the home screen or the input selection menu.
Once the TV is powered on, you can proceed to the next step of connecting the sound bar to the TV. Keep in mind that it’s important to have both devices powered on before establishing the connection so that they can communicate with each other and ensure a proper audio signal transfer.
If you encounter any issues with powering on either the sound bar or the TV, double-check the power connections and ensure that there are no loose or disconnected cables. If the problem persists, consult the user manual or contact Vizio’s customer support for further assistance.
By ensuring that both the sound bar and TV are powered on, you are setting the stage for a successful connection and the enhanced audio experience that your Vizio sound bar has to offer.
Step 4: Connect the Sound Bar to the TV using HDMI ARC
If your TV and Vizio sound bar both have HDMI ARC (Audio Return Channel) ports, this is the recommended method for connecting the two devices. HDMI ARC allows for a streamlined connection and simplified control of your sound bar using your TV remote.
To connect the sound bar to the TV using HDMI ARC, follow these steps:
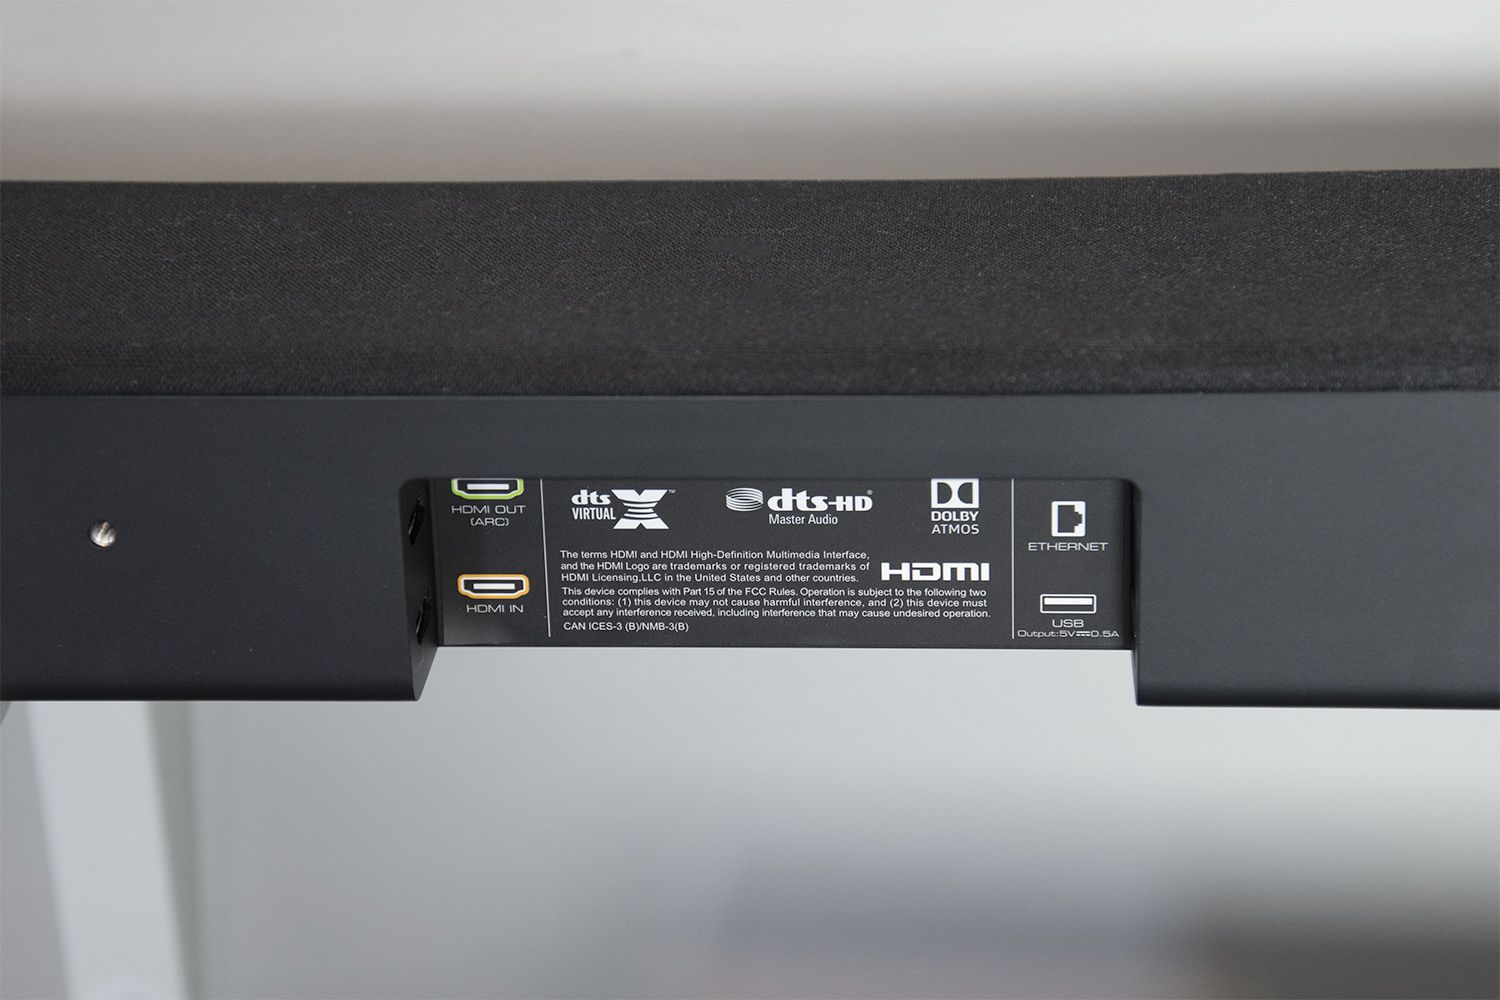
- Locate the HDMI ARC port on your TV. It is usually labeled as “HDMI ARC” or “ARC”.
- Connect one end of the HDMI cable to the HDMI ARC port on your TV.
- Locate the HDMI ARC port on your Vizio sound bar. It is typically labeled as “HDMI ARC” or “ARC”.
- Connect the other end of the HDMI cable to the HDMI ARC port on your sound bar.
- Ensure that both ends of the HDMI cable are securely plugged in.
- Power on both the TV and the sound bar, if they are not already on.
Once the connection is established, your TV should recognize the sound bar automatically. Depending on your TV model, you may see an on-screen prompt or notification indicating that a sound bar is connected. You can now enjoy audio from your TV through the Vizio sound bar.
If you want to control the sound bar using your TV remote, ensure that HDMI CEC (Consumer Electronics Control) is enabled on both the TV and the sound bar. This allows for seamless control of the sound bar’s volume and other settings through your TV remote.
If you encounter any issues with the HDMI ARC connection, such as audio not being played through the sound bar or the sound bar not being recognized by the TV, double-check the HDMI cable connections and ensure that the HDMI ARC feature is enabled in both devices’ settings menus. If the problem persists, consult the user manual or contact Vizio’s customer support for further assistance.
By connecting your Vizio sound bar to your TV using HDMI ARC, you can enjoy high-quality audio and simplify the control of your sound bar through your TV remote.
Step 5: Connect the Sound Bar to the TV using an Optical Cable
If your TV has an optical audio output and your Vizio sound bar has an optical input, you can establish a connection between the two devices using an optical cable. While HDMI ARC is the preferred method, using an optical cable can still provide a reliable audio connection.
To connect the sound bar to the TV using an optical cable, follow these steps:
- Locate the optical audio output on your TV. It is usually labeled as “Optical”, “Digital Audio Out”, or “TOSLINK”.
- Plug one end of the optical cable into the optical audio output on your TV.
- Locate the optical audio input on your Vizio sound bar. It is usually labeled as “Optical” or “TOSLINK”.
- Insert the other end of the optical cable into the optical audio input on your sound bar.
- Make sure that both ends of the optical cable are securely connected.
- Power on both the TV and the sound bar, if they are not already on.
Once the connection is established, you may need to adjust the audio settings on your TV to ensure that the audio is routed to the connected sound bar through the optical output. Consult your TV’s user manual or settings menu for instructions on selecting the audio output source.
With the optical connection, you should now be able to enjoy audio from your TV through the Vizio sound bar. However, note that the control of the sound bar may require a separate remote or the sound bar’s own controls.
In case you encounter any issues with the optical connection, such as no sound or distorted audio, ensure that the optical cable is not damaged and that the audio output settings on your TV are configured correctly. If the problem persists, you may need to consult the user manual or contact Vizio’s customer support for further assistance.
By connecting your Vizio sound bar to your TV using an optical cable, you can enjoy enhanced audio performance and an immersive viewing experience.
Step 6: Connect the Sound Bar to the TV using RCA Cables
If your TV and Vizio sound bar have RCA audio outputs and inputs, respectively, you can establish a connection between the two devices using RCA cables. While this method may not provide the highest audio quality compared to HDMI or optical connections, it is a viable option if your devices have RCA ports.
To connect the sound bar to the TV using RCA cables, follow these steps:
- Locate the RCA audio outputs on your TV. They are usually labeled as “Audio Out” or color-coded with red (right channel) and white (left channel).
- Plug one end of the RCA cables into the corresponding audio outputs on your TV. Connect the red cable to the red output and the white cable to the white output.
- Locate the RCA audio inputs on your Vizio sound bar. They are usually labeled as “Audio In” or color-coded with red (right channel) and white (left channel).
- Insert the other end of the RCA cables into the corresponding audio inputs on your sound bar. Connect the red cable to the red input and the white cable to the white input.
- Ensure that both ends of the RCA cables are securely connected.
- Power on both the TV and the sound bar, if they are not already on.
Once the connection is established, you may need to adjust the audio settings on your TV to ensure that the audio is routed to the connected sound bar through the RCA outputs. Refer to your TV’s user manual or settings menu for instructions on selecting the audio output source.
With the RCA connection, you should now be able to enjoy audio from your TV through the Vizio sound bar. However, note that the control of the sound bar may require a separate remote or the sound bar’s own controls.
If you encounter any issues with the RCA connection, such as no sound or poor audio quality, ensure that the RCA cables are not damaged and that the audio output settings on your TV are configured correctly. If the problem persists, consult the user manual or contact Vizio’s customer support for further assistance.
By connecting your Vizio sound bar to your TV using RCA cables, you can still enhance your audio experience and enjoy better sound quality compared to the TV’s built-in speakers.
Step 7: Adjust Audio Settings on the TV
After connecting your Vizio sound bar to your TV, it’s crucial to adjust the audio settings on your TV to ensure that the audio is properly routed to the sound bar and optimized for the best audio experience.
To adjust the audio settings on your TV, follow these steps:
- Access the settings menu on your TV. This can usually be done by pressing the “Menu” or “Settings” button on your TV remote.
- Navigate to the audio settings section. The location and terminology may vary depending on your TV model, but it is typically labeled as “Audio”, “Sound”, or “Sound Settings”.
- Select the audio output source. Choose the connected sound bar as the audio output device. This might be labeled as “External Speakers”, “Sound Bar”, or by the specific name of your Vizio sound bar model.
- Adjust the audio settings according to your preferences. Depending on your TV, you may have options to control volume levels, equalizer settings, surround sound effects, and more. Experiment with the settings to find the optimal audio quality for your setup.
- Save the changes and exit the settings menu.
By adjusting the audio settings on your TV, you ensure that the audio output is correctly directed to the connected sound bar. This step is crucial for experiencing the full benefits of your Vizio sound bar and achieving the desired audio quality.
Keep in mind that the available audio settings may vary depending on your TV model and brand. Some TVs offer advanced sound settings, such as virtual surround sound or audio presets, which can further enhance your audio experience. Take some time to explore these settings and customize them to your liking.
If you encounter any difficulties while adjusting the audio settings or if the sound continues to play through the TV’s built-in speakers instead of the sound bar, double-check the connections between the TV and the sound bar and ensure that the correct audio output source is selected. Consult your TV’s user manual or contact the manufacturer’s customer support for further assistance if needed.
By fine-tuning the audio settings on your TV, you can optimize the audio experience and fully enjoy the benefits of your Vizio sound bar while watching your favorite movies, TV shows, or gaming sessions.
Step 8: Test the Sound Bar Connection
Once you have completed the physical connection and adjusted the audio settings on your TV, it’s time to test the sound bar connection to ensure that everything is working as expected. Testing the connection will help you confirm that the audio from your TV is successfully being played through the Vizio sound bar.
Follow these steps to test the sound bar connection:
- Play audio from your TV source, such as a movie, TV show, or music.
- Ensure that the volume on both your TV and the sound bar is set to an audible level. You may need to adjust the volume separately on each device.
- Listen for sound coming from the Vizio sound bar instead of the TV’s built-in speakers. The sound bar should provide a richer and more immersive audio experience compared to the TV’s speakers.
- Pay attention to any issues, such as distortion, echoes, or no sound coming from the sound bar. If you encounter any problems, double-check all connections, ensure that the correct audio output source is selected on the TV, and review the audio settings on both devices.
- Try different audio sources and content to further test the sound bar. This can include switching between TV channels, streaming services, or playing different types of media. The sound bar connection should provide consistent and enhanced audio performance across various sources.
If everything sounds clear, balanced, and immersive through your Vizio sound bar, congratulations! You have successfully connected and tested your Vizio sound bar with your TV. Enjoy your enhanced audio experience and immerse yourself in the world of your favorite movies, shows, and games.
If you encounter any persistent issues or challenges with the sound bar connection or audio performance, consult the user manuals for both your TV and sound bar for troubleshooting tips. You can also reach out to Vizio’s customer support for further assistance.
By thoroughly testing the sound bar connection, you can ensure that you are getting the most out of your Vizio sound bar and enjoying high-quality audio that complements your TV viewing experience.
Conclusion
Congratulations on successfully connecting your Vizio sound bar to your TV! By following the step-by-step instructions in this guide, you have enhanced your audio experience and unlocked the full potential of your sound bar.
We started by checking the compatibility between your sound bar and TV to ensure a seamless connection. We then gathered the necessary cables and accessories based on the available ports on both devices.
Next, we powered on the sound bar and TV and proceeded to connect them using various methods, including HDMI ARC, optical cable, and RCA cables. Each method offers its own advantages and suitability based on your specific setup.
After making the physical connections, we emphasized the importance of adjusting the audio settings on your TV. This step ensures that the audio is properly routed to the sound bar and optimized for the best audio experience.
Finally, we tested the sound bar connection by playing audio from your TV and ensuring that the sound is playing through the sound bar instead of the TV’s built-in speakers. This step allowed you to confirm the success of the connection and evaluate the audio performance.
By completing these steps, you can now enjoy an immersive audio experience, enhanced clarity, and a richer soundstage while watching your favorite movies, TV shows, or playing video games.
If you encountered any difficulties during the connection or testing process, refer back to this guide or consult the user manuals for your specific devices. Additionally, Vizio’s customer support is always available to assist you with any technical questions or troubleshooting needs.
Thank you for choosing Vizio and for taking the time to connect your sound bar to your TV. We hope this guide has been helpful and that you enjoy the superior audio quality that your Vizio sound bar brings to your home entertainment setup.