Home>Production & Technology>Sound Effects>How To Add Sound Effects To Your Music
Sound Effects
How To Add Sound Effects To Your Music
Published: November 9, 2023
Enhance your music with professional sound effects. Learn how to easily add sound effects to your tracks and take your music production to the next level.
(Many of the links in this article redirect to a specific reviewed product. Your purchase of these products through affiliate links helps to generate commission for AudioLover.com, at no extra cost. Learn more)
Table of Contents
- Introduction
- Step 1: Choose Your Sound Effects
- Step 2: Set Up Your DAW
- Step 3: Import the Sound Effects
- Step 4: Arrange the Sound Effects
- Step 5: Adjust Volume and Panning
- Step 6: Apply Effects to Sound Effects
- Step 7: Sync Sound Effects to Your Music
- Step 8: Fine-Tune Sound Effects
- Step 9: Export Your Final Mix with Sound Effects
- Conclusion
Introduction
Welcome to the world of sound effects! Whether you are a musician, filmmaker, podcaster, or simply a creative individual looking to add a little something extra to your project, sound effects can be a powerful tool. From adding suspense to a movie scene, to creating atmosphere in a song, sound effects have the ability to transport your audience and enhance their experience.
In this article, we will guide you through the process of adding sound effects to your music. We will discuss everything from choosing the right sound effects to syncing them with your music and exporting the final mix. So, whether you are a seasoned producer or just starting out, we’ve got you covered.
Before we get started, it’s important to understand what sound effects are. Sound effects are artificially created or enhanced sounds that are used to accompany various media, such as movies, music, video games, and more. They can be anything from footsteps and explosions to bird chirping and thunderclaps. Sound effects add depth, realism, and emotion to your music, making it more engaging and immersive for your listeners.
Now that you have a basic understanding of sound effects, let’s dive into the step-by-step process of adding them to your music. Whether you want to create a cinematic soundtrack or spice up your electronic tune, these steps will help you achieve the desired result.
Step 1: Choose Your Sound Effects
The first step in adding sound effects to your music is selecting the right ones for your project. The choice of sound effects will depend on the genre, mood, and theme of your music. Here are some tips to help you choose the perfect sound effects:
- Identify the purpose: Determine what role the sound effects will play in your music. Are you looking for subtle background ambiance or bold, attention-grabbing effects? Understanding the purpose will help you narrow down your options.
- Consider the genre: Different genres require different types of sound effects. For example, if you’re creating a horror soundtrack, you might look for eerie and suspenseful sounds like creaking doors and ghostly whispers. On the other hand, if you’re producing a dance track, you might want energetic and rhythmic effects like claps or risers.
- Match the mood: Sound effects can greatly influence the mood of your music. Determine the emotional atmosphere you want to create and choose sound effects that align with that mood. For a peaceful and calming vibe, you might opt for nature sounds like birds chirping or gentle waves. For a high-energy and intense atmosphere, you might go for explosive impacts or electronic glitches.
- Experiment and be creative: Don’t be afraid to think outside the box and experiment with unconventional sound effects. Combining and manipulating different sounds can lead to unique and captivating results. You can also consider layering multiple sound effects to add depth and complexity to your music.
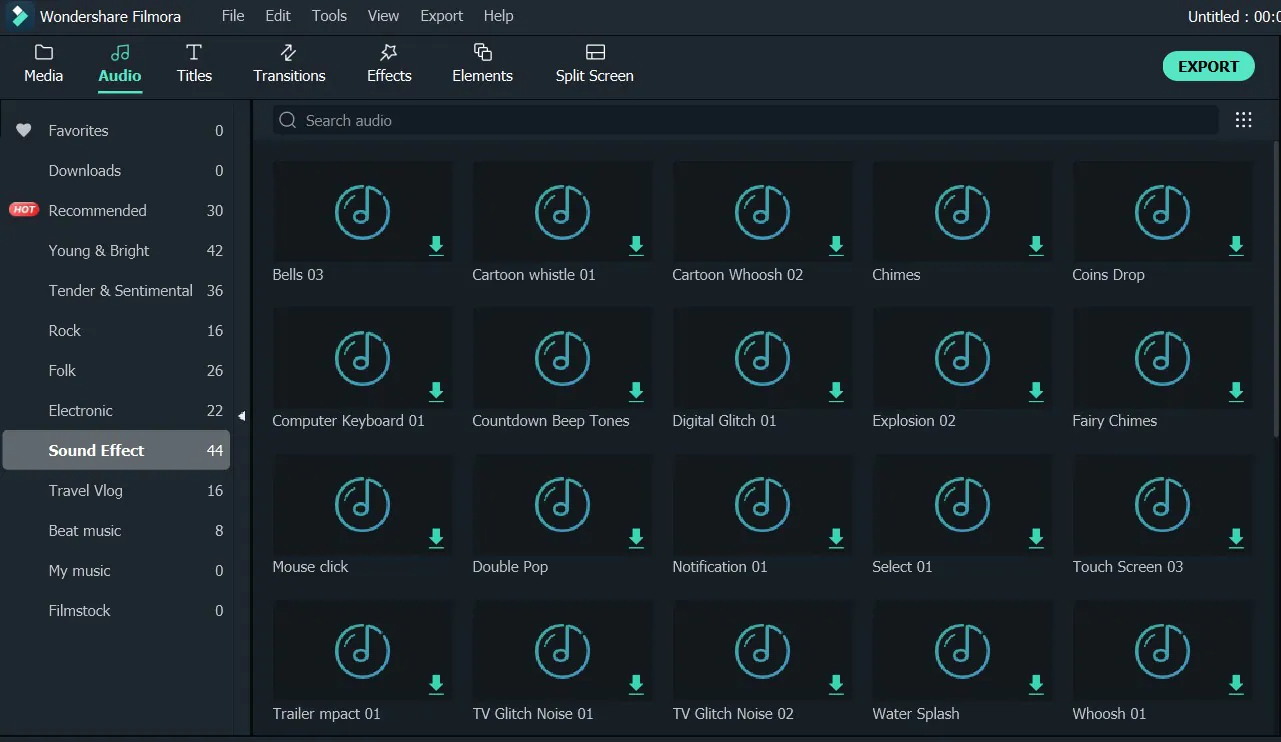
- Source your sound effects: There are various sources for sound effects, including online libraries, sample packs, and even recording your own sounds. Look for reputable sources that offer high-quality audio files in a format compatible with your Digital Audio Workstation (DAW).
Remember, the key is to choose sound effects that complement and enhance your music, rather than overpowering or distracting from it. Take your time during this step, as the right choice of sound effects can make a significant impact on the overall quality and appeal of your music.
Step 2: Set Up Your DAW
Now that you have selected your sound effects, it’s time to set up your Digital Audio Workstation (DAW) and prepare it for adding the effects. Here’s what you need to do:
- Choose your DAW: Select the DAW that best suits your needs and preferences. Popular DAWs include Ableton Live, Logic Pro, FL Studio, and Pro Tools. Each DAW has its own interface and features, so be sure to choose one that you are comfortable with.
- Create a new project: Open your DAW and create a new project. Set the project settings, such as sample rate, bit depth, and tempo, according to your project requirements. Ensure that your project settings match the settings of your sound effects files to avoid any audio compatibility issues.
- Set up audio tracks: Create audio tracks in your DAW to accommodate your sound effects. The number of tracks will depend on the number of sound effects you plan to use. Assign each track with a descriptive name to keep things organized.
- Set up a master track: Assign a master track to your project. This track will control the overall volume and effects of your entire mix, including the sound effects. You can apply mastering plugins to the master track later in the process to achieve a polished and cohesive sound.
- Arrange your workspace: Customize your DAW’s interface and arrange your tracks in a way that is convenient for you. This may include resizing track heights, color-coding, and grouping related tracks together.
Setting up your DAW properly will help you work efficiently and effectively when adding sound effects to your music. It will also ensure that you have a clean and organized workspace to navigate throughout your project.
Step 3: Import the Sound Effects
With your DAW set up, it’s time to import the sound effects into your project. This step is crucial as it allows you to access and manipulate the sound effects within your DAW. Here’s how to import the sound effects:
- Locate your sound effects files: If you have downloaded or recorded your own sound effects, make sure you know the file location on your computer. Organize the files in a folder to make them easily accessible.
- Import the sound effects: In your DAW, navigate to the place where you want to insert the sound effects. Most DAWs have a specific method for importing files, such as dragging and dropping or using the import function. Follow the instructions of your DAW to import the sound effects.
- Place the sound effects on the appropriate tracks: Once imported, drag and drop or place each sound effect onto the corresponding audio track. Make sure to align the sound effects with the desired timing within your project. You can use the playhead or grid within your DAW for accurate placement.
- Name and label the sound effects: To keep your project organized, it’s recommended to name and label each sound effect track accordingly. This will help you easily identify and find specific sound effects as you continue working on your project.
- Edit the sound effects: If needed, you can trim or edit the sound effects within your DAW. This allows you to remove any unwanted parts or adjust the length of the sound effects to better fit your music.
By importing the sound effects into your project, you gain full control over their placement and manipulation. This step sets the foundation for further refinement and integration of the sound effects with your music.
Step 4: Arrange the Sound Effects
Now that the sound effects are imported into your project, it’s time to arrange them in a way that enhances your music. The arrangement of the sound effects plays a crucial role in creating the desired impact and atmosphere. Follow these steps to effectively arrange your sound effects:
- Listen to your music: Familiarize yourself with your music and identify the sections where you want the sound effects to be prominent. These could be moments that require emphasis, transitions between sections, or specific cues in the composition.
- Experiment with placement: Drag and arrange the sound effects on the timeline to align them with the desired moments in your music. You can experiment with different placements to see what feels the most impactful and appropriate. Consider how the sound effects interact with the melody, rhythm, and overall flow of your music.
- Layering and overlapping: If you want to create a more dynamic and immersive experience, try layering multiple sound effects together. This can add depth and complexity to your sound. You can also overlap sound effects to create interesting textures and transitions between sections.
- Use automation: Experiment with automation to control the volume, panning, and other parameters of your sound effects. This allows you to create gradual or sudden changes for a more dramatic effect. For example, you can automate the volume of a sound effect to gradually fade in or out at specific moments.
- Create variation: Repeat sound effects strategically to reinforce certain parts of your music, but also introduce variation to maintain interest. You can modify the timing, pitch, or apply subtle effects to differentiate repeated instances of a sound effect.
- Consider the overall balance: Pay attention to the balance between your music and the sound effects. Ensure that the sound effects enhance the overall composition without overpowering the other elements. Adjust the volume levels and EQ settings of the sound effects to achieve the desired balance.
By arranging the sound effects effectively, you can create a seamless integration between your music and the added elements, elevating the overall impact and emotion of your composition.
Step 5: Adjust Volume and Panning
After arranging the sound effects in your project, it’s important to fine-tune the volume and panning settings to create a balanced and immersive sound. Properly adjusting the volume and panning of your sound effects will enhance their impact and integration with your music. Here’s how to do it:
- Individual volume adjustments: Listen to each sound effect individually and adjust its volume to ensure it blends well with your music. The volume should be loud enough to be heard and make an impact, but not overpowering or distracting. Use your ears as a guide and make subtle adjustments as needed.
- Relative volume of sound effects: Consider the relative importance of different sound effects in your composition. Some sound effects may need to be more prominent and upfront, while others may need to be more subtle and in the background. Adjust the volume levels accordingly to create a cohesive and balanced mix.
- Panning placement: Panning refers to the distribution of sound in the stereo field. Experiment with panning your sound effects to create a sense of space and depth. For example, you can pan a sound effect to the left or right to make it feel as if it’s coming from a specific direction. Use panning to create a sonic landscape that complements your music.
- Spatial placement: Consider the placement of sound effects within your mix. Think about where the sound effects should appear in the stereo field to enhance the overall experience. For instance, if you have a sound effect that represents something happening in the background, you might pan it slightly to one side or place it in the rear channels to create a sense of distance.
- Automation for movement: Use automation to create movement and dynamic changes in volume and panning. This can bring your sound effects to life and make them feel more interactive. Gradually automate the panning or volume of a sound effect to simulate it moving from one side of the stereo field to another, or increase the volume of a sound effect to emphasize a specific moment.
- Check for balance: Continuously listen to your mix and ensure that the sound effects blend well with your music. Pay attention to the overall balance of your composition and make any necessary adjustments to ensure the sound effects contribute harmoniously.
Adjusting the volume and panning of your sound effects will help create a cohesive and immersive listening experience. Take the time to fine-tune these settings, as they can greatly enhance the impact and effectiveness of your sound effects within your music.
Step 6: Apply Effects to Sound Effects
Once you have adjusted the volume and panning of your sound effects, you can further enhance their sonic qualities by applying effects. Effects can add depth, texture, and character to your sound effects, making them more captivating and immersive. Here’s how to apply effects to your sound effects:
- Equalization (EQ): Use EQ to shape the frequency response of your sound effects. For example, you can boost the low-end frequencies of an explosion sound effect to make it feel more impactful, or reduce the high frequencies of a bird chirping sound effect to make it blend better with your music. Experiment with different EQ settings to find the desired tonal balance.
- Reverb: Reverb adds ambience and spatial depth to your sound effects, making them feel more realistic and immersive. Consider applying reverb to sound effects that would benefit from a sense of space, such as footsteps or atmospheric textures. Adjust the reverb settings to match the environment or mood you want to create.
- Delay: Delay can be used to create echoes and repetitions in your sound effects, adding a sense of space and movement. Experiment with different delay settings to achieve the desired effect. This can be particularly effective for sound effects like swooshes or impacts.
- Modulation effects: Modulation effects such as chorus, flanger, and phaser can add movement and depth to your sound effects. These effects modify the sound by creating subtle variations in pitch, timing, and texture. Apply modulation effects to sound effects that would benefit from a more dynamic and fluid quality.
- Distortion and saturation: Distortion and saturation effects can add grit, warmth, and character to your sound effects. They can be useful for creating more aggressive or edgy sound effects, or for adding vintage or analog vibes to your compositions. Use these effects sparingly and adjust the settings to achieve the desired level of distortion.
- Experiment with other effects: Don’t limit yourself to the effects mentioned above. Explore other effects available in your DAW and experiment with them. Effects like pitch shifting, time stretching, granular synthesis, and more can offer unique and creative ways to transform and manipulate your sound effects.
Each sound effect may require different effects to achieve the desired result. Trust your ears and experiment with different combinations and settings to enhance and customize your sound effects to your liking. Remember, the goal is to enhance the impact and immersion of your sound effects within your music.
Step 7: Sync Sound Effects to Your Music
Syncing your sound effects to your music is a crucial step to ensure that they align perfectly with the desired moments and cues in your composition. By syncing the sound effects, you enhance their ability to emphasize certain elements, create transitions, and evoke specific emotions. Here’s how to sync your sound effects to your music:
- Employ visual cues: Use visual cues in your DAW, such as waveforms, markers, or a timeline, to pinpoint the exact moments where you want the sound effects to occur. This will help in aligning the sound effects with specific musical elements, such as drum hits or transitions.
- Utilize grid and snap functions: Most DAWs have grid and snap functions that allow you to align and snap sound effects to specific beats or measures. Enable these functions to ensure precise timing and synchronization. This is particularly useful when syncing sound effects to rhythmic elements in your music.
- Quantize and edit for accuracy: If your sound effects need further alignment, consider quantizing or editing their placement. Quantizing involves snapping the sound effects to the nearest beat or musical division, ensuring consistent timing within your composition. Editing allows you to make fine adjustments to the timing of the sound effects for more precise synchronization.
- Sync with visual elements: If you are working on a visual project, such as a film or video, syncing the sound effects with specific visual cues becomes essential. Pay attention to the timing of the visuals and ensure that your sound effects align perfectly with the corresponding actions or movements on the screen.
- Layer and blend sound effects: Layering multiple sound effects can help create a more immersive experience and add depth to your composition. Experiment with blending different sound effects and syncing them to different musical elements to enhance the overall impact and synchronization.
- Preview and make adjustments: Continuously play back your composition to preview how the sound effects sync with your music. Listen carefully and make any necessary adjustments to the timing or placement of the sound effects until they seamlessly integrate with your composition.
By taking the time to carefully sync your sound effects to your music, you ensure that they enhance and reinforce the desired moments, transitions, and emotions in your composition. This step adds a further layer of cohesion and impact to your overall project.
Step 8: Fine-Tune Sound Effects
Once you have synced your sound effects to your music, it’s time to fine-tune and polish them to ensure they blend seamlessly and create the desired impact. Fine-tuning your sound effects allows you to address any potential issues, enhance their overall quality, and make them stand out in your composition. Here’s how to fine-tune your sound effects:
- Listen critically: Take a focused and critical listen to your sound effects within the context of your composition. Pay attention to their tonal balance, clarity, and overall presence. Identify any areas that may require adjustments or improvements.
- Address frequency conflicts: If your sound effects are clashing with other elements in your mix, such as vocals or instruments, use EQ to carve out space for each element to coexist. Adjust the EQ of your sound effects to prevent frequency conflicts and ensure they cohesively blend with the other elements of your composition.
- Refine dynamics: Adjust the dynamics of your sound effects to ensure they have the desired impact. Use volume automation or compression to even out any inconsistencies in volume and make the sound effects more consistent and controlled. This will help them sit well within the mix and maintain a cohesive dynamic range.
- Clean up unwanted noise: Check for any unwanted noise or artifacts in your sound effects. If you notice clicks, pops, or background noise, consider using noise reduction tools or editing techniques to clean them up. This will ensure that your sound effects sound clean and professional.
- Add subtle effects: Experiment with subtle effects to enhance the character and depth of your sound effects. Consider adding subtle reverb or delay to create a sense of space, or use subtle modulation effects like chorus or flanger to add movement and interest to certain sound effects. Be mindful not to overdo it and maintain the balance between enhancing the sound effects and maintaining their naturalness.
- Automate parameters: Use automation to further enhance the expressiveness and impact of your sound effects. Automate parameters such as filter cutoff, modulation settings, or effect parameters to create dynamic and evolving sound effects that capture the listener’s attention.
- Compare with reference tracks: A/B comparison with professional tracks or reference material can help you evaluate the quality and impact of your sound effects objectively. Compare the tonal balance, dynamics, and overall presence of your sound effects to those in well-mixed and mastered tracks, and make adjustments as needed.
- Continuously listen and make adjustments: As you make these fine-tuning adjustments, continuously listen to your composition to assess their impact. Trust your ears and make any necessary tweaks to achieve the desired sound and impact you have in mind.
Fine-tuning your sound effects enables you to refine their quality, presence, and impact in your composition. It allows you to create a more polished and professional sound that enhances the overall engagement and emotional connection with your audience.
Step 9: Export Your Final Mix with Sound Effects
Once you are satisfied with the arrangement, synchronization, and fine-tuning of your sound effects, it’s time to export your final mix. Exporting your final mix ensures that your composition, including the added sound effects, can be shared, distributed, and enjoyed by others. Here’s how to export your final mix with sound effects:
- Set the export settings: In your DAW, locate the export or render function and access the export settings. Choose the desired file format, quality, and resolution for your final mix. Opt for a high-quality format like WAV or FLAC for the best audio fidelity.
- Choose the export range: Select the range you want to export. You can export the entire composition or choose a specific section if desired. Make sure to include the sections where the sound effects are prominent and essential to the overall listening experience.
- Check the levels: Before exporting, double-check the levels of your master track to ensure they are not clipping or distorting. Adjust the master volume if needed, ensuring a healthy and clean output without any unwanted artifacts.
- Disable any unnecessary processing: If you have applied any mastering plugins or processing on your master track, consider bypassing or removing them before exporting. This ensures that the exported mix retains the integrity of your sound effects without any additional processing altering their characteristics.
- Export the mix: Hit the export or render button to start the exporting process. Choose a destination folder on your computer where the exported mix will be saved. Wait for the export to finish, which may take a few moments depending on the length and complexity of your composition.
- Listen to the exported mix: Once the export is complete, take some time to listen to the exported mix to ensure that the sound effects are still aligned correctly and that the overall mix sounds as you intended. Make any final adjustments if necessary.
- Save a backup copy: It’s always a good practice to save a backup copy of your exported mix, especially if you plan on making further edits or modifications in the future. This ensures that you have a safe and unaltered version to refer back to if needed.
Exporting your final mix with sound effects is the last step in the process. It allows you to share your composition with others, showcase your creative work, or use it in various media platforms such as films, podcasts, or online streaming.
Remember, the export process finalizes your composition, so ensure that you are completely satisfied with the arrangement, synchronization, and overall quality of your sound effects before exporting. Enjoy the satisfaction of sharing your music and sound effects with the world!
Conclusion
Adding sound effects to your music can elevate your compositions to new heights, creating immersive and engaging experiences for your listeners. By following the step-by-step process outlined in this article, you can seamlessly incorporate sound effects into your music and enhance its impact, atmosphere, and emotional connection.
From choosing the right sound effects to syncing them with your music and fine-tuning their qualities, each step plays a crucial role in crafting a professional and polished final mix. Take the time to experiment, be creative, and trust your ears throughout the process. Remember to maintain a balance between the sound effects and the other elements of your composition, ensuring that they enhance and complement your music rather than overpowering it.
Whether you are creating a cinematic soundtrack, producing electronic music, or working on a multimedia project, sound effects have the power to bring your vision to life and captivate your audience. Embrace the creative possibilities that sound effects offer, and don’t be afraid to push boundaries and explore new techniques.
As you embark on your sound effects journey, remember to have fun and enjoy the process. With practice and experimentation, you’ll develop a keen ear for incorporating sound effects seamlessly into your music. So, immerse yourself in the world of sound effects and watch as your compositions come alive in ways you never thought possible.