Home>Production & Technology>Sound Effects>How To Add Sound Effects To Morphvox Pro
Sound Effects
How To Add Sound Effects To Morphvox Pro
Published: November 9, 2023
Learn how to enhance your voice effects with Morphvox Pro by adding various sound effects to your audio recordings. Boost your creativity and transform your voice with ease.
(Many of the links in this article redirect to a specific reviewed product. Your purchase of these products through affiliate links helps to generate commission for AudioLover.com, at no extra cost. Learn more)
Table of Contents
- Introduction
- Step 1: Installing Morphvox Pro Software
- Step 2: Downloading Sound Effects
- Step 3: Importing Sound Effects into Morphvox Pro
- Step 4: Configuring Sound Effects Settings
- Step 5: Applying Sound Effects to Your Voice
- Step 6: Adjusting Sound Effects Parameters
- Step 7: Saving and Exporting Your Modified Voice with Sound Effects
- Conclusion
Introduction
Adding sound effects to audio is a powerful way to enhance your recordings, whether you’re working on a podcast, video game, or film project. Sound effects can bring scenes to life, make dialogues more engaging, and create a more immersive experience for the audience.
In this article, we will explore how to add sound effects to Morphvox Pro, a popular software used for voice modification and communication. Whether you’re a content creator, voice actor, or just someone looking to have some fun with your voice, Morphvox Pro provides a user-friendly interface and a wide range of sound effects options to choose from.
By following the steps outlined in this guide, you will be able to import, apply, and customize sound effects in Morphvox Pro, taking your vocal performances to a whole new level. So let’s dive in and discover how you can unleash your creativity and create stunning audio with sound effects in Morphvox Pro!
Step 1: Installing Morphvox Pro Software
The first step in adding sound effects to Morphvox Pro is to install the software on your computer. Morphvox Pro is compatible with both Windows and Mac operating systems, making it accessible to a wide range of users.
To begin, visit the official website of Morphvox Pro and navigate to the download page. Ensure that you are on the correct version for your operating system, and click on the download button to start the installation process.
Once the download is complete, locate the installer file on your computer and double-click on it to initiate the installation. Follow the on-screen instructions, and choose the desired installation location for the software.
After the installation is complete, you can launch Morphvox Pro from the desktop shortcut or from the Start menu. Upon opening the software for the first time, you might be prompted to register or activate your license. Follow the provided instructions to complete the registration process and gain full access to Morphvox Pro’s features.
It’s worth noting that Morphvox Pro offers a free trial version, allowing you to explore the software and its functionalities before committing to purchasing the full version. Take advantage of this trial period to familiarize yourself with the software and determine if it meets your needs.
With Morphvox Pro successfully installed on your computer, you’re now ready to move on to the next step: downloading sound effects to enhance your vocal recordings.
Step 2: Downloading Sound Effects
To add sound effects to your Morphvox Pro library, you’ll need to download the desired effects from reputable sources. There are several websites and online repositories that offer a wide range of sound effects, both free and paid.
Start by searching for sound effect libraries that suit your needs. Look for websites that provide high-quality audio files in various categories such as nature, animals, machinery, sci-fi, and more. Some popular websites for downloading sound effects include Freesound, SoundBible, and ZapSplat.
Once you’ve found a reliable source, browse through the available sound effects and select the ones you want to download. Most sound effects websites provide a preview or description of each file, allowing you to listen to a sample before downloading.
Choose sound effects that complement your project and add the desired atmosphere or emotion. Whether you’re looking for realistic background sounds or fantastical elements, there’s a vast selection of options to explore.
After making your selections, click on the download button for each sound effect. Depending on the website, you may be prompted to choose a file format. It’s recommended to select a format that is compatible with Morphvox Pro, such as WAV or MP3.
Save the downloaded sound effects to a designated folder on your computer. It’s a good practice to create a dedicated directory for your sound effects library for easy access and organization.
Remember, while downloading sound effects from free sources is tempting, be mindful of licensing restrictions. Ensure that the sound effects you download are copyright-free or properly licensed for your intended use.
With your sound effects library now stored on your computer, you’re ready to proceed to the next step: importing the sound effects into Morphvox Pro.
Step 3: Importing Sound Effects into Morphvox Pro
Now that you have your collection of sound effects ready, it’s time to import them into Morphvox Pro. Follow these steps to seamlessly integrate your downloaded sound effects into the software:
- Launch Morphvox Pro on your computer.
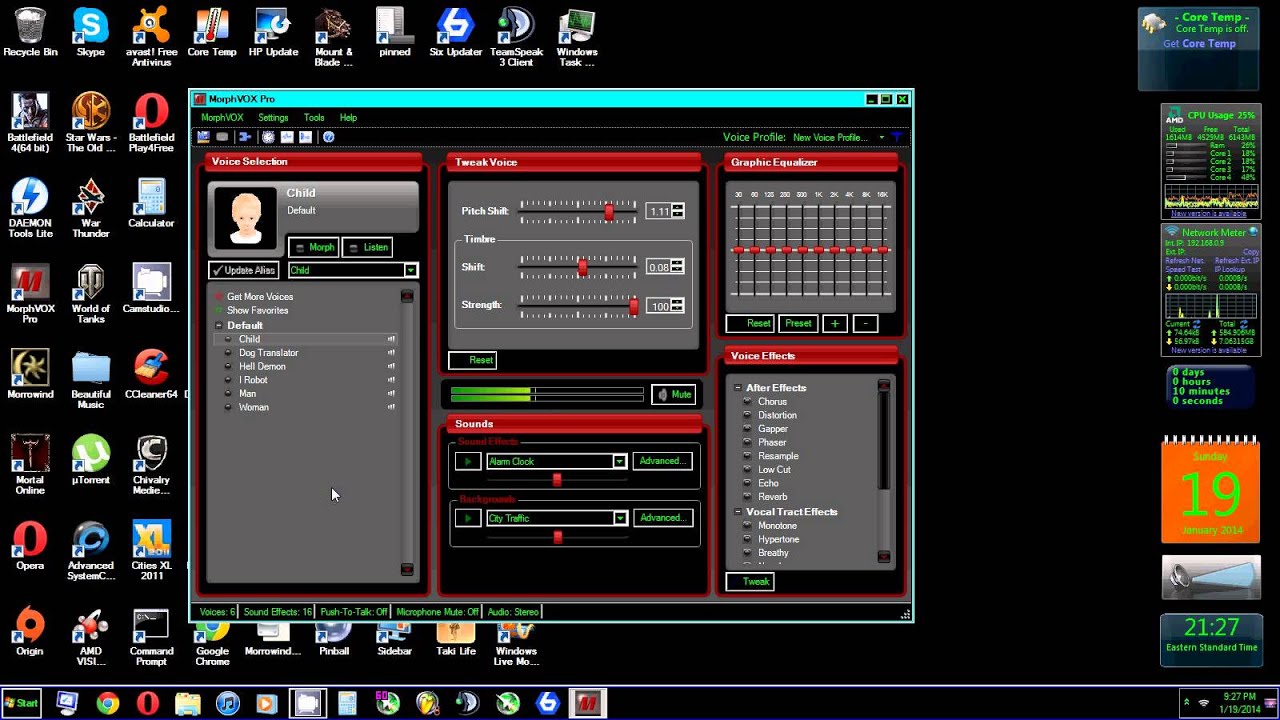
- In the Morphvox Pro interface, look for the “Sound Effects” tab or menu. It is usually located in the main toolbar.
- Click on the “Sound Effects” tab to open the sound effects menu.
- Within the sound effects menu, you’ll find various options and settings. Look for the “Add” or “Import” button and click on it.
- A file explorer window will appear, allowing you to navigate to the folder where your downloaded sound effects are stored.
- Select the sound effects you want to import. You can choose multiple files at once by holding the Ctrl key (or Command key on Mac) while selecting.
- Click on “Open” to import the selected sound effects into Morphvox Pro.
Once imported, the sound effects will be added to your Morphvox Pro library, ready to be applied to your voice recordings. You can organize your sound effects by creating folders or categories within the library, making it easier to locate and access them in the future.
It’s important to note that Morphvox Pro supports various file formats such as WAV, MP3, and OGG. However, it’s recommended to use uncompressed or lossless audio formats like WAV for the best sound quality.
Now that you have successfully imported your sound effects into Morphvox Pro, let’s move on to the next step: configuring the sound effects settings to achieve the desired audio effects.
Step 4: Configuring Sound Effects Settings
After importing your desired sound effects into Morphvox Pro, the next step is to configure the sound effects settings to achieve the desired audio effects. Follow these steps to customize the sound effects according to your preferences:
- Open Morphvox Pro and make sure you are in the “Sound Effects” tab or menu.
- In the sound effects menu, you will see a list of imported sound effects. Select the one you wish to configure.
- Click on the selected sound effect to open its settings panel.
- In the settings panel, you will find various parameters to adjust and fine-tune the sound effect. These parameters may include volume, pitch, echo, reverb, and more. Experiment with different values to achieve the desired effect.
- Some sound effects may have additional settings specific to their nature. For example, a rain sound effect may have settings to control the intensity or frequency of the raindrops. Explore these options to further customize the sound effect.
- Take your time to play around with the settings and listen to the changes in real-time. This will help you find the perfect combination of parameters and create the desired audio effect for your voice recordings.
- Once you are satisfied with the sound effect settings, click on the “Apply” or “Save” button to save the changes.
It’s worth noting that Morphvox Pro allows you to apply multiple sound effects at once, creating layered and complex audio effects. You can mix and match different effects to achieve unique and captivating vocal performances.
Remember to experiment and have fun with the settings. Don’t be afraid to try different combinations and explore the possibilities. The more familiar you become with the sound effects settings, the more creative and versatile you can be with your voice recordings.
With the sound effects settings configured to your liking, it’s time to move on to the next step: applying the sound effects to your voice.
Step 5: Applying Sound Effects to Your Voice
Now that you have imported and configured your desired sound effects in Morphvox Pro, it’s time to apply them to your voice recordings. Follow these steps to add sound effects to your voice:
- In Morphvox Pro, navigate to the main toolbar and locate the “Voice” tab or menu.
- Click on the “Voice” tab to access the voice settings.
- In the voice settings, look for the “Effects” or “Sound Effects” section.
- Within the effects section, you will find a list of available sound effects. Select the one you want to apply to your voice.
- As you select a sound effect, you will notice that your voice is instantly modified to reflect the chosen effect.
- Experiment with different sound effects and listen to the changes in real-time to find the perfect match for your project.
- In addition to selecting a single sound effect, you can also apply multiple effects simultaneously to create layered and dynamic vocal performances.
- Play around with the order of the effects to achieve the desired impact. The order of the effects can significantly alter the final result.
- Once you are satisfied with the applied sound effects, proceed with recording your voice or use Morphvox Pro in real-time communication applications.
It’s important to note that sound effects applied to your voice can greatly enhance the overall audio experience. They can give your voice a different character, create a sense of environment, or add a touch of uniqueness to your recordings.
Remember to monitor your audio levels while applying sound effects to ensure a balanced mix and prevent clipping or distortion. Adjust the volume levels of the sound effects and your voice accordingly to maintain clarity and intelligibility.
With sound effects seamlessly integrated into your voice recordings, you are now ready to move on to the next step: adjusting sound effects parameters for further customization.
Step 6: Adjusting Sound Effects Parameters
After applying sound effects to your voice in Morphvox Pro, you have the option to further customize and fine-tune their parameters. This allows you to achieve precisely the desired audio effect. Follow these steps to adjust sound effects parameters:
- In Morphvox Pro, navigate to the “Effects” or “Sound Effects” section in the voice settings.
- Within the effects section, select the sound effect you want to adjust.
- Look for the parameters associated with the selected sound effect. These parameters may include options such as pitch, speed, resonance, and more.
- Experiment with different parameter values to achieve the desired effect. For example, adjusting the pitch parameter can make your voice sound deeper or higher.
- Take advantage of real-time previewing to hear the changes as you modify the parameters. This will help you fine-tune the sound effects to match your vision.
- Feel free to combine and modify multiple parameters to create unique and customized sound effects for your voice.
- Take note of the default settings for each sound effect, as they can act as a starting point for your adjustments.
- Keep in mind that the optimal parameter values may vary depending on your specific recording project and personal preferences. Trust your ears and experiment until you achieve the desired result.
- Once you are satisfied with the parameter adjustments, click on the “Apply” or “Save” button to save the changes.
By adjusting sound effects parameters, you can add depth, character, and realism to your voice recordings. You have the freedom to create unique audio effects that suit your project’s requirements and reflect your creative vision.
Remember to strike a balance between the sound effects and your original voice to ensure clarity and intelligibility. Test your recordings by listening to them and make any necessary adjustments to the parameters before finalizing your audio.
With your sound effects parameters fine-tuned to perfection, it’s time to proceed to the final step: saving and exporting your modified voice with sound effects.
Step 7: Saving and Exporting Your Modified Voice with Sound Effects
After applying and adjusting sound effects to your voice in Morphvox Pro, it’s important to save and export your modified voice recordings to use in your projects. Follow these steps to save and export your modified voice with sound effects:
- In Morphvox Pro, ensure that you have your desired sound effects applied and adjusted to your liking.
- Click on the “File” or “Export” option in the main toolbar to access the saving and exporting settings.
- Choose a location on your computer where you want to save the modified voice recording.
- Select the desired file format for your export. Common options include WAV, MP3, or OGG, depending on your preference and compatibility requirements.
- Specify any additional settings or options such as the audio quality or bit rate. Higher quality settings will result in larger file sizes but better audio fidelity.
- Enter a suitable file name for your modified voice recording and click on the “Save” or “Export” button to initiate the exporting process.
- Wait for the export process to complete. The time required will depend on the duration of your recording and the selected file format.
- Once the export is finished, navigate to the specified location on your computer to find the exported modified voice recording.
With the modified voice recording exported, you can now use it in your desired projects. Whether you’re creating a podcast, video game, or any other type of audiovisual content, the modified voice with sound effects will enhance the overall quality and engage your audience.
Remember to keep a backup of your modified voice recordings in case you need to access them in the future or make any further modifications. This way, you can have peace of mind knowing that your work is safely stored and readily available.
With the final step completed, you have successfully saved and exported your modified voice with sound effects from Morphvox Pro. Congratulations! Now you can take your creative projects to the next level with professional-quality audio effects.
Conclusion
Adding sound effects to your voice recordings can bring a new dimension of creativity and immersion to your projects. With Morphvox Pro, you have the power to transform your voice and create captivating audio experiences.
In this article, we covered the step-by-step process of adding sound effects to Morphvox Pro. We started with installing the software and downloading sound effects from reputable sources. Then, we learned how to import the sound effects into Morphvox Pro and configure the settings to achieve the desired audio effects. We explored how to apply the sound effects to our voice recordings and adjust the parameters for further customization. Finally, we discussed the importance of saving and exporting our modified voice recordings for use in various projects.
By following these steps and experimenting with different sound effects and settings, you can unlock endless possibilities for expressing your creativity and enhancing your vocal performances. Whether you’re a content creator, voice actor, or simply someone looking to have fun with your voice, Morphvox Pro offers a user-friendly interface and a vast library of sound effects to cater to your needs.
Remember to regularly explore new sound effects and experiment with different combinations to keep your audio fresh and exciting. Stay updated with the latest trends in sound design and let your imagination run wild.
So, go ahead and unleash your voice with Morphvox Pro and its sound effects. Let your recordings come alive, capture your audience’s attention, and immerse them in the captivating world you create through the power of sound effects.