Home>Production & Technology>Background Music>How To Lower Volume Of Background Music In IMovie
Background Music
How To Lower Volume Of Background Music In IMovie
Modified: January 22, 2024
Learn how to easily lower the volume of background music in iMovie with this step-by-step guide. Enhance your videos by adjusting the audio levels.
(Many of the links in this article redirect to a specific reviewed product. Your purchase of these products through affiliate links helps to generate commission for AudioLover.com, at no extra cost. Learn more)
Table of Contents
- Introduction
- Step 1: Importing Background Music into iMovie
- Step 2: Adjusting the Volume of the Background Music
- Step 3: Splitting the Audio Clip
- Step 4: Lowering the Volume of the Background Music
- Step 5: Previewing and Fine-tuning the Audio Levels
- Step 6: Exporting the Final Video with Lower Volume Background Music
- Conclusion
Introduction
Welcome to our guide on how to lower the volume of background music in iMovie. Whether you’re creating a professional video, a personal project, or even a school presentation, having the right balance of audio is crucial. Background music can add depth and emotion to your videos, but sometimes it can overpower other elements or distract from the main content. That’s why knowing how to adjust the volume of the background music is essential.
iMovie is a popular video editing software that offers a range of tools and features, including the ability to customize audio settings. In this tutorial, we’ll walk you through the step-by-step process of lowering the volume of background music in iMovie. By following these instructions, you’ll be able to create a seamless audio experience that enhances your videos without overpowering the main audio or dialogue.
Before we dive into the tutorial, it’s important to note that iMovie is available for Mac and iOS devices. If you’re using a different video editing software or platform, the specific steps may vary. However, the general concept of adjusting audio levels should still apply, so you can adapt these techniques to your preferred software.
We understand that not everyone is a video editing expert, which is why we’ve broken down the process into simple, easy-to-follow steps. Even if you’re a beginner, you’ll be able to navigate iMovie’s interface and make the necessary adjustments to lower the volume of your background music.
Now, let’s get started with Step 1: Importing Background Music into iMovie.
Step 1: Importing Background Music into iMovie
Before you can begin adjusting the volume of your background music, you’ll need to import it into iMovie. Here’s how to do it:
- Launch iMovie on your Mac or iOS device to open a new or existing project.
- In the iMovie interface, locate the Media Library, usually found in the top center of the screen. Click on the “Music and Sound Effects” option.
- A media browser will appear, displaying various options for music and sound effects. You can choose from pre-installed options, or import your own music by clicking on the “Import Media” button.
- Navigate to the location on your computer or device where your background music file is stored. Select the file and click “Import Selected” to add it to your iMovie project.
Once you’ve successfully imported your background music, it will appear in the Media Library alongside other audio and sound effects options. iMovie supports a variety of audio file formats, including MP3, WAV, and AIFF, so you can use your preferred format for the background music.
Remember to choose background music that complements your video’s theme and overall tone. It should enhance the visuals without overpowering them, creating a harmonious viewing experience for your audience.
Now that your background music is imported into iMovie, you’re ready to move on to the next step: adjusting the volume.
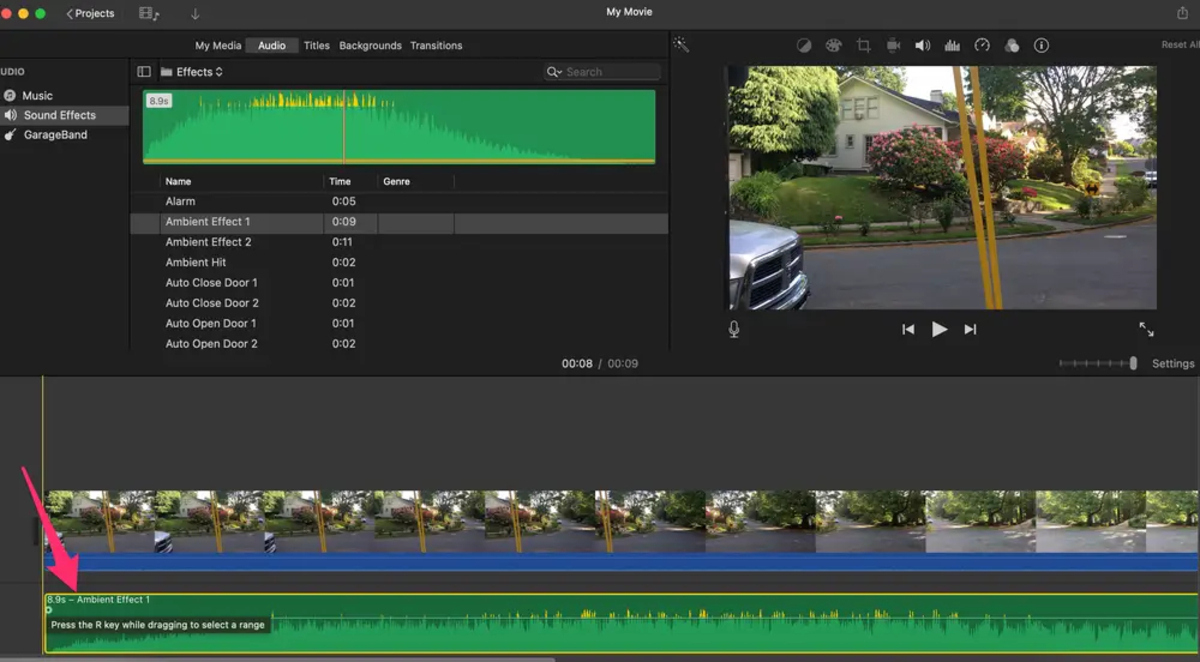
Step 2: Adjusting the Volume of the Background Music
Once you have imported your background music into iMovie, it’s time to adjust its volume levels. Here’s how you can do it:
- Select the background music clip in the timeline by clicking on it.
- In the menu bar at the top of the screen, click on the “Audio” tab.
- A drop-down menu will appear, showing various audio settings. Locate the “Volume” option and click on it.
- By default, the volume slider will be set at 100%. You can lower the volume by moving the slider to the left.
- As you adjust the volume, you can preview the changes in real-time by playing the video or using the playhead to scrub through the timeline.
- Continue adjusting the volume until it reaches the desired level. Make sure the background music is audible but not overpowering other audio elements or dialogue.
iMovie provides you with precise control over the volume levels of your background music. If you wish to fine-tune the volume at specific points in the timeline, you can split the audio clip into smaller segments.
In the next step, we’ll explore how to split the background music clip to have more control over the volume adjustments.
Step 3: Splitting the Audio Clip
To have more control over the volume adjustments of your background music in iMovie, it can be helpful to split the audio clip into smaller segments. This allows you to apply different volume settings to different sections of the video. Follow these steps to split the audio clip:
- Select the background music clip in the timeline by clicking on it.
- Move the playhead to the point where you want to split the audio clip. This can be done by scrubbing through the timeline or using the playback controls.
- In the menu bar at the top of the screen, navigate to the “Modify” tab and click on the “Split Clip” option. This will divide the audio clip into two separate segments at the selected point.
- Repeat the process if you want to split the clip further into more segments.
By splitting the audio clip, you can now independently adjust the volume levels of each segment. This can be particularly useful if you have different sections of your video that require varying audio intensities or if you want to fade the background music in or out at specific points.
Now that you have split the background music into manageable segments, we can move on to the next step: lowering the volume of the background music.
Step 4: Lowering the Volume of the Background Music
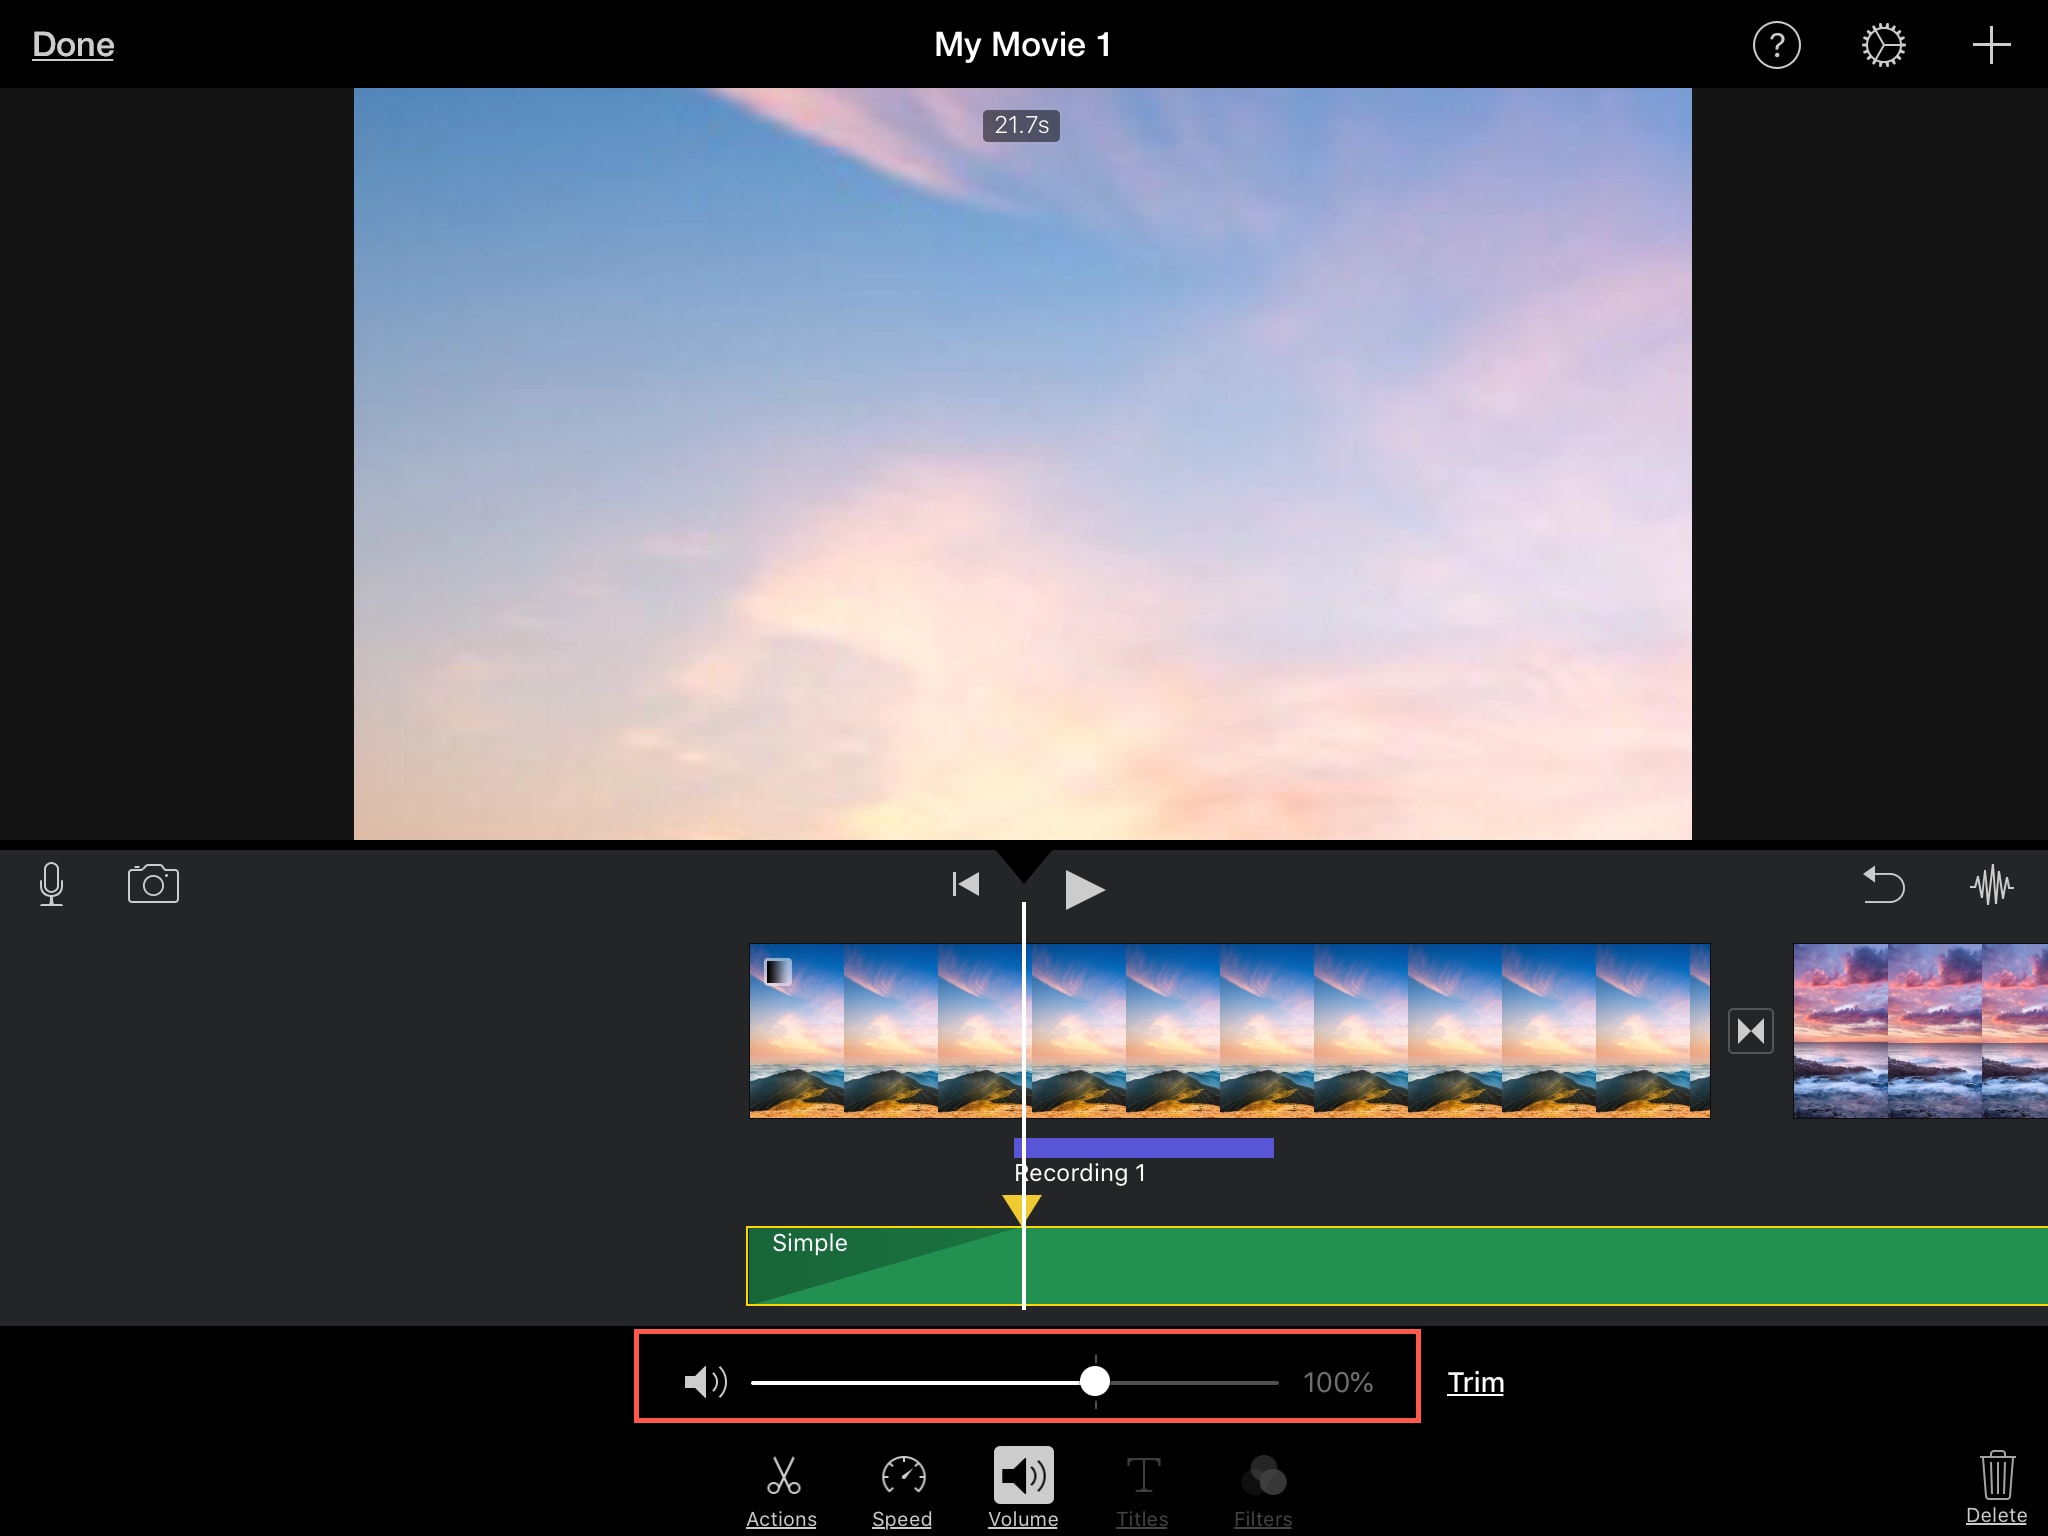
Now that you have split your background music into segments, it’s time to lower the volume of each segment to achieve the desired audio balance. Follow these steps to lower the volume of the background music in iMovie:
- Select the segment of the background music clip that you want to adjust by clicking on it in the timeline.
- In the menu bar at the top of the screen, navigate to the “Audio” tab and click on the “Volume” option.
- A volume slider will appear. Drag the slider to the left to decrease the volume of the selected segment.
- Repeat the process for each segment of the background music clip, adjusting the volume levels according to your preferences.
By individually adjusting the volume of each segment, you can create a dynamic audio experience that complements your video content. You can have louder segments during intense or impactful scenes and lower volume segments for quieter or dialogue-focused moments.
Remember to maintain a balance between the background music and other audio elements in your video. The goal is to enhance the overall viewing experience by ensuring that the background music doesn’t overpower the main content.
Once you have successfully adjusted the volume of each segment, it’s time to preview and fine-tune the audio levels.
Step 5: Previewing and Fine-tuning the Audio Levels
After adjusting the volume of the background music segments in iMovie, it’s crucial to preview and fine-tune the audio levels to ensure a seamless and balanced audio experience. Follow these steps to preview and make any necessary adjustments:
- Play your video from the beginning or scrub through the timeline to the sections where the background music is playing.
- Listen carefully to the audio levels of the background music in relation to the other audio elements such as dialogue or sound effects.
- If you find any sections where the background music is too loud or overpowering, select the specific segment and adjust its volume accordingly by following the steps mentioned in Step 4.
- Continue previewing and fine-tuning the audio levels throughout the video until you achieve a well-balanced and cohesive audio mix.
During the previewing process, it can be helpful to wear headphones or test your video on different devices to ensure the audio levels translate well across different playback platforms. This will help you to capture any potential issues and make the necessary adjustments for optimal sound quality.
Remember that the goal is to create a pleasant and immersive audio experience that enhances your video content without distracting or overpowering it.
Once you are satisfied with the audio levels, it’s time to move on to the final step: exporting the video with the lowered volume background music.
Step 6: Exporting the Final Video with Lower Volume Background Music
Now that you have successfully adjusted the volume of the background music and fine-tuned the audio levels in iMovie, it’s time to export your final video. Here’s how you can do it:
- In the iMovie interface, navigate to the menu bar at the top of the screen and click on the “File” tab.
- From the drop-down menu, select the “Share” option.
- A sub-menu will appear with various sharing options. Choose the format in which you want to export your video. iMovie offers a range of options such as “File,” “YouTube,” or “Vimeo.”
- Name your video file and choose the destination folder where you want to save it.
- Click on the “Next” button and wait for the exporting process to complete. The time it takes to export the video will depend on the length and complexity of your project.
- Once the video export is complete, you can locate the exported file in the destination folder you specified.
Before finalizing the export, it’s important to double-check the audio levels and ensure that the background music maintains its intended volume throughout the exported video. You can do this by playing the exported file and listening to it carefully.
If you notice any issues with the audio levels or the overall quality of the exported video, you can go back to iMovie, make the necessary adjustments, and re-export the video.
Now that you have successfully exported the final video with the lowered volume background music, you can share it with your audience, upload it to your desired platform, or use it for any other purpose you intended.
Congratulations! You have now learned how to lower the volume of background music in iMovie, creating a well-balanced audio experience that enhances your videos. With this knowledge, you can confidently edit your videos to ensure that the background music complements and enhances your content without overpowering it.
Remember to experiment with different volume settings and trust your creative instincts to achieve the desired results. Happy editing!
Conclusion
In conclusion, adjusting the volume of background music in iMovie is essential for creating well-balanced, professional-looking videos. By following the step-by-step guide in this article, you have learned how to import background music, adjust the volume levels, split the audio clip, and fine-tune the audio levels.
Remember, the key is to maintain a balance between the background music and other audio elements in your video. The background music should enhance the overall viewing experience without overpowering the main content or dialogue.
Throughout the process, take the time to preview your video and listen to the audio levels. This will allow you to make necessary adjustments and ensure that the sound quality translates well across different playback platforms.
iMovie offers a range of options for customizing audio settings, including volume control, audio splitting, and fine-tuning capabilities. These features provide you with the flexibility to create dynamic videos with a seamless audio experience.
By applying the techniques outlined in this guide, you can confidently lower the volume of background music in iMovie and create professional-quality videos that captivate and engage your audience.
So, go ahead and unleash your creativity. Experiment with different volume settings, try out various background music tracks, and have fun editing your videos to perfection!