Home>Production & Technology>Stereo>How To Make FM Antenna For Stereo Receiver
Stereo
How To Make FM Antenna For Stereo Receiver
Modified: January 22, 2024
Learn how to make an FM antenna for your stereo receiver and enhance your audio experience. Discover step-by-step instructions to optimize your stereo's reception.
(Many of the links in this article redirect to a specific reviewed product. Your purchase of these products through affiliate links helps to generate commission for AudioLover.com, at no extra cost. Learn more)
Table of Contents
Introduction
Welcome to the world of stereo receivers, where the quality of sound can transport you to a different dimension. Whether you’re a music enthusiast or an avid radio listener, having a reliable FM antenna for your stereo receiver is crucial in capturing clear and uninterrupted signals. A well-built FM antenna can significantly enhance the reception and improve the overall audio experience.
In this article, we will guide you through the process of building your own FM antenna for your stereo receiver. Don’t worry if you don’t have any technical experience – we’ll break down the steps in a simple and easy-to-understand manner. By the end of this article, you’ll have a functional FM antenna that will ensure optimal signal reception and clear sound.
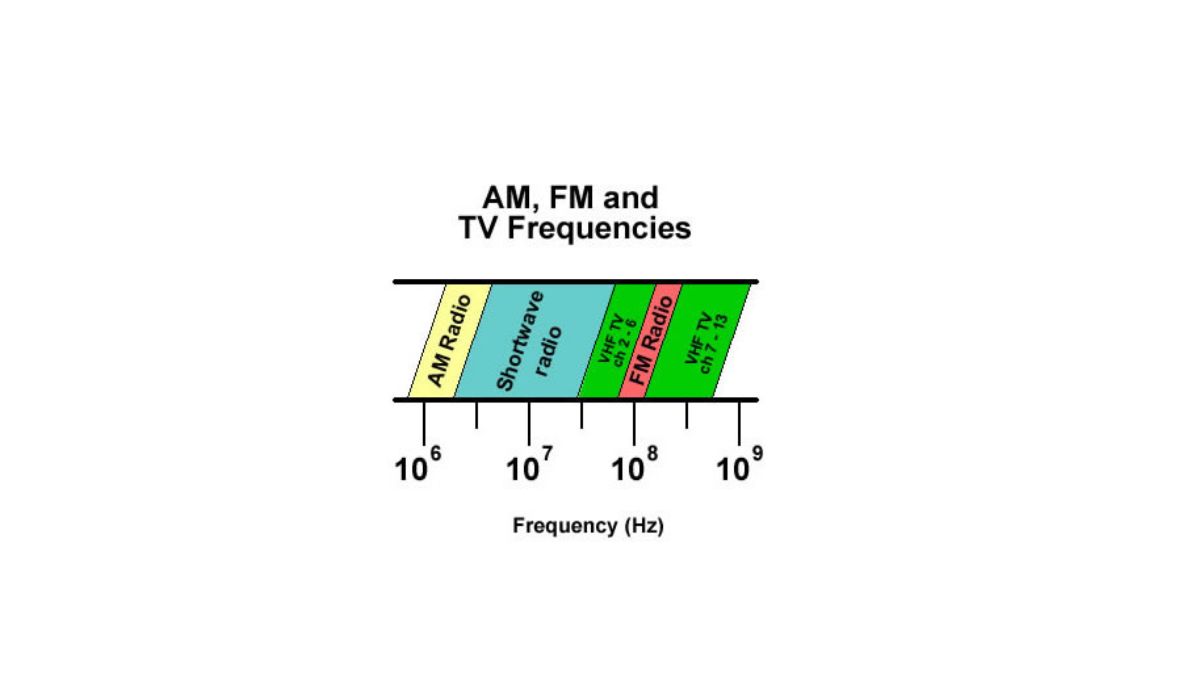
Before we dive into the details of building an FM antenna, let’s take a moment to understand how these antennas work. FM antennas are designed to capture electromagnetic signals transmitted by radio broadcasting stations. These signals are then amplified and converted into audio signals by the stereo receiver, allowing you to enjoy your favorite radio stations in high fidelity.
To build your own FM antenna, you’ll need a few essential materials and tools. Don’t worry, they are readily available and won’t break the bank. We’ll list them out for you in the next section so you can gather everything you need before getting started.
Understanding the Function of an FM Antenna
Before we dive into the process of building an FM antenna, it’s important to understand its function and why it’s a crucial component of your stereo receiver setup. An FM antenna is responsible for capturing radio frequency signals sent out by broadcasting stations and converting them into audio signals that can be amplified and heard through your stereo system.
The primary goal of an FM antenna is to receive these signals with optimal strength and clarity. Without a high-quality antenna, your stereo receiver may struggle to pick up weak or distant stations, resulting in poor signal reception and a degraded listening experience.
FM antennas work on the principle of electromagnetic induction. When a radio signal is transmitted by a broadcasting station, it creates an electromagnetic field in the surrounding area. The FM antenna, with its long wire or metal rod, acts as a receiver for this electromagnetic field. As the electromagnetic waves pass through the antenna, they induce an electrical current in the wire or rod. This current is then sent to the receiver, where it is amplified and converted into audio signals for playback.
It’s important to note that the design and construction of an FM antenna can significantly impact its performance. Factors such as the length and positioning of the antenna, as well as the materials used, can affect signal reception. A well-built FM antenna will provide better signal strength and reduce interference from other electronic devices.
When building your own FM antenna, it’s essential to consider the specific requirements of your location. Factors such as the distance from broadcasting stations, obstructions like buildings or trees, and the local terrain can influence signal strength. By understanding these factors, you can customize your antenna’s design to optimize signal reception based on your unique circumstances.
Now that you have a solid understanding of how an FM antenna works, let’s move on to the materials and tools you’ll need to build one for your stereo receiver.
Materials and Tools Needed
Building your own FM antenna for your stereo receiver doesn’t require fancy or expensive materials. In fact, you’ll find that most of the items needed can be easily obtained from hardware stores or even repurposed from household items. Here’s a list of the materials and tools you’ll need:
Materials:
- Coaxial cable (length will depend on your setup)
- Balun transformer
- Copper wire (16-18 gauge)
- Insulated wire (22-24 gauge)
- Wooden board or PVC pipe
- Screws and nails
Tools:
- Wire cutter/stripper
- Drill and drill bits
- Screwdriver
- Measuring tape or ruler
- Soldering iron and solder
These materials and tools will provide you with everything you need to construct a basic FM antenna. However, feel free to make modifications based on your specific requirements or creative ideas. Now that you have all the necessary components, let’s move on to the next section where we’ll guide you through the process of building the FM antenna.
Building the FM Antenna
Now that you have gathered all the materials and tools, it’s time to start building your FM antenna for your stereo receiver. Follow these step-by-step instructions to ensure a successful construction:
Step 1: Prepare the Base
Decide whether you want to mount your antenna on a wooden board or a PVC pipe. If you choose the wooden board, measure and cut it to the desired size. If using a PVC pipe, ensure it is long enough to accommodate the antenna’s length. Use screws or nails to secure the coaxial cable connector in the center of the board or pipe.
Step 2: Prepare the Copper Wire Elements
Measure and cut the copper wire into multiple lengths, each equal to one-fourth the wavelength of the FM radio frequency you intend to receive. These elements will act as the antenna’s radiating elements. Strip the insulation from both ends of each wire segment.
Step 3: Attach the Copper Wire Elements to the Base
Using a drill and appropriately-sized drill bit, create holes along the top of the wooden board or the PVC pipe. Insert each wire segment into a separate hole so that one end is inside the base, and the other end extends outward. Secure the wires in place by soldering them to the coaxial cable connector.
Step 4: Connect the Balun Transformer
Attach the balun transformer to the coaxial cable connector. The balun transformer serves to match the impedance between the antenna and the receiver, ensuring efficient signal transfer.
Step 5: Fine-Tuning (Optional)
If desired, you can fine-tune the antenna’s performance by adjusting the lengths and positions of the copper wire elements. Experiment with different configurations to achieve the best reception and signal strength.
Once you have completed these steps, your FM antenna should be ready for installation and connection to your stereo receiver. In the next section, we will guide you through the process of connecting the FM antenna to your stereo receiver.
Connecting the FM Antenna to the Stereo Receiver
Now that you have successfully built your FM antenna, it’s time to connect it to your stereo receiver. Follow these steps to ensure a proper and secure connection:
Step 1: Locate the FM Antenna Input
Check your stereo receiver’s back panel for the FM antenna input. It is usually labeled as “FM ANT” or “ANTENNA.” Take note of the type of connector required for the input, as it may be a push-on coaxial connector or a screw terminal.
Step 2: Prepare the Coaxial Cable
Trim the end of the coaxial cable to expose the inner conductor. If necessary, strip the outer insulation to expose the shielding. Be careful not to damage the inner conductor during this process.
Step 3: Connect the Coaxial Cable
For a push-on coaxial connector, simply push the exposed inner conductor into the FM antenna input until it is fully inserted. Make sure it is secure but avoid using excessive force that could damage the receiver or the cable.
For a screw terminal, insert the exposed inner conductor into the terminal and tighten the screw to secure it. Again, ensure it is securely fastened without applying too much force.
Step 4: Position the FM Antenna
Place your FM antenna in a strategic location where it can receive optimal signals. Common placement options include near a window, on a higher shelf, or in an open area away from obstructions. You may need to experiment with different positions to find the best reception.
Step 5: Extend the FM Antenna
If your FM antenna is mounted on a wooden board or a PVC pipe, consider extending it further to achieve better reception. You can use additional coaxial cable to lengthen the connection between the antenna and the stereo receiver. Remember to maintain a secure and stable connection throughout the extension.
Once you have completed these steps, you can power on your stereo receiver and tune it to an FM radio frequency. With the FM antenna properly connected, you should experience improved signal reception and clearer audio. In the next section, we will discuss how to test and adjust your FM antenna for optimal performance.
Testing and Adjusting the FM Antenna
After connecting your FM antenna to the stereo receiver, it’s important to test and adjust its position for optimal performance. Follow these steps to ensure the best signal reception:
Step 1: Tune to a Radio Station
Turn on your stereo receiver and tune it to a radio station that you usually listen to. Start with a station that has a strong signal in your area.
Step 2: Assess the Signal Quality
Listen to the radio station and assess the signal quality. Pay attention to any distortion, static, or low signal strength. Take note of the clarity and loudness of the audio.
Step 3: Adjust the Position of the FM Antenna
Start by repositioning the FM antenna to different locations in the room. Experiment with placing it near windows, on different shelves, or in open areas. Rotating the antenna can also make a difference. Take note of any improvement or degradation in signal quality as you make these adjustments.
Step 4: Fine-Tune the Length of the Elements
If you’re using a customized FM antenna with adjustable wire elements, consider fine-tuning their lengths. Shortening or lengthening the wire segments can impact signal reception. Make small adjustments and retest the signal quality after each change to find the optimum length.
Step 5: Test Different Radio Stations
Once you find a satisfactory position for your FM antenna, test it with different radio stations. Tune to both strong and weak signal stations to assess the antenna’s ability to capture distant broadcasts.
Step 6: Repeat the Process
If you’re still not satisfied with the signal quality or want to explore different positioning options, feel free to repeat the testing and adjusting process. Remember that different locations and times of the day can affect signal strength, so don’t hesitate to experiment.
By following these steps and fine-tuning the position and length of your FM antenna, you can achieve optimal signal reception and enjoy crystal-clear audio from your stereo receiver. In the next section, we will address some common issues that you may encounter and how to troubleshoot them.
Troubleshooting Common Issues
While building and setting up your FM antenna for your stereo receiver, you may encounter some common issues that can affect signal reception. Here are a few troubleshooting tips to help you overcome these challenges:
Issue: Weak Signal or No Signal
– Check the positioning of your FM antenna. Ensure it is placed in a location with minimal obstructions and away from electronic devices that may cause interference.
– Consider extending the antenna by using additional coaxial cable to improve signal reception.
– Try adjusting the length of the wire elements, making them slightly longer or shorter to find the optimum length for signal capture.
Issue: Interference or Static Noise
– Check for any nearby electronic devices that may be causing interference. Move your FM antenna away from these devices to minimize the noise.
– Ensure that all connections are secure and properly insulated to prevent interference from external sources.
Issue: Limited Range
– If you’re experiencing limited range, consider using a stronger and more sensitive FM antenna. Look for options with higher gain or directional capabilities to capture signals from a wider range of angles.
– Verify that the coaxial cable is not damaged or worn out, as this can affect the signal range. Replace the cable if necessary.
Issue: Distorted Audio or Low Volume
– Check the connections between the FM antenna and the stereo receiver. Ensure that all connections are secure and properly soldered, without any loose wires or exposed conductors.
– Verify that the balun transformer is functioning correctly. Replace it if necessary.
Issue: Inconsistent Signal Reception
– Double-check the positioning and orientation of your FM antenna. Sometimes a slight adjustment in placement can make a significant difference in signal reception.
– Experiment with different positions and orientations to find the optimal setup for consistent signal reception.
If you have exhausted all troubleshooting options and are still experiencing issues with signal reception, it may be worth considering a professional consultation or investing in a commercially available FM antenna designed for enhanced performance.
With these troubleshooting tips, you should be able to overcome common issues and optimize the performance of your FM antenna for your stereo receiver. In the concluding section, we’ll summarize the key points and emphasize the importance of a well-built FM antenna for an enjoyable audio experience.
Conclusion
Building and setting up your own FM antenna for your stereo receiver can significantly enhance your audio experience. By understanding the function of an FM antenna and following the steps outlined in this article, you can construct a reliable antenna that captures clear signals and improves the overall performance of your stereo system.
Throughout the process, we discussed the importance of positioning, adjusting wire lengths, and troubleshooting common issues to optimize signal reception. Remember to experiment with different locations and orientations to find the best setup for your specific environment.
However, it’s important to keep in mind that the performance of an FM antenna can also depend on external factors such as the distance to broadcasting stations and local terrain. While building your own antenna can be a fun and cost-effective solution, it may not always provide the same level of performance as specialist antennas designed for specific distances or challenging environments.
Nevertheless, building your own FM antenna allows you to have a customized solution tailored to your specific needs and preferences. It also provides a sense of accomplishment and can further deepen your understanding of stereo systems and radio frequency reception.
We hope that this guide has empowered you to embark on the journey of creating and optimizing your FM antenna for your stereo receiver. Enjoy improved signal reception, crystal-clear audio, and an enhanced listening experience!