Home>Production & Technology>Stereo>How To Make A Stereo Guitar Rig

Stereo
How To Make A Stereo Guitar Rig
Modified: March 7, 2024
Learn how to create a stereo guitar rig for a richer and more immersive sound experience. Enhance your guitar playing with stereo effects.
(Many of the links in this article redirect to a specific reviewed product. Your purchase of these products through affiliate links helps to generate commission for AudioLover.com, at no extra cost. Learn more)
Table of Contents
Introduction
Welcome to the world of stereo guitar rigs! If you’re looking to take your guitar playing to the next level and create a truly immersive sound experience, then building a stereo guitar rig is the way to go. By utilizing two amplifiers and a host of effects pedals, you can create a wide, spacious soundstage that will leave your audience in awe.
But what exactly is a stereo guitar rig? In simple terms, it’s a setup that allows you to send your guitar signal to two separate amplifiers, creating a stereo effect. This opens up a world of sonic possibilities, allowing you to pan your guitar’s sound from left to right or layer different effects on each amplifier.
In this article, we’ll guide you through the process of setting up your own stereo guitar rig. Whether you’re a seasoned guitarist or a beginner looking to experiment with new sounds, this guide will provide you with all the information you need to get started.
Before we dive into the nitty-gritty details, let’s take a look at the equipment you’ll need to build your stereo guitar rig.
Equipment Needed
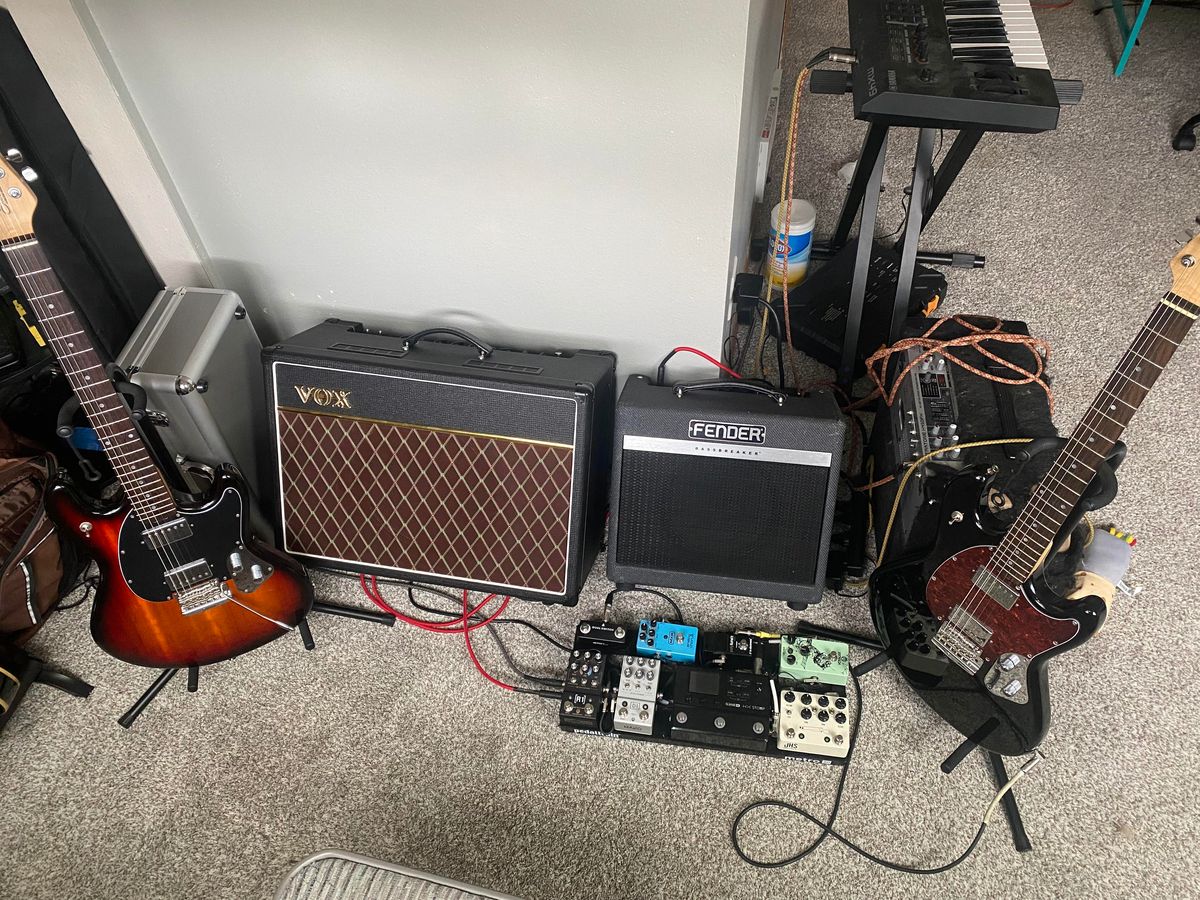
Building a stereo guitar rig requires a few essential pieces of equipment. Here’s a list of what you’ll need:
- Two amplifiers: You’ll need two guitar amplifiers to create a stereo effect. Make sure they have similar power ratings and sound characteristics for optimal results.
- A guitar: Of course, you’ll need a guitar to send the signal through your rig. Use your favorite electric guitar or try different ones to explore the unique tones of each.
- An effects pedalboard: This will serve as the control center for your guitar effects. Choose a pedalboard with enough space to accommodate all your pedals.
- Effects pedals: The heart of your stereo rig lies in the effects pedals. Choose a variety of pedals such as delay, reverb, chorus, flanger, and more to shape your sound.
- Instrument cables: You’ll need high-quality instrument cables to connect your guitar, pedals, and amplifiers. Opt for shielded cables to minimize unwanted noise.
- Audio cables: To connect your pedalboard to the amplifiers, you’ll need stereo audio cables. These cables will split your guitar signal and send it to each amplifier separately.
- Power supply: Many effects pedals require power, so invest in a reliable power supply to ensure all your pedals receive the necessary power.
- Rack or pedalboard case: If you’re planning to take your stereo rig on the road, consider investing in a rack or pedalboard case to protect your gear during transport.
These are the essential components you’ll need to build a stereo guitar rig. However, feel free to experiment with additional accessories like stereo speakers, stereo headphones, or a stereo mixer for further tonal possibilities.
Now that you know what equipment you’ll need, let’s move on to setting up your stereo guitar rig.
Step 1: Setting Up the Amplifiers
The first step in building your stereo guitar rig is setting up the amplifiers. Here’s how to do it:
- Position the amplifiers: Find a suitable location for your amplifiers, ensuring they are stable and won’t be easily knocked over during play. Place them side by side or at a comfortable distance from each other.
- Connect the power: Plug each amplifier into a power source and make sure they are turned off before proceeding.
- Set the volume and tone controls: Adjust the volume and tone controls on each amplifier to your desired settings. This will depend on personal preference and the specific sound you’re looking to achieve.
- Connect the guitar cables: Take one instrument cable and plug it into the input of the first amplifier. Then, take another instrument cable and connect it to the input of the second amplifier.
- Turn on the amplifiers: Once the cables are connected, turn on each amplifier and wait for them to warm up.
- Test the sound: Play your guitar and listen for sound coming from both amplifiers. Adjust the volume and tone controls as needed to achieve a balanced sound.
- Check for any unwanted noise: Listen for any unwanted noise or hum coming from the amplifiers. If you encounter any issues, check your cables and connections to ensure everything is properly connected.
By following these steps, you will have successfully set up your amplifiers for your stereo guitar rig. The next step is connecting your pedalboard to the amplifiers, which we’ll cover in the next section.
Step 2: Connecting the Pedalboard
Now that your amplifiers are set up, it’s time to connect your pedalboard to your stereo rig. Here’s how to do it:
- Position the pedalboard: Find a suitable spot for your pedalboard, keeping in mind the proximity to your amplifiers and ease of access during performance.
- Connect the power supply: Plug your power supply into a power source and connect the appropriate power cables to your effects pedals. Make sure the voltage matches the requirements of your pedals.
- Connect the audio cables: Take one end of a stereo audio cable and plug it into the output of your pedalboard. Then, connect the other ends of the cable to the input of each amplifier. This will split your guitar signal and send it to both amplifiers simultaneously.
- Arrange your pedals: Arrange your effects pedals on the pedalboard in a way that makes it comfortable for you to access and engage them while playing. Consider the order in which you want to use the effects and connect them accordingly.
- Connect the instrument cables: Take an instrument cable and plug it into the output of your guitar. Then, connect the other end of the cable to the input of your pedalboard. This will send your guitar signal through the effects pedals.
- Test the signal: Play your guitar and engage the pedals on your pedalboard. Make sure the signal is coming through both amplifiers and that the effects are functioning as intended.
- Adjust pedal settings: Experiment with the settings on your effects pedals to achieve the desired sound. This is where you can get creative and explore different sonic possibilities that a stereo rig offers.
By following these steps, you’ll have successfully connected your pedalboard to your stereo guitar rig. The next step is to set up the effects loop, which we’ll explore in the next section.
Step 3: Setting Up the Effects Loop
Setting up the effects loop is an important step in maximizing the capabilities of your stereo guitar rig. It allows you to place certain effects pedals in a more controlled position within your signal chain. Here’s how to set up the effects loop:
- Understand the effects loop: An effects loop is a designated section on your amplifier that allows you to add effects after the preamp stage and before the power amp stage. This loop provides a way to insert time-based effects like delay and reverb more effectively.
- Identify the effects loop jacks: Locate the effects loop jacks on both of your amplifiers. They are usually labeled “send” and “return”. One set will be for the first amplifier, and the other set for the second amplifier.
- Connect the effects loop: Take an audio cable and plug one end into the “send” jack of the first amplifier. Connect the other end of the cable to the input of the first time-based effect pedal on your pedalboard. Then, take another audio cable and plug one end into the output of the last time-based effect pedal. Connect the other end of the cable to the “return” jack of the first amplifier.
- Repeat the process for the second amplifier: Take another audio cable and connect the “send” jack of the second amplifier to the input of the first time-based effect pedal. Then, connect the output of the last time-based effect pedal to the “return” jack of the second amplifier.
- Test the effects loop: Activate the time-based effects pedals in your loop and play your guitar. Listen for the difference in sound when the effects are placed within the loop compared to being in the main signal chain.
- Adjust the effects loop level: Most amplifiers have a control knob to adjust the level of the effects loop. Experiment with this knob to find the desired balance between the dry and affected signal.
- Explore different effects in the loop: Aside from delay and reverb, you can also experiment with other effects like modulation or even utilizing a separate set of effects for each amplifier. This will further enhance the stereo sound and add depth to your guitar tone.
By following these steps, you’ll have successfully set up the effects loop in your stereo guitar rig. Now it’s time to move on to connecting your guitar to the rig, which we’ll cover in the next section.
Step 4: Connecting the Guitar
Now that your amplifiers, pedalboard, and effects loop are all set up, it’s time to connect your guitar to your stereo rig. Here’s how:
- Choose your guitar: Select the electric guitar that you want to use with your stereo rig. Whether it’s a Stratocaster, Les Paul, or any other model, make sure it’s in good playing condition.
- Prepare your guitar cable: Take a high-quality instrument cable and ensure that both ends are clean and free from any debris or damage. This will help maintain a strong and clear signal.
- Connect the cable to your guitar: Plug one end of the instrument cable into the output jack of your guitar. Ensure that the connection is secure and tight.
- Connect the cable to your pedalboard: Take the other end of the instrument cable and plug it into the input of your pedalboard. This will send your guitar’s signal through your effects pedals.
- Check the cable connection: Ensure that the cable is securely connected to both your guitar and pedalboard. A loose connection can lead to intermittent sound or unwanted noise.
- Test the signal: Begin playing your guitar and listen for the sound coming through your stereo rig. Adjust the volume and tone controls on your guitar as needed.
- Experiment with different pickup selections: If your guitar has multiple pickups, try switching between them to explore different tonal possibilities. This can further enhance the stereo effect and add variety to your sound.
- Listen for any issues: Pay attention to any unwanted noise or interference that may occur. If you encounter any issues, check your cable connections and troubleshoot accordingly.
By following these steps, you’ll have successfully connected your guitar to your stereo rig. Now it’s time to move on to adjusting the settings for optimum performance, which we’ll cover in the next section.
Step 5: Adjusting the Settings
After connecting your guitar to your stereo rig, it’s important to adjust the settings to ensure optimal performance and sound quality. Here’s how you can do it:
- Balance the amplifier volumes: Adjust the volume controls on each amplifier to achieve a balanced sound. This will ensure that the sound coming from each speaker is equally loud and that there is no overpowering of one side.
- Experiment with panning: Take advantage of the stereo configuration by experimenting with panning your guitar’s sound. Use the pan controls on your amplifiers or effects pedals to place your guitar’s sound in the stereo field. This can create a spacious and immersive experience.
- Tweak the EQ settings: Use the equalization controls on your amplifiers and/or pedals to shape your guitar’s tone. Adjust the bass, mid, and treble frequencies to achieve the desired balance and clarity.
- Set the effects parameters: Fine-tune the settings on your effects pedals to achieve the desired sound. Experiment with different modulation rates, delay times, reverb decay, and other parameters to find the sweet spot for each effect.
- Explore layering effects: Take advantage of the stereo setup by layering different effects on each amplifier. For example, you can add a subtle chorus effect to one amplifier while applying a lush reverb to the other. This will add depth and dimension to your sound.
- Listen and make adjustments: As you play through your stereo rig, listen carefully to the sound and make any necessary adjustments. Trust your ears and make changes to the settings until you’re satisfied with the overall sound.
- Document your settings: Once you find the perfect settings for your stereo rig, consider taking note of them. This will allow you to replicate them in future performances or easily recreate the desired sound if needed.
Remember that adjusting the settings is a creative process, and it’s all about finding the sound that best suits your playing style and musical preferences. Take your time to experiment and explore the possibilities offered by your stereo guitar rig.
Now that your settings are adjusted, it’s time for the final step: testing and troubleshooting. We’ll cover that in the next section.
Step 6: Testing and Troubleshooting
Now that you’ve set up and adjusted your stereo guitar rig, it’s essential to thoroughly test and troubleshoot any potential issues. Here’s what you need to do:
- Test each amplifier: Play your guitar and listen to the sound coming from each amplifier. Ensure that both amplifiers are functioning correctly and producing the desired tone.
- Engage each effects pedal: Activate each effects pedal on your pedalboard and listen carefully to the sound. Make sure that each pedal is functioning as expected and providing the desired effect.
- Listen for any unwanted noise: Pay attention to any hum, buzz, or other unwanted noise in your signal chain. Check your cable connections and ensure that everything is securely plugged in. Consider using shielded cables and noise reduction techniques if necessary.
- Check for signal loss: Verify that your guitar’s signal is not being lost or weakened anywhere in your stereo rig. Make sure all cables are in good condition and properly connected.
- Troubleshoot any issues: If you encounter any issues during testing, systematically isolate the problem. Check each component of your stereo rig one by one to identify the source of the issue. This may involve swapping cables, pedals, or even amplifiers.
- Consult a professional if needed: If you’re unable to resolve any persistent issues on your own, don’t hesitate to seek assistance from a professional guitar technician or sound engineer. They have the expertise to diagnose and fix complex problems.
- Perform a final sound check: Once you’ve addressed any issues and ensured that your stereo rig is functioning properly, perform a final sound check to ensure that the sound is balanced, clear, and meets your expectations.
Testing and troubleshooting are critical steps in ensuring that your stereo guitar rig performs at its best. Take the time to address any issues that arise, as doing so will result in a more satisfying and trouble-free playing experience.
With the testing and troubleshooting complete, you’re now ready to rock out with your stereo guitar rig!
Conclusion
Congratulations! You’ve successfully built and set up your own stereo guitar rig. By following the steps outlined in this guide, you’ve unlocked a world of sonic possibilities and created a truly immersive sound experience for your guitar playing.
A stereo guitar rig allows you to explore a wide range of tones and effects, from a spacious and ambient sound to dynamic and layered textures. The dual amplifiers, effects pedals, and the option to pan your guitar’s sound create an expansive and captivating sonic landscape that will captivate both you and your audience.
Remember to experiment and unleash your creativity as you play through your stereo rig. Explore different effects combinations, adjust settings, and fine-tune your tone to find your own unique sound. Use the stereo capabilities to create depth, width, and movement in your guitar playing, enhancing every note and strum.
Keep in mind that building a stereo guitar rig is an ongoing process. As you gain more experience and discover new pedals or amplifiers, don’t be afraid to tweak and refine your setup. Continuously explore different effects, experiment with different placement options, and adapt your rig to your evolving musical style.
Lastly, have fun with your stereo guitar rig! Use it as a tool for creativity and self-expression. Let the immersive sounds inspire you to push the boundaries of your music, and enjoy the incredible tone your rig produces.
Now that you have the knowledge and steps to set up your stereo guitar rig, it’s time to plug in, turn up the volume, and set your music free in glorious stereo sound!

