Home>Production & Technology>Stereo>What Do You Need To Install A New Car Stereo
Stereo
What Do You Need To Install A New Car Stereo
Published: November 19, 2023
Learn everything you need to know about installing a new car stereo. Get expert tips and guidance on how to successfully upgrade your stereo system.
(Many of the links in this article redirect to a specific reviewed product. Your purchase of these products through affiliate links helps to generate commission for AudioLover.com, at no extra cost. Learn more)
Table of Contents
Introduction
Installing a new car stereo can have a significant impact on your driving experience. Whether you’re looking to upgrade your sound system or add modern features like Bluetooth connectivity, a new car stereo can greatly enhance your daily commute or road trips. However, the installation process may seem intimidating for those who are not familiar with car electronics.
In this article, we will guide you through the step-by-step process of installing a new car stereo. We will cover everything you need to know, from gathering the necessary tools and materials to testing the new car stereo. By following this guide, you can confidently tackle the installation and enjoy the benefits of an upgraded audio system in your vehicle.
Before we dive into the installation process, it’s important to note that different car models may have slightly different installation methods. Therefore, it is always recommended to consult the specific instructions provided by the manufacturer or seek professional help if you are unsure about any steps.
Now, let’s get started on installing your new car stereo!
Step 1: Gather the necessary tools and materials
Before you begin the installation process, it’s essential to gather all the necessary tools and materials to ensure a smooth and successful installation. Here are the tools and materials you will need:
- New car stereo: Make sure to purchase a car stereo that is compatible with your vehicle’s make and model. Consider the features you want, such as Bluetooth connectivity, USB ports, or CD/DVD playback.
- Wiring harness adapter: This adapter is crucial for connecting the new stereo to your vehicle’s existing wiring. It helps maintain the functionality of your car’s electrical system without the need for cutting and splicing wires.
- Dash kit: A dash kit is necessary to securely mount the new stereo into your vehicle’s dashboard. It is designed to match the dimensions and style of your car’s dashboard for a seamless integration.
- Trim removal tools: These tools are used to safely remove the trim panels and other components in your car’s interior without causing any damage. They typically include pry tools and trim removal keys.
- Wire cutters and crimpers: These tools are needed for cutting and crimping wires to connect the wiring harness adapter to the new stereo.
- Electrical tape: It is used to insulate the connected wires and ensure a secure and reliable connection.
- Phillips and flathead screwdrivers: These screwdrivers are commonly used for removing and installing screws holding the stereo or dash kit in place.
It’s essential to have all the necessary tools and materials prepared before you start the installation process. This will save you time and frustration, ensuring that you have everything you need within reach.
Once you have gathered all the tools and materials, you’re ready to move on to the next step: disconnecting the old stereo.
Step 2: Disconnect the old stereo
Before you can install your new car stereo, you need to disconnect the old stereo from your vehicle’s electrical system. Follow these steps to disconnect the old stereo:
- Start by disconnecting the negative terminal of your car’s battery to prevent any electrical mishaps. Use a wrench to loosen the nut on the negative terminal and carefully remove the cable.
- Locate the trim panels surrounding the stereo. These panels may be held in place by screws, clips, or a combination of both. Use your trim removal tools to carefully pry off the panels, starting from the edges and working your way around.
- Once the trim panels are removed, you will see screws securing the stereo unit. Use a Phillips or flathead screwdriver (or the appropriate tool) to unscrew and remove these screws.
- Gently pull the stereo unit out of the dashboard. You may need to disconnect any wiring connectors at the back of the stereo. These connectors are usually released by pressing a tab or lever and pulling the connector apart.
- Once the connectors are detached, carefully remove the old stereo from your vehicle and set it aside.
It’s important to handle the old stereo with care to avoid any damage. Keep in mind that some vehicles may have additional steps or components that need to be removed before accessing the stereo. Refer to your vehicle’s specific instructions or consult a professional if you encounter any difficulties.
With the old stereo removed, you can now proceed to the next step: preparing the wiring harness adapter.
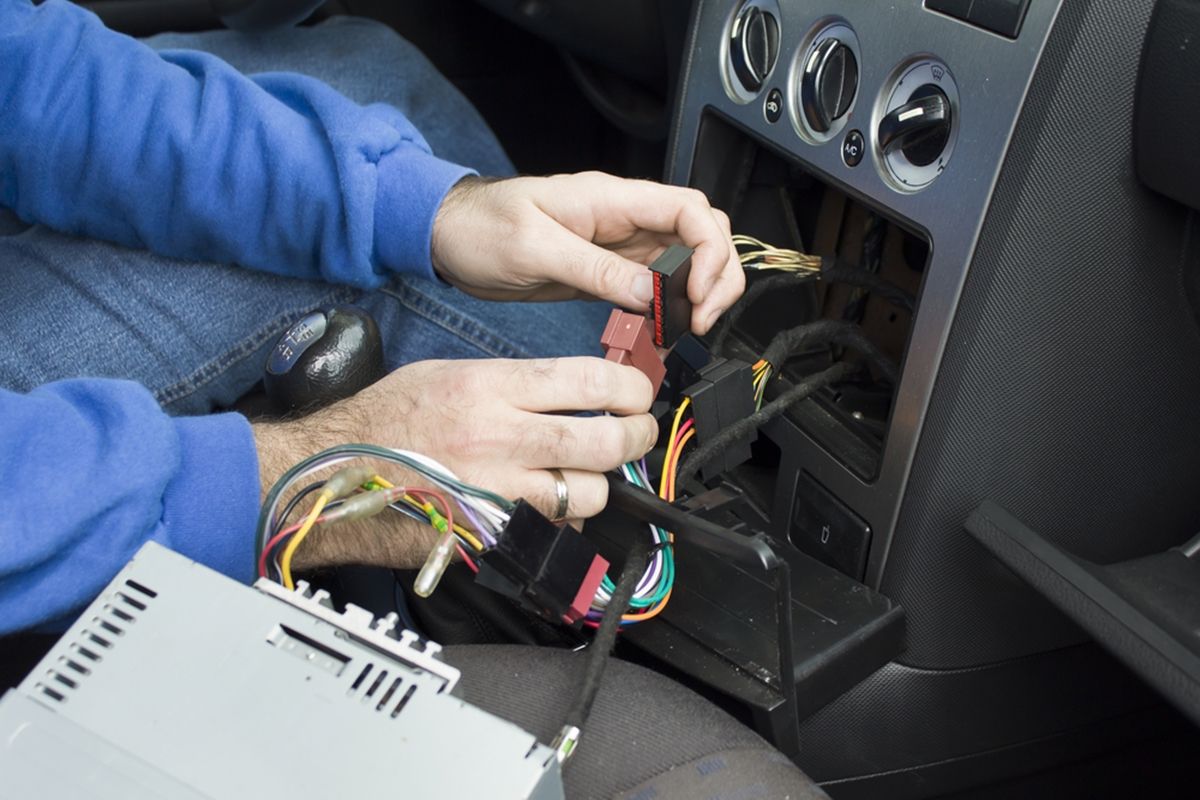
Step 3: Prepare the wiring harness adapter
Preparing the wiring harness adapter is a crucial step in the installation process as it allows you to connect the new car stereo to your vehicle’s existing wiring. Follow these steps to prepare the wiring harness adapter:
- Identify the wiring harness adapter that is compatible with both your vehicle and the new car stereo. These adapters are typically color-coded to match the wires on the stereo and the vehicle’s wiring harness.
- If necessary, strip the insulation off the wires on the wiring harness adapter. Use wire strippers or a sharp utility knife to carefully remove a small section of insulation, exposing the bare wire underneath. Be cautious not to cut or damage the wires while stripping.
- Identify the wires on the wiring harness adapter that correspond to specific functions, such as power, ground, speaker connections, and any other features supported by your new stereo. Refer to the wiring diagram provided by the manufacturer for proper identification.
- If the wiring harness adapter comes with crimp connectors, slide the appropriate connector onto each wire and crimp it securely using wire crimpers. Alternatively, you can twist the exposed wire ends together and cover them with electrical tape for a temporary connection.
Preparing the wiring harness adapter ensures that you have a standardized and compatible connection between your new car stereo and the vehicle’s electrical system. This step is essential for maintaining the functionality of your car’s electrical components and avoiding any damage caused by improper wiring connections.
Once you have prepared the wiring harness adapter, you are ready to move on to the next step: connecting the wiring harness adapter to the new car stereo.
Step 4: Connect the wiring harness adapter
Now that you have prepared the wiring harness adapter, it’s time to connect it to the new car stereo. Follow these steps to ensure a proper and secure connection:
- Locate the wiring harness connector on the back of your new car stereo. It is usually a rectangular or square-shaped connector with multiple pins or slots.
- Take the wiring harness adapter that you prepared in the previous step and align it with the wiring harness connector on the new stereo. Ensure that the pins or slots on both connectors match up correctly.
- Gently push the wiring harness adapter into the wiring harness connector on the stereo until it clicks into place. This ensures a secure and reliable connection.
- Double-check that the wiring harness adapter is securely attached to the stereo by gently tugging on the connector. It should not come loose or disconnect easily.
By connecting the wiring harness adapter to the new car stereo, you establish the electrical connection needed for the stereo to function properly with your vehicle’s wiring system. This step eliminates the need for cutting or splicing wires, making the installation process simpler and reversible if needed.
Once the wiring harness adapter is connected, you can proceed to the next step: mounting the new car stereo into your vehicle’s dashboard.
Step 5: Mount the new car stereo
Mounting the new car stereo into your vehicle’s dashboard is an important step to ensure stability and proper functionality. Follow these steps to securely mount the new car stereo:
- Retrieve the dash kit that is compatible with your vehicle’s make and model. The dash kit typically includes a mounting bracket and trim pieces that match the style and dimensions of your car’s dashboard.
- Attach the mounting bracket to the new car stereo using the screws provided. Make sure the screws are tightened securely but not overly tight.
- Insert the new car stereo with the attached mounting bracket into the opening of your vehicle’s dashboard. Ensure that the wiring harness and antenna plug are correctly routed through the opening.
- Align the mounting holes on the dash kit with the corresponding holes on the stereo and the vehicle’s dashboard.
- Securely fasten the dash kit to the dashboard using the screws provided. Make sure the new car stereo is firmly held in place.
- Install the trim pieces included in the dash kit to cover any gaps between the stereo and the dashboard. These pieces are designed to blend seamlessly with the rest of your car’s interior.
Properly mounting the new car stereo ensures that it stays in place while you’re driving, preventing any unnecessary vibrations or movements that could impact its performance.
Once the new car stereo is securely mounted, you can move on to the next step: connecting the new car stereo to the wiring harness adapter.
Step 6: Connect the new car stereo
With the new car stereo mounted in your vehicle’s dashboard, it’s time to connect it to the wiring harness adapter. Follow these steps to ensure a proper and secure connection:
- Take the wiring harness adapter that is connected to your vehicle’s wiring system and locate the matching connector on the new car stereo. It should be labeled or color-coded for easy identification.
- Align the connectors of the wiring harness adapter and the new car stereo, ensuring they fit together properly.
- Push the connectors together until they click into place. You may need to exert some force, but make sure to do it gently to avoid damaging the connectors.
- Double-check the connection by gently tugging on the wiring harness adapter and the new car stereo. They should be securely connected and not come loose easily.
By connecting the new car stereo to the wiring harness adapter, you establish the essential electrical connection for the stereo to function with your vehicle’s wiring system. This connection allows the stereo to receive power, audio signals, and other necessary data.
Once the new car stereo is connected, you can move on to the final step: testing the new car stereo to ensure everything is working correctly.
Step 7: Test the new car stereo
After successfully connecting the new car stereo, it’s time to test its functionality and ensure everything is working correctly. Follow these steps to test the new car stereo:
- Reconnect the negative terminal of your car’s battery by securely tightening the nut on the negative terminal.
- Turn on your vehicle’s ignition to power up the new car stereo.
- Test the basic functions of the new car stereo, such as power on/off, volume control, and radio tuning. Ensure that the buttons and knobs are responsive and working correctly.
- Test any additional features or functionalities of the new car stereo, such as Bluetooth connectivity, USB input, CD/DVD playback, or any other features specific to your model.
- Check the sound output from the new car stereo. Make sure the audio quality is clear, and all speakers are functioning properly.
- Adjust the settings of the new car stereo, such as the equalizer, balance, and fade, to suit your preferences.
- If you have installed any additional accessories, such as amplifiers or subwoofers, test their functionality as well.
During the testing process, pay close attention to any issues, such as distorted sound, malfunctioning buttons, or connectivity problems. If you notice any problems, double-check the connections and consult the user manual for troubleshooting guidance.
If everything is working as expected, you have successfully installed and tested your new car stereo! Enjoy the enhanced audio experience and the added features that come with it.
If you encounter any difficulties or are unsure about any steps during the installation process, it’s always recommended to seek professional assistance or consult the manufacturer’s instructions for your specific car model and stereo.
Congratulations on completing the installation of your new car stereo!
Conclusion
Installing a new car stereo can greatly enhance your driving experience, allowing you to enjoy high-quality sound and modern features in your vehicle. By following the step-by-step guide outlined in this article, you can confidently install a new car stereo and reap the benefits it offers.
From gathering the necessary tools and materials to disconnecting the old stereo, preparing the wiring harness adapter, mounting the new car stereo, and connecting it to the wiring harness, each step is essential for a successful installation. The testing phase ensures that everything is working correctly before you hit the road.
Remember, while this guide provides a general overview of the installation process, it’s crucial to consult the specific instructions provided by the manufacturer for your car model and stereo. If you’re unsure about any steps or encounter difficulties, it’s always best to seek professional assistance or guidance.
With a new car stereo in place, you can enjoy improved audio quality, seamless connectivity, and a more enjoyable driving experience. Whether you’re a music enthusiast, a podcast lover, or simply want to upgrade your vehicle’s entertainment system, installing a new car stereo is a rewarding endeavor.
So go ahead, gather your tools, choose the right stereo for your needs, and embark on the installation journey. Discover the joy of driving with a premium sound system and modern features at your fingertips. Get ready to enjoy your favorite tunes and enhance your driving adventures with a new car stereo!