Home>Production & Technology>Tempo>How To Change Music Tempo In Audacity
Tempo
How To Change Music Tempo In Audacity
Modified: January 27, 2024
Learn how to easily change the music tempo in Audacity using our step-by-step guide. Adjust the speed of your songs and create the perfect rhythm.
(Many of the links in this article redirect to a specific reviewed product. Your purchase of these products through affiliate links helps to generate commission for AudioLover.com, at no extra cost. Learn more)
Table of Contents
Introduction
In the world of music production and editing, one of the essential techniques is the ability to change the tempo of a song. Tempo refers to the speed or pace of a piece of music, and being able to adjust it can completely transform the feel and vibe of a track. Whether you want to speed up a slow ballad to make it more energetic or slow down a fast-paced dance track to create a chill remix, knowing how to change the tempo is a valuable skill.
When it comes to altering the tempo of a song, Audacity is a popular and powerful tool that can assist you. Audacity is a free, open-source software program that allows you to edit and manipulate audio files with ease. With its user-friendly interface and extensive features, it has become a go-to choice for musicians, podcasters, and sound engineers.
In this article, we will guide you through the process of changing the music tempo using Audacity. We’ll walk you through the steps, from opening the program to exporting the modified audio. By the end of this guide, you’ll have a solid understanding of how to manipulate tempo in Audacity, giving you the creative freedom to experiment with your music.
So, whether you’re a professional musician or just a music enthusiast looking to explore different possibilities, let’s dive into the world of Audacity and learn how to change the tempo of your favorite songs.
Step 1: Opening Audacity
The first step in changing the tempo of a song is to open Audacity on your computer. If you haven’t installed Audacity yet, you can download it for free from the official Audacity website.
Once you have Audacity installed, launch the program by double-clicking on the Audacity icon on your desktop or by searching for it in your computer’s applications folder. Audacity is available for both Windows and Mac operating systems.
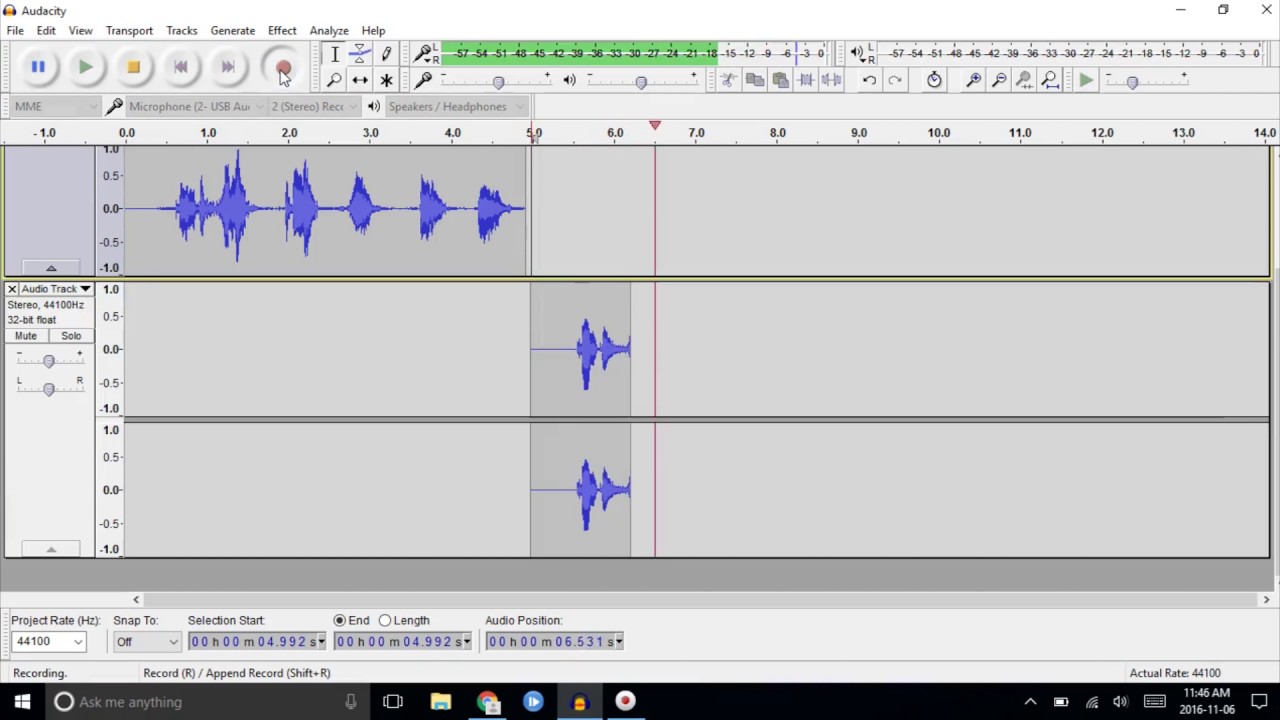
After opening Audacity, you will be greeted with a clean and user-friendly interface. The main window consists of several elements, including the menu bar, toolbar, timeline, and track controls. Take a moment to familiarize yourself with these components, as we’ll be using them to change the tempo of our audio.
If you already have an audio file that you want to modify, you can drag and drop it into the Audacity workspace. Alternatively, you can click on the “File” menu at the top left corner of the screen and select “Open” to browse and select the audio file you wish to work with.
Opening Audacity is the first step towards transforming the tempo of your music. Now that you are ready to dive into the world of audio editing, let’s move on to the next step: importing the audio file.
Step 2: Importing the audio file
Once you have Audacity open and ready, the next step is to import the audio file that you want to change the tempo of. Audacity supports a wide range of audio file formats, including MP3, WAV, FLAC, and more.
To import an audio file, you have a couple of options. The first option is to drag and drop the audio file directly into the Audacity workspace. Simply locate the file on your computer, click and hold on it, and then drag it into the Audacity window. You will see a waveform representation of the audio file appear on the timeline.
The second option is to use the “File” menu at the top left corner of the screen. Click on “File” and select “Open” from the drop-down menu. This will open a file browser window where you can navigate to the location of your audio file. Once you have located the file, select it and click “Open.” The audio file will then be imported into Audacity.
When importing an audio file into Audacity, it’s important to note that the software will create a new track for the imported audio. This allows you to work on multiple tracks simultaneously and make adjustments to each track separately.
Once you have successfully imported the audio file into Audacity, you are now ready to move on to the next step: selecting the portion of the audio you want to change the tempo of.
Step 3: Selecting the portion to change tempo
Before you can adjust the tempo of the audio file, it’s important to select the specific portion of the audio that you want to modify. This allows you to focus on a specific section of the song or isolate certain elements for tempo adjustment.
In Audacity, selecting a portion of the audio can be done by clicking and dragging on the waveform representation of the audio file. The waveform displays the amplitude and frequency of the audio, making it easy to visually identify where certain parts of the song begin and end.
Here’s how you can select a portion of the audio in Audacity:
- Zoom in on the waveform: Before selecting the portion, it can be helpful to zoom in on the waveform for greater precision. You can do this by using the zoom tool or by using the “View” menu and selecting the appropriate zoom option.
- Click and drag to select: Once you have zoomed in, click at the beginning of the section you want to change the tempo of, and while holding the mouse button, drag the cursor to the end of the section. This will create a selection range within the waveform.
- Adjust the selection: If you need to fine-tune the selection, you can click and drag the edges of the range to expand or contract it. You can also click anywhere within the range and drag it to a different position if needed.
By selecting a specific portion of the audio, you have now defined the area that you want to modify the tempo of. With the selection in place, you can proceed to the next step: adjusting the tempo to achieve the desired effect.
Step 4: Adjusting the tempo
Once you have selected the portion of the audio that you want to change the tempo of, it’s time to adjust the tempo using the various tools and features available in Audacity. Audacity provides several methods to modify the tempo of an audio file, giving you flexibility in achieving the desired effect.
Here are a few ways to adjust the tempo in Audacity:
- Change the tempo percentage: One straightforward method is to use the “Change Tempo” effect. To access this feature, select the desired portion of the audio and navigate to the “Effects” menu. From there, choose “Change Tempo” and a dialog box will appear. Adjust the percentage value to increase or decrease the tempo of the selected section. A higher percentage will speed up the tempo, while a lower percentage will slow it down.
- Use the time-scale-pitch tool: Another powerful tool in Audacity is the “Time-Shift Tool,” commonly known as the time-scale-pitch tool. This tool allows you to independently adjust the tempo without affecting the pitch or vice versa. To use this tool, select the desired portion of the audio, activate the time-scale-pitch tool from the toolbar, and drag the edges of the selection to increase or decrease the tempo accordingly.
- Apply tempo automation: In addition to the above methods, Audacity also offers the option to apply tempo automation. This allows you to create gradual tempo changes or tempo ramps within the selected portion of the audio. To use tempo automation, select the portion, navigate to the “Effect” menu, choose “Tempo” and then “Apply Track Tempo.” This will open a dialogue box where you can define the tempo changes over time using keyframes or control points.
Experiment with these different methods to find the one that works best for your specific audio and desired outcome. Remember to preview the changes as you make them to ensure they align with your vision.
Once you are satisfied with the adjusted tempo, you can proceed to the next step: previewing the changes to ensure they have the desired effect.
Step 5: Previewing the changes
After adjusting the tempo of the selected portion of the audio, it’s crucial to preview the changes to ensure they have the desired effect. This step allows you to listen to the modified section and make any necessary adjustments before proceeding further.
To preview the changes in Audacity, follow these steps:
- Select the modified portion: Ensure that the portion of the audio with the tempo adjustments is still selected.
- Click the play button: Located in the toolbar at the top of the Audacity interface, the play button allows you to listen to the selected portion.
- Listen carefully: Pay attention to the tempo changes and how they affect the overall sound of the audio file. Note any areas that might require further modifications or fine-tuning.
While previewing, you can use the playback controls in Audacity to pause, rewind, or fast-forward to specific sections within the selected portion. This gives you the flexibility to analyze the changes and make any necessary adjustments in real-time.
If you are not satisfied with the changes or feel that additional tweaks are needed, you can go back to Step 4, “Adjusting the tempo,” and make the desired modifications. Continue previewing the changes until you achieve the desired effect.
Previewing the changes is a crucial step in the workflow as it helps you ensure that the tempo adjustments align with your artistic vision. Once you are satisfied with the modified audio, you can proceed to the final step: exporting the file.
Step 6: Exporting the modified audio
Once you have successfully adjusted the tempo of the selected portion of the audio and previewed the changes, it’s time to export the modified audio file from Audacity. Exporting the file allows you to save the changes you’ve made and use the modified version for various purposes, such as sharing online or incorporating it into other projects.
To export the modified audio in Audacity, follow these steps:
- Select the portion: Make sure that the portion of the audio with the tempo adjustments is still selected. You can check the selection by visually confirming if the waveform is highlighted.
- Navigate to the “File” menu: Click on the “File” menu located at the top left corner of the Audacity interface.
- Select “Export”: From the drop-down menu, choose the “Export” option.
- Choose the format and location: A dialog box will appear, allowing you to specify the file name, format (such as MP3 or WAV), and the location on your computer where you want to save the exported audio. Select the desired options based on your preferences.
- Click “Save” or “Export”: Once you have chosen the format and location, click the “Save” or “Export” button to initiate the exporting process.
Depending on the size and length of the audio file, the exporting process may take a few moments. After the process is complete, you will have the modified audio file saved to the specified location on your computer.
Once the file is exported, you can use it in various ways, such as sharing it on music platforms, incorporating it into video projects, or simply enjoying it on your personal devices.
Congratulations! You have successfully changed the tempo of an audio file using Audacity and exported the modified version. With this newfound skill, you can explore endless possibilities in music production and sound editing.
Remember, don’t be afraid to experiment and try different techniques to achieve the desired tempo for your audio. Audacity provides a versatile platform for you to unleash your creativity and transform your music.
Enjoy the process of tempo manipulation and keep exploring the exciting world of audio editing!
Conclusion
Changing the tempo of a song can completely transform its mood, energy, and overall feel. With Audacity, a free and powerful audio editing software, you can easily adjust the tempo of any audio file to suit your creative vision. In this guide, we have walked you through the process of changing the tempo using Audacity, from opening the program to exporting the modified audio.
We started by familiarizing ourselves with the Audacity interface and importing the audio file. Then, we learned how to select specific portions of the audio to modify the tempo. After that, we explored different methods to adjust the tempo, including changing the tempo percentage, using the time-scale-pitch tool, and applying tempo automation.
It’s important to remember the significance of previewing the changes as you make them, ensuring they align with your desired outcome. By taking the time to listen and assess the modified audio, you can make any necessary adjustments to achieve the desired effect.
Finally, after previewing the changes and being satisfied with the modified audio, we discussed the process of exporting the file. Exporting allows you to save the modified audio in various formats and use it for sharing, incorporating into projects, or simply enjoying it yourself.
By mastering the art of tempo adjustment in Audacity, you have gained a valuable skill for music production, remixing, podcast editing, and more. With your newfound knowledge, you can explore endless possibilities in shaping and transforming audio to match your creative ideas.
Remember, don’t be afraid to experiment, try different techniques, and let your creativity soar. Audacity provides you with the foundation to explore the world of audio editing and unlock your artistic potential.
So, dive into Audacity, have fun changing tempos, and create unique, captivating music that resonates with both yourself and your audience. Happy editing!