Home>Production & Technology>MP3>How To Change Audacity Files To MP3

MP3
How To Change Audacity Files To MP3
Modified: January 22, 2024
Learn how to easily convert Audacity files to MP3 format with our step-by-step guide. Start enjoying your favorite audio tracks in MP3 without hassle.
(Many of the links in this article redirect to a specific reviewed product. Your purchase of these products through affiliate links helps to generate commission for AudioLover.com, at no extra cost. Learn more)
Table of Contents
Introduction
Welcome to the world of digital audio where MP3 files have become the go-to format for music lovers and audio enthusiasts alike. However, if you’ve been using Audacity, the popular open-source audio editing software, you may have noticed that it saves files in a different format – WAV (Waveform Audio File Format). While WAV files offer high-quality audio, they tend to be larger in size, making it inconvenient for sharing and storing. If you’ve been wondering how to change Audacity files to MP3, we’ve got you covered.
In this article, we’ll guide you through the step-by-step process of converting Audacity files to the universally supported MP3 format. By converting your Audacity files to MP3, you can reduce the file size without compromising the audio quality, making it easier to share and manage your audio projects.
To accomplish this task, we’ll make use of the LAME MP3 Encoder, a popular and powerful tool that allows Audacity to export files in the MP3 format. Don’t worry – it’s not as complicated as it sounds! We’ll break down the process into easy-to-follow steps and provide helpful tips along the way. So, let’s get started on your journey to converting your Audacity files to MP3!
Step 1: Installing the LAME MP3 Encoder
Before we can start converting Audacity files to MP3, we need to install the LAME MP3 Encoder. This encoder allows Audacity to export files as MP3, giving us the flexibility to convert our audio projects.
Follow these steps to install the LAME MP3 Encoder:
- Visit the official LAME website at https://lame.sourceforge.io/.
- Look for the download section or navigate to the downloads page.
- Select the appropriate version of the LAME MP3 Encoder based on your operating system (Windows, macOS, or Linux).
- Once the download is complete, locate the downloaded file and run the installation program.
- Follow the on-screen instructions to complete the installation process.
Congratulations! You’ve successfully installed the LAME MP3 Encoder on your computer. Now, let’s move on to the next step and start converting your Audacity files to MP3.
Pro Tip: If you’re using Audacity on Windows, make sure to remember the location where you installed the LAME MP3 Encoder. We’ll need to specify this location in Audacity to enable the MP3 export functionality.
Step 2: Exporting Audacity Files as WAV
Now that we have the LAME MP3 Encoder installed, let’s proceed with exporting your Audacity files as WAV. This step is crucial because we need the WAV files as a starting point for the conversion process to MP3.
Follow these steps to export your Audacity files as WAV:
- Open Audacity on your computer.
- Open the Audacity project or audio file you want to convert to MP3.
- Ensure that your audio project is edited and ready for export.
- Go to the “File” menu and select “Export” or use the keyboard shortcut Ctrl+Shift+E (Windows/Linux) or Command+Shift+E (macOS).
- In the export dialog box, choose a location on your computer where you want to save the WAV file.
- Give the file a descriptive name and select WAV as the file format.
- Click “Save” to start the export process.
- Audacity will export your audio project as a WAV file to the specified location.
Remember to repeat this process for each Audacity project or audio file you want to convert to MP3. Once you have exported your Audacity files as WAV, you’re ready to move on to the next step of converting them to MP3 using the LAME MP3 Encoder.
Pro Tip: It’s always a good practice to keep the original Audacity project files as backup before converting them to MP3. This ensures that you have the editable versions available for future modifications or edits.
Step 3: Converting WAV Files to MP3 using the LAME Encoder
Now that you have your Audacity files exported as WAV, it’s time to convert them to the popular MP3 format using the LAME MP3 Encoder. This step will allow you to reduce the file size while maintaining a high level of audio quality.
Follow these steps to convert your WAV files to MP3:
- Launch Audacity on your computer.
- Go to the “File” menu and select “Open.”
- Navigate to the location where you saved the WAV file and select it.
- Audacity will import the WAV file into the project.
- Click on the “File” menu and select “Export” or use the shortcut Ctrl+Shift+E (Windows/Linux) or Command+Shift+E (macOS).
- In the export dialog box, choose a location on your computer to save the MP3 file.
- Enter a name for the file and select “MP3 Files” in the “Save as type” dropdown menu.
- Click “Save” to start the conversion process.
- Audacity will use the LAME MP3 Encoder to convert the WAV file to MP3.
- Wait for the conversion process to complete.
Congratulations! You’ve successfully converted your WAV file to MP3 using the LAME MP3 Encoder. Repeat these steps for each WAV file you want to convert. You now have your Audacity files transformed into the widely supported MP3 format.
Pro Tip: If you encounter any issues during the conversion process, make sure that you have correctly installed the LAME MP3 Encoder and set the proper location in Audacity preferences.
Step 4: Adjusting MP3 Export Settings in Audacity
Before finalizing the conversion of your Audacity files to MP3, it’s essential to adjust the MP3 export settings to ensure the desired audio quality and file size. Audacity provides various options that allow you to customize the MP3 export settings according to your preferences.
Follow these steps to adjust the MP3 export settings in Audacity:
- Launch Audacity on your computer.
- Open the Audacity project or audio file you want to convert to MP3.
- Go to the “File” menu and select “Export” or use the keyboard shortcut Ctrl+Shift+E (Windows/Linux) or Command+Shift+E (macOS).
- In the export dialog box, select “MP3 Files” in the “Save as type” dropdown menu if it’s not already selected.
- Before clicking “Save,” click on the “Options” button to open the MP3 Export Options dialog box.
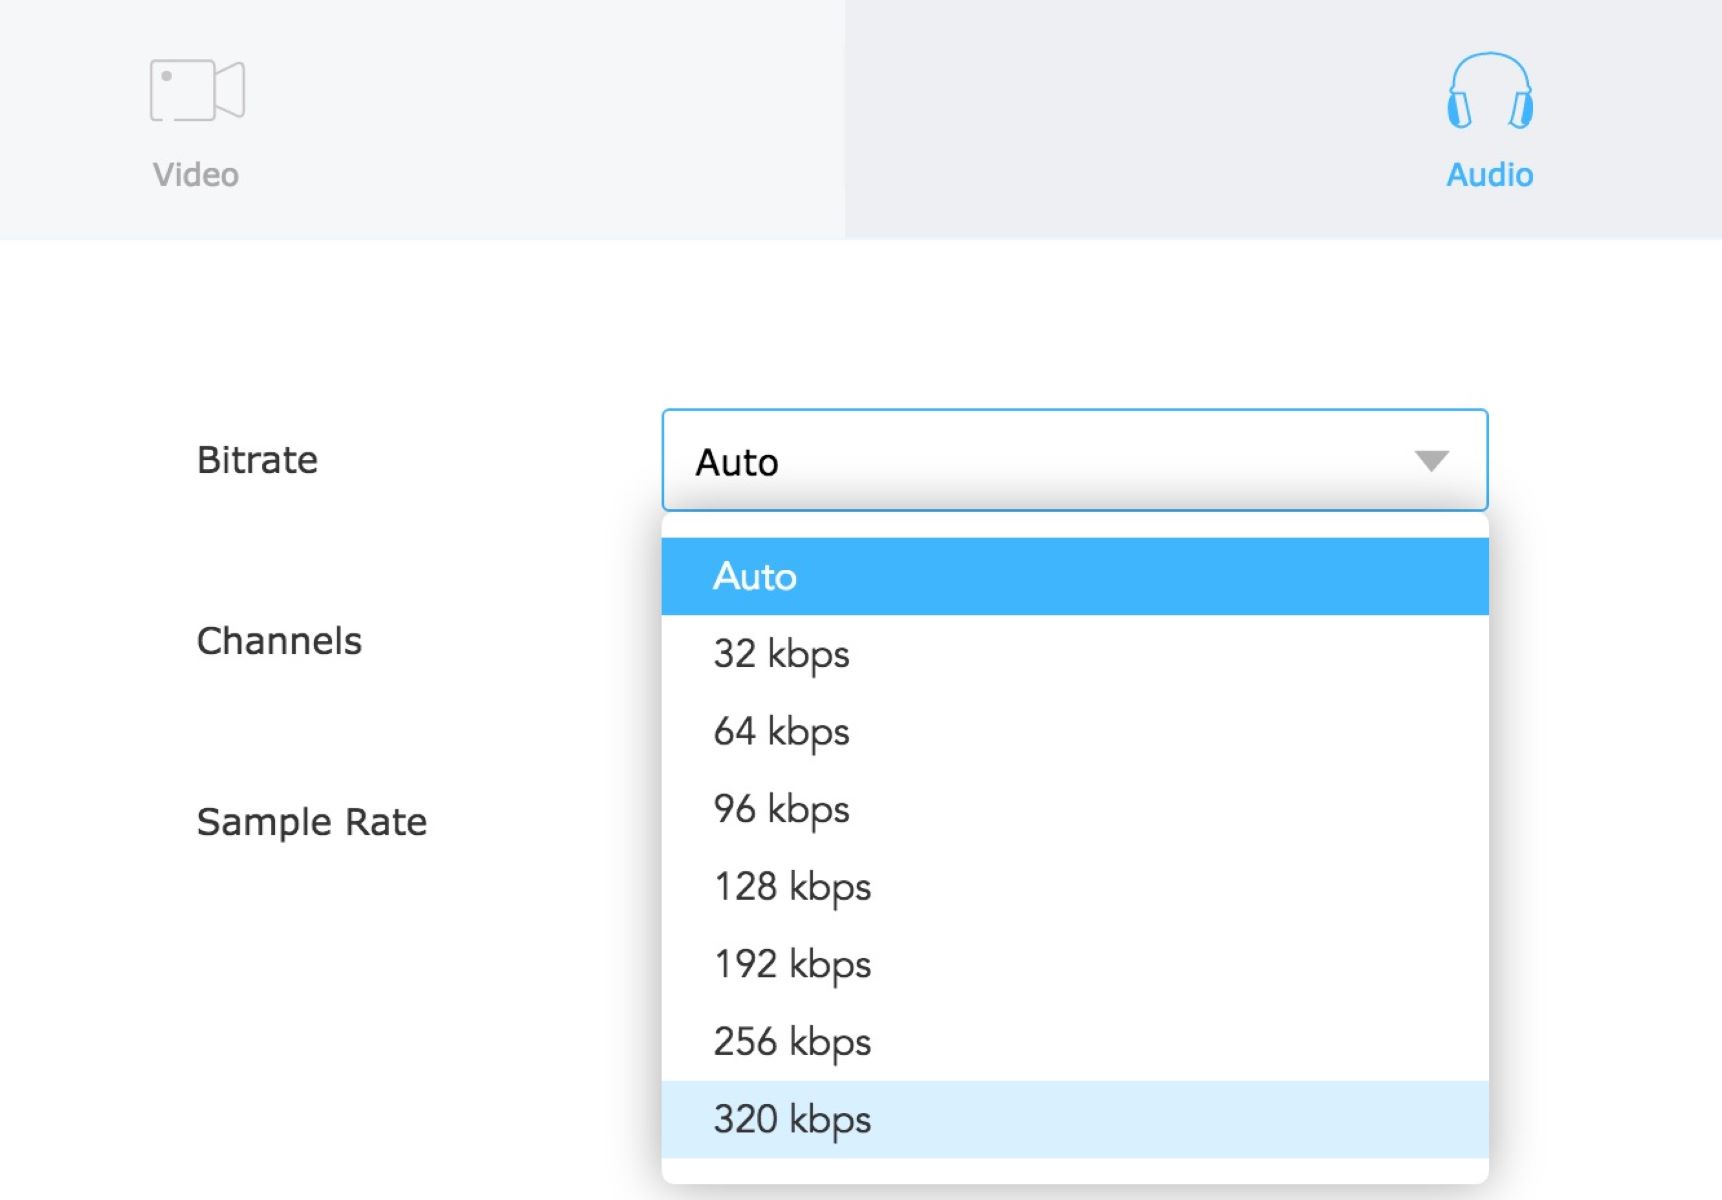
- Under the “Quality” section, you can set the desired bit rate for the MP3 file. Higher bit rates result in better audio quality but larger file sizes.
- Adjust the other options such as channel mode, sample rate, and variable speed if needed.
- Click “OK” to save the changes and return to the export dialog box.
- Specify a location on your computer to save the MP3 file and enter a name for the file.
- Click “Save” to start the conversion process.
- Audacity will export the Audacity project or audio file as an MP3 file using the adjusted settings.
By adjusting the MP3 export settings, you can optimize the balance between audio quality and file size, depending on your specific requirements. Experimenting with different settings can help you find the perfect combination for your needs.
Pro Tip: Be mindful that extremely low bit rates can lead to noticeable loss of audio quality, while excessively high bit rates may result in unnecessarily large file sizes. It’s essential to strike a balance based on your preferences and the intended use of the MP3 files.
Conclusion
Converting Audacity files to MP3 format is now within your reach, thanks to the power of the LAME MP3 Encoder and Audacity’s export functionality. By following the step-by-step process outlined in this article, you can easily transform your Audacity projects into the widely compatible and space-saving MP3 format.
The installation of the LAME MP3 Encoder sets the stage for the conversion process. With the encoder in place, you can proceed to export your Audacity files as WAV, the intermediate format necessary for MP3 conversion. Once you have exported your files as WAV, using Audacity’s straightforward export functionality, you’re ready to move on to converting them to MP3 using the LAME MP3 Encoder.
Adjusting the MP3 export settings in Audacity allows you to fine-tune the audio quality and file size based on your specific preferences and requirements. You have the flexibility to choose the bit rate, channel mode, sample rate, and more, ensuring your MP3 files meet your desired standards.
As you embark on your journey of converting Audacity files to MP3, feel free to experiment with different settings and explore the possibilities. Remember to keep a backup of your original Audacity project files for future modifications.
With your Audacity files now successfully converted to MP3, you can enjoy the benefits of smaller file sizes without sacrificing audio quality. Share your music, podcasts, or other audio projects with ease, knowing that they can be played on various devices and platforms that support the universally accepted MP3 format.
So, what are you waiting for? Start converting your Audacity files to MP3 today and unlock a world of possibilities for sharing and enjoying your audio creations!