Home>Production & Technology>Tempo>How To Change Tempo In Finale Print Music
Tempo
How To Change Tempo In Finale Print Music
Modified: January 22, 2024
Learn how to easily change the tempo in Finale PrintMusic with step-by-step instructions and optimize your musical compositions for a seamless performance.
(Many of the links in this article redirect to a specific reviewed product. Your purchase of these products through affiliate links helps to generate commission for AudioLover.com, at no extra cost. Learn more)
Table of Contents
Introduction
Finale Print Music is a powerful tool for composers and musicians alike, providing a range of features to create and edit musical scores. One of the essential aspects of any musical composition is tempo, which refers to the speed or pace at which a piece of music is played. Controlling and adjusting the tempo is crucial to bring out the intended emotions and convey the musical ideas effectively.
In this article, we will explore how to change tempo in Finale Print Music, allowing you to modify the speed of your musical compositions with ease. Whether you’re looking to speed things up for an exciting section or slow it down for a more relaxed mood, understanding the process of adjusting tempo will empower you to fine-tune your musical creations.
By the end of this article, you’ll have a clear understanding of how to manipulate the tempo in your scores using Finale Print Music’s powerful features. So let’s dive in and explore the world of tempo adjustment!
Understanding Tempo in Finale Print Music
Before we dive into the process of changing tempo in Finale Print Music, it’s important to have a solid understanding of what tempo is and how it impacts a musical composition.
Tempo, often indicated by a term or a metronome marking, refers to the speed at which a piece of music should be played. It sets the overall pace and rhythm of the composition and greatly influences the mood and expressive qualities of the music.
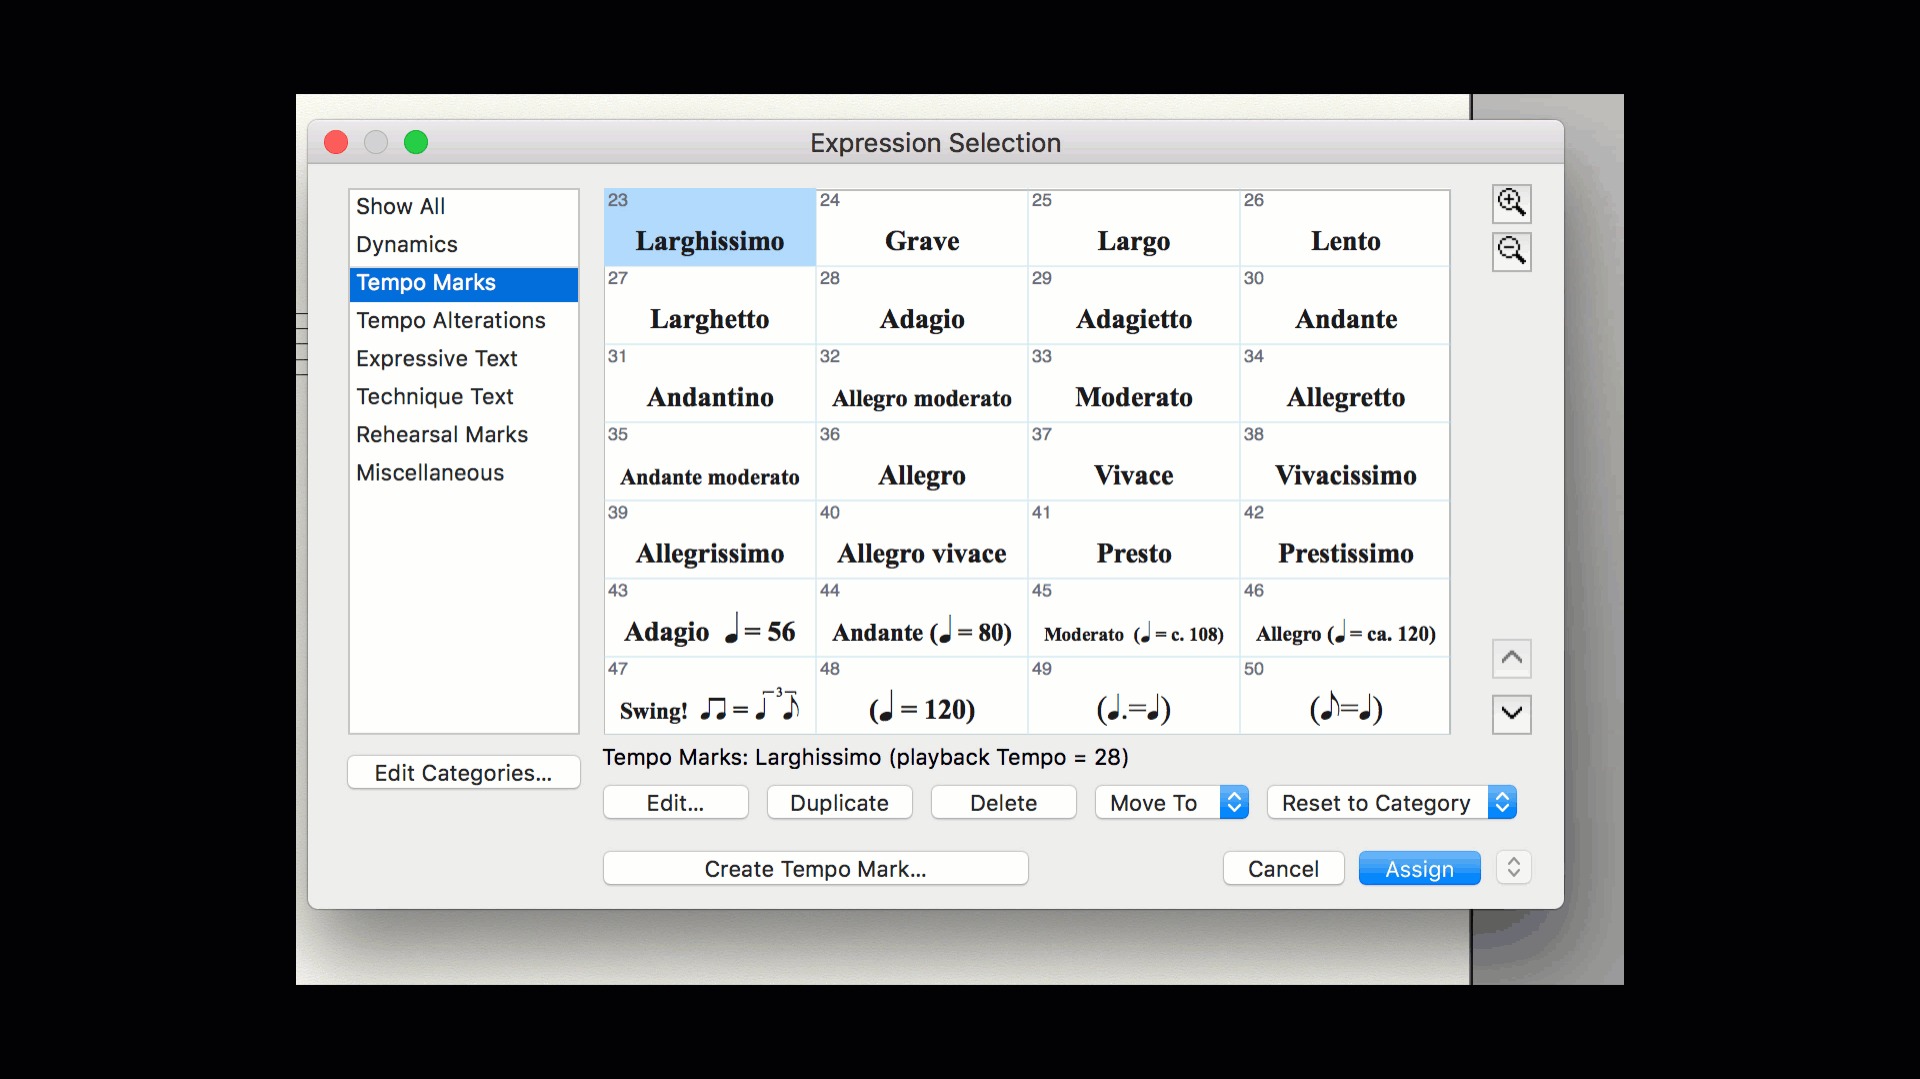
In Finale Print Music, tempo is typically controlled using metronome marks, which specify the desired number of beats per minute (BPM). You can also use tempo markings like “Largo” (very slow) or “Presto” (very fast) to convey the tempo in a more subjective manner.
It’s worth noting that tempo changes can occur within a musical score, allowing for variations in speed and intensity to create dynamic and engaging performances. These changes can be gradual (accelerando or ritardando) or sudden (fermata or a tempo).
Understanding the impact of tempo on your compositions is crucial to effectively communicate your musical ideas. Whether you want to evoke a sense of serenity with a slow tempo or create excitement and energy with a fast tempo, mastering tempo control in Finale Print Music will enable you to bring your musical vision to life.
Now that we have a solid understanding of tempo, let’s move on to the practical steps of changing tempo in Finale Print Music.
Step 1: Open your Score in Finale Print Music
The first step in changing the tempo of your composition in Finale Print Music is to open your score in the software. Launch Finale Print Music and locate the score you want to work on.
If you’re starting a new project, you can create a new score by selecting “New” from the File menu. This will open a blank score where you can begin composing your musical masterpiece.
If you already have an existing score that you want to modify, go to the File menu and select “Open.” Browse your computer or storage device to find the score file and click “Open” to load it into Finale Print Music.
Once your score is open in the software, you’re ready to proceed to the next step in adjusting the tempo.
It’s important to note that Finale Print Music supports a wide range of file formats, including its native .MUS format as well as MIDI, XML, and more. This allows you to import and work on scores from other software or devices, providing flexibility in your composition process.
By opening your score in Finale Print Music, you gain access to all the tools and features necessary to modify and optimize tempo. So, ensure that your score is loaded and ready before moving on to the next step.
Step 2: Access the Tempo Tool
Once you have your score open in Finale Print Music, it’s time to access the Tempo tool, which will allow you to make changes to the tempo of your composition.
To access the Tempo tool, navigate to the toolbar at the top of the Finale Print Music window. Look for the icon that resembles a metronome or a tempo marking. This is the Tempo tool.
Click on the Tempo tool icon to activate it. You may need to hover your mouse over the icon to see its description or tooltip.
When the Tempo tool is active, you’ll notice that your cursor changes to a metronome icon. This signifies that you’re ready to make tempo adjustments within your score.
If you can’t locate the Tempo tool icon on the toolbar, you can also access it by going to the Tools menu and selecting “Tempo.”
Now that you’ve successfully accessed the Tempo tool, you’re ready to move on to the next step and start adjusting the tempo of your composition in Finale Print Music.
Keep in mind that accessing the Tempo tool is a crucial step in the tempo adjustment process. Without activating this tool, you won’t be able to make changes or modifications to the tempo within your score.
With the Tempo tool at your disposal, you have the power to control and shape the tempo of your musical composition. So, let’s move on to the next step and explore how to adjust the tempo in Finale Print Music.
Step 3: Adjust the Tempo
With the Tempo tool activated in Finale Print Music, you can now proceed to adjust the tempo of your composition. Here’s how:
- Select the measure where you want to change the tempo.
- Click and drag your cursor across the desired range of measures to highlight them.
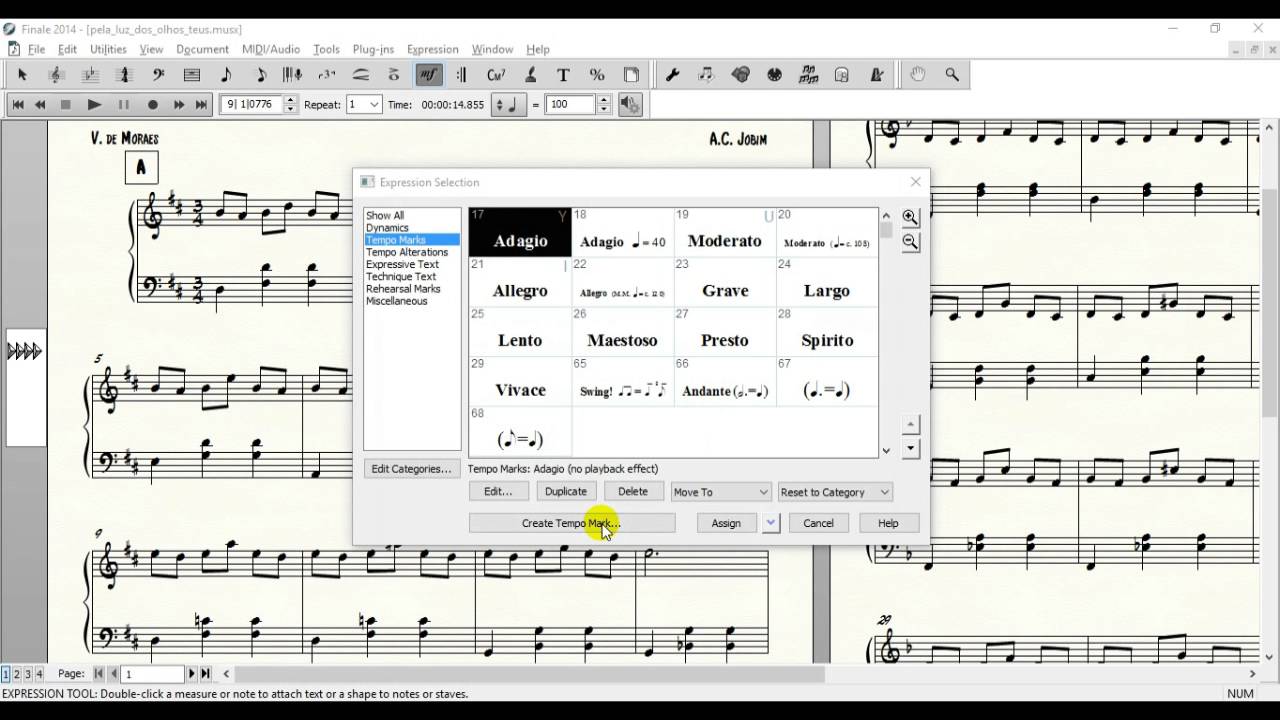
- Once the measures are highlighted, locate the Tempo Input Palette on your screen. This palette contains various tempo symbols, markings, and values.
- Choose the tempo value or symbol that represents the desired speed for the selected measures. You can select a specific BPM value or use tempo markings like “Allegro” or “Adagio.”
- Click on the desired tempo value or symbol in the Tempo Input Palette and release the mouse button.
- Finale Print Music will automatically apply the selected tempo to the highlighted measures.
- If you want to apply different tempos to different sections of your composition, repeat steps 1 to 6 for each section.
Keep in mind that tempo adjustments can be made at specific points within your score or applied to larger sections of measures. The flexibility of Finale Print Music allows you to customize tempo changes according to your musical intentions.
By adjusting the tempo in Finale Print Music, you have the ability to bring out the desired emotions, intensify or relax the pacing, and enhance the overall impact of your musical composition.
Now that you’ve successfully adjusted the tempo in your composition, it’s time to proceed to the next step and apply these changes to your score.
Step 4: Apply the Changes
After adjusting the tempo for your desired measures in Finale Print Music, you need to ensure that the changes are applied correctly. Follow these steps to apply the tempo changes to your score:
- Review the tempo adjustments you made using the Tempo tool. Make sure that the selected measures are highlighted and that the tempo values or symbols are correct.
- Go to the Playback menu and select “Apply Changes to Score.” This action will apply the tempo adjustments you made to your score.
- Finale Print Music will update the tempo markings and values within the highlighted measures to reflect your changes.
- Verify that the tempo changes are accurately applied by visually inspecting your score. Look for the updated tempo markings and symbols at the respective measures.
- If you need to make further adjustments, you can repeat the previous steps and modify the tempo accordingly.
It’s essential to apply the tempo changes to your score to ensure consistency and clarity in your musical composition. This step finalizes the modifications you made using the Tempo tool, making your score reflect the intended tempo adjustments.
By applying the changes, you can confidently proceed to play back your composition and review the tempo modifications in action.
Now that you’ve successfully applied the tempo changes, let’s move on to the final step – playing back and reviewing your modified score.
Step 5: Playback and Review
Once you’ve applied the tempo changes to your score in Finale Print Music, it’s time to play back your composition and review the modifications. Follow these steps:
- Ensure that your score is still open in Finale Print Music.
- Go to the Playback menu and select “Play” or use the associated keyboard shortcut (usually the spacebar).
- Finale Print Music will start playing back your composition, taking into account the tempo adjustments you made.
- Listen carefully to the playback and observe how the tempo changes affect the overall feel and flow of your composition.
- If you notice any issues or discrepancies in the tempo, you can go back to the Tempo tool and make further adjustments.
- Continue to play back and review your composition until you are satisfied with the tempo modifications and the overall sound.
Playback and review are essential steps in the tempo adjustment process as they allow you to experience how the tempo changes impact your composition in a more dynamic and realistic manner.
Take this opportunity to fine-tune your tempo adjustments, making sure that the pacing and mood align with your artistic intentions and musical vision.
After completing this step, you can step back and appreciate the impact of your tempo changes on your musical composition.
Congratulations! You have successfully adjusted the tempo in Finale Print Music, applied the changes, and reviewed the modified composition through playback. Your score now reflects the desired tempo modifications, allowing you to create a more captivating and expressive musical experience.
Remember, the tempo of your composition plays a significant role in shaping its emotional impact, rhythm, and overall quality. With Finale Print Music’s powerful features and your newfound understanding of tempo adjustment, you have the tools to perfect your musical masterpieces!
Additional Tips and Considerations
While the steps mentioned above guide you through the process of changing tempo in Finale Print Music, here are some additional tips and considerations to enhance your tempo adjustment experience:
- Experiment with different tempos: Don’t be afraid to explore different tempo options and experiment with various speeds to find the one that best captures the desired mood and emotion of your composition.
- Utilize gradual tempo changes: Instead of making sudden tempo shifts, consider using gradual accelerando or ritardando techniques to create smooth transitions and add depth to your musical phrases.
- Pay attention to context: When adjusting tempo, consider the musical context. For example, a fast tempo might work well in an energetic section, while a slow tempo might be more suitable for a reflective or melancholic passage.
- Use playback controls: Take advantage of Finale Print Music’s playback controls to listen to specific sections, loop certain parts, or adjust the playback speed. This allows you to closely analyze the impact of your tempo changes.
- Collaborate with musicians: If you’re working with other musicians, such as an ensemble or band, communicate your desired tempo changes to ensure a synchronized performance and a cohesive musical interpretation.
- Consider dynamic markings: Alongside tempo adjustments, consider incorporating dynamic markings, such as crescendos and decrescendos, to further enhance the expressive qualities of your composition.
- Save multiple versions: If you want to compare different tempo options or revert to a previous tempo, create multiple versions of your score by using the “Save As” function. This allows you to keep track of your creative decisions.
Remember, adjusting tempo is not only a technical process but also an artistic one. Trust your instincts and use your musical intuition to guide you in finding the perfect tempo for your composition.
By keeping these additional tips and considerations in mind, you can elevate your tempo adjustments in Finale Print Music and create captivating musical experiences.
Conclusion
Changing tempo in Finale Print Music allows you to have complete control over the pacing and mood of your musical compositions. With the Tempo tool at your disposal, you can effortlessly adjust the tempo to create the desired emotional impact and bring your compositions to life.
Throughout this article, we’ve explored the step-by-step process of changing tempo in Finale Print Music, from opening your score to applying the tempo changes and reviewing them through playback. By following these steps and considering the additional tips and considerations, you can fine-tune your compositions and achieve the desired artistic vision.
Remember, tempo is a powerful element that influences the overall emotion and rhythm of your music. Don’t be afraid to experiment, explore different options, and trust your musical intuition when adjusting tempo in Finale Print Music.
As you continue on your musical journey, take advantage of the diverse features and tools that Finale Print Music offers. Collaborate with other musicians, listen to the playback of your modified score, and make further adjustments as necessary.
By mastering the art of tempo adjustment in Finale Print Music, you can captivate your audience, evoke the intended emotions, and create truly immersive musical experiences. So go ahead, open your score, access the Tempo tool, and let your compositions shine with the perfect tempo adjustments!