Home>Devices & Equipment>Radio>IHome Clock Radio: How To Set Time
Radio
IHome Clock Radio: How To Set Time
Published: November 10, 2023
Learn how to set the time on your iHome clock radio and ensure your radio is always accurate and ready to go. Perfect for radio enthusiasts.
(Many of the links in this article redirect to a specific reviewed product. Your purchase of these products through affiliate links helps to generate commission for AudioLover.com, at no extra cost. Learn more)
Table of Contents
Introduction
Welcome to the world of iHome clock radios, where you can wake up to your favorite tunes and start your day on a high note. Whether you’re a music lover or simply rely on a dependable alarm to get you out of bed, the iHome clock radio is a versatile and feature-packed device that makes mornings a breeze.
Setting the time on your iHome clock radio is a straightforward process that ensures accurate timekeeping and synchronization with your daily routine. In this article, we’ll guide you through the steps to set the time on your iHome clock radio, allowing you to wake up at the right hour and stay punctual throughout the day.
With its sleek design, intuitive controls, and advanced features, the iHome clock radio is not just a functional timepiece; it’s also a stylish addition to your bedside table. Whether you prefer the classic look of a digital display or the warm glow of a clock face, iHome offers a variety of models to suit your aesthetic preferences.
But before we dive into the specifics of setting the time on your iHome clock radio, let’s take a moment to explore some of the key features that make it a popular choice among music enthusiasts and alarm clock users alike.
First and foremost, the iHome clock radio doubles as a speaker, allowing you to connect your devices and enjoy your favorite songs, podcasts, or audiobooks in crystal-clear quality. It’s equipped with Bluetooth technology, enabling wireless streaming from your smartphone, tablet, or computer.
Another standout feature of the iHome clock radio is its dual alarm system, which allows you to set separate wake-up times for different days of the week. Whether you need to wake up early for work on weekdays or prefer to sleep in on weekends, the iHome clock radio has you covered.
Furthermore, the iHome clock radio offers USB charging ports, so you can conveniently charge your devices while you sleep. With the built-in FM radio, you can tune in to your favorite stations and stay up to date with the latest news, weather forecasts, and music releases.
Now that you’re familiar with some of the impressive features of the iHome clock radio, it’s time to dive into the step-by-step process of setting the time. Follow along as we guide you through each stage, ensuring that you’ll never miss a beat and always start your day on time with the iHome clock radio.
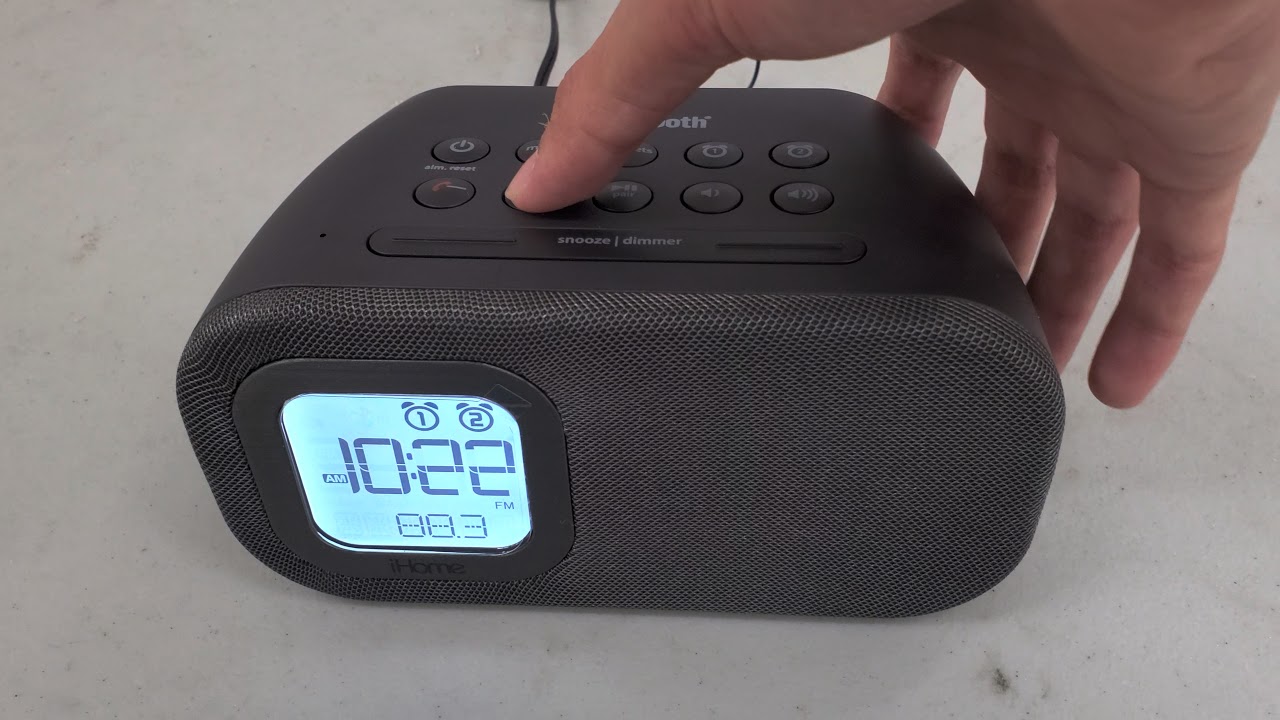
Step 1: Powering on the iHome Clock Radio
Before we can proceed with setting the time on your iHome clock radio, let’s make sure it’s powered on and ready to go. Follow these simple steps to power on your device:
- Locate the power button on your iHome clock radio. It is usually located on the top, front, or side of the device.
- Press and hold the power button for a few seconds until the display or indicator lights up. This signifies that the clock radio is now powered on.
- If your iHome clock radio has a separate power adapter, make sure it is securely plugged into a power outlet. Ensure that the power outlet is functioning properly by testing it with another device if needed.
- If your clock radio is battery-powered, make sure you have inserted fresh batteries into the designated compartment. Check the battery polarity to ensure they are inserted correctly.
Once your iHome clock radio is powered on, you’re ready to move on to the next step of setting the time. By ensuring that your device is properly powered, you can trust that it will keep accurate time and provide you with the best user experience.
It’s worth noting that some iHome clock radios may have additional power-saving features, such as automatic dimming or sleep mode. These features help conserve energy and prolong the battery or power adapter’s lifespan. If you encounter any issues powering on your clock radio, consult the user manual or contact iHome customer support for assistance.
Now that your iHome clock radio is up and running, let’s move on to the next step: accessing the time setting menu. This is where you’ll be able to adjust the hours and minutes to ensure an accurate and personalized time display on your device.
Step 2: Accessing the Time Setting Menu
To set the time on your iHome clock radio, you’ll need to access the time setting menu. Follow these steps to access the menu and begin the time adjustment process:
- Look for the “Menu” button on your iHome clock radio. It is usually labeled and located near the display or control panel.
- Press the “Menu” button to enter the settings menu. Depending on your clock radio model, you may need to press and hold the button for a few seconds to access the menu.
- Once in the menu, use the navigation buttons or knobs on your clock radio to scroll through the available settings options. Look for an option that is labeled “Clock,” “Time,” or something similar.
- Select the “Clock” or “Time” option from the menu by pressing the corresponding button or turning the knob. This will take you to the time setting screen.
It’s important to note that the exact method of accessing the time setting menu may vary depending on your specific iHome clock radio model. If you’re unable to find the “Menu” button or encounter any difficulties, refer to the user manual provided with your device or reach out to iHome customer support for assistance.
Once you’ve successfully accessed the time setting menu, you’re ready to move on to the next step: adjusting the hours. This will ensure that the clock radio displays the correct hour, allowing you to wake up at the desired time.
Step 3: Adjusting the Hours
Now that you’ve accessed the time setting menu on your iHome clock radio, it’s time to adjust the hours. Follow these simple steps to ensure that the clock radio displays the correct hour:
- Look for the hour setting option on the time setting screen. It is typically labeled “Hour” or “Hr.”
- Using the navigation buttons or knobs on your clock radio, increase or decrease the hour value to match the current time. Some clock radios may have separate buttons or knobs for each digit of the hour.
- Pay attention to whether your clock radio operates on a 12-hour or 24-hour format. If it’s a 12-hour format, make sure to set the appropriate AM or PM designation for the time.
- Once you’ve set the correct hour, navigate to the next setting option or proceed to the step of adjusting the minutes.
It’s important to note that during the adjustment process, you may encounter additional options in the time setting menu, such as daylight savings time or time zone settings. If needed, make the necessary adjustments to ensure that your clock radio reflects the correct time accurately.
If you make a mistake while setting the hour or need to make adjustments later, simply repeat these steps to access the time setting menu and update the hour value accordingly.
Now that you’ve successfully adjusted the hours on your iHome clock radio, it’s time to move on to the next step: adjusting the minutes to fine-tune the time display accurately.
Step 4: Adjusting the Minutes
Now that you’ve set the correct hour on your iHome clock radio, it’s time to fine-tune the time display by adjusting the minutes. Follow these simple steps to ensure that the clock radio reflects the accurate minute:
- Locate the minute setting option on the time setting screen. It is typically labeled “Minute” or “Min.”
- Using the navigation buttons or knobs on your clock radio, increase or decrease the minute value to match the current time.
- Take note of the minute increments on your clock radio’s display. Some models may allow you to adjust the minutes in one-minute increments, while others may offer increments of five minutes or even one minute and 10 seconds.
- Continue adjusting the minutes until you’ve precisely set the correct minute value.
As you adjust the minutes, keep an eye on the time display to ensure that it accurately reflects the current time. If needed, make small incremental adjustments to fine-tune the minutes until it aligns with the desired time.
It’s worth mentioning that some iHome clock radios may offer additional options in the time setting menu, such as time synchronization with a radio signal or online service. If your clock radio provides these features, follow the on-screen prompts or refer to the user manual for guidance on how to utilize them effectively.
Once you’ve successfully adjusted the minutes to the correct value, you’re almost there! Now, let’s move on to the next step: saving the time and ensuring that it’s set correctly on your iHome clock radio.
Step 5: Saving the Time
After adjusting the hours and minutes on your iHome clock radio, it’s time to save the newly set time to ensure that it remains accurate. Follow these simple steps to save the time:
- Look for the “Save” or “Set” button on your clock radio’s time setting screen. It is usually labeled and located near the navigation buttons or knobs.
- Press the “Save” or “Set” button to confirm and save the adjusted time. Some clock radios may require you to press and hold the button for a few seconds for the changes to take effect.
- Observe the display on your clock radio to see if it reflects the newly set time accurately. The display should now show the updated hour and minute values.
If the time displayed on your clock radio has not changed or remains incorrect, repeat the previous steps to re-adjust the hours and minutes. Be sure to save the time again to ensure it is properly updated and saved on your clock radio.
It’s important to note that some iHome clock radios may have a “Sync” or “Auto Time Set” feature, which automatically synchronizes the time with a radio signal or online service. If your clock radio offers this functionality, refer to the user manual to activate and configure it for accurate timekeeping.
Now that you’ve saved the time on your iHome clock radio, it’s time to proceed to the next step: verifying that the set time is displaying correctly on your device.
Step 6: Verifying the Set Time
After saving the newly adjusted time on your iHome clock radio, it’s essential to verify that the set time is accurately displayed on your device. Follow these steps to ensure that the time is correct:
- Take a moment to observe the time displayed on your iHome clock radio. Check if the hour and minute values match the current time.
- If the displayed time is incorrect, double-check the adjustments you made in the previous steps. Repeat the time setting process if necessary, ensuring that you correctly adjust the hours and minutes.
- It’s always a good idea to compare the displayed time on your clock radio with a reliable external time source, such as your smartphone, computer, or an official timekeeping service. This helps ensure that your clock radio is accurately synchronized.
- If you notice any discrepancies between the displayed time on your clock radio and the external time source, make the necessary adjustments again. Pay attention to small timing variations and aim for precise timekeeping.
By verifying the set time on your iHome clock radio, you can have confidence that it will function as a reliable timepiece and ensure that you start your day on time.
It’s also worth mentioning that some iHome clock radios have additional features related to timekeeping, such as snooze functionality, alarm settings, or automatic display brightness adjustments. Familiarize yourself with these features through the user manual provided with your device to make the most out of your iHome clock radio.
Now that you’ve verified the set time on your clock radio, you’re all set! You can enjoy waking up to your favorite music or the sound of your reliable alarm, all thanks to your properly set iHome clock radio.
Step 7: Troubleshooting
While setting the time on your iHome clock radio is typically a straightforward process, you may encounter some occasional challenges or issues. If you run into any problems during the time setting process, follow these troubleshooting tips:
- Ensure that your iHome clock radio is properly powered on. Double-check the power source, whether it’s plugged into a functioning power outlet or has fresh batteries inserted.
- If your clock radio is displaying an incorrect time despite your adjustments, try resetting the device to its factory settings. Consult the user manual for instructions on how to perform a factory reset.
- If your clock radio has an option for automatic time synchronization, verify that this feature is activated and properly configured. Make sure your clock radio is within range of a radio signal or connected to the internet for accurate time updates.
- Make sure the buttons or knobs on your clock radio are functioning correctly. If you find that they are unresponsive or difficult to operate, gently clean the surface with a soft cloth to remove any debris that may be interfering with their function.
- If you continue to experience issues with the time display or other functionalities of your iHome clock radio, consider contacting iHome customer support for further assistance. They can provide specific troubleshooting steps or recommend any necessary repairs or replacements if needed.
Remember to refer to your iHome clock radio’s user manual for detailed troubleshooting guidance specific to your model. Following the troubleshooting steps and seeking assistance when needed will help ensure that your iHome clock radio remains in optimal working condition.
With these troubleshooting tips in mind, you can quickly overcome any hurdles in the time setting process and enjoy the benefits of your properly functioning iHome clock radio.
Conclusion
Congratulations! You’ve successfully learned how to set the time on your iHome clock radio and ensure that it accurately reflects the current hour and minute. With your iHome clock radio properly set, you can wake up on time, enjoy your favorite tunes, and start your day off right.
Throughout this guide, we’ve covered the step-by-step process of powering on the clock radio, accessing the time setting menu, adjusting the hours and minutes, and saving the time. We’ve also discussed how to troubleshoot any potential issues that may arise during the time setting process.
Remember, the iHome clock radio is more than just a timekeeping device. It offers a range of features, such as dual alarms, Bluetooth connectivity, USB charging ports, and FM radio, enhancing your overall experience and adding convenience to your daily routine.
Whether you’re a music lover who enjoys waking up to your favorite songs or someone who relies on a dependable alarm to start the day, the iHome clock radio delivers both functionality and style. Its sleek design and advanced features make it a versatile addition to your bedside table.
By following the steps outlined in this guide, you can confidently set the time on your iHome clock radio and enjoy the peace of mind that comes with accurate timekeeping. Remember to refer to your specific clock radio’s user manual for model-specific instructions and additional features.
Thank you for choosing the iHome clock radio and investing the time to master its time setting process. Now, go ahead and start enjoying your mornings with the perfect soundtrack or the gentle buzz of your reliable alarm. Rise and shine!