Home>Production & Technology>Metronome>How To Set Up The Korg 50 Metronome For 4/4 Time
Metronome
How To Set Up The Korg 50 Metronome For 4/4 Time
Published: January 15, 2024
Learn how to set up the Korg 50 metronome quickly and easily for playing in 4/4 time. Improve your timing and rhythm with this essential musical tool.
(Many of the links in this article redirect to a specific reviewed product. Your purchase of these products through affiliate links helps to generate commission for AudioLover.com, at no extra cost. Learn more)
Table of Contents
- Introduction
- Understanding the Korg 50 Metronome
- Step 1: Powering On the Korg 50 Metronome
- Step 2: Accessing the Settings Menu
- Step 3: Selecting the Time Signature
- Step 4: Setting the Time Signature to 4/4
- Step 5: Adjusting the Tempo
- Step 6: Choosing a Metronome Sound
- Step 7: Fine-tuning the Metronome
- Step 8: Saving and Exiting the Settings Menu
- Conclusion
Introduction
Welcome to the world of metronomes! Whether you’re a musician, a dancer, or simply someone looking to improve their sense of rhythm, a metronome can be a valuable tool. In this article, we will specifically delve into how to set up the Korg 50 metronome for 4/4 time, one of the most commonly used time signatures in music.
The Korg 50 metronome is a versatile and user-friendly device that offers a wide range of features to help you stay on beat. By setting it up properly, you can ensure that you’re practicing or performing in perfect sync with the desired tempo and time signature.
Whether you’re a beginner or an experienced musician, it’s crucial to understand the basics of setting up a metronome, as it serves as the foundation for maintaining a steady rhythm. In this guide, we’ll walk you through the step-by-step process of setting up the Korg 50 metronome for 4/4 time and provide additional tips to help you optimize your metronome usage.
With the Korg 50 metronome, you can fine-tune your timing, develop your sense of rhythm, and improve your overall musical performance. So, let’s dive in and discover how to set up this powerful tool to make the most out of your practice sessions or performances.
Understanding the Korg 50 Metronome
Before we jump into the setup process, let’s take a moment to familiarize ourselves with the Korg 50 metronome and the features it offers.
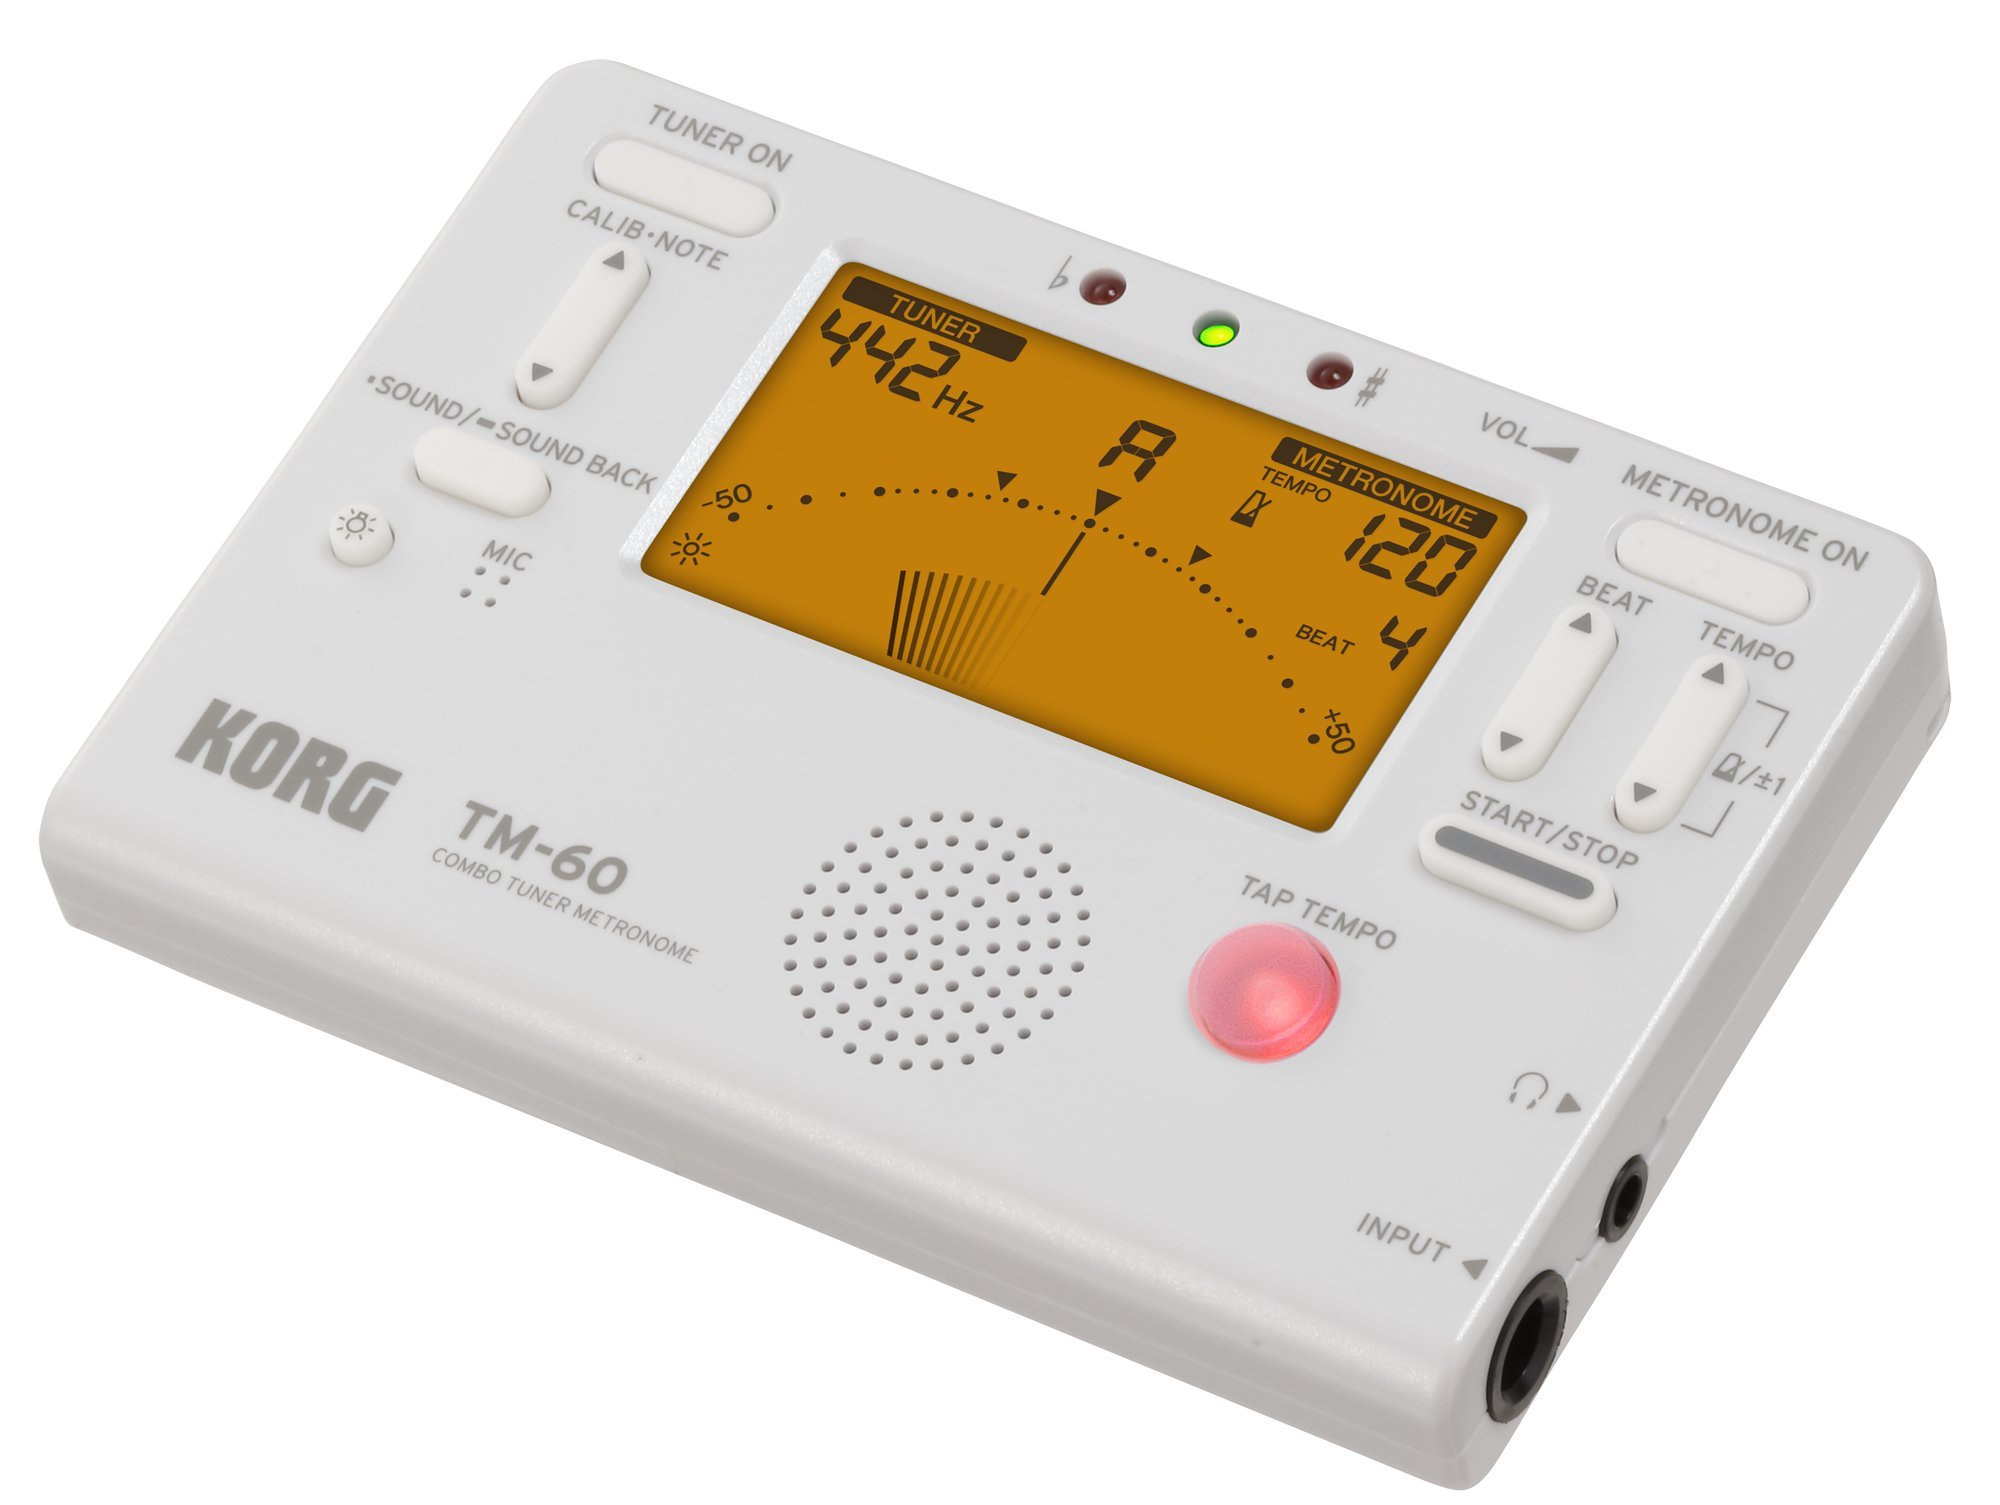
The Korg 50 metronome is a portable electronic device designed to help musicians maintain a consistent tempo and stay in sync with the desired rhythm. It comes equipped with a variety of functions and settings that can be customized to suit your specific needs. Here are a few key features to keep in mind:
- Tempo Range: The Korg 50 metronome allows you to set a tempo within a wide range, typically from 30 to 252 beats per minute (BPM). This flexibility makes it suitable for various musical genres, from slow ballads to fast-paced songs.
- Time Signatures: The Korg 50 metronome supports different time signatures, including the popular 4/4 time. Time signatures determine the number of beats in each measure and the type of note that receives one beat. It’s important to set the correct time signature to ensure accurate metronome playback.
- Metronome Sounds: The Korg 50 metronome offers a range of sounds to choose from for the metronome’s click or tick. This allows you to find a sound that is pleasing to your ears and easy to follow.
- Volume Control: You have the option to adjust the volume of the metronome to your preference. This flexibility ensures that the metronome is audible enough for you to hear, but not overpowering or distracting.
- Additional Features: The Korg 50 metronome may also include features like a built-in tuner, rhythm training exercises, and even a tap tempo function, which allows you to set the tempo by tapping a button in time with the desired speed.
Now that we have a basic understanding of the Korg 50 metronome and its features, we can move on to the step-by-step process of setting it up for 4/4 time.
Step 1: Powering On the Korg 50 Metronome
The first step in setting up the Korg 50 metronome is to ensure that it is properly powered on. Follow these simple steps to turn on your device:
- Locate the power button on the Korg 50 metronome. It is usually located on the side or the front of the device.
- Press and hold the power button for a few seconds until the screen lights up. You should see the Korg logo or the metronome display appear on the screen.
- Once the metronome is powered on, you may need to wait a few moments for it to fully initialize and be ready for use.
It’s important to note that the specific location and design of the power button may vary depending on the model of the Korg 50 metronome you are using. Refer to the user manual or the manufacturer’s instructions for your specific device if you are unsure about the power button’s location.
Now that your Korg 50 metronome is powered on, you can proceed to access the settings menu to configure the time signature and other parameters for your desired rhythm.
Step 2: Accessing the Settings Menu
Once your Korg 50 metronome is powered on, you’ll need to access the settings menu to make adjustments and configure the desired time signature. Follow these steps to access the settings menu:
- Look for a button labeled “Menu” or “Settings” on your Korg 50 metronome. This button is usually located near the screen or on the side of the device.
- Press the “Menu” or “Settings” button to enter the settings menu. On the screen, you should see a list of options or settings that you can adjust.
- Use the navigational buttons, typically labeled with arrows or icons, to scroll through the menu options until you find the “Time Signature” or “Beat” setting. This is where you will configure the time signature of the metronome.
- Once you have selected the “Time Signature” option, press the appropriate button to enter the submenu or to start adjusting the time signature values.
Note that the exact steps to access the settings menu may vary based on the specific model of the Korg 50 metronome you are using. Consult the user manual or the manufacturer’s instructions for your particular device if you encounter any difficulties.
Now that you have successfully accessed the settings menu, you can proceed to set the time signature to 4/4, which is commonly used in various musical genres.
Step 3: Selecting the Time Signature
Now that you have accessed the settings menu of your Korg 50 metronome, it’s time to select the appropriate time signature. The time signature determines the number of beats in a measure and the type of note that receives one beat. Follow these steps to select the time signature:
- In the settings menu, scroll through the options until you find the “Time Signature” or “Beat” setting.
- Press the appropriate button to enter the submenu or to start adjusting the time signature values.
- Using the navigational buttons, select the desired number of beats per measure. In the case of 4/4 time, you should set it to “4”. This means that there will be 4 beats in each measure.
- Select the appropriate type of note that will receive one beat. In 4/4 time, the quarter note typically receives one beat. Set this value accordingly.
- Once you have selected the desired time signature, confirm your selection by pressing the appropriate button or following the on-screen instructions.
It’s important to note that different models of the Korg 50 metronome may have slightly different menu interfaces or terminologies. Refer to the user manual or the manufacturer’s instructions for your specific device to ensure you are following the correct steps.
By selecting the appropriate time signature, you are now one step closer to setting up your Korg 50 metronome for 4/4 time. The next step is to adjust the tempo to your desired speed.
Step 4: Setting the Time Signature to 4/4
Setting the time signature to 4/4 on your Korg 50 metronome is a crucial step in ensuring that you stay in sync with the rhythm. Here’s how you can set the time signature to 4/4:
- In the settings menu of your Korg 50 metronome, locate the “Time Signature” or “Beat” setting.
- Enter the submenu or start adjusting the time signature values.
- Select “4” as the number of beats per measure. In 4/4 time, there are four beats in each measure.
- Choose the appropriate note value that will receive one beat. In 4/4 time, the quarter note usually receives one beat.
- Confirm your selection by pressing the appropriate button or following the on-screen instructions.
It’s important to note that the process of setting the time signature may differ slightly depending on the specific model of the Korg 50 metronome you are using. Refer to the user manual or the manufacturer’s instructions for your particular device to ensure you are following the correct steps.
By setting the time signature to 4/4, you have successfully configured your Korg 50 metronome to match one of the most commonly used time signatures in music. Next, let’s move on to adjusting the tempo to your desired speed.
Step 5: Adjusting the Tempo
Once you have set the time signature to 4/4, the next step in setting up your Korg 50 metronome is to adjust the tempo. The tempo determines the speed at which the metronome will tick, helping you maintain a steady rhythm. Follow these steps to adjust the tempo:
- Locate the tempo control buttons on your Korg 50 metronome. These buttons are typically labeled with “+” and “-” symbols.
- Press the “+” button to increase the tempo or the “-” button to decrease it. The tempo is measured in beats per minute (BPM), which indicates the number of beats the metronome will play in one minute.
- Adjust the tempo according to your desired speed. Start with a moderate tempo and gradually increase or decrease it as needed.
- Listen to the metronome ticking at the selected tempo and see if it matches the rhythm you are aiming for. Make any necessary adjustments to the tempo to ensure it aligns with your desired pace.
- Continue modifying the tempo until you find the speed that feels comfortable and suits the piece of music or exercise you are practicing.
Remember, the tempo is subjective and can vary depending on the musical genre, song, or personal preference. It’s essential to experiment and find the tempo that works best for you and your musical needs.
Once you have adjusted the tempo to your liking, you are one step closer to optimizing your Korg 50 metronome. In the next step, we will explore how to choose a suitable metronome sound.
Step 6: Choosing a Metronome Sound
Choosing the right metronome sound can greatly enhance your experience using the Korg 50 metronome. The sound you select should be clear, distinct, and easy to follow. Here’s how you can choose a suitable metronome sound:
- Access the sound settings menu on your Korg 50 metronome. Look for options like “Sound,” “Tone,” or “Metronome Sound.”
- Scroll through the available sound options using the navigational buttons to preview each one. Typically, metronome sounds include a variety of tones such as a click, beep, bell, or even a drum sound.
- Listen to each sound and choose the one that you find most comfortable and enjoyable to listen to. Remember, you’ll be relying on this sound to help keep you in rhythm, so make sure it resonates with your musical preferences.
- Once you’ve selected a metronome sound, confirm your choice by pressing the appropriate button or following the on-screen instructions.
Keep in mind that the specific options and settings for choosing a metronome sound may vary depending on the model of the Korg 50 metronome you are using. Consult the user manual or the manufacturer’s instructions for your particular device if you need further guidance.
Choosing a suitable metronome sound can make practicing or performing more enjoyable and engaging. It can also help you establish a strong sense of timing and precision. After selecting your preferred sound, it’s time to fine-tune the metronome to suit your specific needs.
Step 7: Fine-tuning the Metronome
After selecting the metronome sound, the next step in setting up your Korg 50 metronome is to fine-tune it to your specific requirements. Fine-tuning allows you to make adjustments that ensure a seamless and tailored metronome experience. Here’s how you can fine-tune your metronome:
- Access the settings menu on your Korg 50 metronome and look for options like “Fine-Tuning,” “Offset,” or “Calibration.”
- Enter the submenu or mode that allows you to make adjustments to the metronome’s tuning or calibration settings.
- Use the navigational buttons to make small adjustments to the metronome’s timing. You can speed it up or slow it down slightly to synchronize it perfectly with your playing or desired tempo.
- Make incremental changes and listen to how the metronome aligns with your playing. Experiment with different settings until you achieve a perfect match between the metronome’s timing and your playing.
- Once you are satisfied with the fine-tuning adjustments, save the settings and exit the menu.
It’s essential to note that not all metronomes have a fine-tuning feature. If your Korg 50 metronome does not offer this functionality, you can skip this step and move on to the next one. However, if it does, take advantage of this feature to refine the metronome and ensure optimal timing accuracy.
Fine-tuning the metronome allows you to tailor the timing to your playing style and preferences. By making these small adjustments, you can ensure a more precise and reliable rhythmic experience as you practice or perform.
Now that you have fine-tuned your metronome, let’s move on to the final step of saving your settings and exiting the settings menu.
Step 8: Saving and Exiting the Settings Menu
After making all the desired adjustments to your Korg 50 metronome’s settings, it’s important to save your changes and properly exit the settings menu. This ensures that your customized settings are retained for future use. Follow these steps to save and exit the settings menu:
- Once you’ve finished adjusting the tempo, time signature, metronome sound, and any other desired settings, navigate to the “Save” or “Apply” option within the settings menu.
- Press the appropriate button to save your changes. The metronome will typically display a confirmation message or an indicator that your settings have been saved.
- After saving, navigate to the “Exit” or “Back” option in the settings menu.
- Press the appropriate button to exit the settings menu and return to the main metronome screen.
- Ensure that the settings you configured are being reflected correctly on the main screen of your Korg 50 metronome. Double-check the time signature, tempo, and other relevant settings to confirm that they were saved properly.
It’s crucial to properly save and exit the settings menu to prevent unintentional changes to your settings during future use. By following these steps, you can have confidence in the consistency and accuracy of your Korg 50 metronome’s settings.
Now that you have successfully saved your settings and exited the menu, you are fully prepared to use your Korg 50 metronome in 4/4 time with your desired tempo and metronome sound. Take advantage of this powerful tool to strengthen your sense of rhythm, improve your timing, and enhance your musical performance.
Conclusion
Congratulations! You have successfully set up your Korg 50 metronome for 4/4 time. By following the step-by-step guide outlined in this article, you can now confidently practice or perform with a reliable and accurate rhythmic tool.
Understanding the features of the Korg 50 metronome, such as its tempo range, time signature capabilities, and metronome sounds, is essential for optimizing your experience. By selecting the appropriate time signature, adjusting the tempo to your desired speed, choosing a suitable metronome sound, and fine-tuning the metronome, you can tailor the device to your specific needs and preferences.
Remember to save your settings and properly exit the settings menu to ensure that your configurations are retained for future use. This will allow you to quickly and easily access your preferred settings whenever you need to use the metronome.
Practicing with a metronome is an invaluable way to develop your sense of rhythm, improve your timing, and enhance your overall musical performance. Whether you are a musician, dancer, or anyone seeking to improve your rhythmic skills, the Korg 50 metronome can be a valuable tool in your journey.
Now that you have successfully set up your Korg 50 metronome, it’s time to put it to use. Start incorporating it into your practice routine, rehearsals, or performances, and reap the benefits of enhanced timing and precision. Stay in sync, stay on beat, and enjoy the process of continuous improvement.