Home>Production & Technology>Stereo>How To Make A Mono Track Stereo In Audition
Stereo
How To Make A Mono Track Stereo In Audition
Modified: March 7, 2024
Learn how to make a mono track stereo in Audition and enhance your audio with the power of stereo. Transform your sound with simple steps.
(Many of the links in this article redirect to a specific reviewed product. Your purchase of these products through affiliate links helps to generate commission for AudioLover.com, at no extra cost. Learn more)
Table of Contents
- Introduction
- Understanding Mono and Stereo Tracks
- Why Convert Mono Track to Stereo
- Method 1: Using Panning to Create Stereo Effect
- Method 2: Using Stereo Widening or Enhancing Effects
- Method 3: Duplicating and Layering Mono Track
- Method 4: Introducing Reverb or Delay Effects
- Method 5: Creating Stereo Space with EQ and Filters
- Tips and Tricks for a Convincing Stereo Sound
- Conclusion
Introduction
Welcome to the world of audio production! If you’ve ever worked with audio tracks, you’ve probably come across the terms “mono” and “stereo.” Mono refers to a single audio channel, while stereo refers to two separate audio channels, providing a more immersive and dynamic listening experience. However, what if you have a mono track that you want to make stereo?
In this article, we will explore various methods and techniques on how to make a mono track stereo in Adobe Audition, a popular digital audio workstation. Whether you are a musician, podcaster, sound engineer, or someone who simply enjoys playing with audio, these techniques will help you transform your mono recordings into vibrant stereo creations.
Understanding the difference between mono and stereo tracks is crucial before diving into the conversion process. A mono track plays the same audio signal through both the left and right channels, creating a centered sound. On the other hand, a stereo track features distinct audio signals for the left and right channels, resulting in a more spacious and immersive soundstage.
So why would you want to convert a mono track to stereo? There are numerous reasons. Perhaps you want to add depth and width to a vocal recording, make a guitar track sound more expansive, or simply experiment with different stereo effects to make your audio stand out.
Now that we’ve laid the foundation, let’s explore some methods to transform your mono tracks into captivating stereo masterpieces.
Understanding Mono and Stereo Tracks
Before we delve into the techniques and methods of making a mono track stereo, it’s essential to have a solid understanding of what mono and stereo tracks are.
A mono track, short for monophonic, consists of a single audio channel. This means that the audio signal is identical across both the left and right speakers. Mono tracks are commonly used for vocals, spoken word recordings, and some musical instruments like bass or kick drum.
On the other hand, a stereo track, also known as stereophonic, utilizes two separate audio channels: the left channel and the right channel. Each channel carries a unique audio signal, allowing for a more immersive and spatial audio experience. Stereo tracks are commonly used for music, sound effects, and recordings that require a sense of depth and separation.
In a stereo track, the audio signals are distributed between the left and right channels. This allows for the placement of different elements of the soundstage, creating a more realistic and dynamic listening experience. For example, a guitar riff can be panned slightly to the left, while the drums can be spread across the stereo field to provide a sense of width.
When working with mono tracks, it’s important to understand that the audio will be confined to the center of the stereo image. This means that when played back on a stereo system, the audio will be localized in the middle, without any sense of width or spatial separation.
Knowing the difference between mono and stereo tracks is crucial as it determines how you approach the task of making a mono track stereo. By understanding the characteristics and limitations of each track type, you can choose the most suitable methods to achieve the desired stereo effect.
Why Convert Mono Track to Stereo
You might wonder why you would want to convert a mono track to stereo when mono tracks already serve their purpose in certain situations. The answer lies in the enhanced listening experience that stereo tracks provide.
Converting a mono track to stereo opens up a world of possibilities in terms of audio perception and immersion. Here are a few reasons why you might consider making the switch:
- Expanded Soundstage: Stereo tracks offer a wider and more spacious soundstage compared to mono tracks. By having distinct audio signals playing through the left and right channels, the sound appears to come from different directions, enhancing the overall depth and immersion.
- Enhanced Spatial Separation: Stereo tracks allow you to position various elements of the audio in different parts of the stereo field. This separation creates a sense of space and dimension, making the listening experience more realistic and enjoyable.
- Improved Instrument Separation: Converting a mono track to stereo can help to separate different instruments or sound sources within the mix. By panning them to different positions in the stereo field, you can create a clearer and more defined presentation, allowing the listener to pick out individual instruments more easily.
- Artistic Creativity: Stereo tracks provide a canvas for experimenting with creative effects, such as stereo widening, panning, and spatial modulation. These effects can add a unique touch to your audio, making it more engaging and captivating for the listener.
Whether you’re working on music production, podcasting, or sound design, converting a mono track to stereo can elevate the overall quality and impact of your audio. It allows you to take advantage of the inherent capabilities of stereo systems and create an immersive, three-dimensional sound that captivates your audience.
Now that we understand the benefits of converting a mono track to stereo, let’s explore different methods that you can use to achieve this transformation in Adobe Audition.
Method 1: Using Panning to Create Stereo Effect
Panning is a fundamental technique in audio production that involves adjusting the left-right balance of a sound source to create a stereo effect. By panning a mono track to different positions in the stereo field, we can achieve a sense of width and spatial separation. Here’s how you can use panning to make a mono track stereo in Adobe Audition:
- Open Adobe Audition and import your mono track into the multitrack session.
- Locate the track in the multitrack session and click on the “Show/Hide Track Pan and Volume Envelopes” button to reveal the panning controls.
- Click and drag the panning control to adjust the position of the audio within the stereo field. Moving the control towards the left will make the sound appear more to the left, while moving it towards the right will make it appear more to the right.
- To create a wider stereo image, you can pan different elements of your track to varying positions. For example, you can pan a guitar riff slightly to the left and a vocal track slightly to the right.
- Listen to the track while adjusting the panning settings to find the desired stereo balance. Be mindful of not over-panning, as extreme panning can result in an unnatural or imbalanced sound.
- Once you’ve achieved the desired stereo effect, export the track as a stereo file to preserve the panning positions.
Panning is a simple yet effective method to create a stereo effect from a mono track. By intelligently positioning different elements within the stereo field, you can achieve a more immersive and dynamic sound. However, keep in mind that panning alone may not provide a fully convincing stereo experience, especially if you’re aiming for a wider and more spacious sound. In such cases, you can explore other methods and techniques, which we will discuss in the following sections.
Now that you’ve learned how to use panning to create a stereo effect, let’s move on to another method: using stereo widening or enhancing effects.
Method 2: Using Stereo Widening or Enhancing Effects
If you want to take the stereo effect of your mono track to the next level, you can utilize stereo widening or enhancing effects. These effects can add depth, width, and spatial separation to your audio, making it sound more expansive and immersive. Here’s how you can use stereo widening or enhancing effects in Adobe Audition:
- Open Adobe Audition and import your mono track into the multitrack session.
- Locate the track in the multitrack session, and in the Effects Rack, click on the “Effects” dropdown menu to access a range of audio effects.
- Scroll through the effects list and look for stereo widening or enhancing effects such as “Stereo Enhancer,” “Haas Effect,” or “Stereo Imager.”
- Select the desired effect, and adjust the parameters to achieve the desired stereo width. This typically involves adjusting parameters like “Width,” “Delay,” or “Panning” within the effect plugin.
- Preview the track while adjusting the effect parameters to find the optimal stereo enhancement. Be cautious not to over-widen the track, as it may result in an unnatural or exaggerated effect.
- Once you’re satisfied with the stereo widening effect, export the track as a stereo file to retain the enhanced stereo image.
Stereo widening or enhancing effects can be an excellent option when you want to create a more pronounced and expansive stereo sound from a mono track. These effects work by manipulating the stereo image, adding width and spatial separation to the audio. Be sure to experiment with different effect parameters to find the perfect balance and achieve the desired stereo enhancement.
While stereo widening effects can be highly effective, it’s important to note that they may not always be suitable for every audio source or genre. Some tracks, such as vocals or bass-heavy instruments, may not benefit from excessive stereo widening. Use your judgment and listen critically to determine whether the stereo effect complements the overall mix and enhances the desired elements.
Now that you’ve explored using stereo widening and enhancing effects, let’s move on to another method: duplicating and layering the mono track.
Method 3: Duplicating and Layering Mono Track
Duplicating and layering a mono track is another effective method to create a stereo effect. By duplicating the mono track and slightly altering each duplicate, you can achieve a sense of width and separation in the stereo field. Here’s how you can use this method in Adobe Audition:
- Open Adobe Audition and import your mono track into the multitrack session.
- Right-click on the mono track and select “Duplicate” to create an identical copy of the track.
- Pan the first track slightly to the left and the duplicated track slightly to the right. This can be done by adjusting the panning controls or using the “Pan” parameter in the track properties.
- Make subtle modifications to the duplicated track to create distinctness between the left and right channels. This can include adjusting the volume levels, applying slight EQ changes, or adding subtle effects.
- Preview the track while listening to the stereo field to ensure that the left and right channels complement each other and create a convincing stereo effect.
- If desired, you can further enhance the stereo effect by layering additional copies of the mono track and adjusting their panning and modifications.
- Once satisfied with the stereo effect, export the track as a stereo file to preserve the layered and widened stereo image.
Duplicating and layering a mono track provides more control over the stereo field by creating distinct audio signals in the left and right channels. This method allows you to introduce subtle variations between the duplicate tracks, giving the perception of a wider and more spacious sound. It’s important to strike a careful balance between the panning and modifications to avoid cluttering the mix or creating an artificial stereo effect.
Keep in mind that this technique works best when the original mono track has a clear and defined audio source. It may not be suitable for tracks with complex or dense arrangements, as it could result in an overcrowded soundscape. Use your discretion and experiment with different layers and modifications to achieve the desired stereo outcome.
Now that you’ve learned about duplicating and layering mono tracks, let’s explore another method: introducing reverb or delay effects.
Method 4: Introducing Reverb or Delay Effects
Adding reverb or delay effects is a popular method to create a sense of depth and space in audio recordings. By applying these effects to a mono track, you can enhance the stereo image and simulate a more natural and immersive sound. Here’s how you can use reverb or delay effects in Adobe Audition to make a mono track stereo:
- Open Adobe Audition and import your mono track into the multitrack session.
- Locate the track in the multitrack session, and in the Effects Rack, click on the “Effects” dropdown menu to access a variety of audio effects.
- Scroll through the effects list and look for reverb or delay effects such as “Reverb,” “Echo,” or “Delay.”
- Select the desired effect and adjust the parameters to control the level, decay, and other properties of the effect. Experiment with different settings to find the right balance that adds ambience and spaciousness without overpowering the original sound.
- Apply the effect to the mono track, and adjust the wet/dry mix to blend the effect with the original audio. This will allow the reverb or delay to fill up the stereo space and create a sense of depth.
- Preview the track while adjusting the effect parameters to ensure the reverb or delay enhances the stereo image and creates a natural-sounding space.
- Once you’re satisfied with the stereo effect, export the track as a stereo file to retain the added reverb or delay and its impact on the stereo image.
Introducing reverb or delay effects to a mono track can add richness and dimension to the audio, making it sound more like a natural stereo recording. The reverberations or echoes created by these effects simulate the sound bouncing off various surfaces or the delay between the left and right channels, resulting in a more immersive and spacious auditory experience.
When applying reverb or delay effects, it’s essential to strike a balance between adding depth and maintaining clarity. The level and decay time of the effect should be adjusted carefully to avoid overwhelming the original sound and creating a muddy mix. Additionally, subtle and transparent effects often work better for creating a convincing stereo image.
Remember that the nature of the original audio source and the desired style of the track can influence the choice and settings of the reverb or delay effect. Experiment with different presets and parameters to find the perfect combination and achieve the desired stereo enhancement.
Now that you’ve explored the use of reverb and delay effects, let’s move on to another method: creating stereo space with EQ and filters.
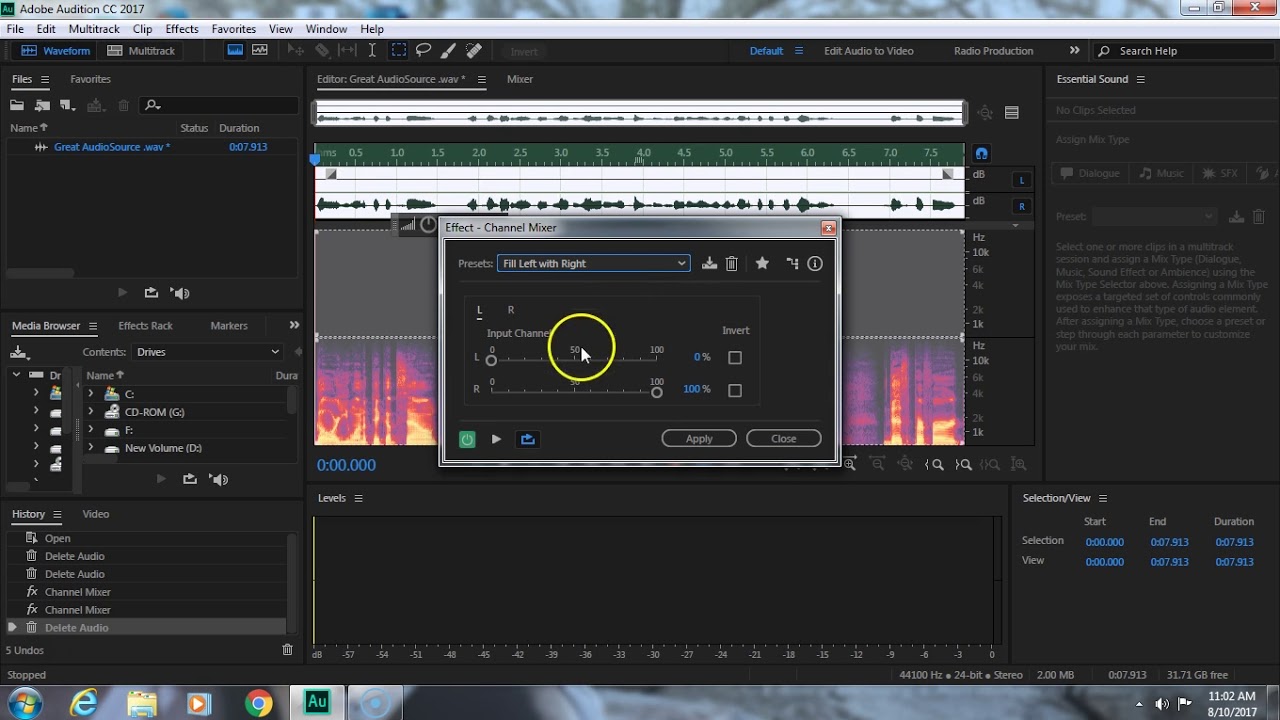
Method 5: Creating Stereo Space with EQ and Filters
Using equalization (EQ) and filters is another method to create a stereo effect from a mono track. By manipulating the frequencies and applying stereo imaging techniques, you can create a sense of space and width in the stereo field. Here’s how you can use EQ and filters to make a mono track stereo in Adobe Audition:
- Open Adobe Audition and import your mono track into the multitrack session.
- Locate the track in the multitrack session, and in the Effects Rack, click on the “Effects” dropdown menu to access various audio effects.
- Select an EQ plugin and apply it to the track. The EQ plugin should have stereo imaging capabilities, allowing you to adjust the frequencies and spatial positioning of the audio.
- Use the EQ controls to boost or attenuate specific frequency ranges in the left or right channel. For example, you can boost the high frequencies in the left channel and the low frequencies in the right channel to create a wider stereo image.
- Experiment with different EQ settings to achieve the desired stereo effect. You can also apply stereo widening or imaging plugins in conjunction with EQ to further enhance the spatial separation and width.
- Preview the track while adjusting the EQ and filter settings to ensure that the changes create a convincing stereo sound without compromising the overall audio quality.
- Once satisfied with the stereo effect, export the track as a stereo file to retain the EQ and filter settings and their impact on the stereo image.
Using EQ and filters to create stereo space allows you to manipulate the frequencies and spatial positioning of the audio, resulting in a wider and more immersive sound. By boosting or attenuating specific frequencies in each channel, you can emphasize certain elements and create a sense of separation within the stereo field.
Keep in mind that EQ and filters should be used judiciously to avoid muddying the mix or introducing unnatural tonal imbalances. Take the time to listen critically and make subtle adjustments to achieve a balanced and appealing stereo effect.
It’s worth noting that this method may not work as effectively for all types of audio sources. The success of using EQ and filters to create stereo space depends on the characteristics of the original mono track and the desired outcome. Experimentation and careful listening will help you determine the right EQ and filter settings to achieve the desired stereo enhancement.
Now that you’ve learned how to create stereo space with EQ and filters, let’s move on to some additional tips and tricks for achieving a convincing stereo sound.
Tips and Tricks for a Convincing Stereo Sound
Creating a convincing stereo sound requires attention to detail and careful consideration of various factors. Here are some tips and tricks to help you achieve a professional and immersive stereo sound:
- Use a combination of techniques: Experiment with different methods, such as panning, stereo widening effects, layering, reverb, and EQ, to find the right combination that suits your audio source and desired outcome.
- Be subtle: Avoid excessive use of stereo effects, as this can result in an unnatural or exaggerated sound. Subtle enhancements often yield more realistic and pleasing stereo images.
- Consider the mono compatibility: Remember that not all playback systems are capable of reproducing stereo effects accurately. Ensure that your stereo mix still translates well when collapsed to mono, with minimal phase cancellation or loss of audio quality.
- Use headphones and speakers: Listen to your stereo mix on both headphones and speakers to ensure a balanced and consistent sound across different playback systems. This will help you identify any issues or inconsistencies in the stereo image.
- Pay attention to the source material: The quality and characteristics of the original mono track will greatly influence the effectiveness of the stereo conversion. Start with a well-recorded and clean mono track to achieve the best results.
- Consider the genre and context: The desired stereo effect may vary depending on the genre and context of your audio. The stereo treatment for a spoken word podcast will differ from that of a heavy metal track. Tailor your approach accordingly.
- Don’t neglect the center: While creating a stereo sound, it’s essential to maintain a solid and focused center, especially for vocals and important elements of the mix. A well-defined center ensures clarity and coherence in the stereo image.
- Use automation: Automate the panning, level, and effect parameters over time to create movement and interest in the stereo field. This can add depth and dynamics to your audio, making it more engaging for the listener.
- Trust your ears: Ultimately, your ears are the best judge of what sounds good. Listen critically and trust your instincts to make informed decisions about the stereo treatment of your audio.
By applying these tips and tricks, you can enhance your mono tracks and transform them into captivating stereo compositions. Remember that achieving a convincing stereo sound requires a balance between technique, creativity, and an understanding of the overall mix. Use these guidelines as a starting point, but don’t be afraid to think outside the box and experiment to find your unique sound.
Now that you have an arsenal of techniques and insights, go ahead and explore the world of stereo sound. Embrace the possibilities, unleash your creativity, and create stereo tracks that captivate and immerse your listeners.
Before we conclude, let’s recap what we’ve learned in this article.
Conclusion
Transforming a mono track into stereo can breathe new life into your audio recordings. Whether you’re a musician, podcaster, sound engineer, or simply an audio enthusiast, the ability to create an immersive and dynamic stereo sound opens up endless creative possibilities.
In this article, we explored five methods to make a mono track stereo in Adobe Audition. We learned about using panning to create a stereo effect, utilizing stereo widening or enhancing effects, duplicating and layering mono tracks, introducing reverb or delay effects, and creating stereo space with EQ and filters. Each method offers a unique approach to enhance the stereo image of your audio, providing varying levels of depth, width, and spatial separation.
Throughout the process, it’s important to maintain a balance between creating a convincing stereo effect and preserving the original integrity of the audio. Subtlety and an understanding of the genre and context play a crucial role in achieving an immersive and professional stereo sound.
Remember to listen critically, experiment with different techniques, and trust your ears to guide you in the creation of an exceptional stereo mix. Use a combination of methods, adapt them to your specific needs, and don’t be afraid to think outside the box. The goal is to create a sound that captivates listeners and enhances their listening experience.
With the knowledge and insights gained from this article, you now have a solid foundation to embark on your stereo sound journey. Embrace creativity, trust your instincts, and continue to explore the depths of stereo audio production.
Now, it’s time to apply these techniques, unleash your imagination, and transform your mono tracks into rich, immersive stereo masterpieces. Happy audio production!