Home>Events & Info>Playback>How To Turn Off Microphone Playback Windows 10
Playback
How To Turn Off Microphone Playback Windows 10
Published: November 23, 2023
Learn how to turn off microphone playback on Windows 10 and improve your audio experience. Stop the echoing and unwanted sound with a simple step-by-step guide.
(Many of the links in this article redirect to a specific reviewed product. Your purchase of these products through affiliate links helps to generate commission for AudioLover.com, at no extra cost. Learn more)
Table of Contents
- Introduction
- Method 1: Disabling Microphone Playback through Sound Settings
- Method 2: Disabling Microphone Playback through Device Manager
- Method 3: Disabling Microphone Playback through Control Panel
- Method 4: Disabling Microphone Playback through Communication Settings
- Method 5: Disabling Microphone Playback through Recording Devices
- Conclusion
Introduction
Windows 10 provides users with a plethora of features and settings to enhance their computing experience. One such feature is the ability to enable microphone playback, which allows users to hear their own voice or other audio inputs through their computer’s speakers or headphones. While microphone playback can be useful in some situations, there may be times when it becomes unnecessary or unwanted.
Whether you’re experiencing echo issues during video calls, hearing unwanted background noise, or simply prefer not to hear yourself on playback, turning off microphone playback can help you achieve a more seamless audio experience. In this article, we will explore various methods to disable microphone playback on Windows 10, catering to different preferences and technical settings.
Before proceeding with the methods, it’s important to note that the steps may vary slightly depending on your specific Windows 10 version or system configuration. However, the general principles remain the same, and we will guide you through the common steps to disable microphone playback.
So, whether you’re a tech-savvy individual or new to Windows 10 operating systems, let’s dive into the various methods you can use to turn off microphone playback on your Windows 10 device.
Method 1: Disabling Microphone Playback through Sound Settings
The first method we will explore is disabling microphone playback through the Sound settings in Windows 10. Here’s how you can do it:
- Right-click on the speaker icon in the system tray located at the bottom right corner of your screen. Select “Sounds” from the context menu that appears.
- In the Sound window that opens, navigate to the “Recording” tab.
- Locate and double-click on the microphone that you want to disable playback for. This will open the Microphone Properties window.
- In the Microphone Properties window, go to the “Listen” tab.
- Uncheck the box next to “Listen to this device.”
- Click “OK” to save the settings and close the window.
By following these steps, you have successfully disabled microphone playback through the Sound settings. Now, any audio input through this microphone will no longer be played back through your speakers or headphones.
This method is straightforward and accessible to most users, as it utilizes the native Sound settings available in Windows 10. However, if you prefer to disable microphone playback through a different method or encounter any issues with the Sound settings approach, you can explore alternative methods that we will cover in the following sections.
Method 2: Disabling Microphone Playback through Device Manager
If you prefer a more advanced approach to disable microphone playback on your Windows 10 device, you can utilize the Device Manager. Follow these steps:
- Right-click on the Start button and select “Device Manager” from the context menu that appears.
- In the Device Manager window, expand the “Audio inputs and outputs” category.
- Locate your microphone from the list of devices. It may be labeled as “Microphone” or with the name of the specific microphone model you’re using.
- Right-click on the microphone and select “Properties.”
- In the Properties window, go to the “Driver” tab.
- Click on the “Disable” button to disable the device.
- Click “OK” to save the settings.
By following these steps, you have successfully disabled microphone playback through the Device Manager. The device will remain disabled until you enable it again.
This method is useful when you want to have more control over the specific devices connected to your computer. However, exercise caution while making changes in the Device Manager, as modifying or disabling the wrong device may impact other functionalities.
If you prefer not to delve into the technical aspects of the Device Manager, don’t worry. We have alternative methods to disable microphone playback that are more user-friendly, which we will explore in the next sections.
Method 3: Disabling Microphone Playback through Control Panel
If you prefer using the Control Panel for managing system settings, you can also disable microphone playback through this interface. Here’s how:
- Open the Control Panel by searching for it in the Start menu or by right-clicking the Start button and selecting “Control Panel.”
- In the Control Panel, set the view to either “Large icons” or “Small icons” to see all available options.
- Click on the “Sound” or “Sound and Audio Devices” option, depending on your Control Panel version.
- In the Sound or Sound and Audio Devices window, navigate to the “Playback” tab.
- Locate the microphone that you want to disable playback for. It may be listed as “Microphone” or with the name of the specific microphone model.
- Select the microphone and click on the “Properties” button.
- In the Microphone Properties window, go to the “Listen” tab.
- Uncheck the box next to “Listen to this device.”
- Click “OK” to save the settings and close the window.
By following these steps, you have successfully disabled microphone playback through the Control Panel. This method offers a more familiar interface for users who are accustomed to managing system settings through the Control Panel.
Keep in mind that the Control Panel interface may vary slightly depending on your specific Windows 10 version. However, the general steps to disable microphone playback remain consistent across versions.
If the previous methods are not suitable for your specific requirements or you desire an alternative approach, we have more methods to disable microphone playback that we will cover in the next sections.
Method 4: Disabling Microphone Playback through Communication Settings
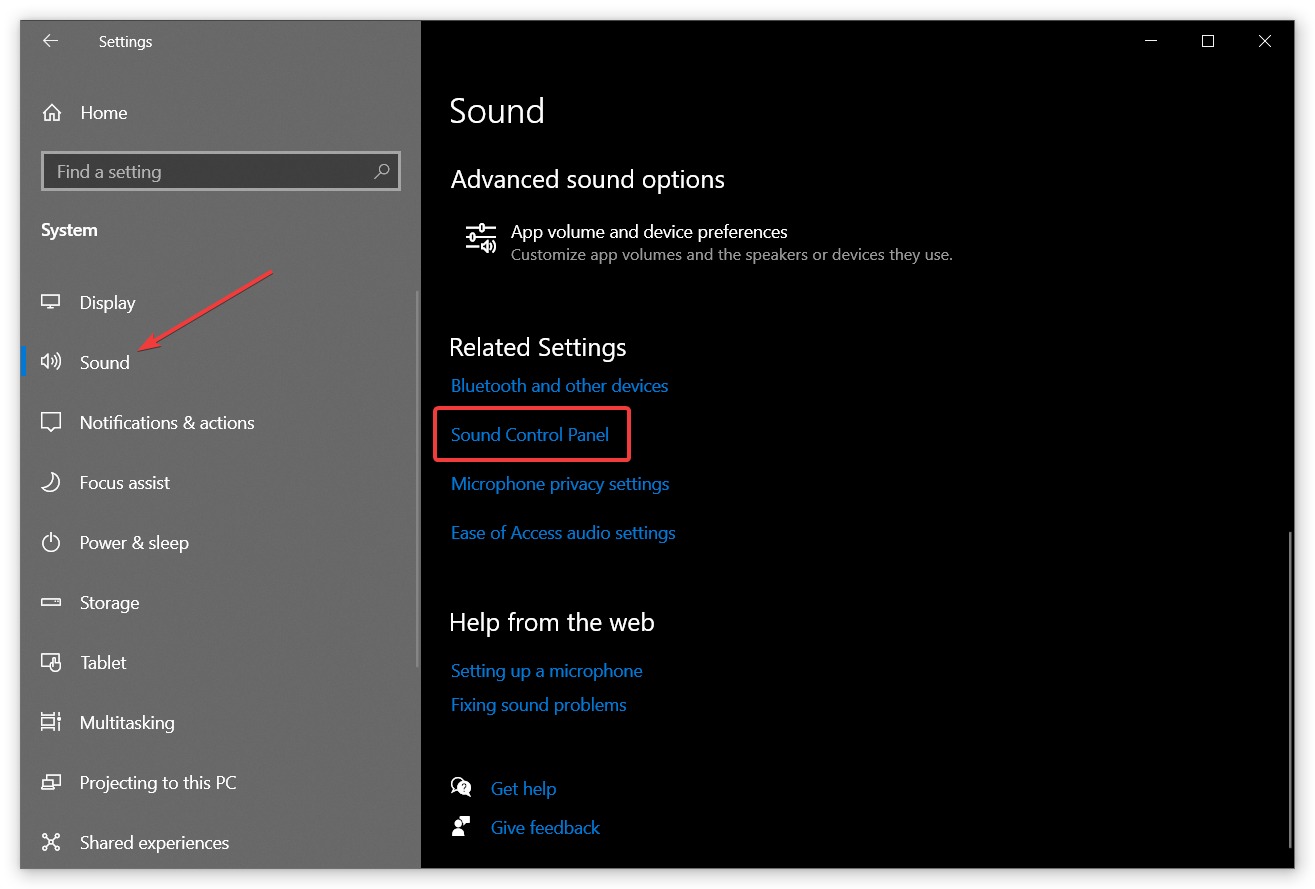
If you frequently use communication applications like Skype or Microsoft Teams and want to disable microphone playback specifically for those applications, Windows 10 offers a convenient option to do so. Follow these steps:
- Open the Start menu and click on the “Settings” gear icon.
- In the Settings window, click on the “System” option.
- From the left sidebar, select “Sound.”
- Scroll down to the “Sound Control Panel” section and click on the “Sound Control Panel” link.
- In the Sound window that appears, go to the “Playback” tab.
- Locate and select your microphone from the list of devices.
- Click on the “Properties” button.
- In the Microphone Properties window, go to the “Communications” tab.
- Select the “Do nothing” option.
- Click “OK” to save the settings and close the window.
By following these steps, you have successfully disabled microphone playback specifically for communication applications. This method allows you to keep microphone playback enabled for other applications or system sounds, while muting it during communication activities.
Keep in mind that this method may not be applicable to all Windows 10 versions or configurations. If you do not see the “Sound Control Panel” option in the Settings window, you can explore alternative methods to disable microphone playback that we will cover in the next sections.
Method 5: Disabling Microphone Playback through Recording Devices
If you prefer to disable microphone playback by adjusting recording device settings directly, you can use the Recording Devices feature in Windows 10. Here’s how:
- Right-click on the speaker icon in the system tray located at the bottom right corner of your screen. Select “Sounds” from the context menu that appears.
- In the Sound window that opens, navigate to the “Recording” tab.
- Locate your microphone from the list of devices. It may be labeled as “Microphone” or with the name of the specific microphone model.
- Right-click on the microphone and select “Properties.”
- In the Microphone Properties window, go to the “Listen” tab.
- Uncheck the box next to “Listen to this device.”
- Click “OK” to save the settings and close the window.
By following these steps, you have successfully disabled microphone playback through the Recording Devices feature in Windows 10. Now, any audio input through this microphone will no longer be played back through your speakers or headphones.
This method offers a direct and accessible way to disable microphone playback without delving into more advanced settings or interfaces. However, if you prefer a different approach or encounter any issues, you can explore the alternative methods we covered in the preceding sections.
Conclusion
Disabling microphone playback on Windows 10 can greatly enhance your audio experience by eliminating unwanted echo, background noise, or personal voice feedback. In this article, we discussed five different methods to turn off microphone playback, catering to various preferences and technical settings.
Starting with the native Sound settings, you can easily disable microphone playback by unchecking the “Listen to this device” option. If you prefer a more advanced approach, you can utilize the Device Manager to disable the microphone device driver. The Control Panel provides a familiar interface for managing system settings, including microphone playback. Additionally, the Communication Settings feature allows you to disable microphone playback specifically for communication applications. Lastly, adjusting the settings through the Recording Devices feature provides a direct method to disable microphone playback.
It’s important to note that the availability and specific steps may vary slightly depending on your Windows 10 version or system configuration. However, by following the general principles outlined in each method, you should be able to disable microphone playback effectively.
Experiment with these methods and find the one that works best for you. Whether you’re a casual user looking for a quick solution or a technical enthusiast exploring advanced settings, there is an approach that suits your needs.
Remember, if you ever wish to re-enable microphone playback, you can simply follow the same steps and check the appropriate options or enable the device.
We hope that this article has provided valuable insights and solutions to help you disable microphone playback on your Windows 10 device. Enjoy a seamless audio experience without any unnecessary audio feedback or distractions!