Home>Production & Technology>Stereo>How To Change From Mono To Stereo On Windows 10
Stereo
How To Change From Mono To Stereo On Windows 10
Modified: January 22, 2024
Learn how to easily change your audio settings on Windows 10 from mono to stereo for an enhanced listening experience. Follow our step-by-step guide to enable stereo sound.
(Many of the links in this article redirect to a specific reviewed product. Your purchase of these products through affiliate links helps to generate commission for AudioLover.com, at no extra cost. Learn more)
Table of Contents
Introduction
Are you tired of listening to music or watching movies in mono sound on your Windows 10 computer? Do you crave the immersive experience of stereo sound? You’re in luck! In this article, we will explore how to change from mono to stereo on Windows 10, allowing you to enjoy your favorite audio content in all its rich and dynamic glory.
Before we dive into the step-by-step process, let’s take a moment to understand the difference between mono and stereo sound. Mono, short for monaural, refers to audio played through a single channel. This means that the sound is identical in both the left and right speakers. On the other hand, stereo sound provides a more realistic and spatial listening experience by creating a sense of depth and separation between the left and right channels. It allows you to perceive the sound coming from different directions, enhancing your overall audio immersion.
Now, it’s important to note that not all audio hardware supports stereo sound. Some older or budget-friendly devices may only have mono capabilities. Therefore, before attempting to change to stereo sound, it’s crucial to check if your audio hardware is capable of supporting stereo output.
Understanding Mono and Stereo Sound
To fully appreciate the process of changing from mono to stereo on Windows 10, it’s essential to have a solid understanding of the differences between mono and stereo sound.
Mono sound, short for monaural, refers to audio that is played through a single channel. In mono sound, the same audio signal is sent to both the left and right speakers, resulting in a unified and centered sound. This approach was commonly used in early audio devices and systems due to its simplicity and cost-effectiveness. While mono sound can get the job done, it lacks the depth, separation, and spatial experience that stereo sound provides.
On the other hand, stereo sound offers a much more immersive and realistic listening experience. It utilizes two separate audio channels, one for the left ear and one for the right ear. This separation allows for a more dynamic and natural sound representation, as different sounds can be directed to each ear independently. Stereo sound creates a sense of depth and directionality, making you feel like you are surrounded by the audio, whether it’s music, dialogue, or effects.
Stereo sound is particularly valuable in scenarios such as listening to music, watching movies, playing video games, or enjoying other multimedia content. It allows you to hear instruments and vocals from different angles, appreciate intricate sound effects, and feel the full ambience of a recording. It adds depth and dimension to the audio, making the listening experience more engaging and enjoyable.
It’s worth noting that stereo sound requires audio equipment that supports it. Most modern audio devices, such as headphones, speakers, and sound systems, come with built-in stereo capabilities. However, it’s crucial to check if your specific hardware can deliver stereo output before proceeding with any changes.
Checking Audio Hardware Compatibility
Before diving into the process of changing from mono to stereo on Windows 10, it’s important to ensure that your audio hardware supports stereo output. While most modern devices are already equipped with stereo capabilities, it’s worth double-checking to avoid any potential issues.
Here’s how you can check if your audio hardware is compatible with stereo sound:
- Start by determining the type of audio device you are using. This could be headphones, external speakers, or even built-in speakers on your computer.
- Check the specifications or user manual of your audio device. Look for any mention of stereo capabilities or stereo output.
- If you are using headphones, ensure they have two separate speakers: one for the left ear and one for the right ear. This indicates that they are stereo headphones.
- If you are using external speakers or a sound system, examine the speaker setup. Ensure there are at least two separate speakers, one for the left channel and one for the right channel. This confirms that your speakers support stereo sound.
In the event that your audio hardware does not support stereo output, you may need to consider upgrading your equipment to experience the benefits of stereo sound. Luckily, there are a wide range of affordable stereo headphones and speakers available in the market that can significantly enhance your audio experience.
Once you have confirmed that your audio hardware is capable of delivering stereo sound, you’re ready to proceed with configuring the settings on your Windows 10 computer to enable stereo output.
Configuring Mono to Stereo Output on Windows 10
Now that you have verified your audio hardware’s compatibility with stereo sound, let’s move on to the steps required to configure mono to stereo output on Windows 10. The process involves adjusting the speaker configuration, enabling stereo mix, and adjusting audio playback settings.
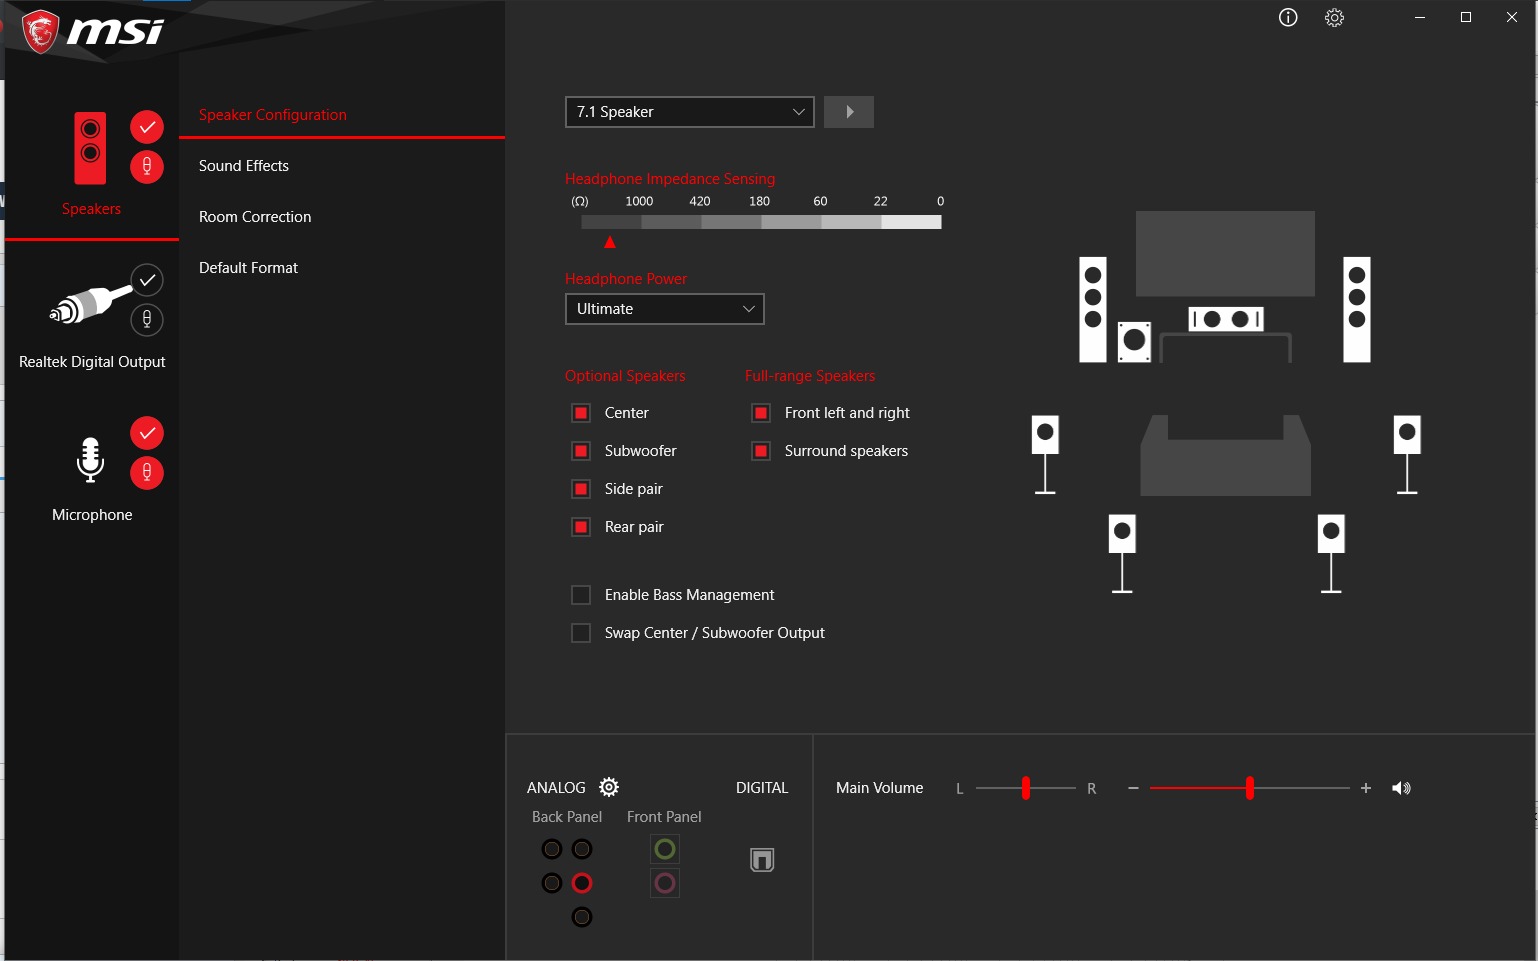
- Changing Speaker Configuration:
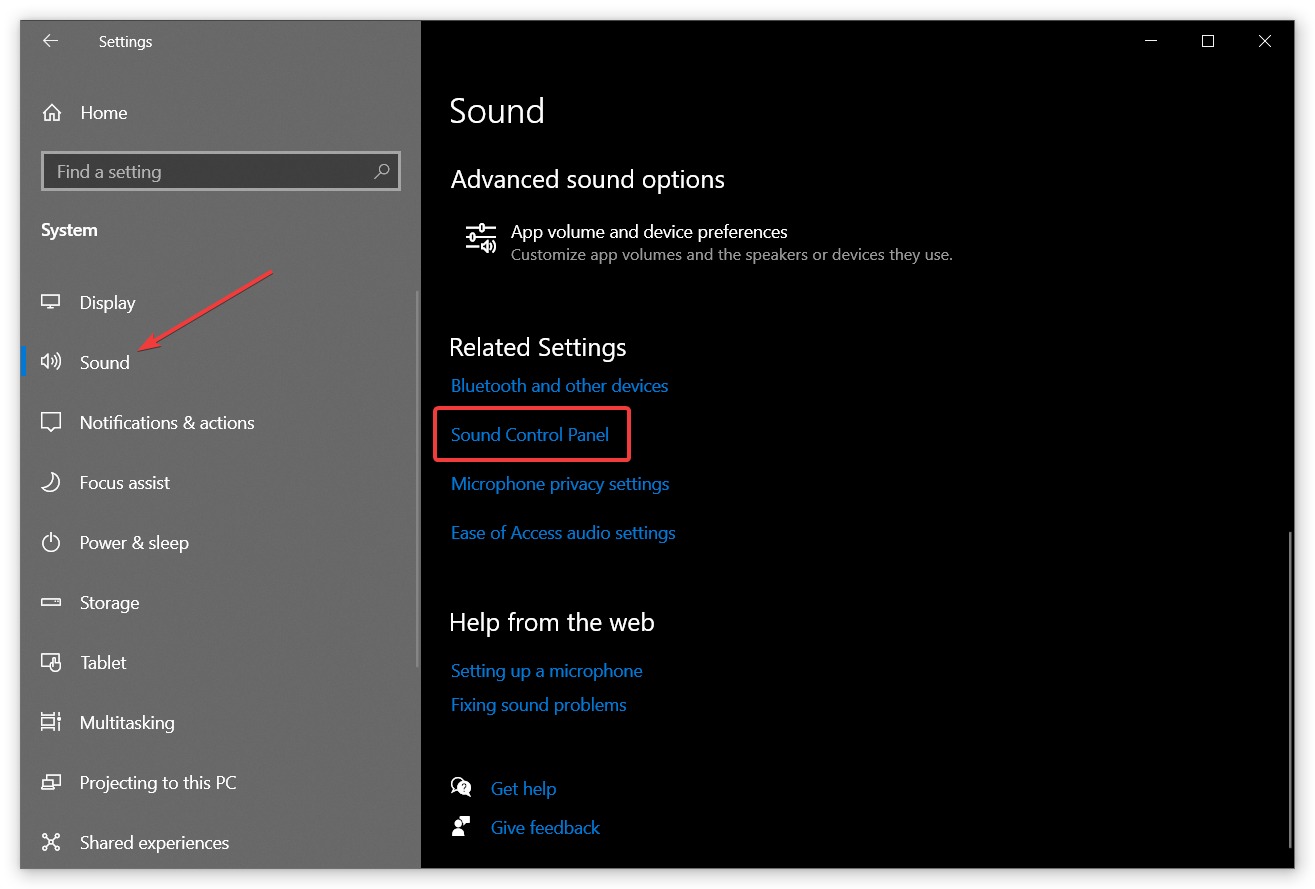
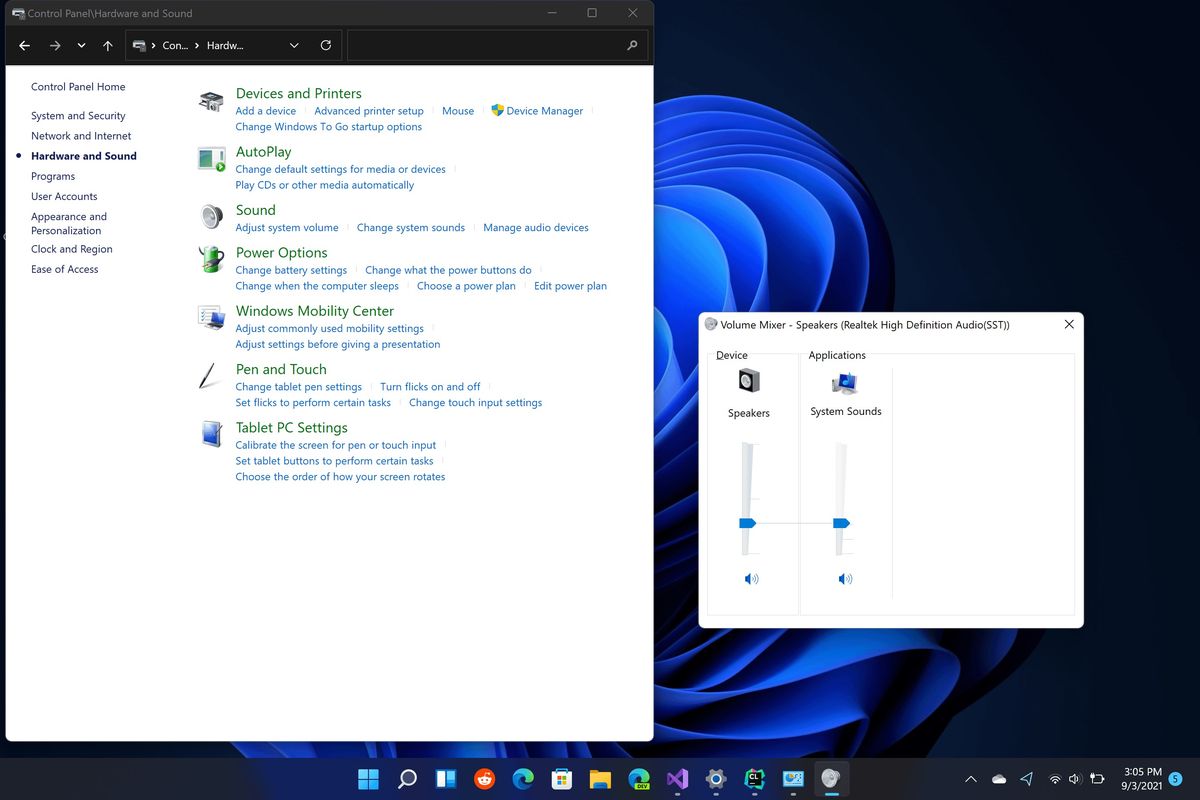
Begin by right-clicking on the sound icon in the Windows taskbar and selecting “Sounds” from the context menu. In the Sound control panel, navigate to the “Playback” tab. Here, you will see a list of audio devices connected to your computer. Find the device you are using, right-click on it, and select “Configure Speakers”. In the Speaker Setup wizard, choose the option labeled “Stereo” and follow the on-screen instructions to complete the configuration. This will ensure that your speakers or headphones are set up for stereo sound output.
- Enabling Stereo Mix:
Go back to the Sound control panel and select the “Recording” tab. Right-click on an empty area in the list of recording devices and make sure that “Show Disabled Devices” and “Show Disconnected Devices” are checked. Locate the “Stereo Mix” option, right-click on it, and select “Enable”. If you do not see the Stereo Mix option, your audio driver may not support it, or it may be disabled by default. In that case, you may need to update your audio driver or consult the manufacturer’s documentation for assistance.
- Adjusting Audio Playback Settings:
Return to the “Playback” tab in the Sound control panel. Right-click on your audio device and select “Properties”. In the Properties dialog box, navigate to the “Enhancements” tab. Check the box next to “Disable all enhancements” and click “Apply” or “OK” to save the changes. Disabling enhancements can help ensure a clean and unaltered stereo sound output.
Once you have completed these steps, your Windows 10 computer is now configured to output stereo sound. You can verify the change by playing any stereo audio content, such as music or a stereo test file, and ensuring that the sound is properly distributed between the left and right channels.
If you encounter any issues or do not see the expected changes, double-check that you followed the steps correctly and that your audio hardware is indeed capable of stereo output. Additionally, consider updating your audio drivers to the latest version for optimal performance.
Changing Speaker Configuration
One of the key steps in configuring mono to stereo output on Windows 10 is adjusting the speaker configuration. By setting up your speakers or headphones correctly, you can ensure that audio is outputted in stereo, providing a more immersive and realistic sound experience.
To change the speaker configuration on Windows 10, follow these steps:
- Begin by right-clicking on the sound icon located in the Windows taskbar. A context menu will appear.
- Select “Sounds” from the menu to open the Sound control panel.
- Switch to the “Playback” tab in the Sound control panel. Here, you will find a list of audio devices connected to your computer.
- Identify the device you are using for audio output (such as your headphones or external speakers).
- Right-click on the device and select “Configure Speakers” from the menu that appears.
- The Speaker Setup wizard will open, presenting various options for speaker configuration.
- Choose the option labeled “Stereo” to configure your speakers for stereo sound output.
- Follow the on-screen instructions provided by the wizard to complete the speaker configuration process.
By selecting the “Stereo” option in the Speaker Setup wizard, you are instructing your Windows 10 computer to output audio in stereo. This allows you to enjoy a more immersive sound experience, where different sounds are separated and directed to the left and right channels. Whether you are listening to music, watching movies, or playing games, stereo sound enriches the overall audio quality and enhances your entertainment.
It’s important to note that not all audio devices may support stereo sound. In such cases, the Speaker Setup wizard may not provide the option for stereo configuration. If this is the case with your particular hardware, you may need to consider upgrading to devices that are capable of delivering stereo sound for an optimal audio experience.
Enabling Stereo Mix
To enable stereo sound output on your Windows 10 computer, you’ll need to enable the Stereo Mix option. This feature allows you to capture and play audio from your computer’s sound card, ensuring that the audio output is in stereo format. Enabling Stereo Mix can be a helpful step in the process of configuring mono to stereo output. Here’s how you can enable it:
- Right-click on the sound icon in the Windows taskbar to open the context menu.
- Select “Sounds” from the menu to open the Sound control panel.
- Switch to the “Recording” tab in the Sound control panel.
- Right-click on an empty area within the list of recording devices.
- Ensure that both “Show Disabled Devices” and “Show Disconnected Devices” options are checked.
- Locate the “Stereo Mix” option in the list of recording devices.
- Right-click on “Stereo Mix” and select “Enable” from the menu.
Enabling Stereo Mix allows your computer to capture the stereo sound being played and redirect it to your selected recording device. This ensures that you can enjoy stereo audio output from any application or source.
In some cases, you may not see the Stereo Mix option listed in the Sound control panel. This could be due to various reasons, such as incompatible audio drivers or disabled functionality. If you encounter this issue, you might need to update your audio drivers or consult the manufacturer’s documentation for assistance.
Once you have successfully enabled the Stereo Mix option, you can begin enjoying stereo sound output on your Windows 10 computer. Whether you are listening to music, watching videos, or engaging in multimedia activities, the stereo mix will enhance your audio experience by providing a more immersive and well-balanced soundstage.
It’s worth noting that not all audio hardware and drivers support the Stereo Mix function. If you are unable to find the Stereo Mix option or experience any complications, it’s recommended to check the manufacturer’s website or support resources for further guidance.
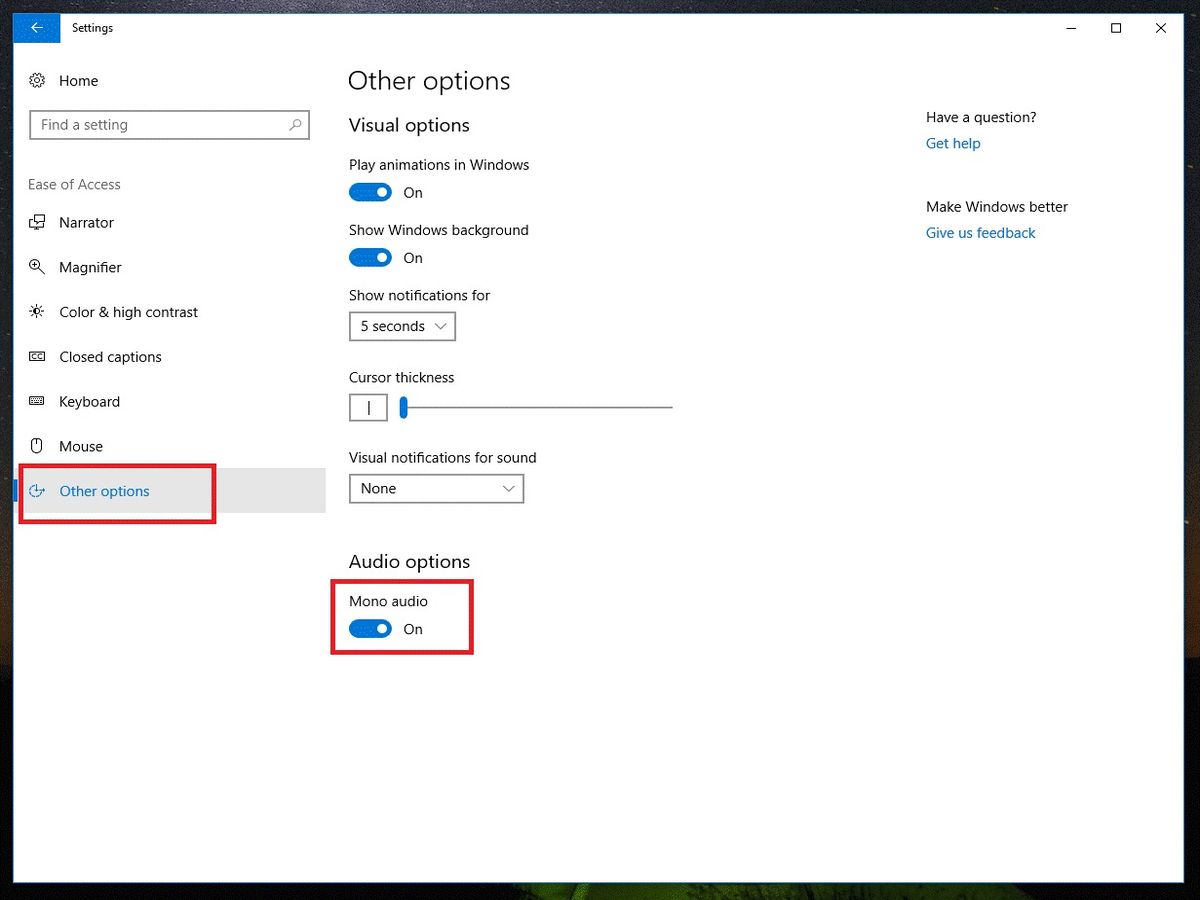
Adjusting Audio Playback Settings
To ensure optimal stereo sound output on your Windows 10 computer, it may be necessary to adjust the audio playback settings. These settings can affect the quality, balance, and overall performance of the audio output. By making a few adjustments, you can enhance your stereo listening experience. Here’s how:
- Right-click on the sound icon in the Windows taskbar and select “Sounds” from the context menu to open the Sound control panel.
- Switch to the “Playback” tab within the Sound control panel.
- Locate the audio device that you are using for output, whether it’s speakers or headphones.
- Right-click on the device and select “Properties” from the menu.
- In the Properties dialog box, navigate to the “Enhancements” tab.
- Check the box next to “Disable all enhancements”.
- Click “Apply” or “OK” to save the changes.
Disabling all enhancements ensures that the audio output remains clean and unaltered, allowing for a more accurate representation of the stereo sound. It eliminates any added effects or processing that may interfere with the intended audio experience. By disabling enhancements, you can enjoy the audio as intended by the content creators, whether it’s music, movies, or games.
It’s important to note that the availability and range of enhancement options may vary depending on the audio device and drivers you have installed. In some cases, you may have additional customization options within the Enhancements tab. It’s recommended to explore these options and experiment with them to find the settings that suit your personal preferences.
By adjusting the audio playback settings and disabling enhancements, you can ensure a clean and accurate stereo sound output on your Windows 10 computer. This will allow you to fully experience the depth, separation, and spatial qualities offered by stereo sound, enhancing your overall audio enjoyment.
If you encounter any issues or do not observe the expected changes after adjusting the audio playback settings, double-check that you followed the steps correctly and that your audio hardware is indeed compatible with stereo output. Additionally, consider updating your audio drivers to the latest version to ensure optimal performance and compatibility.
Troubleshooting Tips
While configuring mono to stereo output on Windows 10 is generally a straightforward process, you may encounter some issues or challenges along the way. If you’re experiencing any difficulties, don’t worry! We’ve compiled a list of troubleshooting tips to help you overcome common obstacles and enjoy stereo sound on your computer.
Try these troubleshooting tips:
- Check your audio drivers: Outdated or incompatible audio drivers can prevent you from accessing stereo sound options. Visit the manufacturer’s website to download and install the latest drivers for your audio device.
- Verify compatibility: Ensure that your audio hardware supports stereo sound. Refer to the user manual or contact the manufacturer for clarification.
- Restart your computer: Sometimes, a simple restart can resolve minor software glitches or conflicts that may be affecting the audio settings.
- Test different applications: If stereo sound is not working in one particular application, try playing audio from a different program to determine if the issue is application-specific.
- Check connection and cables: Ensure all audio cables are securely connected and not damaged. Faulty connections or cables can affect sound quality or lead to mono output.
- Update your operating system: Keeping your Windows 10 operating system up to date can address compatibility issues and provide bug fixes that may impact audio functionality.
- Reset audio settings: If all else fails, you can try resetting your audio settings to their default configurations. Right-click on the sound icon, select “Troubleshoot sound problems”, and follow the on-screen instructions.
By following these troubleshooting tips, you can overcome common hurdles that may arise during the process of changing from mono to stereo on Windows 10. If you continue to experience difficulties, it may be helpful to consult community forums or seek assistance from technical support to resolve the specific issues you are encountering.
Remember, patience and persistence are key when troubleshooting audio issues. With a little effort and troubleshooting, you’ll soon be enjoying the immersive and captivating experience of stereo sound on your Windows 10 computer.
Conclusion
In conclusion, changing from mono to stereo sound on your Windows 10 computer can greatly enhance your audio experience. By following the steps outlined in this article, you can configure your audio settings to output stereo sound, providing a more immersive and realistic listening experience.
Understanding the difference between mono and stereo sound is essential to appreciate the benefits of stereo output. Mono sound, played through a single channel, lacks the depth and spatial qualities that stereo sound offers. Stereo sound, on the other hand, creates a sense of directionality and separation, resulting in a more engaging and dynamic audio experience.
Before attempting to change to stereo sound, it’s crucial to check if your audio hardware supports stereo output. Additionally, adjusting the speaker configuration, enabling Stereo Mix, and tweaking audio playback settings can further optimize the stereo sound output on your Windows 10 computer.
Although the process is usually straightforward, troubleshooting tips can help you overcome any potential obstacles that arise during the configuration process. By ensuring your audio drivers are up to date, verifying compatibility, checking connections, and performing system updates, you can troubleshoot common audio issues and enjoy stereo sound without any hindrances.
In summary, changing from mono to stereo sound on Windows 10 transforms your audio experience, allowing you to fully immerse yourself in the richness and depth of your favorite music, movies, and multimedia content. So go ahead, follow the steps outlined in this article, troubleshoot if needed, and start enjoying the captivating power of stereo sound on your Windows 10 device today.