Home>Production & Technology>MP3>How To Trim MP3 Files On Windows 10
MP3
How To Trim MP3 Files On Windows 10
Published: December 8, 2023
Looking for a simple way to trim MP3 files on Windows 10? Learn how to easily trim, edit, and cut your MP3 files with step-by-step instructions and recommended tools.
(Many of the links in this article redirect to a specific reviewed product. Your purchase of these products through affiliate links helps to generate commission for AudioLover.com, at no extra cost. Learn more)
Table of Contents
Introduction
Welcome to the world of MP3 files! With the prevalence of digital music, MP3s have become the go-to format for storing and playing audio files. Whether you’re a musician, a podcast producer, or simply someone who enjoys a vast music library, you may find yourself in need of trimming MP3 files from time to time. Trimming MP3 files allows you to extract specific parts of a song, remove unwanted segments, or create custom ringtones.
In this article, we will explore various methods to trim MP3 files on Windows 10. You don’t need to be an expert or purchase expensive software to accomplish this task. We will cover both built-in and third-party tools that provide simple and effective ways to edit your MP3 files.
Trimming MP3 files can be helpful in a variety of situations. Perhaps you want to create a shorter version of a song for a project, remove the intro or outro of a podcast episode, or convert a long audio file into individual tracks. No matter the reason, the methods we will discuss will allow you to achieve your desired results without any hassle.
So, if you’re ready to dive into the world of MP3 file editing, let’s get started with method one: using the built-in Groove Music app.
Method 1: Using the Built-in Groove Music App
If you’re using Windows 10, you may already have the Groove Music app installed on your computer. This native music player offers a simple and convenient way to trim MP3 files without the need for additional software. Here’s how to use the Groove Music app to trim your MP3s:
- Open the Groove Music app on your Windows 10 computer.
- Navigate to your MP3 file by clicking on the three horizontal lines in the top-left corner of the app and selecting “Songs” from the menu.
- Locate the MP3 file you want to trim and right-click on it. Select “Open With” and choose Groove Music from the options.
- Once the song is playing in the Groove Music app, click on the three dots (…) next to the song’s title and select “Edit Info” from the dropdown menu.
- In the Edit Info window, you’ll see a “Trim” option near the bottom. Click on it to open the Trim tool.
- Use the yellow sliders to define the start and end points of the segment you want to keep. You can preview the selected portion by clicking the play button within the Trim tool.
- Once you’re satisfied with your selection, click the “Save” button to trim the MP3 file.
The trimmed version of the MP3 file will be saved in the same location as the original file, with the word “Trim” appended to the file name. Now you have a trimmed MP3 file that contains only the portion you selected.
The Groove Music app provides a simple and user-friendly way to trim MP3 files without the need for complicated software or technical knowledge. However, if you prefer more advanced editing options or if you don’t have the Groove Music app installed on your computer, there are alternative methods available. Let’s explore another option in method two: using the free mp3DirectCut software.
Method 2: Using the Free mp3DirectCut Software
If you’re looking for a more feature-rich solution to trim your MP3 files, mp3DirectCut is a fantastic option. This free and lightweight software offers advanced editing capabilities while remaining easy to use. Follow the steps below to trim your MP3 files using mp3DirectCut:
- Download and install mp3DirectCut from the official website. It is a small-sized program that won’t take up much space on your computer.
- Launch mp3DirectCut after installation.
- Click on the “File” tab and select “Open” to choose the MP3 file you want to trim.
- A waveform representation of the MP3 file will appear, allowing you to visualize the audio.
- Position the playback cursor at the beginning of the segment you want to keep, and click the “Mark Start” button.
- Move the playback cursor to the end of the desired segment and click the “Mark End” button.
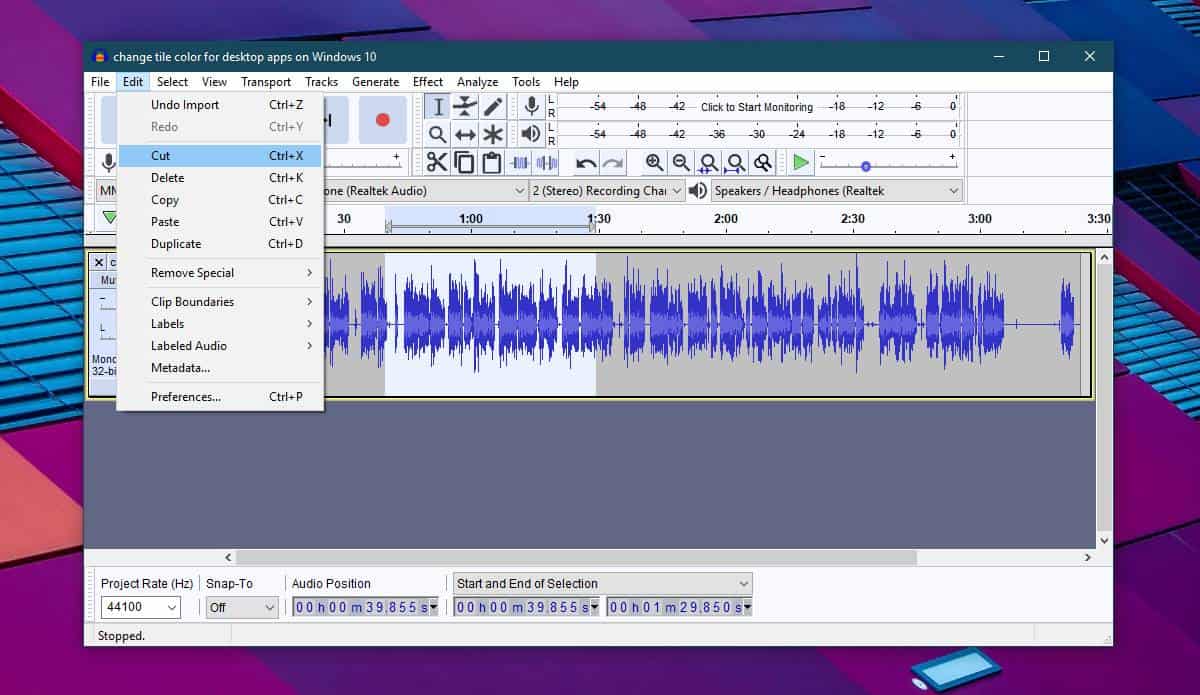
- Press the “Delete” key on your keyboard or click the “Cut” button to remove the selected portion of the MP3 file.
- If you want to undo the cut or make further adjustments, use the “Undo” and “Redo” buttons in the toolbar.
- Once you are satisfied with the trimmed version, click on the “File” tab and select “Save” to save the changes to a new file.
mp3DirectCut offers additional features such as fade in/out effects, volume normalization, and direct MP3 recording. It also supports batch processing, making it a powerful tool for editing multiple MP3 files simultaneously.
However, it’s important to note that mp3DirectCut operates on a lossless editing principle, which means it doesn’t re-encode the audio. This ensures that the audio quality remains unaffected during the trimming process. Furthermore, the software is relatively fast, so you can trim your MP3 files quickly and effortlessly.
Now that you’re familiar with trimming MP3 files using the mp3DirectCut software, let’s move on to method three: using an online audio cutter website.
Method 3: Using the Online Audio Cutter Website
If you prefer to avoid installing software or if you’re on a different operating system, using an online audio cutter website is a convenient option to trim your MP3 files. These websites offer a user-friendly interface and allow you to edit your audio files directly from your web browser. Here’s how to trim your MP3 files using an online audio cutter website:
- Open your preferred web browser and search for “online audio cutter” or “MP3 trimmer.”
- Choose a reputable online audio cutter website from the search results.
- Upload your MP3 file by clicking the “Upload” or “Choose File” button on the website’s homepage.
- Wait for the website to upload and process your file. The time may vary depending on the size of your MP3 file and the website’s server speed.
- Once the website has finished processing your MP3 file, you’ll see a waveform representation of the audio.
- Use your cursor to select the start and end points of the segment you want to keep. You can preview the selection by listening to the audio using the playback controls provided.
- After finalizing your selection, look for an option such as “Trim” or “Cut.” Click on it to remove the unwanted portions of the MP3 file.
- Once the trimming process is complete, the website will provide you with options to save the trimmed file. You can either download it directly to your computer or save it to a cloud storage service if available.
Online audio cutter websites offer a quick and accessible method to trim MP3 files without the need for any software installation. They are compatible with various operating systems and can be accessed from any device with an internet connection. Just make sure to choose a reliable website to ensure the security and privacy of your audio files.
Now you’ve learned how to trim MP3 files using an online audio cutter website. However, if you prefer using a media player that you already have installed on your Windows 10 computer, method four might be the ideal solution for you. Let’s explore how to trim MP3 files using the popular VLC Media Player.
Method 4: Using the VLC Media Player
VLC Media Player, known for its versatility and wide-ranging compatibility, is not only a powerful media player but also offers the functionality to trim MP3 files. If you already have VLC Media Player installed on your Windows 10 computer, you can easily use it to edit your MP3 files. Here’s how:
- Launch VLC Media Player on your computer.
- Click on “Media” in the top navigation menu and select “Convert/Save…” from the dropdown menu.
- In the “Open Media” window that appears, click on the “Add” button to select the MP3 file you want to trim.
- Once you’ve added the file, click on the “Convert/Save” button at the bottom right of the window.
- In the “Convert” window that appears, navigate to the “Profile” section. Here, you can choose the desired audio format for the trimmed file. If you want to keep the format as MP3, select “Audio – MP3” from the dropdown menu.
- Next, click on the “Edit selected profile” button, represented by a pencil icon.
- In the “Encapsulation” tab, make sure “Audio – MP3” is selected as the encapsulation format.
- In the “Audio codec” tab, click on the “Audio” tab and check the box next to “Keep original audio track.”
- Click on the “Start” button to begin the conversion process.
- In the “Destination File” window, choose the location on your computer where you want to save the trimmed MP3 file and give it a suitable name.
- Click on the “Save” button to start the trimming process.
- Wait for the conversion and trimming to complete. The time taken will depend on the length of the MP3 file and the speed of your computer.
- Once the process is finished, you will have a trimmed version of the MP3 file saved in your chosen location.
VLC Media Player provides a simple and effective method to trim your MP3 files. Whether you want to extract a specific portion of a song or remove unwanted segments from a podcast episode, VLC Media Player offers the versatility and flexibility to achieve your desired results.
Now that you know how to trim MP3 files using VLC Media Player, you have a variety of methods at your disposal to edit and customize your audio files. Whether you choose the built-in Groove Music app, the free mp3DirectCut software, an online audio cutter website, or VLC Media Player, you have the tools to create perfect MP3 files for your specific needs.
With these methods, you can effortlessly trim MP3 files on your Windows 10 computer, unlocking a new world of possibilities for your audio editing ventures.
Conclusion
Trimming MP3 files doesn’t have to be a complicated process. With the methods we’ve explored in this article, you have a range of options to choose from based on your preferences and the tools available to you. Whether you opt for the built-in Groove Music app, the free mp3DirectCut software, an online audio cutter website, or VLC Media Player, you can easily edit and customize your MP3 files on your Windows 10 computer.
Using the Groove Music app provides a simple and user-friendly solution, especially if you already have it installed. It allows you to trim your MP3 files directly within the app, without the need for additional software.
If you’re looking for more advanced editing capabilities, the free mp3DirectCut software is a great choice. It offers features like fade in/out effects and volume normalization, making it a powerful tool for trimming your MP3 files while maintaining audio quality.
For those who prefer a hassle-free and platform-independent solution, online audio cutter websites offer a convenient way to edit your MP3 files directly from your web browser. These websites are accessible from any operating system and eliminate the need for installing software.
Finally, VLC Media Player presents a versatile option for trimming MP3 files. With its wide range of features and compatibility, including the ability to keep the original audio track, VLC Media Player allows you to customize and save your trimmed MP3 files with ease.
Now that you’re armed with these methods, you can confidently embark on your MP3 file editing journey. Whether you’re creating custom ringtones, extracting specific portions of songs, or removing unwanted segments from podcasts, trimming MP3 files on your Windows 10 computer is now a simple and enjoyable task.
So go ahead and give these methods a try. Begin exploring the world of MP3 file editing and unlock a whole new level of creativity and customization for your audio files.