Home>Instruments>Harmonica>How To Clean Harmonica Reeds
Harmonica
How To Clean Harmonica Reeds
Published: February 2, 2024
Learn the best techniques for cleaning harmonica reeds and prolonging the lifespan of your harmonica. Keep your harmonica sounding its best with our step-by-step guide.
(Many of the links in this article redirect to a specific reviewed product. Your purchase of these products through affiliate links helps to generate commission for AudioLover.com, at no extra cost. Learn more)
Table of Contents
Introduction
Welcome to our comprehensive guide on how to clean harmonica reeds! If you’re a passionate harmonica player, you know that keeping your instrument clean is essential for optimal performance and longevity. While regular maintenance is crucial, cleaning the reeds requires a bit of extra care and attention.
Harmonica reeds are the heart and soul of the instrument. Their delicate construction and precise alignment are what produce those beautiful, soulful tones. However, over time, reeds can accumulate debris, moisture, and even develop corrosion, affecting their responsiveness and sound quality.
By giving your harmonica reeds regular cleaning, you can remove any built-up gunk and ensure they continue to perform at their best. Not only will this improve the overall sound and playability of your harmonica, but it can also extend its lifespan.
In this guide, we’ll take you step-by-step through the process of cleaning harmonica reeds. We’ll cover the necessary supplies, techniques, and precautions to ensure you clean your reeds effectively without damaging the instrument. So let’s dive in and get those reeds sparkling and singing again!
Understanding Harmonica Reeds
Before we delve into the cleaning process, let’s take a moment to understand the importance of harmonica reeds and how they function within the instrument.
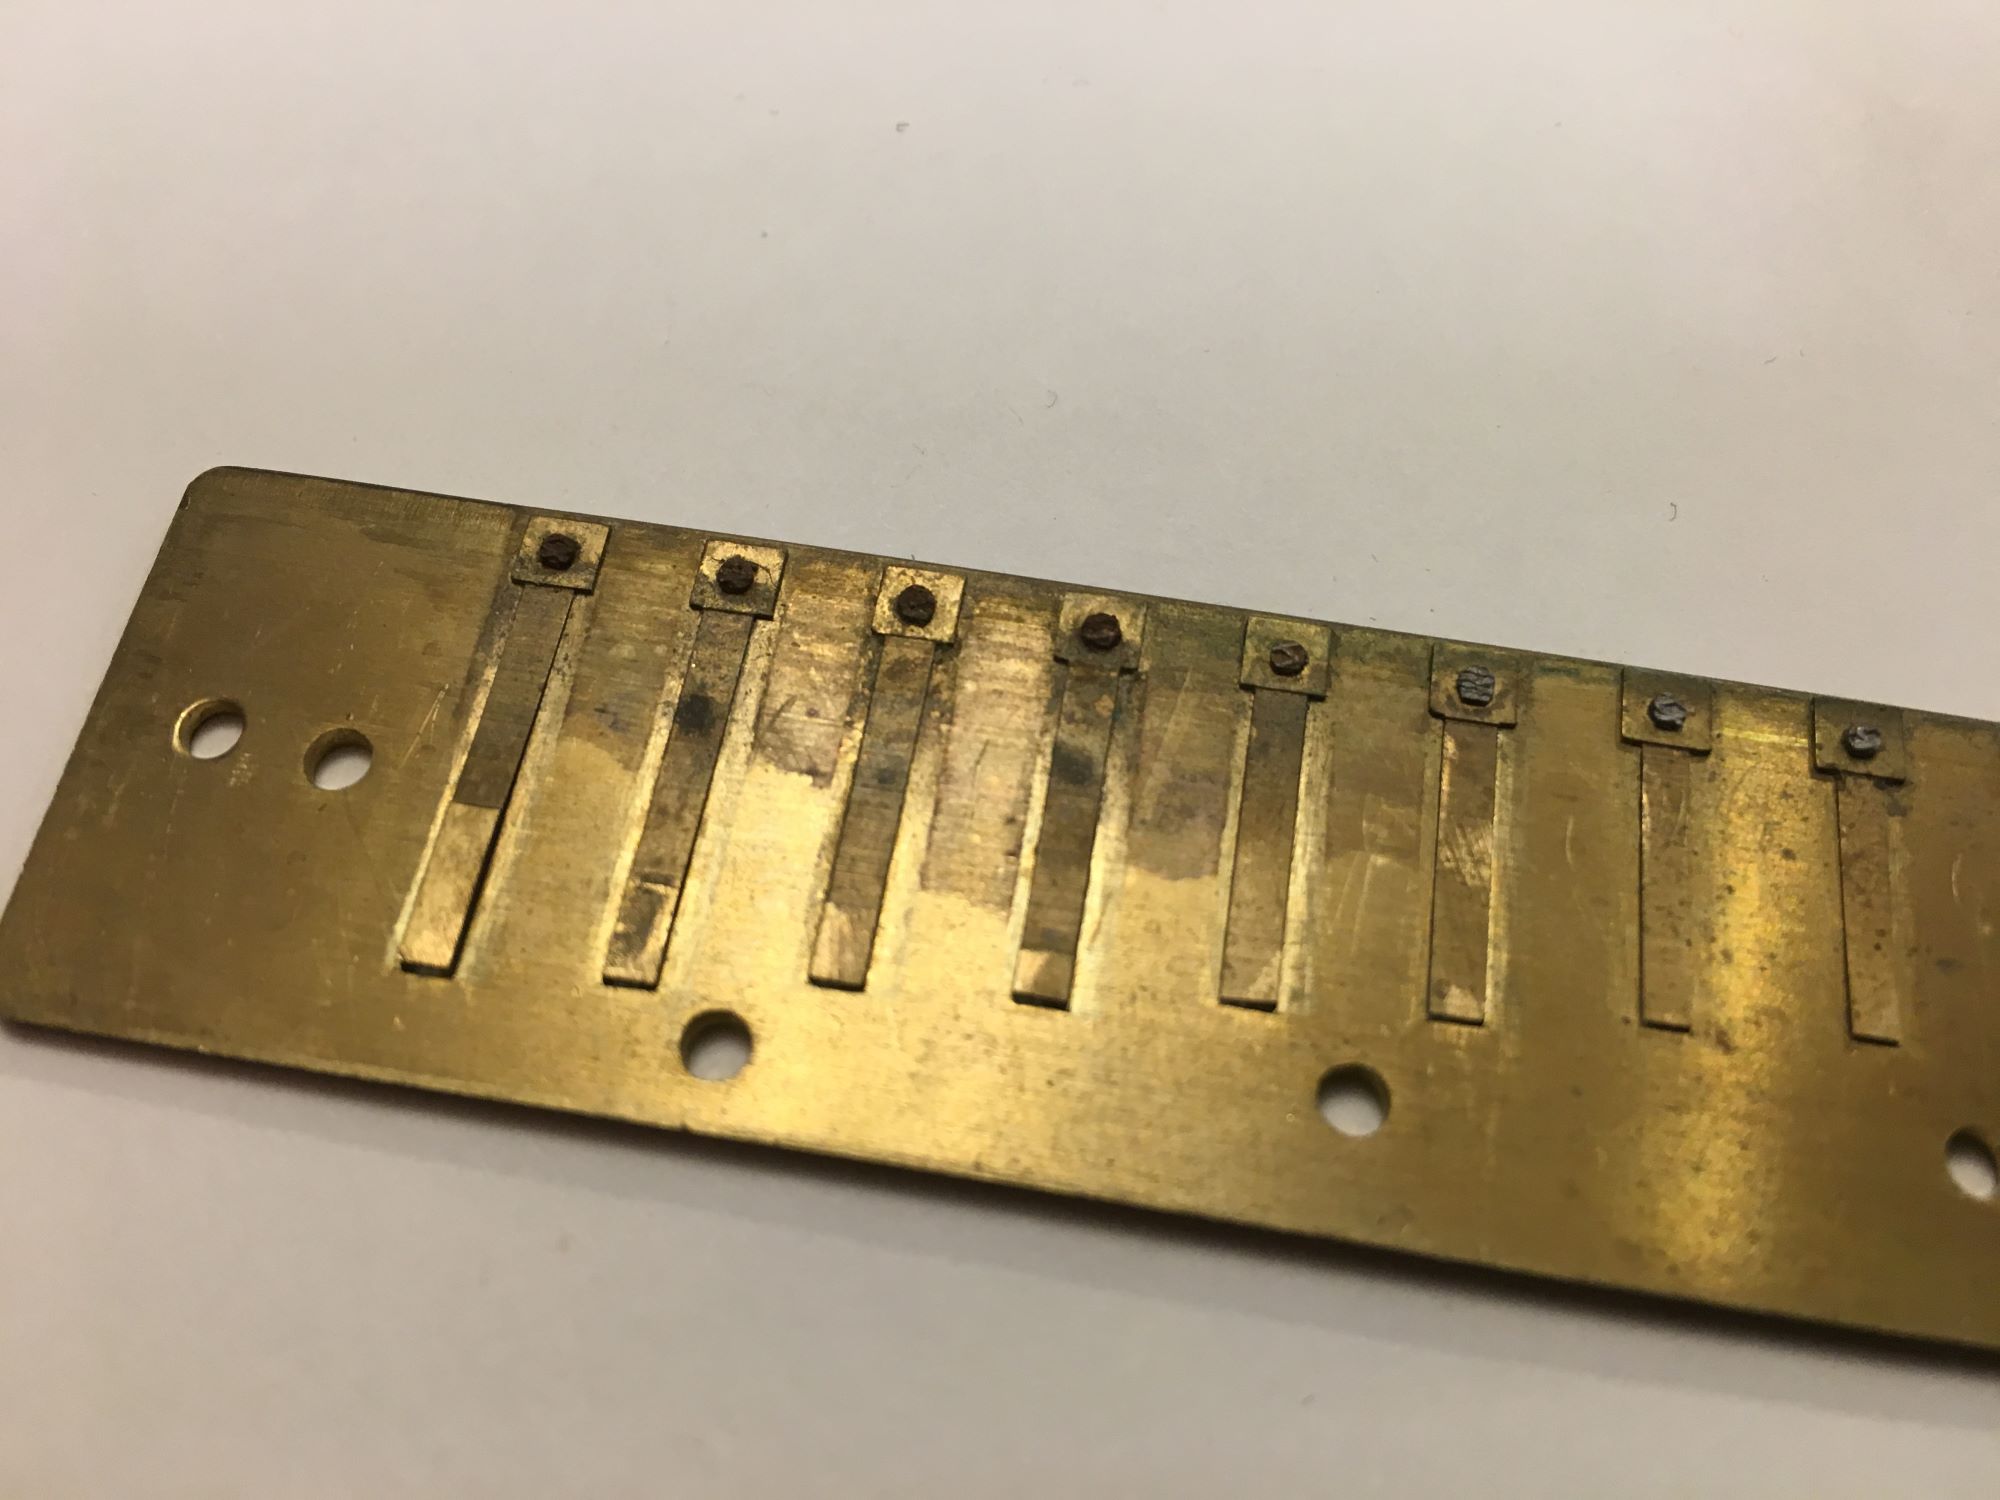
Harmonica reeds are thin strips of metal (usually brass or phosphor bronze) that are fixed at one end and vibrate freely at the other. These vibrating reeds create the distinct notes and tones that we hear when we play the harmonica.
There are two types of reeds in a harmonica: blow reeds and draw reeds. The blow reeds produce sound when you blow into the instrument, while the draw reeds produce sound when you inhale or draw air into the harmonica.
Each reed is placed over an air hole on a reed plate, which is a thin metal plate containing multiple reeds. The reed plate is then mounted onto the comb, which is the body of the harmonica. The comb is usually made of wood, plastic, or metal.
The length, thickness, and tension of the reeds determine their pitch and the sound they produce. Higher-pitched reeds are shorter and thinner, while lower-pitched reeds are longer and thicker. The reed’s position on the reed plate also affects its pitch.
Due to their exposed nature and constant vibration, harmonica reeds are prone to accumulating dirt, saliva, and other particles over time. This accumulation can lead to clogged reeds, reduced responsiveness, and compromised sound quality.
Proper cleaning of harmonica reeds is essential to maintain their performance and prevent damage. By regularly cleaning the reeds, you can ensure that they vibrate freely and produce clear, resonant tones.
Now that we have a basic understanding of harmonica reeds, let’s proceed to the next section, where we’ll discuss the preparations required before cleaning the reeds.
Preparing for Cleaning
Before diving into the cleaning process, it’s important to make a few preparations to ensure a smooth and effective cleaning session. Taking the time to gather the necessary supplies and set up a clean and organized workspace will help you clean your harmonica reeds with ease. Here are the steps to follow:
- Gather the necessary supplies: To clean harmonica reeds effectively, you’ll need a few basic supplies. These include a small soft brush, such as a toothbrush or a specialized harmonica cleaning brush, rubbing alcohol or a harmonica cleaner solution, a clean cloth or paper towels, and a small dish or container to hold the cleaning solution.
- Find a suitable workspace: Look for a clean, well-lit area where you can comfortably work on your harmonica. Make sure you have enough space to lay out your cleaning supplies and have easy access to water or a sink if needed.
- Remove the reed plates: In some cases, you may need to remove the reed plates from the harmonica to clean the reeds thoroughly. This step is optional and depends on the specific design of your harmonica. If you’re unsure about removing the reed plates, consult the manufacturer’s instructions or seek guidance from a knowledgeable person.
- Inspect the harmonica: Before cleaning the reeds, take a moment to inspect the harmonica for any signs of damage or wear. Look for bent or misaligned reeds, cracks in the comb, or any other issues that may require repair. Addressing these issues before cleaning will ensure that you’re working with a harmonica in good condition and prevent further damage.
- Warm up the harmonica (optional): If you’ve been playing your harmonica, the reeds may be warmed up or moist from your breath. If this is the case, give your harmonica a short break to allow the reeds to cool down and dry out slightly. This will make the cleaning process more effective.
By following these preparation steps, you’ll be ready to move on to the actual cleaning process. In the next section, we’ll discuss the specific cleaning supplies needed and the step-by-step process for cleaning harmonica reeds.
Cleaning Supplies Needed
When it comes to cleaning harmonica reeds, having the right tools and supplies is crucial for a successful cleaning session. Here are the essential cleaning supplies you’ll need:
- Soft brush: A small, soft brush is essential for gently removing debris and dirt from the reeds. A toothbrush with soft bristles or a specialized harmonica cleaning brush works well. Make sure the brush is clean and dry before use to avoid introducing any additional particles to the reeds.
- Rubbing alcohol or harmonica cleaner solution: Rubbing alcohol, or a harmonica-specific cleaning solution, is used to disinfect and remove any bacteria or buildup from the reeds. It’s important to use a high percentage isopropyl alcohol (at least 70%) for effective cleaning. Alternatively, you can use a harmonica cleaner solution made specifically for cleaning harmonicas.
- Clean cloth or paper towels: You’ll need a clean, lint-free cloth or paper towels to dry the reeds and remove any excess moisture or cleaning solution. Avoid using fabric that can leave lint behind, as this can interfere with the reed’s movement.
- Small dish or container: A small dish or container is needed to hold the cleaning solution. It should be wide enough to comfortably fit the reed plates or individual reeds for soaking.
- Warm water (optional): In some cases, warm water may be required to loosen stubborn debris from the reeds or remove excess cleaning solution. Make sure the water is warm, but not hot, as excessive heat can damage the harmonica.
- Soft cloth or pad: A soft cloth or pad can be used to gently wipe down the reed plates and remove any residue or remaining dirt. Make sure the cloth is clean and dry before use.
By having these cleaning supplies ready, you’ll be well-equipped to clean your harmonica reeds effectively. In the next section, we’ll walk you through the step-by-step process of cleaning the reeds and ensuring they’re in top condition.
Step-by-Step Cleaning Process
Now that you have gathered the necessary supplies, it’s time to dive into the step-by-step cleaning process for your harmonica reeds. Follow these instructions carefully to ensure a thorough and effective cleaning:
- Remove the reed plates: If your harmonica allows for it, remove the reed plates from the comb. This step will give you better access to the reeds and facilitate a more thorough cleaning. Be sure to handle the reed plates with care to avoid bending or damaging the delicate reeds.
- Inspect the reed plates: Before proceeding with cleaning, take a moment to inspect the reed plates. Look for any visible debris, corrosion, or bent reeds. If you notice any issues, take note of them and address them appropriately before continuing with cleaning.
- Prepare the cleaning solution: If you’re using rubbing alcohol, pour a small amount into the dish or container. If you’re using a harmonica cleaner solution, follow the manufacturer’s instructions for dilution or application. Ensure that there is enough solution to submerge the reeds or reed plates if necessary.
- Soak the reed plates or individual reeds (optional): If your reed plates are removable, you can choose to soak them in the cleaning solution. This will help break up any stubborn debris or buildup. If your harmonica doesn’t allow for reed plate removal, you can dip a soft brush or cotton swab into the solution and gently clean the reeds individually.
- Gently brush the reeds: Take your soft brush and gently brush the reeds back and forth, starting from the base where they are attached. Use light pressure to avoid bending or damaging the reeds. The brush will help remove any loose debris or deposits on the reeds.
- Focus on stubborn spots: If you encounter stubborn debris or buildup, use the brush to target those areas and apply a bit of pressure. Be careful not to overdo it, as excessive force can damage the reeds. If needed, you can also dip the brush in the cleaning solution for additional cleaning power.
- Rinse the reed plates (optional): If you have soaked the reed plates, rinse them under warm water to remove any remaining cleaning solution. Gently shake off any excess water and pat them dry with a clean cloth or paper towel.
- Wipe down the reed plates: Using a dry, clean cloth or pad, wipe down the reed plates to remove any residue or moisture. Ensure that they are completely dry before reassembling the harmonica.
- Clean the comb: While focusing on the reed plates and reeds, don’t forget to clean the comb as well. Use the soft brush or a clean cloth to remove any debris or moisture from the comb. Ensure that it is completely dry before reassembling the harmonica.
- Reassemble the harmonica: Once everything is clean and dry, carefully reattach the reed plates to the comb. Make sure they are aligned correctly, and the screws or fastenings are tightened securely but not overly tight to avoid damage.
- Play and test: After cleaning and reassembling, give your harmonica a quick play test to ensure the reeds are working properly. If any issues persist, further inspection or adjustments may be necessary.
By following these step-by-step instructions, you can effectively clean your harmonica reeds and ensure they perform at their best. In the next sections, we’ll discuss cleaning the reed plates, cleaning the reeds individually, and cleaning the harmonica covers for a thorough cleaning session.
Cleaning the Reed Plates
When it comes to cleaning a harmonica, one crucial step is cleaning the reed plates. The reed plates house the individual reeds and can accumulate dirt and debris over time, affecting the instrument’s performance. Here’s how you can effectively clean the reed plates:
- Remove the reed plates: If your harmonica allows for it, carefully remove the reed plates from the comb. Refer to the manufacturer’s instructions or seek guidance if you’re unsure about this step.
- Inspect the reed plates: Before cleaning, examine the reed plates for any visible dirt, debris, or corrosion. Take note of any bent or misaligned reeds that may require adjustment or repair.
- Prepare the cleaning solution: You can use rubbing alcohol or a harmonica cleaner solution for this step. Place a small amount of the cleaning solution in a dish or container.
- Soak the reed plates (optional): If you prefer, you can choose to soak the reed plates in the cleaning solution for a few minutes. This will help dislodge stubborn debris and buildup. If you decide to soak the plates, make sure they are fully submerged.
- Brush the reed plates: Take a soft brush, such as a toothbrush or a specialized harmonica cleaning brush, and gently brush the reed plates. Start from the base of the reeds and brush in a back and forth motion. Use light pressure to avoid bending or damaging the reeds.
- Focus on stubborn spots: If you encounter any stubborn debris or buildup, focus the brush on those areas and apply a bit more pressure. Take care not to exert excessive force that could harm the reeds or reed plates.
- Rinse the reed plates (optional): If you soaked the reed plates, rinse them under warm water to remove any remaining cleaning solution. Be sure to shake off any excess water and pat them dry with a clean cloth or paper towel.
- Wipe down the reed plates: Using a dry, clean cloth or pad, gently wipe down the reed plates to remove any moisture or residue. Ensure that the plates are completely dry before reassembling the harmonica.
- Reattach the reed plates: Once the reed plates are clean and dry, carefully reattach them to the comb, ensuring they are aligned correctly. Tighten the screws or fastenings securely but not overly tight to prevent damage.
- Play and test: After cleaning and reassembling, give your harmonica a play test to ensure that the reed plates are functioning properly. If any issues persist, further inspection or adjustments may be necessary.
By following these steps, you can effectively clean the reed plates and ensure that your harmonica performs optimally. In the next section, we’ll discuss the process of cleaning the individual reeds for a thorough cleaning session.
Cleaning the Reeds
When cleaning a harmonica, it’s important not to neglect the individual reeds themselves. Cleaning the reeds helps remove any built-up debris and maintains their responsiveness and sound quality. Here’s a step-by-step guide on how to clean the reeds:
- Inspect the reeds: Before beginning the cleaning process, inspect each reed individually for any visible dirt, debris, or signs of corrosion. Pay attention to any bent or misaligned reeds that may require adjustment or repair.
- Prepare the cleaning solution: Use rubbing alcohol or a harmonica cleaner solution for this step. Pour a small amount into a dish or container.
- Dip the brush: Take a small, soft brush (like a toothbrush or specialized harmonica cleaning brush) and dip it into the cleaning solution. Make sure the bristles are saturated but not dripping.
- Gently brush the reeds: Using the brush, gently brush each individual reed back and forth. Start from the base where the reed is attached and work your way towards the tip. Apply light pressure to avoid bending or damaging the reed.
- Pay attention to stubborn spots: If you encounter any stubborn debris or buildup on a reed, focus the brush on that particular area and apply a bit more pressure. Be careful not to use excessive force that could harm the reed.
- Rinse the reeds (optional): If you prefer, you can rinse the reeds under warm water to remove any remaining cleaning solution or loosened debris. Gently shake off any excess water.
- Dry the reeds: Use a clean cloth or paper towel to carefully dry each reed. Gently blot any remaining moisture to ensure they are completely dry before reassembling the harmonica.
- Reassemble the harmonica: Once the reeds are clean and dry, you can reattach the reed plates to the comb. Ensure they are aligned correctly, and the screws or fastenings are tightened securely but not overly tight to avoid damage.
- Play and test: Give your harmonica a play test to ensure that the reeds are functioning properly. If any issues persist, further inspection or adjustments may be necessary.
By following these steps, you can effectively clean the reeds and maintain their performance and longevity. In the next section, we’ll discuss how to clean the harmonica covers, which is an important aspect of the overall cleaning process.
Cleaning the Harmonica Covers
When cleaning a harmonica, it’s crucial not to overlook the harmonica covers, which protect the reeds and contribute to the overall sound and playability of the instrument. Cleaning the covers will help remove any dirt, grime, or residue, ensuring optimal performance and maintaining the harmonica’s appearance. Here’s a step-by-step guide on how to clean the harmonica covers:
- Inspect the covers: Before beginning the cleaning process, inspect the harmonica covers for any visible dirt, debris, or corrosion. Pay attention to any areas that require special attention or cleaning.
- Prepare the cleaning solution: Use mild soap or dish detergent mixed with warm water for this step. You can also use a specialized harmonica cleaning solution if available.
- Moisten the cloth: Dip a clean cloth or sponge into the cleaning solution, ensuring it’s damp but not dripping.
- Gently wipe down the covers: Carefully wipe the harmonica covers with the damp cloth or sponge. Pay attention to both the outer and inner sides of the covers, removing any dirt, grime, or residue that may have accumulated.
- Target stubborn spots: If you encounter any stubborn stains or debris, apply a bit more pressure to those areas while wiping. However, avoid using abrasive materials or excessive force that may scratch or damage the covers.
- Rinse the covers: If necessary, rinse the covers under warm water to remove any soapy residue. Gently shake off excess water and pat them dry with a clean cloth or paper towel.
- Dry the covers completely: Ensure that the covers are completely dry before reassembling the harmonica. You can use a clean cloth or allow them to air dry in a well-ventilated area. Avoid using heat sources such as hairdryers, as excessive heat can damage the covers.
- Reassemble the harmonica: Once the covers are dry, carefully reattach them to the harmonica comb, ensuring they are aligned correctly. Securely fasten them, but be cautious not to overtighten the screws or fastenings to prevent damage.
- Play and test: After cleaning and reassembling, give your harmonica a play test to ensure that the covers are properly positioned and not causing any interference with the reeds. If any issues persist, further inspection or adjustments may be necessary.
By following these steps, you can effectively clean the harmonica covers, maintaining their appearance and contributing to the overall cleanliness and performance of your harmonica. In the next section, we’ll provide some additional tips and precautions to keep in mind during the cleaning process.
Drying and Reassembling
Once you have completed the cleaning process for your harmonica, it’s essential to ensure that all the components are properly dried and reassembled. Drying the harmonica thoroughly will help prevent moisture-related issues and maintain its performance. Here’s what you need to do:
- Drying the reed plates and reeds: After cleaning the reed plates and reeds, use a clean, lint-free cloth or paper towel to gently pat them dry. Removing any excess moisture will help prevent rusting or damage to the metal components.
- Drying the harmonica covers: Similarly, ensure that the covers are completely dry before reassembling the harmonica. Wipe them with a clean, dry cloth or allow them to air dry in a well-ventilated area. Absorbing any remaining moisture will prevent potential issues in the future.
- Drying the comb: If the comb has come into contact with water during the cleaning process, it’s crucial to dry it thoroughly. Wipe it with a clean, dry cloth and ensure that no moisture remains before reassembling the harmonica.
- Reassembling the harmonica: Carefully reattach the reed plates to the comb, ensuring they align properly. Use the appropriate screws or fastenings to secure them in place. Be cautious not to overtighten, as this may damage the harmonica.
- Test the harmonica: After reassembly, give the harmonica a play test to ensure that all the components are in their correct positions and functioning properly. Check for any buzzing, muted, or malfunctioning reeds that may require further attention or adjustment.
By thoroughly drying the components and reassembling the harmonica correctly, you can maintain its performance and prevent any potential issues caused by dampness or improper fitting. In the next section, we’ll provide some additional tips and precautions to keep in mind during the cleaning process.
Tips and Precautions
Cleaning your harmonica reeds requires care and attention to ensure optimal performance and longevity. Here are some additional tips and precautions to keep in mind during the cleaning process:
- Regular maintenance: Regularly cleaning your harmonica reeds is essential for maintaining their performance. Aim to clean your harmonica every few months or whenever you notice a decline in sound quality or responsiveness.
- Use the right tools: Invest in quality cleaning tools specifically designed for harmonicas, such as soft brushes and harmonica cleaning solutions. Using the correct tools will help avoid damage to the delicate reeds and components.
- Avoid excessive moisture: Moisture can lead to damage or rusting of the reeds and other metal components. Dry the reeds thoroughly after cleaning and store your harmonica in a dry place to prevent moisture buildup.
- Inspect for damage: Take the time to inspect your harmonica before and after cleaning. Look for any bent or misaligned reeds, cracks in the comb, or loose screws. Address any issues promptly to prevent further damage during the cleaning process.
- Don’t over-tighten screws: When reassembling your harmonica, be cautious not to overtighten the screws or fastenings. Over-tightening can damage the harmonica or cause the reeds to become unresponsive.
- Store properly: After cleaning, ensure your harmonica is properly dried before storing it. Use a protective case or pouch to prevent dust, debris, and moisture from accumulating on the reeds and other components.
- Play regularly: Regularly playing your harmonica and maintaining good oral hygiene will help prevent excessive saliva buildup on the reeds. This can reduce the frequency of deep cleaning sessions and keep your harmonica in better condition.
- Seek professional help if needed: If you encounter complex issues or are unsure about cleaning certain components of your harmonica, it’s best to seek advice from a professional harmonica technician. They can provide expert guidance and maintenance services to ensure your harmonica stays in top shape.
By following these tips and precautions, you can effectively clean your harmonica reeds while maintaining their performance, extending their lifespan, and enjoying optimal playing experience. Now that you’re equipped with the knowledge to clean your harmonica reeds, go ahead and give your instrument some well-deserved TLC!
Conclusion
Cleaning your harmonica reeds is a crucial aspect of harmonica maintenance that ensures optimal performance and longevity of your instrument. By following the step-by-step cleaning process outlined in this guide and implementing the tips and precautions we provided, you can effectively remove dirt, debris, and buildup from the reeds, reed plates, and harmonica covers.
Regularly cleaning your harmonica reeds not only enhances the sound quality and playability of your instrument but also helps prevent issues like clogged reeds, reduced responsiveness, and sound distortion. By maintaining clean reeds, you can continue to produce those soulful tones that make the harmonica such a captivating instrument.
Remember to gather the necessary supplies, prepare your workspace, and take the time to inspect your harmonica before and after cleaning. Use the appropriate cleaning solutions and brushes, and be careful not to apply excessive force or overtighten screws. Properly drying the reeds, reed plates, and covers is essential to prevent moisture-related issues.
By incorporating regular harmonica cleaning into your routine and staying mindful of potential issues, you can ensure that your harmonica performs at its best for years to come. So, take the time to clean your harmonica reeds and give your instrument the care it deserves!