Home>Instruments>Guitar>How To Clean A Guitar Fretboard
Guitar
How To Clean A Guitar Fretboard
Published: February 12, 2024
Learn how to clean a guitar fretboard and keep your guitar in top condition. Follow our step-by-step guide for maintaining your guitar.
(Many of the links in this article redirect to a specific reviewed product. Your purchase of these products through affiliate links helps to generate commission for AudioLover.com, at no extra cost. Learn more)
Table of Contents
Introduction
Welcome to the essential guide on how to clean a guitar fretboard. The fretboard is not only a crucial component of the guitar’s playability but also a part that requires regular maintenance to ensure the instrument’s longevity and optimal performance. Over time, the accumulation of dirt, sweat, and grime can affect the fretboard’s appearance, playability, and tone. By learning how to properly clean and condition the fretboard, you can preserve the integrity of your instrument and enhance your playing experience.
Whether you’re a seasoned guitarist or a beginner, understanding the process of cleaning and conditioning a guitar fretboard is a valuable skill that can contribute to the overall maintenance of your instrument. Not only does this maintenance routine contribute to the guitar’s aesthetics, but it also plays a crucial role in maintaining the fretboard’s structural integrity and preventing potential damage from neglect.
In this comprehensive guide, we will walk you through the step-by-step process of cleaning and conditioning your guitar fretboard. From preparing the necessary materials to the final re-stringing of the guitar, each step is essential in ensuring that your instrument remains in optimal playing condition. By following these instructions, you can elevate your guitar maintenance routine and keep your instrument in top shape for years to come.
Materials Needed
Before embarking on the journey of cleaning and conditioning your guitar fretboard, it’s essential to gather the necessary materials. Having the right tools at your disposal will streamline the process and ensure that you can effectively restore your fretboard to its pristine condition. Here’s a list of the materials you will need:
- Guitar Polish or Fretboard Cleaner: Choose a high-quality guitar polish or fretboard cleaner specifically designed for the type of wood used in your fretboard. Some cleaners are formulated for specific wood types, such as rosewood or ebony, so be sure to select the appropriate product for your guitar.
- Fine Steel Wool or Fretboard Brush: For removing stubborn grime and dirt buildup, fine steel wool or a specialized fretboard brush can be used. These tools are effective in reaching the nooks and crannies of the fretboard without causing damage.
- Lemon Oil or Fretboard Conditioner: To condition the fretboard after cleaning, lemon oil or a dedicated fretboard conditioner is essential. This helps to hydrate the wood and prevent it from drying out, ultimately prolonging the life of the fretboard.
- Clean, Lint-Free Cloths: Prepare a few clean, lint-free cloths for the cleaning and conditioning process. These cloths will be used to apply the cleaner, remove dirt, and buff the fretboard to a shine.
- Guitar String Winder: While not directly related to cleaning the fretboard, a guitar string winder can be handy for the re-stringing process, which often follows fretboard maintenance.
- Guitar Strings: If your guitar strings are due for a change, it’s advisable to have a fresh set of strings on hand to complete the maintenance process with a re-stringing.
By ensuring that you have these materials readily available, you can proceed with confidence, knowing that you have everything necessary to give your guitar fretboard the care and attention it deserves.
Step 1: Remove the Strings
Before delving into the cleaning process, it’s essential to remove the strings from your guitar. This step is crucial as it allows unobstructed access to the fretboard, enabling thorough cleaning and conditioning. Here’s a simple guide to removing the strings:
- Loosen the Tuning Pegs: Begin by loosening the tension of each string at the tuning pegs. Using a guitar string winder can expedite this process, making it quicker and easier to unwind the strings.
- Remove the Bridge Pins (Acoustic Guitars): If you’re working with an acoustic guitar, you may need to remove the bridge pins to release the strings. Carefully extract the bridge pins using a specialized tool or a flat object, allowing the strings to be lifted from the bridge.
- Unwind and Remove the Strings: Once the tension has been released, unwind the strings from the tuning pegs and remove them from the guitar. Coil the strings neatly for disposal or recycling, especially if they are old and worn.
With the strings removed, you now have a clear view of the fretboard, ready to undergo the cleaning and conditioning process. This initial step sets the stage for thorough maintenance, ensuring that every inch of the fretboard can be attended to without any hindrance from the strings.
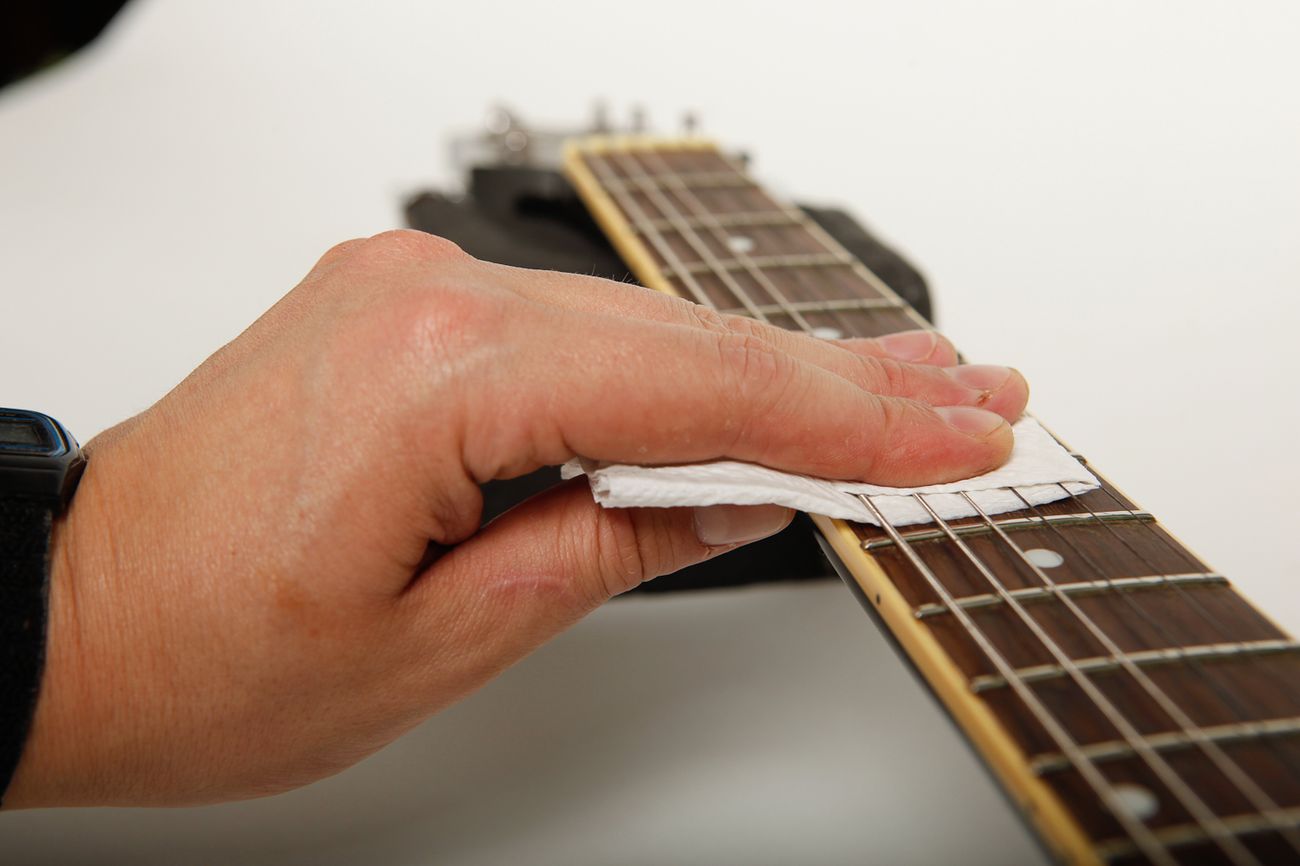
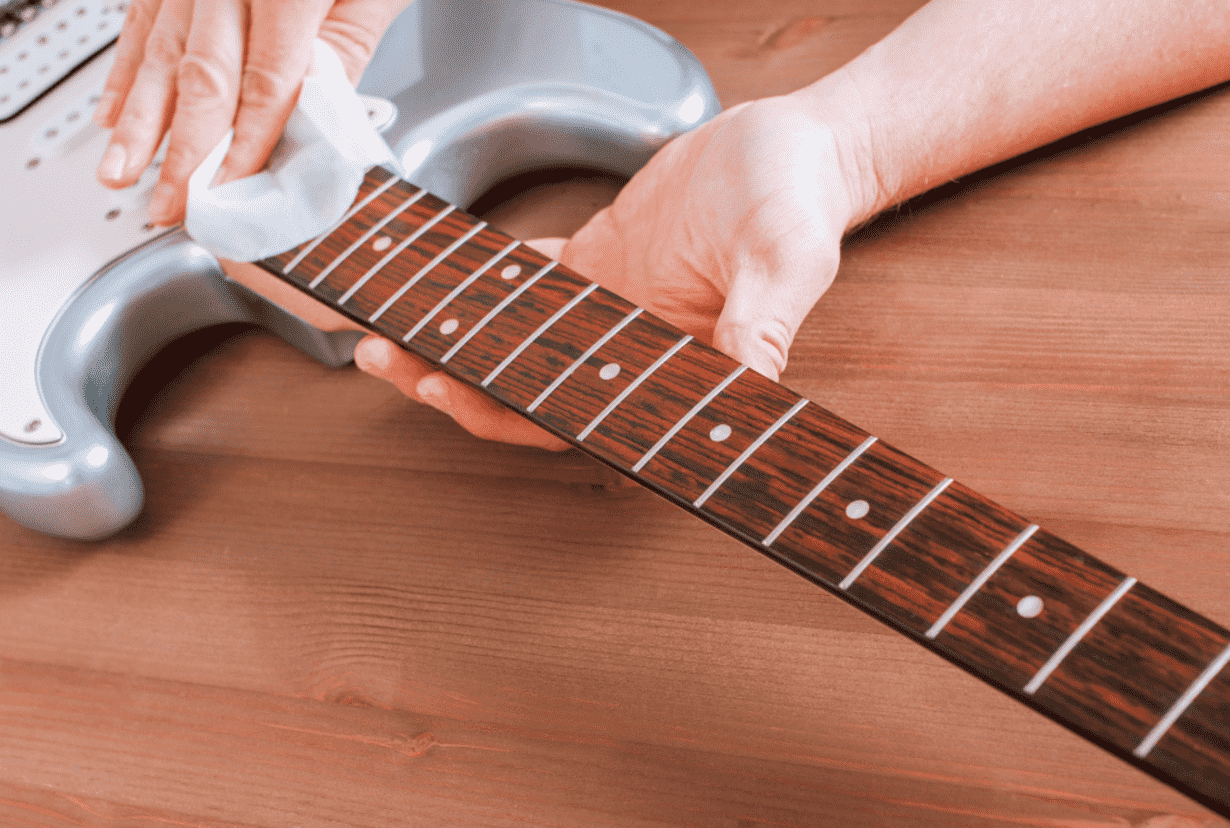
Step 2: Clean the Fretboard
With the strings removed, it’s time to focus on cleaning the fretboard. Over time, dirt, oils, and residue can accumulate on the fretboard, affecting its appearance and playability. Here’s a comprehensive guide to effectively cleaning the fretboard:
- Remove Surface Debris: Begin by using a dry, lint-free cloth to gently wipe away any loose debris and dirt from the fretboard. This initial step helps eliminate surface-level grime before applying any cleaning solutions.
- Apply Fretboard Cleaner: Depending on the type of wood used in your fretboard, choose a suitable guitar polish or fretboard cleaner. Apply a small amount of the cleaner to a clean cloth and gently rub it onto the fretboard, focusing on one section at a time. Ensure that the cleaner is specifically formulated for your fretboard’s wood type to avoid any potential damage.
- Scrub Stubborn Areas (if necessary): For stubborn grime or buildup, a fine-grade steel wool or a specialized fretboard brush can be used to gently scrub the affected areas. Exercise caution to avoid scratching the wood, and always follow the wood grain’s direction when using these tools.
- Wipe and Buff: After applying the cleaner and addressing any stubborn areas, use a clean cloth to wipe away the excess cleaner and dirt from the fretboard. Once the fretboard is clean, use another dry cloth to gently buff the wood, restoring its natural luster.
By following these steps, you can effectively remove dirt and grime from the fretboard, revitalizing its appearance and ensuring a smooth playing surface. Cleaning the fretboard not only enhances the guitar’s aesthetics but also contributes to maintaining the integrity of the wood, allowing for optimal playability and tone.
Step 3: Condition the Fretboard
Once the fretboard is clean, the next crucial step is to condition the wood to maintain its health and prevent it from drying out. Conditioning the fretboard helps to replenish the natural oils in the wood, keeping it supple and resilient. Here’s a detailed guide on how to effectively condition your guitar fretboard:
- Select the Right Conditioner: Choose a high-quality lemon oil or a specialized fretboard conditioner suitable for your fretboard’s wood type. It’s important to use a conditioner specifically designed for guitars, as household oils or conditioners may contain substances that could harm the wood.
- Apply the Conditioner: Put a small amount of the conditioner on a clean, lint-free cloth and gently rub it into the fretboard, ensuring even coverage. Be mindful not to apply excessive oil, as a little goes a long way in conditioning the wood.
- Allow Absorption Time: After applying the conditioner, allow the wood to absorb the oil for the recommended duration specified by the product’s instructions. This absorption period allows the wood to benefit from the conditioning treatment, replenishing its natural oils and moisture content.
- Remove Excess Oil: Once the absorption time has elapsed, use a fresh cloth to gently wipe away any excess conditioner from the fretboard. This step helps to prevent an oily residue and ensures that the fretboard is left with a smooth, conditioned finish.
By following these steps, you can effectively condition your guitar fretboard, preserving the wood’s integrity and enhancing its longevity. Conditioning not only nourishes the wood but also contributes to maintaining a consistent playing feel and protecting the fretboard from environmental factors that could lead to drying or cracking.
Step 4: Re-string the Guitar
After completing the cleaning and conditioning process, the final step involves re-stringing the guitar. Fresh strings not only contribute to a vibrant tone but also complement the revitalized fretboard, offering a complete maintenance overhaul. Here’s a step-by-step guide to re-stringing your guitar:
- Select the Right Strings: Choose a set of high-quality guitar strings suitable for your playing style and musical preferences. Consider the gauge and material of the strings to achieve the desired tone and feel.
- Thread the Strings: Begin by threading the strings through the bridge of the guitar, ensuring that they are properly seated and secured. For acoustic guitars, reinsert the bridge pins if necessary, ensuring a snug fit to hold the strings in place.
- Wind the Strings: With the strings threaded through the bridge, carefully wind each string around the corresponding tuning peg. Use a string winder to expedite the winding process, ensuring that the strings are wrapped neatly and securely to maintain stable tuning.
- Tune and Stretch: Once all the strings are in place, tune the guitar to the desired pitch. After tuning, gently stretch each string to help them settle and stabilize. This process helps minimize tuning instability during initial play.
- Cut Excess String Length: Trim any excess string length beyond the tuning pegs using a suitable wire cutter. Exercise caution to avoid leaving sharp ends that could cause injury or damage to the guitar.
By following these steps, you can successfully re-string your guitar, completing the comprehensive maintenance process. Fresh strings, combined with a clean and conditioned fretboard, contribute to an enhanced playing experience, improved tone, and overall revitalization of the instrument.
Conclusion
Congratulations! By following this comprehensive guide on cleaning and conditioning your guitar fretboard, you’ve taken a significant step toward maintaining the health and longevity of your instrument. The fretboard, a vital component of your guitar, requires regular care and attention to ensure optimal playability, tone, and aesthetics.
Understanding the importance of using the right materials, removing the strings, and implementing a thorough cleaning and conditioning process empowers you to preserve the integrity of the fretboard and elevate your playing experience. By investing time in this maintenance routine, you contribute to the overall well-being of your guitar, ensuring that it remains a reliable and inspiring musical companion for years to come.
Remember, regular maintenance is key to sustaining the quality and performance of your instrument. By integrating fretboard cleaning and conditioning into your maintenance routine, you demonstrate a commitment to preserving the beauty and functionality of your guitar.
As you embark on this journey of guitar care, you not only enhance the instrument’s longevity but also deepen your connection with the music you create. The revitalized fretboard, combined with the fresh set of strings, sets the stage for countless hours of inspired playing and musical exploration.
So, pick up your newly maintained guitar, feel the smoothness of the fretboard, and let the rejuvenated tones resonate with your melodies. Your dedication to caring for your instrument ensures that it will continue to be a source of joy and creativity, enriching your musical journey every step of the way.