Home>Production & Technology>Acoustic>How To Clean Acoustic Guitar Fretboard
Acoustic
How To Clean Acoustic Guitar Fretboard
Published: March 12, 2024
Learn how to effectively clean your acoustic guitar fretboard with our step-by-step guide. Keep your instrument in top condition for optimal performance.
(Many of the links in this article redirect to a specific reviewed product. Your purchase of these products through affiliate links helps to generate commission for AudioLover.com, at no extra cost. Learn more)
Table of Contents
Introduction
Maintaining the fretboard of your acoustic guitar is crucial for preserving its playability and ensuring a long lifespan. Over time, the accumulation of dirt, sweat, and oils from your fingers can tarnish the fretboard, affecting the instrument's tone and feel. Regular cleaning and conditioning of the fretboard not only enhance the guitar's aesthetics but also contribute to a smoother playing experience.
In this comprehensive guide, we will walk you through the step-by-step process of cleaning and conditioning your acoustic guitar fretboard. By following these instructions, you can restore the fretboard to its original luster and maintain the integrity of your instrument for years to come.
A clean and well-maintained fretboard not only enhances the visual appeal of your guitar but also contributes to the overall tone and playability. Whether you're a seasoned guitarist or a beginner, learning how to properly care for your instrument is an essential skill that can prolong its lifespan and improve your playing experience.
Now, let's delve into the detailed steps required to clean and condition your acoustic guitar fretboard, ensuring that it remains in optimal condition for countless jam sessions and performances.
Step 1: Gather the necessary materials
Before embarking on the process of cleaning and conditioning your acoustic guitar fretboard, it's essential to gather the necessary materials. Having the right tools at your disposal will streamline the maintenance process and ensure that you achieve optimal results. Here's a comprehensive list of the materials you'll need:
-
Lint-free cloths: These are essential for wiping down the fretboard and removing any accumulated grime and residue. Ensure that the cloths are soft and won't leave behind any lint or fibers.
-
Guitar polish or cleaner: Select a high-quality guitar polish or cleaner specifically designed for fretboard maintenance. Avoid using generic household cleaners, as they may contain chemicals that can damage the wood or fretboard finish.
-
Fretboard conditioner: Look for a premium fretboard conditioner formulated to nourish and protect the wood. It's crucial to choose a conditioner that is suitable for the specific type of wood used in your guitar's fretboard, whether it's rosewood, ebony, or another variety.
-
Fine steel wool or fretboard brush: Depending on the level of grime and buildup on the fretboard, you may need fine steel wool or a specialized fretboard brush to gently scrub away stubborn residue. Exercise caution when using steel wool to avoid scratching the fretboard.
-
Guitar strings: While not directly related to cleaning the fretboard, it's a good opportunity to replace old strings with fresh ones after completing the maintenance process. New strings can complement the refreshed fretboard, enhancing the overall playability and tone of the guitar.
-
String winder and cutter: These tools will come in handy when removing the old strings and installing the new ones. A string winder speeds up the process of loosening and tightening the tuning pegs, while a string cutter ensures clean and precise trimming of the excess string length.
By ensuring that you have these materials readily available, you'll be well-prepared to embark on the fretboard cleaning and conditioning process. With the right tools at your disposal, you can effectively revitalize your acoustic guitar's fretboard, maintaining its pristine condition and optimizing its performance.
Step 2: Remove the strings
Removing the strings from your acoustic guitar is a crucial step in the fretboard cleaning and conditioning process. This task allows for unobstructed access to the fretboard, enabling thorough cleaning and conditioning without the interference of the strings. Additionally, removing the strings presents an opportunity to inspect the frets and fretboard for any signs of wear or damage, ensuring that your instrument remains in optimal playing condition.
To begin, it's essential to have a comfortable and well-lit workspace where you can safely handle the guitar. Here's a detailed guide on how to remove the strings from your acoustic guitar:
-
Loosen the strings: Using a string winder, gradually loosen the tension of each string by turning the tuning pegs counterclockwise. It's important to unwind the strings evenly to prevent sudden release of tension, which can cause damage to the guitar's neck or headstock.
-
Remove the bridge pins: For guitars with bridge pins securing the strings, carefully extract each pin using a bridge pin puller or a suitable tool. Gently apply upward pressure beneath the head of the bridge pin to dislodge it from the bridge, allowing the string to be released.
-
Unwind and remove the strings: Once the tension has been sufficiently reduced, unwind the strings from the tuning pegs and carefully remove them from the guitar. Take care to avoid any sudden movements that could scratch the body or fretboard.
-
Inspect the fretboard and frets: With the strings removed, take a moment to inspect the fretboard and frets for any accumulated debris, wear, or damage. This visual assessment provides valuable insight into the condition of the fretboard, guiding the subsequent cleaning and conditioning steps.
By methodically removing the strings from your acoustic guitar, you create a conducive environment for thorough fretboard maintenance. This process not only facilitates effective cleaning and conditioning but also allows for a comprehensive inspection of the fretboard and frets, ensuring that your instrument receives the care it deserves.
Step 3: Clean the fretboard
Cleaning the fretboard of your acoustic guitar is a pivotal step in the maintenance process, as it effectively removes accumulated grime, oils, and residue that can compromise the playability and aesthetics of the instrument. By meticulously cleaning the fretboard, you can restore its natural luster and ensure that it remains in optimal condition for countless jam sessions and performances.
Substep 1: Removing Stubborn Grime
Begin by inspecting the fretboard for any stubborn grime or residue that may have accumulated over time. If you notice particularly stubborn areas, you can use fine steel wool or a specialized fretboard brush to gently scrub away the buildup. Exercise caution and apply gentle pressure to avoid scratching the fretboard or damaging the wood. This meticulous approach ensures that even the most tenacious grime is effectively removed, preparing the fretboard for the subsequent cleaning and conditioning steps.
Substep 2: Applying Guitar Cleaner
Once any stubborn grime has been addressed, apply a small amount of high-quality guitar cleaner to a lint-free cloth. Gently rub the cloth along the entire length of the fretboard, ensuring that the cleaner effectively lifts away dirt and oils. Take care to cover the entire fretboard surface, including the areas beneath the strings and around the frets. This thorough cleaning process not only enhances the visual appeal of the fretboard but also contributes to a smoother playing experience by removing any impediments caused by accumulated residue.
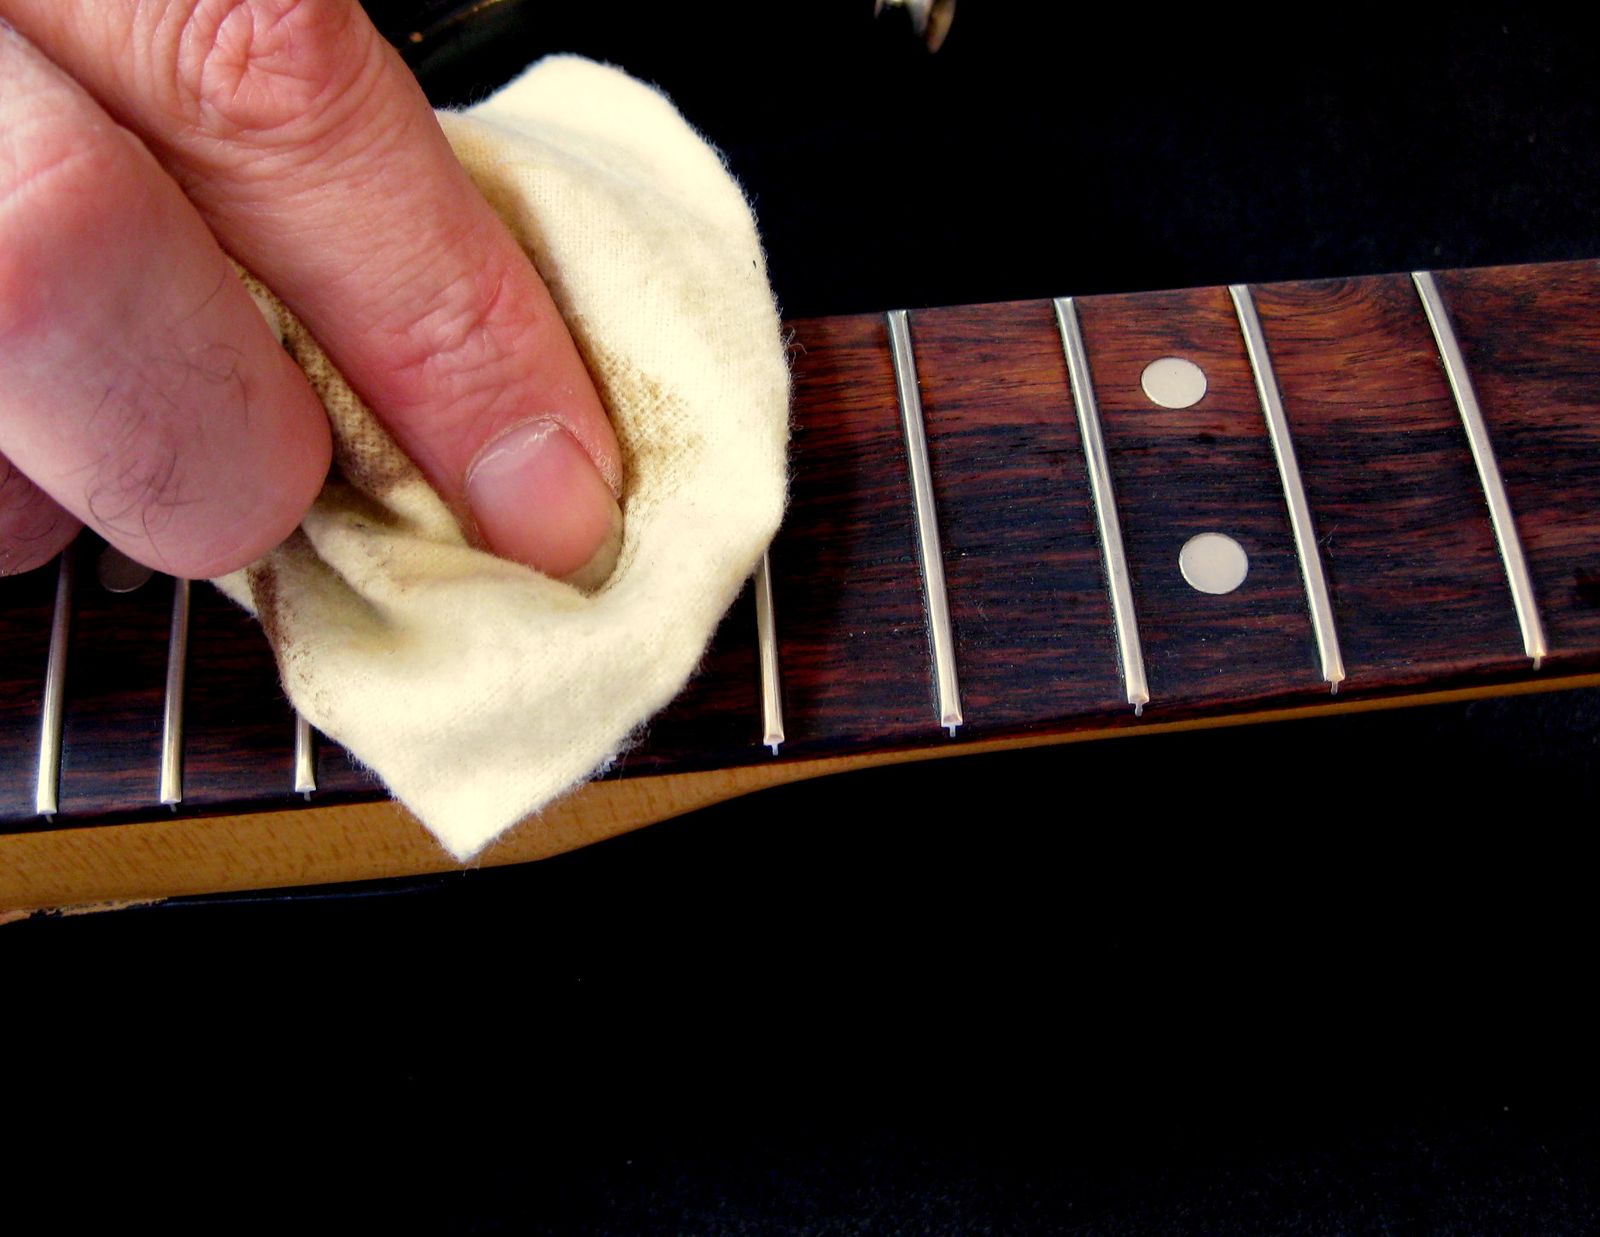
Substep 3: Wiping Down the Fretboard
After applying the guitar cleaner, use a fresh lint-free cloth to meticulously wipe down the fretboard, removing any remaining cleaner and residual grime. Ensure that the cloth effectively absorbs any lingering dirt and oils, leaving the fretboard clean and free from any residue. This meticulous wiping process contributes to the overall cleanliness of the fretboard, setting the stage for the subsequent conditioning step.
By meticulously cleaning the fretboard of your acoustic guitar, you can effectively remove accumulated grime and residue, restoring its natural luster and ensuring optimal playability. This comprehensive cleaning process not only enhances the visual appeal of the fretboard but also contributes to a smoother playing experience, allowing you to fully enjoy the musical potential of your instrument.
Step 4: Condition the fretboard
Conditioning the fretboard of your acoustic guitar is a crucial step in the maintenance process, as it nourishes the wood and protects it from drying out or developing cracks. The conditioning process not only enhances the visual appeal of the fretboard but also contributes to its longevity and overall playability. By applying a premium fretboard conditioner, you can ensure that the wood remains supple and resilient, allowing for a smooth and responsive playing experience.
Substep 1: Selecting the Right Fretboard Conditioner
Before applying any conditioner to the fretboard, it's essential to select a high-quality product that is specifically formulated for the type of wood used in your guitar's fretboard. Whether your fretboard is made of rosewood, ebony, maple, or another wood variety, choosing a conditioner that is compatible with the specific wood type is paramount. Each wood type has unique characteristics and requires a conditioner that can effectively nourish and protect it without leaving behind any residue or buildup.
Substep 2: Applying the Fretboard Conditioner
Once you have selected the appropriate fretboard conditioner, apply a small amount to a clean, lint-free cloth. Gently rub the conditioner onto the fretboard, ensuring that it is evenly distributed across the entire surface. Take care to work the conditioner into the wood, allowing it to penetrate and nourish the fretboard effectively. Pay particular attention to any areas that may exhibit dryness or lackluster appearance, as these regions can benefit significantly from the conditioning treatment.
Substep 3: Allowing the Conditioner to Set
After applying the fretboard conditioner, allow it to set for the recommended duration specified by the product manufacturer. This resting period enables the conditioner to permeate the wood, replenishing its natural oils and revitalizing its appearance. During this time, the wood absorbs the conditioner, becoming more supple and resilient, thereby enhancing its ability to withstand the rigors of regular playing and environmental factors.
Substep 4: Wiping Off Excess Conditioner
Following the recommended setting duration, use a clean lint-free cloth to gently wipe off any excess conditioner from the fretboard. Ensure that the cloth effectively removes any residual conditioner, leaving the fretboard with a smooth and uniform appearance. This final wiping step ensures that the fretboard is free from any excess product, allowing for a pristine and polished finish.
By meticulously conditioning the fretboard of your acoustic guitar, you can effectively nourish and protect the wood, ensuring its longevity and maintaining its optimal playability. This conditioning process not only enhances the visual appeal of the fretboard but also contributes to a smoother and more responsive playing experience, allowing you to fully explore the musical potential of your instrument.
Step 5: Re-string the guitar
Re-stringing your acoustic guitar is the final step in the comprehensive process of cleaning and conditioning the fretboard. This task not only ensures that your instrument is equipped with fresh strings for optimal tone and playability but also complements the revitalized fretboard, creating a harmonious synergy that enhances the overall musical experience.
Substep 1: Selecting High-Quality Strings
Before re-stringing your acoustic guitar, it's essential to select high-quality strings that align with your playing style and tonal preferences. Whether you prefer the warmth of phosphor bronze or the brightness of 80/20 bronze, choosing the right type of strings can significantly impact the overall sound and feel of your instrument. Additionally, consider the string gauge that best suits your playing style, as lighter gauges offer increased flexibility and ease of play, while heavier gauges provide enhanced projection and sustain.
Substep 2: Attaching the Strings to the Bridge
Begin the re-stringing process by securing the ball end of each string to the corresponding bridge pin. Insert the ball end into the bridge pin hole, ensuring a snug fit that prevents any slippage or movement during tuning and playing. With the strings anchored at the bridge, you can proceed to the next crucial step in re-stringing your acoustic guitar.
Substep 3: Guiding the Strings Through the Nut
After securing the strings at the bridge, guide the opposite end of each string through the respective nut slot. This step ensures that the strings are correctly positioned and aligned, allowing for smooth and stable tuning. Take care to avoid any kinks or sharp bends in the strings as they pass through the nut, as this can affect tuning stability and string longevity.
Substep 4: Tuning and Stretching the Strings
Once the strings are properly seated at the bridge and nut, begin the process of tuning each string to its respective pitch. Use a reliable tuner to ensure accurate tuning, and gradually bring each string up to pitch, taking care to maintain even tension across all strings. After tuning, it's essential to stretch the strings to minimize initial tuning instability. Gently pull and stretch each string along its length, allowing it to settle and stabilize.
Substep 5: Trimming Excess String Length
With the strings tuned and stretched, use a string cutter to trim the excess length from each string. Leave a small amount of excess string to accommodate any potential adjustments but ensure that the remaining length is neatly trimmed to prevent interference with playing or handling the guitar.
By meticulously re-stringing your acoustic guitar, you complete the comprehensive process of cleaning and conditioning the fretboard, ensuring that your instrument is equipped with fresh strings for optimal tone and playability. This final step not only complements the revitalized fretboard but also sets the stage for countless hours of musical inspiration and enjoyment.
Conclusion
In conclusion, the process of cleaning and conditioning the fretboard of your acoustic guitar is a fundamental aspect of instrument maintenance that directly impacts its playability, longevity, and overall aesthetic appeal. By following the step-by-step guide outlined in this comprehensive article, you have gained valuable insights into the meticulous care required to preserve the integrity of your acoustic guitar's fretboard.
From gathering the necessary materials to meticulously cleaning and conditioning the fretboard, each step in the maintenance process contributes to the revitalization and preservation of the instrument. The careful removal of the strings, thorough cleaning to remove accumulated grime, and the application of a premium fretboard conditioner all work in harmony to ensure that the fretboard remains in optimal condition.
Furthermore, the re-stringing process not only provides the opportunity to equip your guitar with fresh strings for enhanced tone and playability but also complements the revitalized fretboard, creating a harmonious synergy that enhances the overall musical experience.
By investing time and attention into the maintenance of your acoustic guitar's fretboard, you are not only preserving its visual appeal but also contributing to a smoother playing experience and ensuring its longevity. The tactile satisfaction of a clean and conditioned fretboard, coupled with the enhanced tonal clarity and responsiveness, underscores the significance of this maintenance process.
Ultimately, the care and maintenance you invest in your acoustic guitar's fretboard directly translate into an enriched playing experience and a deeper connection with your instrument. Whether you're a seasoned guitarist or a beginner, the knowledge and skills acquired through this maintenance process empower you to uphold the pristine condition of your instrument, allowing you to fully explore its musical potential.
As you embark on your musical journey, remember that the care and attention you devote to your acoustic guitar's fretboard are a testament to your commitment to craftsmanship and musical expression. By integrating these maintenance practices into your routine, you are not only preserving the physical condition of your instrument but also honoring the artistry and tradition of acoustic guitar playing.
In essence, the process of cleaning and conditioning your acoustic guitar's fretboard is a labor of love—a tangible expression of your dedication to the craft and a testament to the enduring bond between musician and instrument.