Home>Production & Technology>Background Music>How To Remove Background Music From YouTube Video

Background Music
How To Remove Background Music From YouTube Video
Published: October 28, 2023
Learn how to remove background music from YouTube videos with our simple step-by-step guide. Eliminate distractions and enhance your video's sound quality.
(Many of the links in this article redirect to a specific reviewed product. Your purchase of these products through affiliate links helps to generate commission for AudioLover.com, at no extra cost. Learn more)
Table of Contents
Introduction
Welcome to the world of YouTube videos, where content creators showcase their creativity, entertain millions, and share their knowledge with the world. One important element that enhances the viewing experience is background music. It sets the tone, creates emotions, and adds depth to the storytelling. However, there may be instances when you want to remove the background music from a YouTube video. Whether you’re a content creator looking to modify your own videos or simply a viewer who wants to remove distracting music, this article will guide you through the process.
Understanding the Background Music
Background music plays a significant role in video production. It enhances the overall mood and narrative, making the content more engaging and impactful. The choice of background music can vary greatly based on the video’s genre, target audience, and desired emotional response.
Why Remove Background Music from YouTube Videos?
While background music can greatly enhance a video, there are several reasons why you might want to remove it:
- Copyright concerns: Using copyrighted music without permission can lead to copyright claims and even the removal of your video. Removing the background music allows you to avoid any legal issues.
- Clarity and focus: Sometimes, the background music can overpower the speech or narration in a video, making it difficult to understand. By removing the background music, you can improve the clarity and focus of the audio.
- Personalization: Removing the background music gives you the opportunity to customize the video by adding your own music or sound effects.
- Editing purposes: If you are a content creator, removing the background music can facilitate editing tasks, such as adding voiceovers or adjusting audio levels without any interference.
Understanding the Background Music
Background music in videos is a powerful tool that can significantly impact the viewer’s experience. It adds depth, emotion, and atmosphere to the visual content, enhancing the storytelling aspect. The choice of background music is crucial and should align with the video’s genre, theme, and intended emotions.
When selecting background music, content creators consider various factors, including tempo, genre, instrumentation, and mood. Tempo refers to the speed of the music, which can range from slow and calming to fast and energetic. The genre of the music should match the tone of the video, whether it’s a soothing melody for a travel vlog or an upbeat track for a fitness video. Instrumentation involves the selection of instruments used in the music, such as piano, guitar, drums, or orchestral instruments. Each instrument has its unique characteristics, contributing to the overall sound and atmosphere. Lastly, the mood of the background music should match the desired emotional response from the audience, whether it’s happiness, sadness, excitement, or relaxation.
Background music can be categorized into two main types: royalty-free music and copyrighted music. Royalty-free music is specifically created for use in various media projects, including YouTube videos, and can be obtained from platforms that offer licensed music libraries. This type of music allows content creators to use it without worrying about copyright claims. On the other hand, copyrighted music refers to any music protected by copyright laws, and using it in your videos without proper authorization can result in copyright infringement.
It’s important to note that background music is an integral part of the video creation process and contributes to the overall production value. It sets the mood, creates a specific atmosphere, and keeps the viewers engaged. Therefore, when considering removing background music from a YouTube video, it’s essential to carefully evaluate the impact it will have on the video’s storytelling and viewer experience.
Why Remove Background Music from YouTube Videos?
While background music can enhance the overall viewing experience of YouTube videos, there are instances where removing it becomes necessary. Here are a few reasons why you might want to remove background music from your YouTube videos:
- Copyright concerns: Using copyrighted music without proper authorization or a license can lead to copyright infringement issues. YouTube has an automated Content ID system that scans uploaded videos for copyrighted material, and if a match is found, your video could be flagged, demonetized, or removed altogether. Removing the background music eliminates any potential copyright claims, allowing you to avoid legal complications.
- Clarity and focus: Sometimes, the background music in a video can overpower other important audio elements, such as speech or narration. This can make it difficult for viewers to understand the spoken content, reducing the overall clarity and impact of the video. Removing the background music can help improve the clarity and focus of the audio, ensuring that viewers can fully comprehend the message being conveyed.
- Personalization: By removing the existing background music, you have the opportunity to add your own music or sound effects to the video. This customization allows you to create a unique and personalized experience for your viewers, aligning the audio with your specific branding or desired atmosphere.
- Editing purposes: In some cases, removing the background music from a YouTube video may be necessary for editing purposes. For example, if you want to add a voiceover or adjust audio levels, having a clean audio track without the interference of background music makes the editing process easier and more efficient.
It’s important to keep in mind that removing background music from a YouTube video should be done responsibly and in compliance with copyright laws. Always make sure to respect the intellectual property of others and seek proper licensing or use royalty-free music when adding alternative music to your videos. By doing so, you can avoid any potential legal issues while maintaining the desired quality and impact of your content.
Legal Considerations
When it comes to background music in YouTube videos, it’s crucial to understand the legal aspects and adhere to copyright laws. Failure to do so can result in copyright claims, video takedowns, or even legal consequences. Here are some key legal considerations to keep in mind:
- Copyright ownership: Music is protected by copyright laws, which grant exclusive rights to the original creators or copyright holders. This means that you cannot use someone else’s music in your YouTube videos without permission, unless the music falls under specific exceptions, such as fair use or if it is in the public domain.
- Public performance rights: Background music is considered a public performance when it is played or transmitted to an audience. Depending on your jurisdiction, you may need to obtain specific licenses or permissions for public performances of copyrighted music in your videos. Performance rights organizations (PROs) such as ASCAP, BMI, and SESAC handle these licenses and collect royalties on behalf of the songwriters and publishers.
- Royalty-free music: Using royalty-free music is a popular and legal alternative for YouTube videos. Royalty-free music refers to music that can be licensed for a one-time fee or sometimes used for free, without the need for paying royalties on a per-use basis. There are numerous royalty-free music libraries available online, offering a wide range of genres and styles.
- Creative Commons licenses: Creative Commons licenses provide a framework for creators to grant permissions for the use of their works. Some musicians release their music under specific Creative Commons licenses, which allow for free use under certain conditions. It’s important to review the specific terms of the license to ensure compliance with any attribution or usage requirements.
When removing background music from a YouTube video, it’s essential to consider these legal aspects and make informed decisions. Always respect the rights of copyright holders and seek proper licensing or use royalty-free music to avoid any legal issues or copyright claims. By doing so, you can confidently create and share your YouTube videos while staying within the boundaries of the law.
Methods to Remove Background Music
There are various methods available to remove background music from YouTube videos, depending on your specific needs and technical abilities. Here are three commonly used methods:
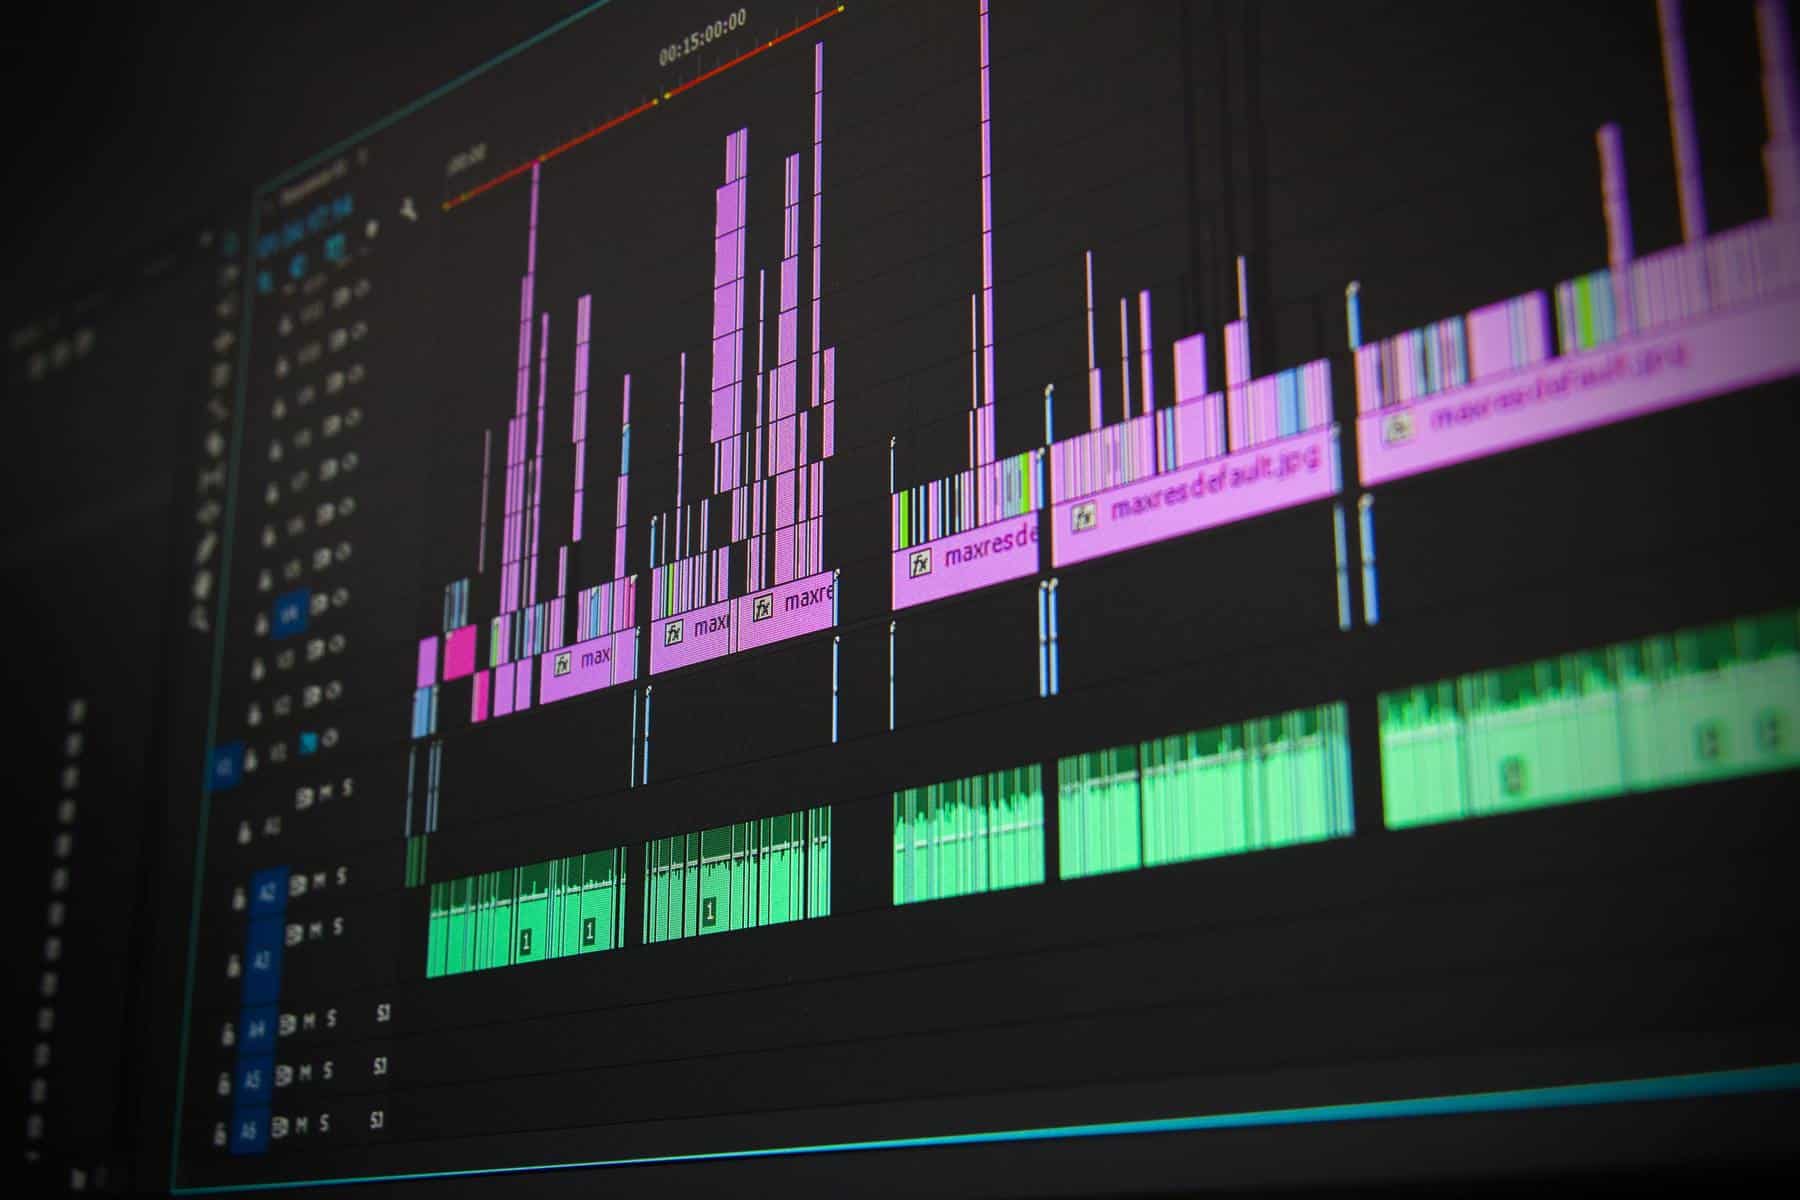
- Using Video Editing Software: One of the most popular ways to remove background music is by utilizing video editing software. Programs like Adobe Premiere Pro, Final Cut Pro, or iMovie offer advanced audio editing capabilities that allow you to isolate and remove specific audio tracks. With these tools, you can visually analyze the audio waveform and use techniques like audio ducking or keyframing to reduce or eliminate the background music. This method requires some level of technical knowledge and experience with video editing software.
- Using Online Audio Removal Tools: If you’re looking for a more accessible and user-friendly option, online audio removal tools can be a great choice. Websites like Kapwing, Audacity, or Online Voice Recorder offer audio editing features that allow you to isolate and remove background music from your YouTube videos. These tools typically require you to upload your video file, and they use advanced algorithms to detect and remove the background audio. Keep in mind that the effectiveness of these tools may vary depending on the complexity of the background music and the overall audio quality of your video.
- Hiring a Professional Editor: If you don’t have the time, expertise, or desire to remove the background music yourself, hiring a professional video editor can be a viable alternative. There are freelance platforms, such as Upwork or Fiverr, where you can find experienced editors who can handle the audio editing process efficiently. By working with a professional, you can ensure high-quality results and have more control over the final output.
When choosing a method to remove background music, consider your comfort level with video editing software, the complexity of the background music, and the desired quality of the final video. It’s important to note that removing background music can be challenging, especially if it is mixed with other audio elements. In some cases, it may not be possible to completely remove the background music without affecting the overall audio quality or dialogues in the video. Therefore, it’s crucial to manage your expectations and aim for a balance between removing the background music and maintaining the overall audio integrity of the video.
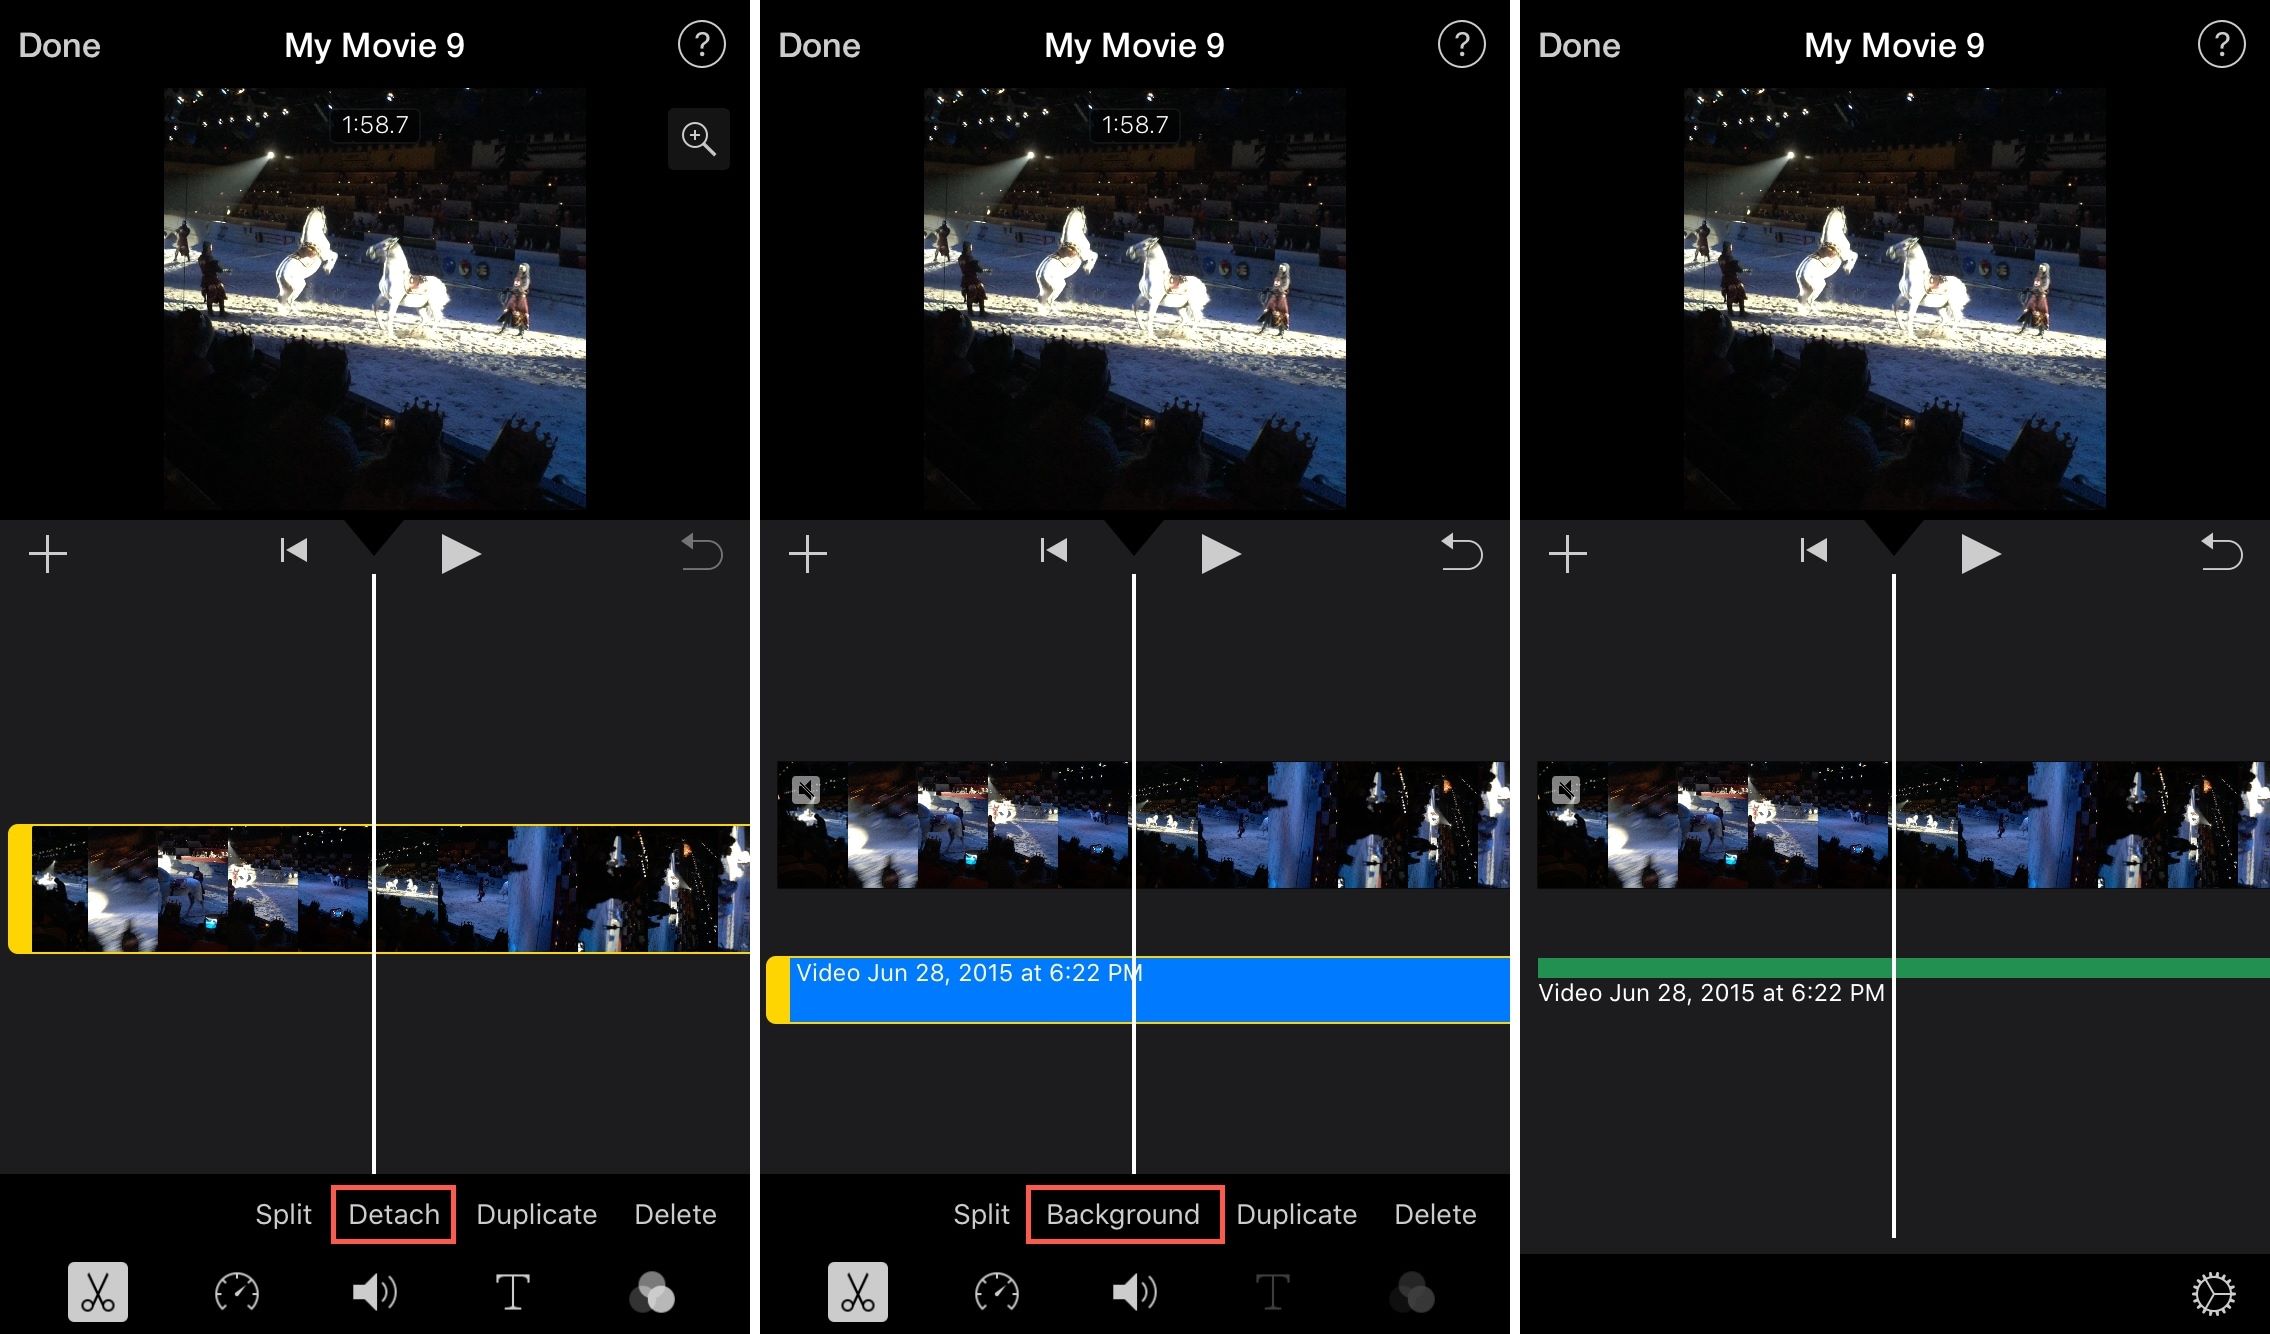
Using Video Editing Software
One method to remove background music from a YouTube video is by utilizing professional video editing software. Programs like Adobe Premiere Pro, Final Cut Pro, or iMovie provide advanced audio editing capabilities that allow you to isolate and remove specific audio tracks with precision.
The process typically involves the following steps:
- Import the video: Start by importing the YouTube video into your chosen video editing software. This can usually be done by dragging and dropping the video file into the software’s timeline.
- Separate the audio track: Once the video is imported, you’ll need to separate the audio track from the video footage. This is usually done by right-clicking on the video clip in the timeline and selecting the option to detach or extract the audio.
- Identify the background music: Play through the video and identify the sections where the background music is prominent and needs to be removed. This will help you focus on those specific portions during the editing process.
- Apply audio effects: Use audio effects and filters provided by the software to reduce or mute the background music. Techniques like audio ducking, where the volume of the background music is automatically reduced when other audio, such as voiceover, is present, can be effective in minimizing the impact of the background music.
- Review and refine: Play through the video and listen carefully to ensure the background music is successfully removed without affecting the overall audio quality. Make adjustments as needed to achieve a seamless audio mix.
- Export the edited video: Once you’re satisfied with the results, you can export the edited video, which will have the background music removed. You can then upload this version to YouTube or any other platform.
Using video editing software offers greater control and precision in background music removal. However, it requires some level of technical knowledge and experience with the chosen software. If you’re new to video editing or find the process overwhelming, consulting tutorials or seeking guidance from online communities can be helpful.
Remember to save a backup of the original video before making any edits, as irreversible changes may occur during the editing process. Additionally, it’s important to respect copyright laws and ensure that you have the necessary rights and permissions for the background music you’re using or removing in your YouTube videos.
Using Online Audio Removal Tools
If you’re looking for a more accessible and user-friendly option to remove background music from a YouTube video, online audio removal tools can be a convenient choice. These tools utilize advanced algorithms to detect and remove background audio from your videos. Here’s how you can use online audio removal tools:
- Select a suitable online audio removal tool: There are several online platforms available that offer audio editing features, such as Kapwing, Audacity, or Online Voice Recorder. Choose a tool that suits your needs in terms of ease of use, supported file formats, and quality of results.
- Upload your video file: Most online audio removal tools allow you to upload your YouTube video directly from your computer or provide a URL where the video is hosted. Make sure you have a high-quality version of the video available.
- Process the video: Once the video is uploaded, the online tool will analyze the audio track and identify the background music. It will then apply algorithms to isolate and remove the background music from the video’s audio.
- Preview and fine-tune: After the audio removal process, the online tool will provide a preview of the modified video. Take the time to review the results and ensure that the background music is adequately removed without negatively impacting other audio elements.
- Export the edited video: Once you’re satisfied with the results, you can usually download the edited video file with the background music removed. Ensure that the file format and quality are suitable for your intended use, whether it’s uploading to YouTube or sharing on other platforms.
Using online audio removal tools offers a straightforward and accessible solution for removing background music. These tools are often beginner-friendly and require minimal technical knowledge or experience. Keep in mind that the effectiveness of these tools may vary based on the complexity of the background music and the overall audio quality of your video. It’s a good idea to test different tools and compare the results before finalizing the edited video.
Remember to review the terms and conditions of the online audio removal tool you’re using, as well as any limitations or restrictions on usage. Additionally, make sure you have the necessary rights and permissions for the background music you’re removing from your YouTube video to avoid any copyright infringements.
Hiring a Professional Editor
If you prefer to hand over the task of removing background music from your YouTube video to an expert, hiring a professional video editor can be a great solution. Here’s how you can go about finding and working with a professional editor:
- Select a reputable freelance platform: Look for reputable freelance platforms like Upwork, Fiverr, or Freelancer, where you can find experienced video editors. These platforms typically allow you to browse through portfolios, reviews, and ratings to help you choose a suitable editor.
- Define your requirements: Before hiring a professional editor, clearly outline your requirements and expectations. Communication is key in ensuring that the editor understands your vision and goals for removing the background music from your YouTube video.
- Budget consideration: Determine your budget for hiring a professional editor. Rates can vary based on the editor’s experience, portfolio, and the complexity of the project. It’s important to find a balance between your budget and the level of expertise you require.
- Share your video file: Provide the professional editor with a high-quality version of your YouTube video. Make sure to communicate any specific sections or timestamps where the background music needs to be removed.
- Collaborate with the editor: Maintain open communication with the editor throughout the process. Clarify any questions or concerns, and provide feedback on the edited versions they share with you. Collaboration ensures that the final output meets your expectations.
- Review and finalize: Once the professional editor has completed the task, review the edited video file to ensure that the background music has been effectively removed without compromising the overall audio quality. If adjustments are needed, communicate them clearly to the editor.
- Payment and delivery: Once you’re satisfied with the final version, complete the payment as agreed upon with the professional editor. They will then deliver the edited video file to you, which you can upload to YouTube or any other platform.
Hiring a professional editor ensures that the background music removal process is handled by an experienced individual. This option saves you time and effort, particularly if you lack the technical expertise or resources to perform the task yourself. By collaborating with a professional, you can expect high-quality results that align with your creative vision and requirements.
Keep in mind that hiring a professional editor comes at a cost, and rates will vary depending on the editor’s skill level and the complexity of your project. It’s always a good idea to review the editor’s portfolio, read client reviews, and communicate your expectations clearly to ensure a successful collaboration.
Remember to respect copyright laws and ensure that you have the necessary rights and permissions for the background music you’re removing from your YouTube video. This helps you avoid any legal issues related to intellectual property infringement.
Tips and Best Practices
When removing background music from a YouTube video, here are some tips and best practices to keep in mind:
- Plan ahead: Before adding background music to your video, consider whether you may need to remove it in the future. If possible, choose background music that can easily be removed or adjusted without compromising the overall audio quality.
- Backup your original video: Always keep a backup copy of your original video before making any edits. This ensures that you can revert back to the original version if needed.
- Use reputable sources for royalty-free music: If you’re looking for new background music to replace the removed audio, use reputable sources that offer royalty-free music. This allows you to legally use the music without copyright concerns.
- Consider the video’s narrative and atmosphere: When removing background music, keep in mind the impact it may have on the video’s narrative and atmosphere. Consider whether the absence of background music will affect the overall storytelling and emotional experience for the viewer.
- Test and review: After removing the background music, thoroughly review the edited video to ensure that the audio quality is balanced and the removal is seamless. This includes checking for any sudden audio transitions or artifacts.
- Communicate with your audience: If you remove background music from videos that were initially uploaded with it, consider adding an optional explanation or subtitle to inform your viewers about the change. This can help manage expectations and maintain transparency.
- Respect copyright laws: Always make sure you have the necessary rights and permissions for the background music you’re using or removing. Respect the intellectual property of others and avoid copyright infringement.
- Keep track of music licenses: If you’ve obtained licenses for the background music you used in your video, keep records of those licenses. This will help you provide proof of usage rights if needed.
- Seek professional assistance if needed: If you find the process of removing background music complex or time-consuming, consider seeking assistance from professional video editors or audio engineers. They can provide expert guidance and ensure high-quality results.
By following these tips and best practices, you can effectively remove background music from your YouTube videos while maintaining a seamless audio experience. Remember to prioritize the quality and legality of your video content to create a positive viewing experience for your audience.
Conclusion
Background music can greatly enhance the overall viewing experience of YouTube videos, but there are instances when it may be necessary to remove or adjust it. Whether it’s to comply with copyright laws, improve audio clarity, customize the video, or facilitate editing tasks, there are various methods available to remove background music.
In this article, we explored three common methods: using video editing software, utilizing online audio removal tools, and hiring a professional editor. Each method has its own advantages and considerations, allowing you to choose the option that best fits your technical abilities, time constraints, and budget.
When removing background music, it’s important to respect copyright laws and ensure that you have the necessary rights and permissions for the music you’re using or removing. This helps you avoid legal complications and maintain the integrity of your content.
Additionally, it’s crucial to review and test the edited videos to ensure that the background music removal is done seamlessly and without negatively impacting the overall audio quality. Maintain open communication with professionals or seek assistance if needed to ensure high-quality results.
As you embark on the process of removing background music from your YouTube videos, consider the narrative, atmosphere, and emotional impact the absence of background music may have on your viewers. Strive for a balance that allows for a captivating and engaging viewing experience.
Remember, background music is just one element of video production, and its removal should be approached thoughtfully. By following the tips and best practices mentioned in this article, you can successfully remove background music and create compelling videos that resonate with your audience.
Ultimately, the decision to remove background music from your YouTube videos should align with your goals, preferences, and the specific requirements of each video. With the right tools, techniques, and considerations in place, you can navigate the process with confidence and create impactful videos that captivate and engage your audience.