Home>Production & Technology>Background Music>How To Add Background Music To YouTube Video
Background Music
How To Add Background Music To YouTube Video
Published: October 28, 2023
Learn how to add background music to your YouTube videos easily and enhance your viewers' experience. Step-by-step guide for beginners.
(Many of the links in this article redirect to a specific reviewed product. Your purchase of these products through affiliate links helps to generate commission for AudioLover.com, at no extra cost. Learn more)
Table of Contents
- Introduction
- Understanding YouTube’s Copyright Policy
- Finding Suitable Background Music
- Downloading Background Music
- Editing Your YouTube Video
- Adding Background Music Using YouTube’s Video Editor
- Adding Background Music Using Third-Party Video Editing Software
- Updating Video Description and Metadata
- Previewing and Publishing Your Video
- Conclusion
Introduction
Welcome to the world of online video content creation! YouTube has become the go-to platform for sharing videos, showcasing talent, and expressing creativity. Whether you’re a vlogger, a filmmaker, or a business looking to promote your products or services, adding background music to your YouTube videos can greatly enhance the viewer experience.
Background music sets the tone, creates emotion, and adds depth to your videos. It can capture attention, evoke specific moods, and convey the intended message more effectively. From upbeat tunes to relaxed melodies, the right background music can transform an ordinary video into a captivating masterpiece.
However, it’s important to understand the guidelines and policies around copyright when it comes to using background music in your YouTube videos. YouTube has stringent regulations to protect copyright holders and prevent unauthorized use of their work. As a content creator, it’s crucial to respect these guidelines to avoid copyright infringement issues and potential penalties.
In this article, we’ll explore how you can add background music to your YouTube videos while staying within the bounds of YouTube’s copyright policy. We’ll cover where to find suitable background music, how to download it legally, different methods for adding the music to your videos, and how to update your video description and metadata to optimize its visibility.
Whether you’re a seasoned content creator or just starting your YouTube journey, this guide will provide you with the knowledge and tools to incorporate background music into your videos in a safe, legal, and engaging manner. So let’s dive in and discover the exciting world of background music for YouTube videos!
Understanding YouTube’s Copyright Policy
YouTube takes copyright infringement very seriously. As a content creator, it is essential to understand and abide by YouTube’s copyright policy to avoid any potential legal issues or penalties.
YouTube’s copyright policy is designed to protect the rights of content creators and copyright holders. It ensures that original works are respected and credited appropriately. When it comes to using background music in your videos, you need to be aware of the following key aspects:
- Originality: Make sure that the background music you use in your videos is either royalty-free or that you have obtained proper licensing and permissions.
- Public Domain: Public domain music is not protected by copyright and can be used freely without permission. However, it’s crucial to verify that the specific composition falls under public domain.
- Creative Commons: Creative Commons licenses allow artists to share their work under certain conditions. There are different types of Creative Commons licenses, so ensure you comply with the specific terms set by the artist.
- Royalty-Free Music: Royalty-free music means that you can pay for the license once and use the music in your videos without any additional payment or permission needed. However, you may still be required to give credit to the artist.
It’s important to note that using copyrighted music without proper permission or licensing can lead to your video being flagged, demonetized, or even removed from YouTube. In some cases, the copyright holder may also take legal action against you. To avoid these issues, there are legal sources where you can find background music for your YouTube videos.
YouTube also provides a comprehensive Content ID system that helps copyright holders protect their work. This system scans uploaded videos and compares them against a database of copyrighted material. If your video contains copyrighted music, you may receive a copyright claim, and the copyright holder may choose to block your video or monetize it by placing ads on it.
As a responsible content creator, it’s crucial to familiarize yourself with YouTube’s Copyright School and stay up to date with their policies and guidelines. By understanding and respecting copyright laws, you can enjoy the creative freedom of incorporating background music into your YouTube videos while protecting the rights of the original artists.
Finding Suitable Background Music
When it comes to finding suitable background music for your YouTube videos, you have several options to consider. It’s important to choose music that matches the mood, tone, and message of your video while respecting the copyright of the original artists.
Here are a few methods to help you find the perfect background music:
- Royalty-Free Music Libraries: There are numerous websites and platforms that offer royalty-free music specifically designed for content creators. These libraries provide a wide selection of tracks across various genres and moods. Some popular royalty-free music libraries include Epidemic Sound, Artlist, and AudioJungle. These platforms often require a subscription or one-time payment for access to their music collection.
- Creative Commons Platforms: Websites like SoundCloud, Bandcamp, and Jamendo offer music under Creative Commons licenses. Search for music that suits your needs, and make sure to comply with the specific license terms set by the artist. Some licenses may require attribution, so be sure to provide proper credit in your video description.
- YouTube Audio Library: YouTube itself provides a vast library of royalty-free music that you can use in your videos without any attribution. You can access the YouTube Audio Library by clicking on the “Creation Tools” tab in your YouTube Studio and selecting “Audio Library.” Here you’ll find a wide range of music tracks sorted by genre, duration, and mood.
- Collaborating with Musicians: If you have friends who are musicians or have access to talented individuals, you can collaborate with them to create original music for your videos. This not only adds a personal touch to your content but also ensures that you have complete control over the rights and usage of the music.
When searching for background music, consider factors such as the tempo, instrumentation, and mood of the track. Think about how the music will complement your video’s storyline, visuals, and intended emotional impact. Ensure that the music is not overpowering and doesn’t distract from the main content.
Take the time to listen to different tracks and experiment with combinations until you find the perfect match for your video. Remember that music has the power to enhance the viewer’s experience, so choose wisely to create a seamless and engaging audiovisual journey.
Downloading Background Music
Once you have found the suitable background music for your YouTube video, the next step is to download it legally and ensure that you have the necessary permissions and licenses to use it in your content. Here are the steps to download background music:
- Royalty-Free Music Libraries: If you are using a royalty-free music library, such as Epidemic Sound or Artlist, you can typically download the chosen tracks directly from their platform. These libraries often provide multiple file formats to accommodate different editing software and quality preferences. Follow the instructions on the website to download the music files to your computer.
- Creative Commons Platforms: When using Creative Commons music from platforms like SoundCloud or Bandcamp, artists often provide a download option within the platform. Look for the download button or a download link provided by the artist. Make sure to read and comply with the specific licensing terms associated with the track.
- YouTube Audio Library: If you decide to use music from the YouTube Audio Library, downloading the tracks is as simple as clicking on the download icon next to each song. YouTube provides different file format options, including MP3 and WAV.
- Collaborating with Musicians: If you are working with musicians to create original music for your video, make sure to discuss the terms of use and obtain the necessary rights and permissions. Once the music is composed and recorded, you can obtain the digital files directly from the musicians or use cloud storage or file-sharing platforms to transfer the files securely.
When downloading the background music, keep the original file format and quality intact whenever possible. This allows for a higher audio quality in your final video, ensuring a seamless listening experience for your viewers.
Once the music files are downloaded to your computer, create a dedicated folder to store them. Naming the files appropriately and organizing them based on genres, moods, or specific projects can help keep your library organized and easily accessible for future use.
Remember, it’s crucial to respect the rights of the artists and the terms of the licenses associated with the music you download. Failure to do so may result in copyright infringement issues and potential legal consequences. Always double-check the licensing terms and comply with any attribution requirements if necessary.
With the background music downloaded and ready, you are now prepared to integrate it seamlessly into your YouTube video.
Editing Your YouTube Video
Before adding the background music to your YouTube video, you may need to do some editing to ensure a cohesive and polished final product. Here are some essential steps to edit your YouTube video:
- Importing Your Footage: Start by importing your video footage into a video editing software of your choice. Popular options include Adobe Premiere Pro, Final Cut Pro, iMovie, and Windows Movie Maker. Arrange your clips in the desired order and trim any unnecessary sections.
- Adjusting the Audio Levels: Take a moment to adjust the audio levels of your video. Make sure that the dialogues or main audio elements are clear and properly balanced. This step is crucial to ensure that the background music doesn’t drown out important audio details.
- Adding Transitions and Effects: Enhance the visual flow of your video by adding transitions between the clips. Smooth transitions help create a seamless viewing experience. Additionally, you can apply visual effects, color grading, or filters to enhance the overall aesthetics of your video.
- Adding Text and Graphics: Consider adding text overlays, subtitles, or graphics to provide additional information, context, or enhance storytelling. Text elements can add a professional touch to your video, making it more engaging and informative for the viewers.
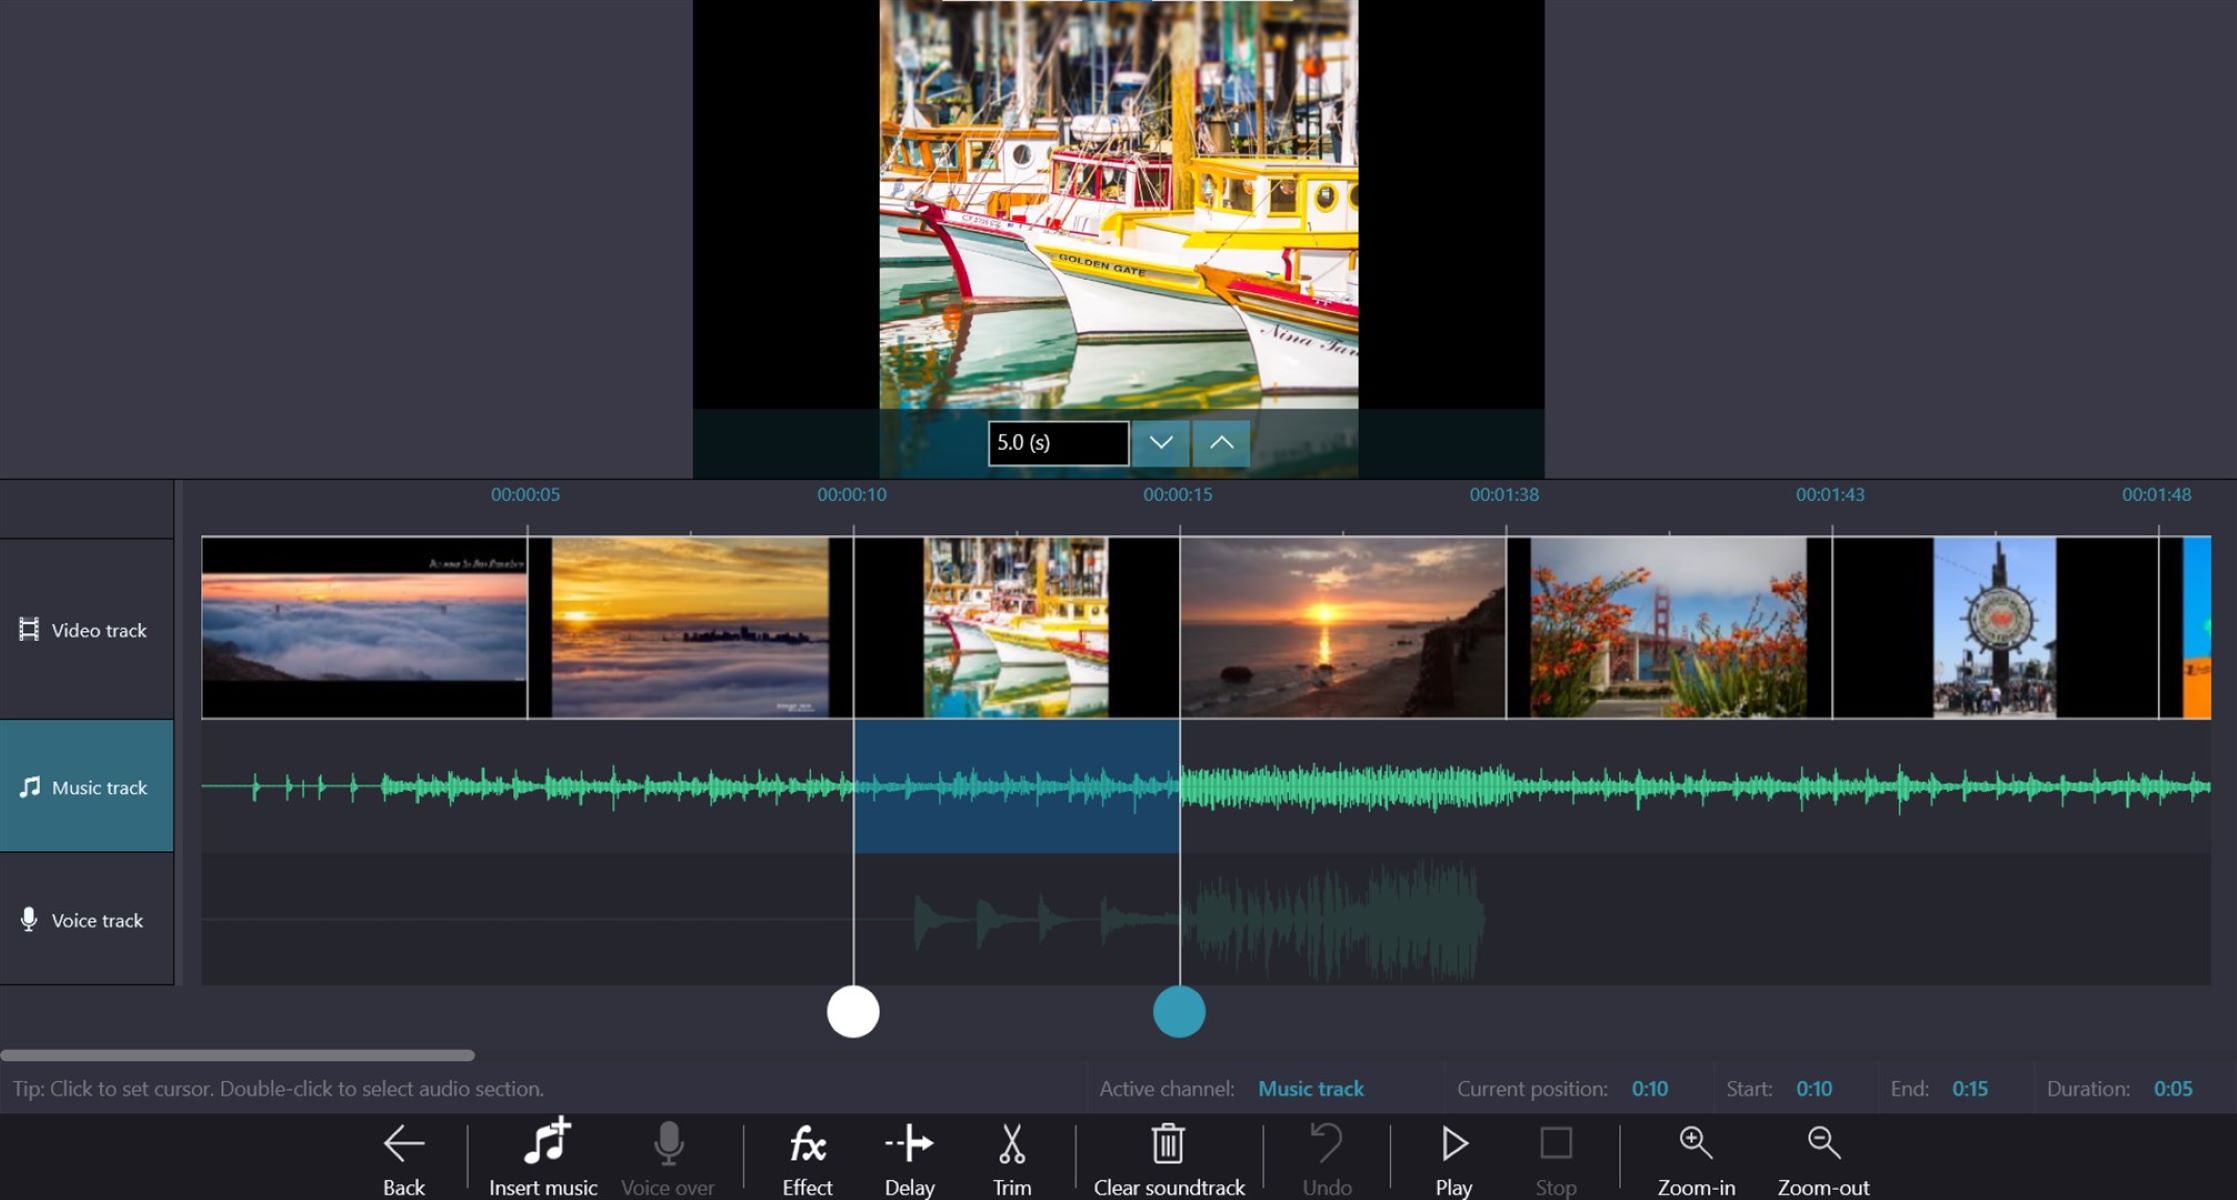
- Trimming and Arranging the Music: Once your video is edited, you can start integrating the background music. Import the music file into your editing software and trim it to the desired length. Consider aligning specific musical cues or beats with key moments in your video to add emphasis and impact.
During the editing process, focus on creating a cohesive and engaging visual narrative that aligns with the tone and message of your video. Pay attention to the pacing, timing, and overall flow of the content to maintain viewer interest throughout the video.
Experiment with different editing techniques, such as cuts, transitions, and effects, to add visual interest and maintain the viewer’s attention. However, it’s important to strike a balance and not overwhelm the video with excessive edits, which can distract from the main content.
Once you are satisfied with the overall editing of your video, it’s time to add the background music to elevate the viewing experience and create an emotional connection with your audience. In the next sections, we’ll explore how to add background music using YouTube’s Video Editor and third-party editing software.
Adding Background Music Using YouTube’s Video Editor
If you prefer a simple and straightforward method for adding background music to your YouTube video, you can utilize YouTube’s built-in Video Editor. Follow these steps to add background music using YouTube’s Video Editor:
- Accessing YouTube’s Video Editor: Sign in to your YouTube account and navigate to your Creator Studio. Click on “Video Editor” under the “Create” section to launch YouTube’s Video Editor.
- Importing Your Video: In the Video Editor, click on the ‘Arrow’ icon to upload the video you want to edit. Choose the video file from your computer and wait for it to upload onto the editor.
- Adding Background Music: Once your video is loaded, click on the “Audio” tab in the Video Editor. You’ll have two options for adding background music:
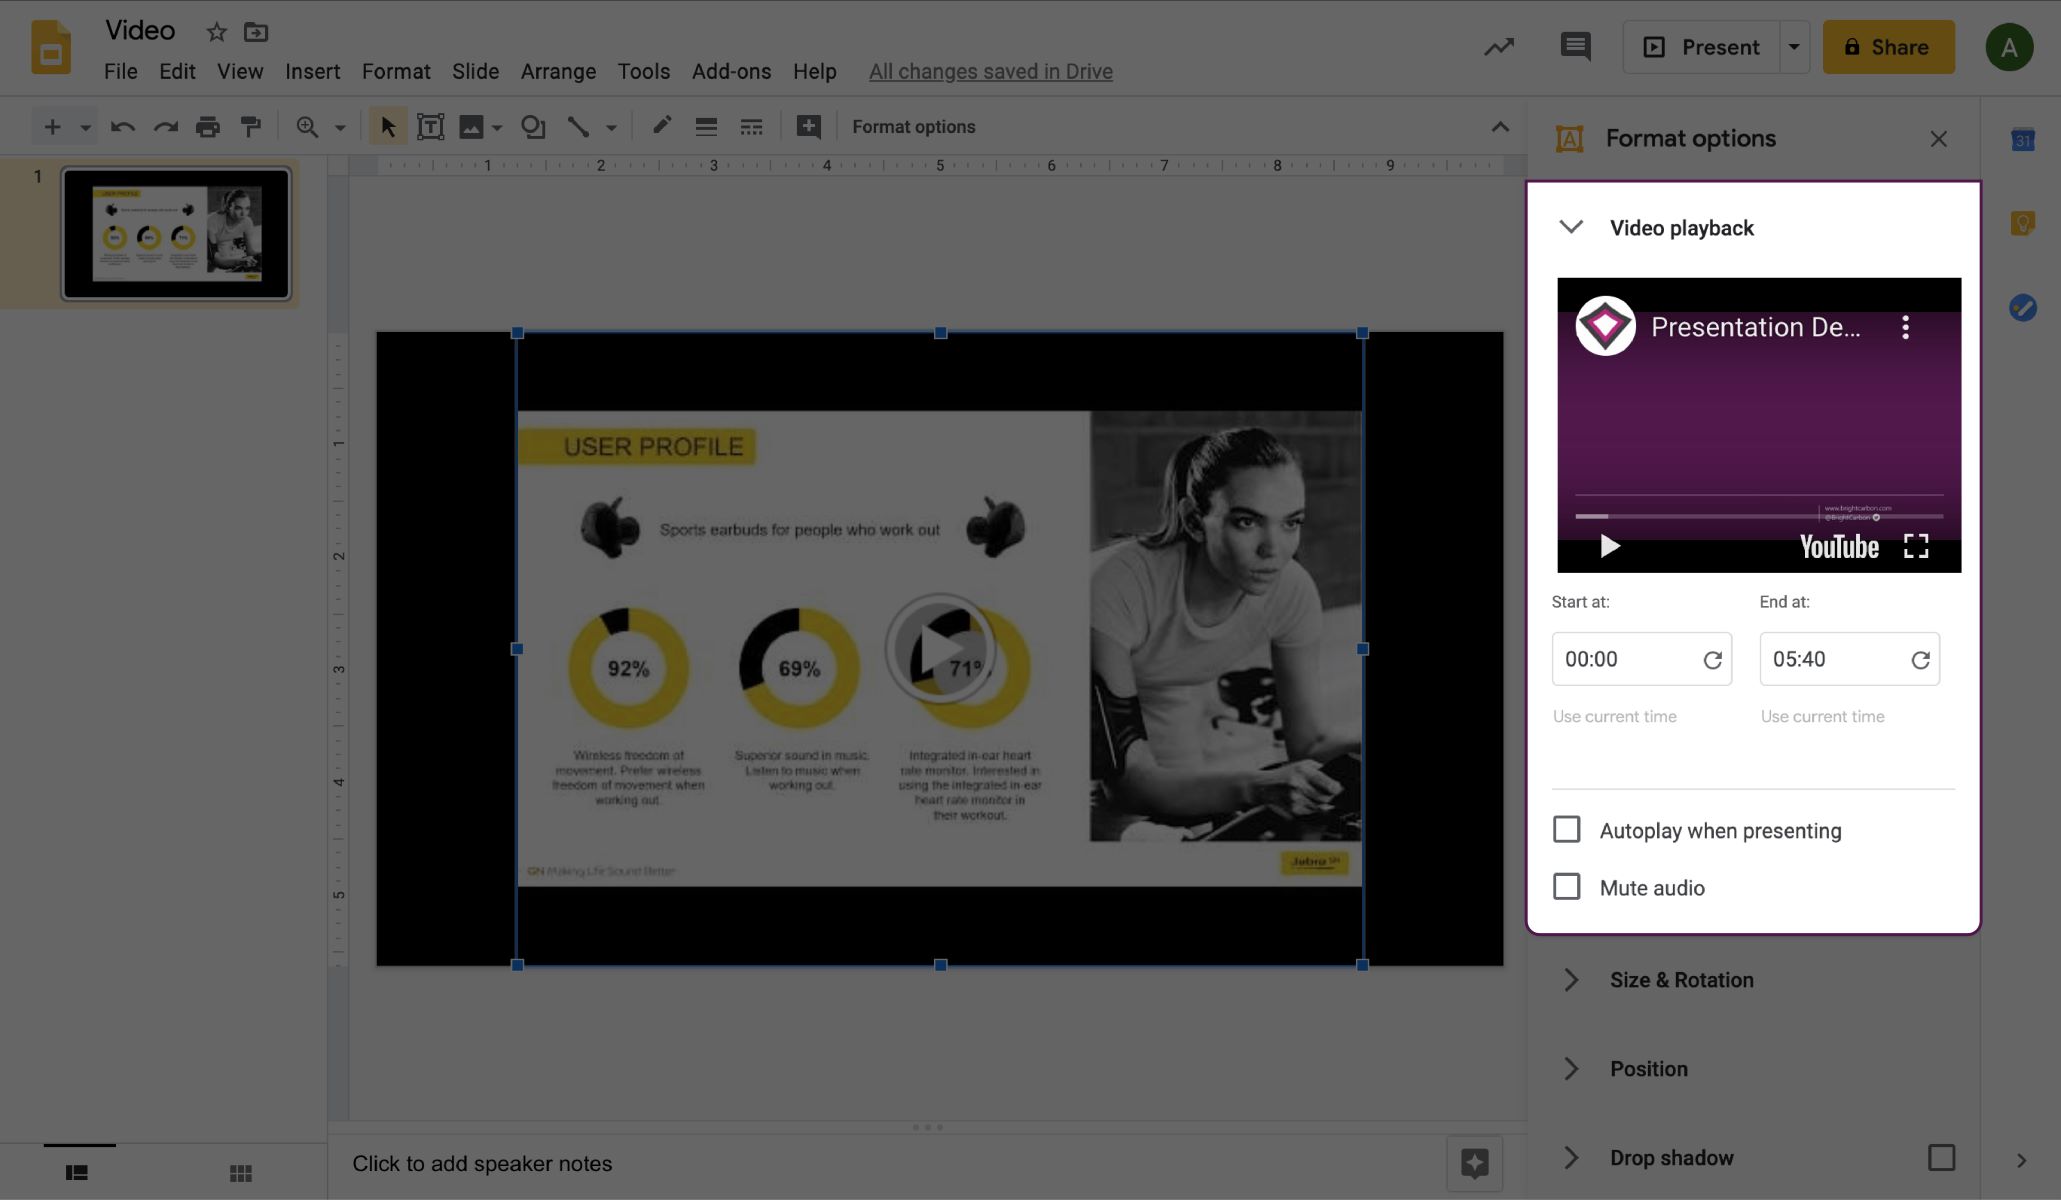
- Add Music: This option allows you to choose from YouTube’s library of royalty-free music. Browse through the available tracks, preview them, and select the one that best suits your video.
- My Music: If you have previously uploaded music tracks to your YouTube account, you can select them from this tab.
- Adjusting Music Placement: After selecting the background music, drag and drop it onto the audio timeline below the video preview. Use the handles to adjust the length as needed. You can also use the “Fade in” and “Fade out” options to smoothly transition the music at the beginning and end of the video.
- Previewing and Saving: Once you’re satisfied with the placement of the background music, play through the video to ensure that the audio and video elements are well synchronized. Make any necessary adjustments before clicking on the “Create” button to save the edited video.
When adding background music using YouTube’s Video Editor, ensure that the selected track aligns with the mood, tone, and purpose of your video. Experiment with different music options to find the perfect match that enhances the overall viewing experience.
It’s important to note that YouTube’s Video Editor has certain limitations in terms of advanced editing features. If you require more control over your video editing process, you may consider using third-party video editing software.
In the next section, we’ll explore how you can add background music to your YouTube videos using third-party video editing software, providing you with more flexibility and advanced editing options.
Adding Background Music Using Third-Party Video Editing Software
If you prefer more control and advanced editing options, utilizing third-party video editing software is an excellent choice for adding background music to your YouTube videos. Here’s how you can do it:
- Selecting Video Editing Software: Choose a video editing software that suits your needs and skill level. Popular options include Adobe Premiere Pro, Final Cut Pro, iMovie, and Windows Movie Maker. Install the software on your computer and familiarize yourself with its interface and features.
- Importing Your Video: Launch your chosen editing software and import the video footage you want to edit. You can usually do this by clicking on the “Import” button or dragging and dropping the video files into the software’s media library or timeline.
- Importing Background Music: Similarly, import the background music file into your editing software. This can be done by using the same import function you used for your video footage. Ensure that the music file is in a compatible format such as MP3 or WAV.
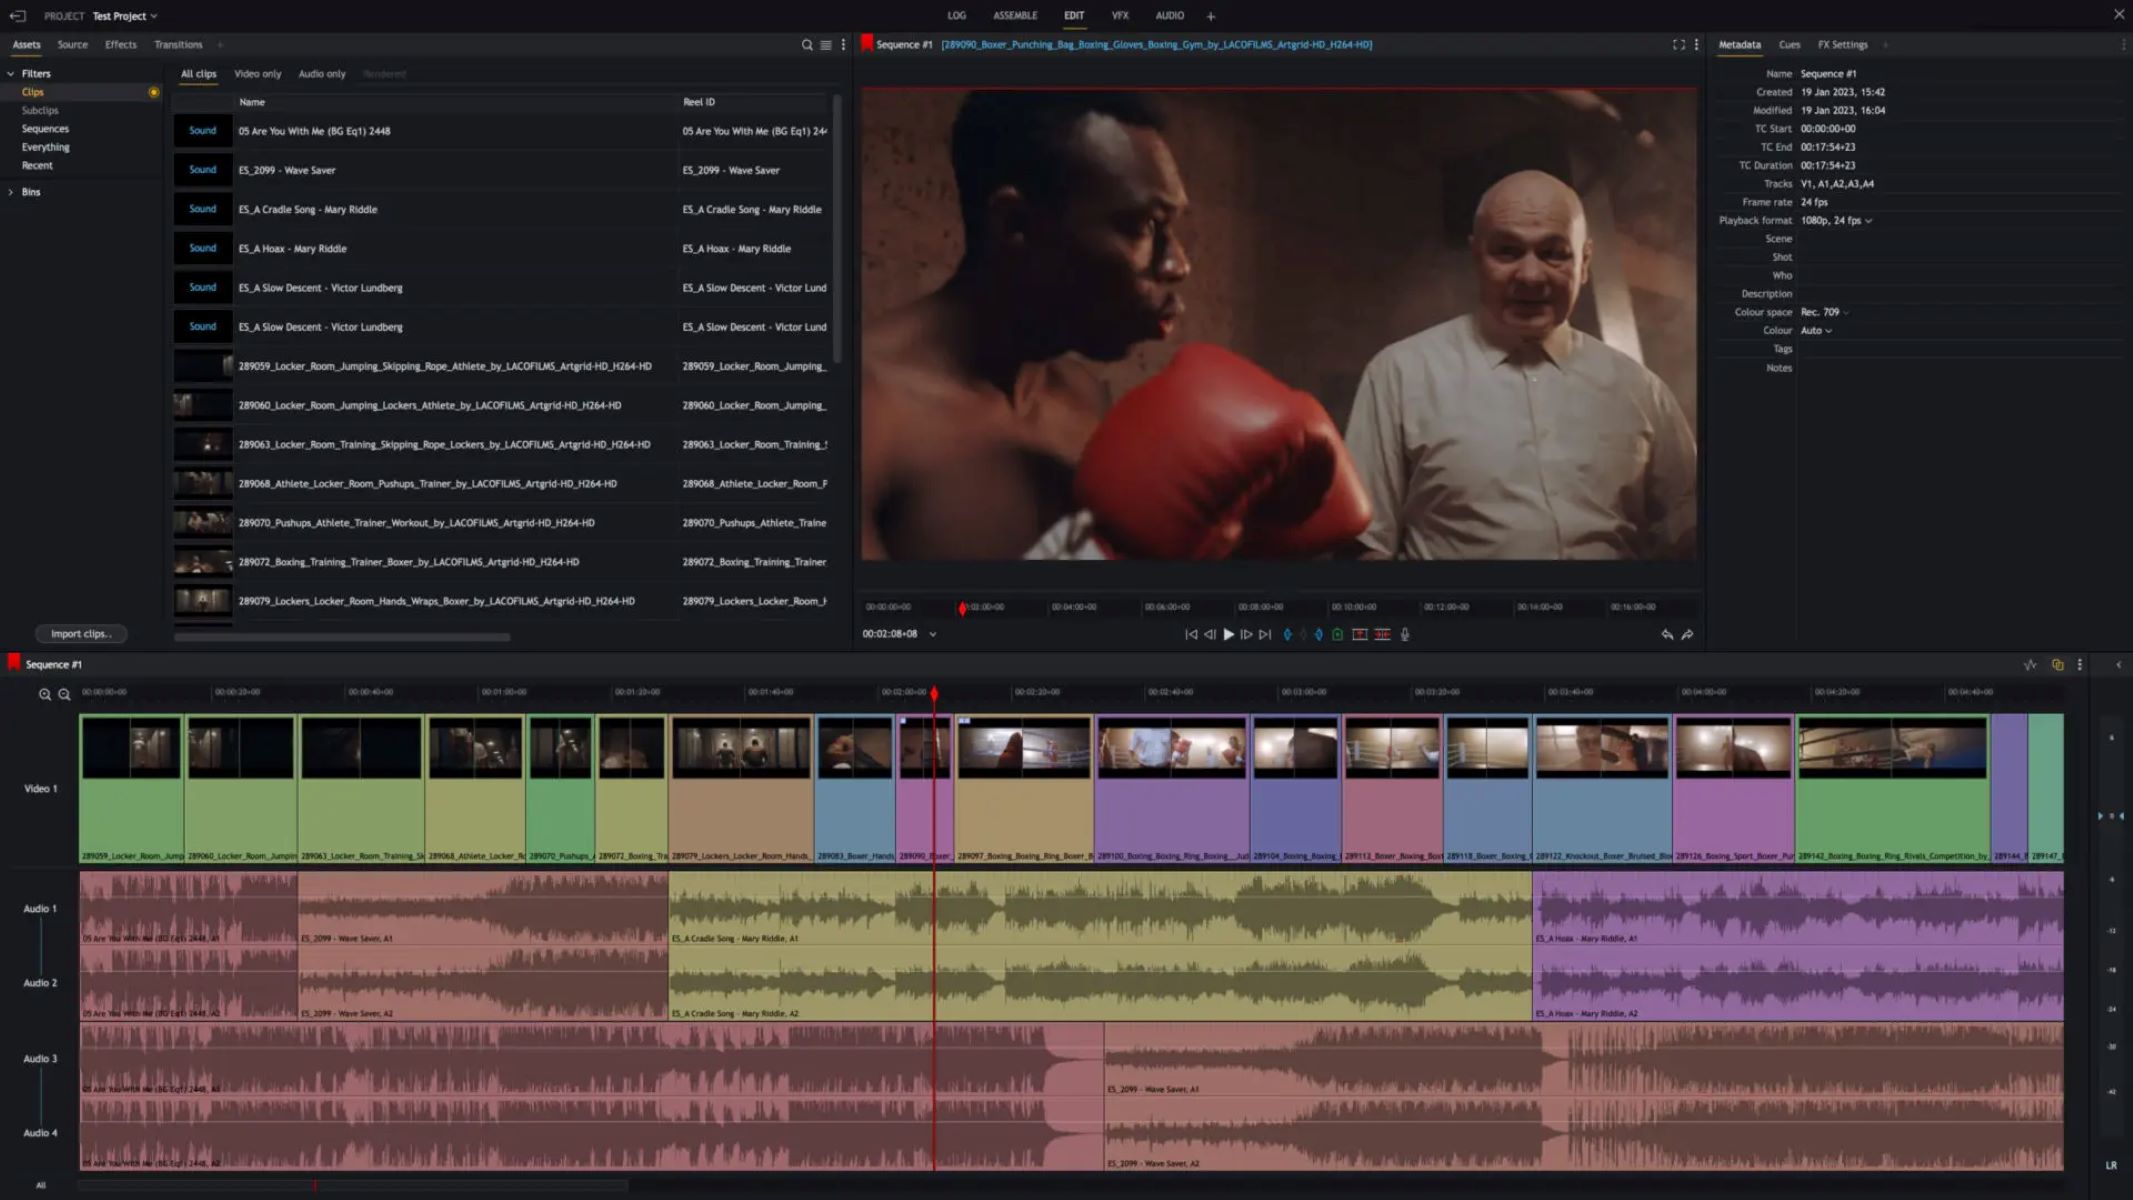
- Arranging the Timeline: Drag and drop the video footage onto the timeline of the editing software. Arrange the clips in the desired order, and trim them as needed. Then, create a new audio track or layer on the timeline specifically for the background music.
- Adding Background Music: Place the background music file on the designated audio track or layer. Adjust the volume levels to ensure that the music doesn’t overpower the other audio elements. You can also use keyframes to fade the music in and out at specific points to create seamless transitions.
- Syncing the Music: Pay attention to the timing and synchronization between the video footage and the background music. Align specific beats or musical cues with significant moments in your video to create a more impactful and engaging viewing experience.
- Editing the Music: Depending on your editing software, you can further enhance the background music by applying effects, adjusting equalizer settings, or adding additional audio filters. This allows you to customize the sound of the music to better suit your video’s atmosphere.
- Previewing and Exporting: Once you have fine-tuned the background music and completed the overall editing process, preview your video to ensure that the audio and video elements work harmoniously together. Make any necessary adjustments before exporting the final video in a format suitable for YouTube.
Adding background music using third-party video editing software provides you with more advanced features, precision control, and creative opportunities. It allows you to fine-tune the audio elements, synchronize them perfectly with the visuals, and create a unique and professional video that stands out on YouTube.
Remember to always save your project regularly as you work on it to prevent any loss of progress. Additionally, exporting the final video in the appropriate settings will ensure optimal playback quality on YouTube.
With your video edited and background music seamlessly integrated, you’re now ready to update the video description and metadata to optimize its performance and publish it on YouTube.
Updating Video Description and Metadata
Once you have completed the editing process and added the background music to your YouTube video, it’s important to update the video description and metadata to optimize its visibility and reach a wider audience. Here are the key aspects to focus on:
- Title: Craft a compelling and descriptive title for your video that accurately represents its content. Incorporate relevant keywords to improve searchability and attract potential viewers.
- Description: Write a detailed and engaging description that provides valuable information about your video. Include relevant keywords, timestamps for key moments, and any relevant links or references. Also, mention the background music used and credit the artist accordingly.
- Tags: Add appropriate tags to your video to help YouTube understand the content and improve its visibility. Include relevant keywords, genres, and descriptive terms that align with your video and the background music.
- Thumbnails: Create an eye-catching thumbnail that accurately represents your video. A visually appealing thumbnail can significantly increase click-through rates and attract more viewers. Ensure that your thumbnail is relevant, high-quality, and adheres to YouTube’s guidelines.
- Captions and Subtitles: If applicable, consider adding captions or subtitles to your video. This improves accessibility and makes your content more inclusive. YouTube provides tools to automatically generate captions or manually upload your own subtitle files.
- End Screens and Cards: Utilize YouTube’s end screens and cards feature to promote related videos, playlists, or external links at the end of your video. This can help increase engagement and drive viewers to take further action.
- Engagement Features: Encourage viewers to like, comment, and subscribe to your channel. Respond to comments promptly, engage with your audience, and build a community around your content. Increased engagement signals to YouTube that your video is valuable and can help improve its visibility in search results and recommendations.
Updating the video description and metadata not only helps YouTube’s algorithm understand and categorize your video accurately, but it also provides valuable information to potential viewers. By optimizing these elements, you increase the chances of your video being discovered by the right audience.
Remember to be accurate and honest in your description, tags, and other metadata. Misleading or deceptive information can lead to negative user experiences and potential penalties from YouTube.
Furthermore, regularly monitor and analyze the performance of your videos using YouTube Analytics. This allows you to gain insights into viewer behavior, engagement levels, and the effectiveness of your optimization efforts. Adjust your video description and metadata as needed based on the feedback and data you gather.
With the video description and metadata updated, it’s time to preview your video and make any final adjustments before publishing it on YouTube.
Previewing and Publishing Your Video
Before publishing your YouTube video with the newly added background music, it’s crucial to preview it to ensure that everything is in place and meets your expectations. Here are the steps to preview and publish your video:
- Review the Video: Watch your video from start to finish to check for any errors, inconsistencies, or issues. Pay attention to the audio levels, visual quality, and overall flow of the content. Make any necessary adjustments or edits to ensure a polished final product.
- Check Copyright Claims: If you have used copyrighted material, such as background music, YouTube’s Content ID system may generate copyright claims. Review any copyright notifications and ensure that you have the necessary permission or licensing to use the material. Address any issues before proceeding to the next step.
- Choose Privacy Settings: Decide on the privacy settings for your video. You can set it to public, private, or unlisted based on your preferences. Public videos are visible to anyone, private videos are only accessible to specific users, and unlisted videos are not searchable but can be viewed if someone has the direct link.
- Set Thumbnails and Publish: Choose and set the most appealing and representative thumbnail for your video. This is the image that viewers will see before clicking on your video. Once you’re satisfied, click on the publish button to make your video live on YouTube.
- Monitor Performance and Engagement: After publishing, monitor the performance of your video using YouTube Analytics. Track metrics such as views, watch time, audience retention, and engagement to gain insights into how your video is performing. Use this data to optimize future videos and better understand your audience’s preferences.
- Promote Your Video: Promote your video through various channels to reach a wider audience. Share it on social media platforms, embed it on your website or blog, and collaborate with other influencers or content creators to expand your reach. Encourage viewers to share and engage with your video to increase its visibility.
Publishing your video on YouTube not only presents your content to the world but also opens up opportunities for growth, engagement, and building a community around your channel. Remember to actively engage with your audience, respond to comments, and continually create high-quality content to maintain and expand your viewership.
Keep in mind that YouTube’s algorithms take time to analyze and recommend your video to relevant audiences. It may take some time to see significant results, so stay consistent, patient, and continue to refine your content as you gather feedback and insights.
Congratulations! You have now successfully added background music to your YouTube video, optimized its metadata, and published it for the world to see. Continue to enhance your skills, explore new creative ideas, and enjoy the journey of being a YouTube content creator.
Conclusion
Adding background music to your YouTube videos can significantly enhance the viewer experience, evoke emotions, and create a professional and engaging atmosphere. However, it’s important to understand and respect YouTube’s copyright policies to avoid any legal issues or penalties.
In this comprehensive guide, we explored various aspects of incorporating background music into your YouTube videos. We discussed the importance of finding suitable and legal background music, downloading it from reputable sources, and understanding YouTube’s copyright policy to ensure compliance.
We also examined the process of editing your YouTube video, whether through YouTube’s Video Editor or third-party editing software. We covered the steps of arranging video footage, adjusting audio levels, adding transitions and effects, and, most importantly, seamlessly integrating the background music into your videos.
Furthermore, we emphasized the significance of updating the video description and metadata using relevant keywords, accurate information, and engaging content to optimize visibility and attract the right audience. Additionally, we highlighted the importance of previewing your video, checking for copyright claims, and choosing appropriate privacy settings before publishing it on YouTube.
Remember, creating captivating and successful YouTube videos goes beyond just adding background music. Engaging with your audience, promoting your videos, monitoring performance, and continually improving your content are all crucial elements to nurture your channel and achieve long-term success.
By carefully following the guidelines and tips provided in this guide, you can confidently add background music to your YouTube videos, creating a more immersive and memorable experience for your viewers. So, embrace your creativity, explore different music genres, and embark on an exciting journey of producing outstanding YouTube content.