Home>Production & Technology>MIDI>How To Set Up A MIDI Ableton
MIDI
How To Set Up A MIDI Ableton
Published: February 19, 2024
Learn how to set up MIDI in Ableton with our step-by-step guide. Get started with MIDI controllers, instruments, and more to enhance your music production.
(Many of the links in this article redirect to a specific reviewed product. Your purchase of these products through affiliate links helps to generate commission for AudioLover.com, at no extra cost. Learn more)
Table of Contents
Introduction
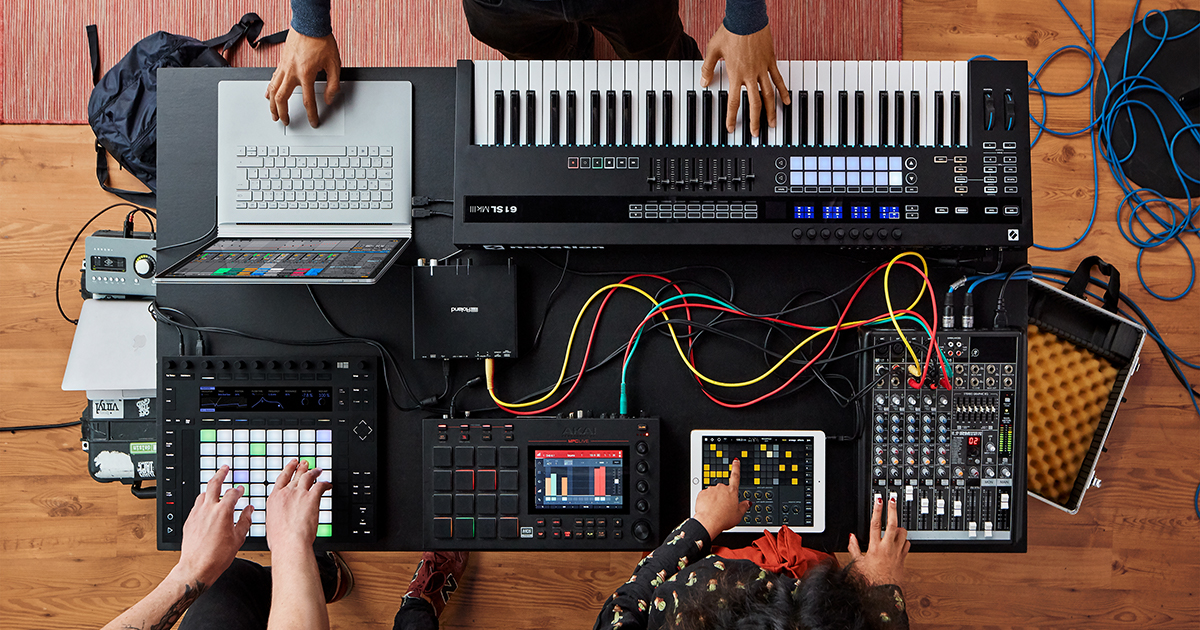
Setting up a MIDI controller in Ableton Live can revolutionize your music production experience, allowing you to harness the power of tactile control and real-time manipulation. Whether you're a seasoned producer or just delving into the world of music creation, integrating a MIDI controller with Ableton Live can significantly enhance your workflow and creativity.
MIDI, short for Musical Instrument Digital Interface, is a universal protocol that enables electronic musical instruments, computers, and other devices to communicate with each other. This versatile technology has become an integral part of modern music production, offering a seamless way to control software instruments, effects, and parameters in digital audio workstations like Ableton Live.
In this comprehensive guide, we will walk you through the process of setting up a MIDI controller in Ableton Live, covering everything from connecting the hardware to your computer to configuring the software for optimal performance. By the end of this tutorial, you'll be ready to harness the full potential of your MIDI controller within the dynamic environment of Ableton Live.
Let's dive into the exciting world of MIDI integration and unleash the boundless possibilities it offers for music creation and performance.
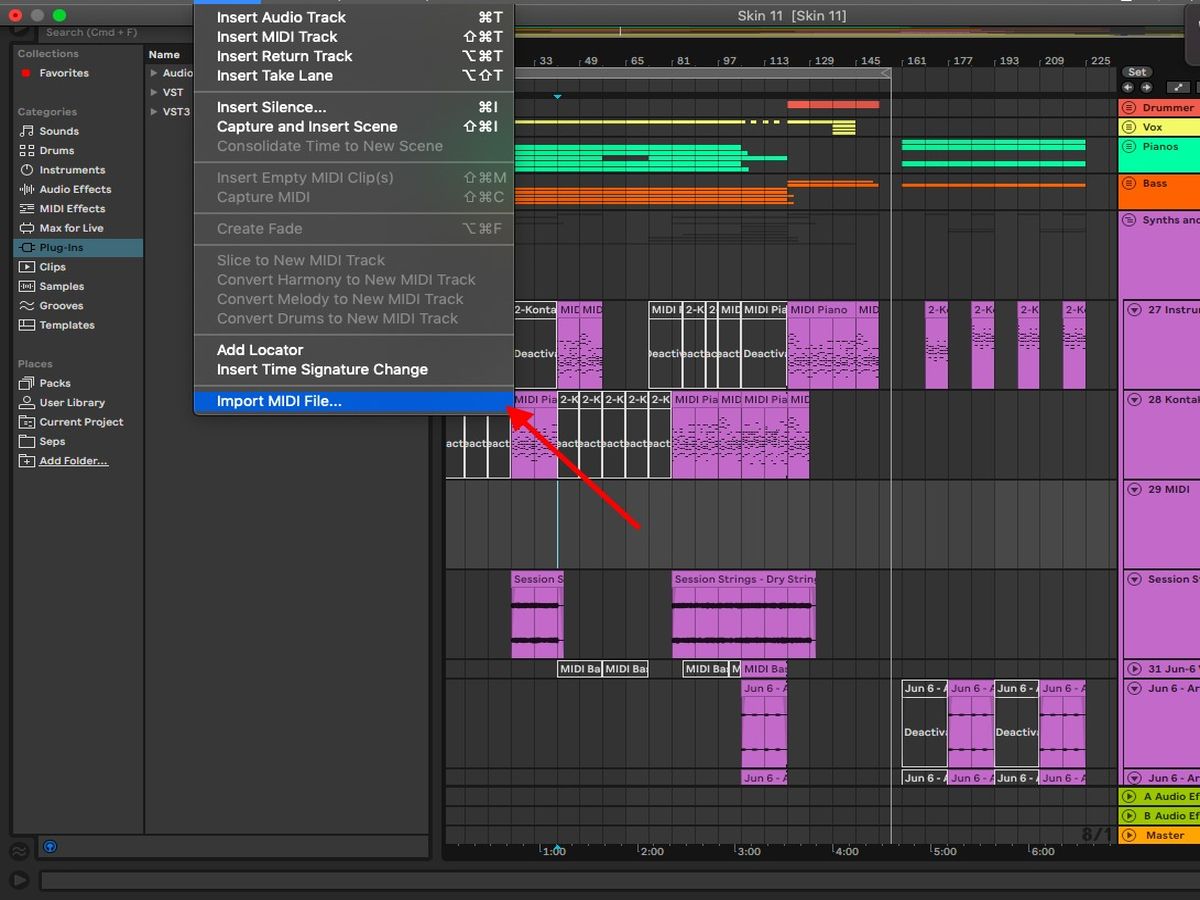
Step 1: Connect MIDI Controller to Computer
Before diving into the enchanting realm of music production within Ableton Live, the first crucial step is to establish a physical connection between your MIDI controller and your computer. This fundamental link serves as the gateway for transmitting MIDI data and enabling seamless interaction between the hardware and software components of your music production setup.
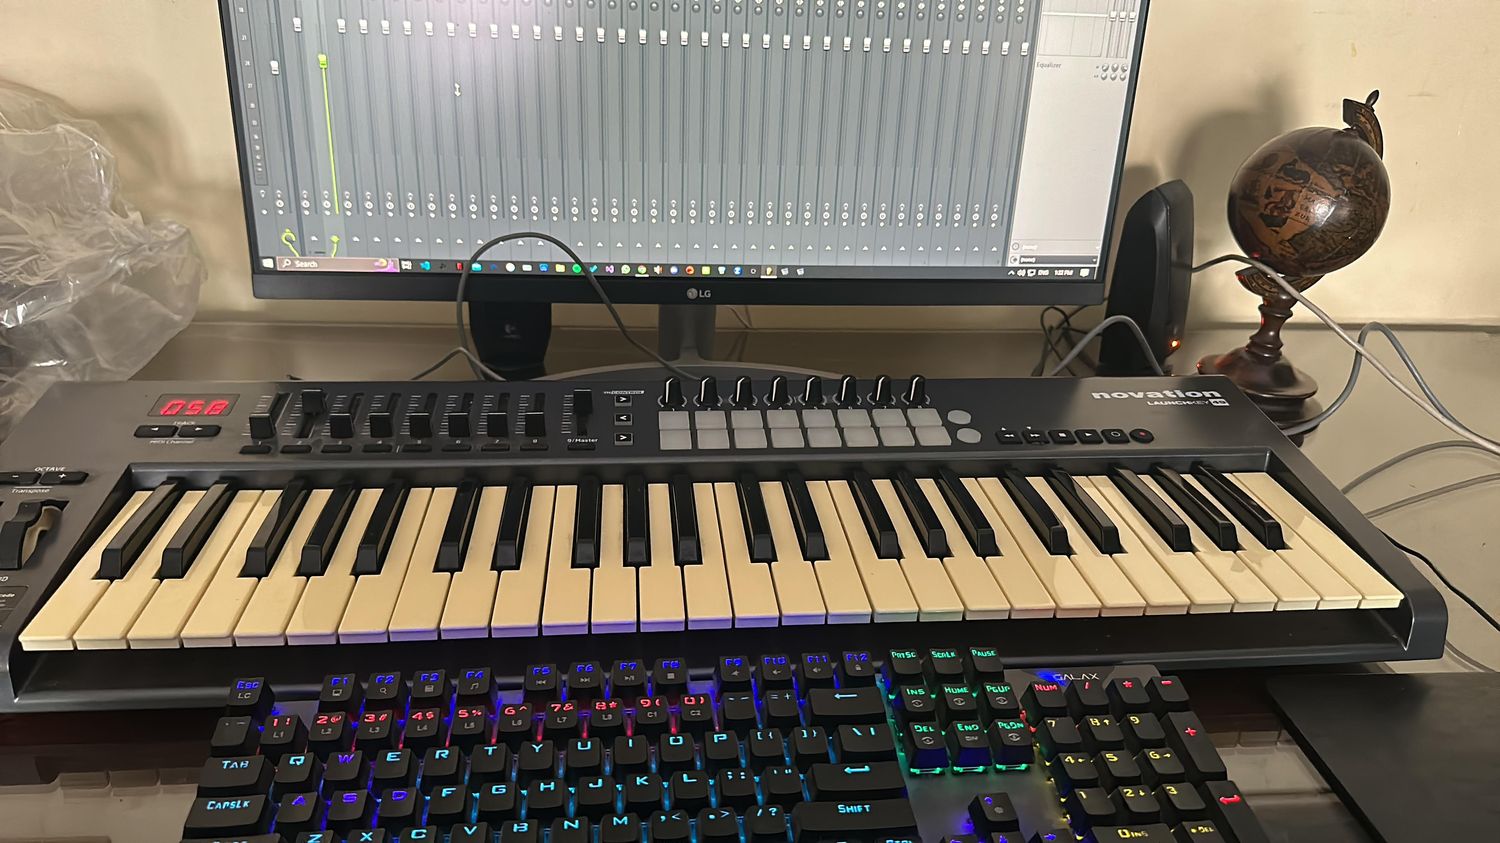
USB Connection
The majority of modern MIDI controllers are equipped with a USB port, simplifying the connectivity process. To initiate the connection, locate the USB port on your MIDI controller and plug the USB cable into it. Subsequently, connect the other end of the cable to an available USB port on your computer. Once connected, your computer should automatically recognize the MIDI controller as a new device, ensuring a hassle-free setup process.
MIDI Ports
In the scenario where your MIDI controller features traditional MIDI ports instead of a USB connection, you'll need a MIDI interface to facilitate the connection with your computer. Begin by connecting the MIDI OUT port of your controller to the MIDI IN port of the MIDI interface using a standard MIDI cable. Next, connect the MIDI OUT port of the interface to the MIDI IN port of your controller. Following this, connect the MIDI interface to your computer using a USB cable or MIDI-to-USB adapter, allowing for seamless MIDI communication between your controller and computer.
Power Up
After establishing the physical connection, power on your MIDI controller. This action not only activates the hardware but also signals to your computer that the MIDI controller is ready for operation. Upon successful connection and power-up, your MIDI controller becomes an integral part of your music production environment, poised to unleash its full potential within the captivating realm of Ableton Live.
By ensuring a robust physical connection between your MIDI controller and computer, you pave the way for a seamless and immersive music production experience within Ableton Live. With this foundational step completed, you're now ready to embark on the next stage of the setup process, delving into the intricacies of configuring MIDI settings within Ableton Live.
Step 2: Open Ableton Live
With your MIDI controller seamlessly connected to your computer, the next pivotal step in the journey of MIDI integration with Ableton Live is to launch the software and prepare it for interaction with your controller. Ableton Live, renowned for its intuitive interface and powerful music production capabilities, serves as the canvas upon which you'll paint your sonic masterpieces. Here's how to open Ableton Live and initiate the process of MIDI setup:
Launching Ableton Live
-
Locate the Application: Begin by locating the Ableton Live application on your computer. If you've installed Ableton Live in the default directory, you can typically find it in the "Applications" folder on Mac or the "Program Files" directory on Windows.
-
Double-Click to Open: Once you've located the Ableton Live application, double-click on the icon to launch the software. As the application initializes, you'll be greeted by the welcoming glow of the Ableton Live interface, setting the stage for your musical endeavors.
-
Wait for Initialization: Depending on the processing power of your computer, Ableton Live may take a few moments to initialize. During this brief interlude, the software prepares itself to provide you with a seamless and responsive environment for music creation.
Choosing a Template
Upon launching Ableton Live, you'll be presented with the option to choose a template or start with a blank canvas. Templates offer pre-configured setups tailored for various musical contexts, ranging from electronic music production to live performance. Selecting a template that aligns with your creative vision can streamline the initial setup process, providing you with a starting point that resonates with your musical aspirations.
Embracing the Canvas of Creativity
As Ableton Live unfolds before you, immerse yourself in the captivating interface that beckons you to explore its myriad features and possibilities. The session view, arrangement view, and an array of instruments and effects await your artistic touch, ready to transform your musical ideas into tangible expressions.
By opening Ableton Live, you've embarked on a journey into the heart of music production, where the synergy between your MIDI controller and the software will give rise to boundless creativity and sonic innovation. With Ableton Live at your fingertips, you're poised to delve into the next phase of MIDI setup, configuring the software to harmonize seamlessly with your MIDI controller.
As Ableton Live beckons with its promise of musical exploration, the stage is set for the harmonious convergence of hardware and software, paving the way for a symphonic collaboration that transcends the boundaries of conventional music production.
Step 3: Configure MIDI Settings in Ableton
Configuring MIDI settings in Ableton is a pivotal stage that bridges the gap between your MIDI controller and the software, ensuring seamless communication and control over various aspects of your music production environment. By fine-tuning the MIDI settings within Ableton Live, you can unleash the full potential of your MIDI controller, harnessing its tactile interface to manipulate instruments, effects, and parameters with precision and fluidity.
Accessing the MIDI Settings
-
Navigate to Preferences: To initiate the configuration process, navigate to the "Preferences" menu within Ableton Live. This can be accessed by clicking on "Live" in the top-left corner of the screen (on Mac) or "Options" in the top-left corner (on Windows), followed by selecting "Preferences" from the dropdown menu.
-
Select the MIDI Tab: Within the Preferences window, locate and click on the "MIDI" tab. This section houses a plethora of options for configuring MIDI input and output, enabling you to tailor the MIDI setup to suit your specific requirements.
MIDI Input and Output Configuration
-
Enable MIDI Input: Under the "MIDI Ports" section, ensure that the MIDI input for your controller is enabled. This allows Ableton Live to recognize and receive MIDI data from your controller, establishing a vital link for real-time interaction.
-
Assign MIDI Output: If your MIDI controller features MIDI output capabilities, you can configure the MIDI output settings within this section. This facilitates the transmission of MIDI data from Ableton Live to your controller, enabling synchronization and control over external hardware or devices.
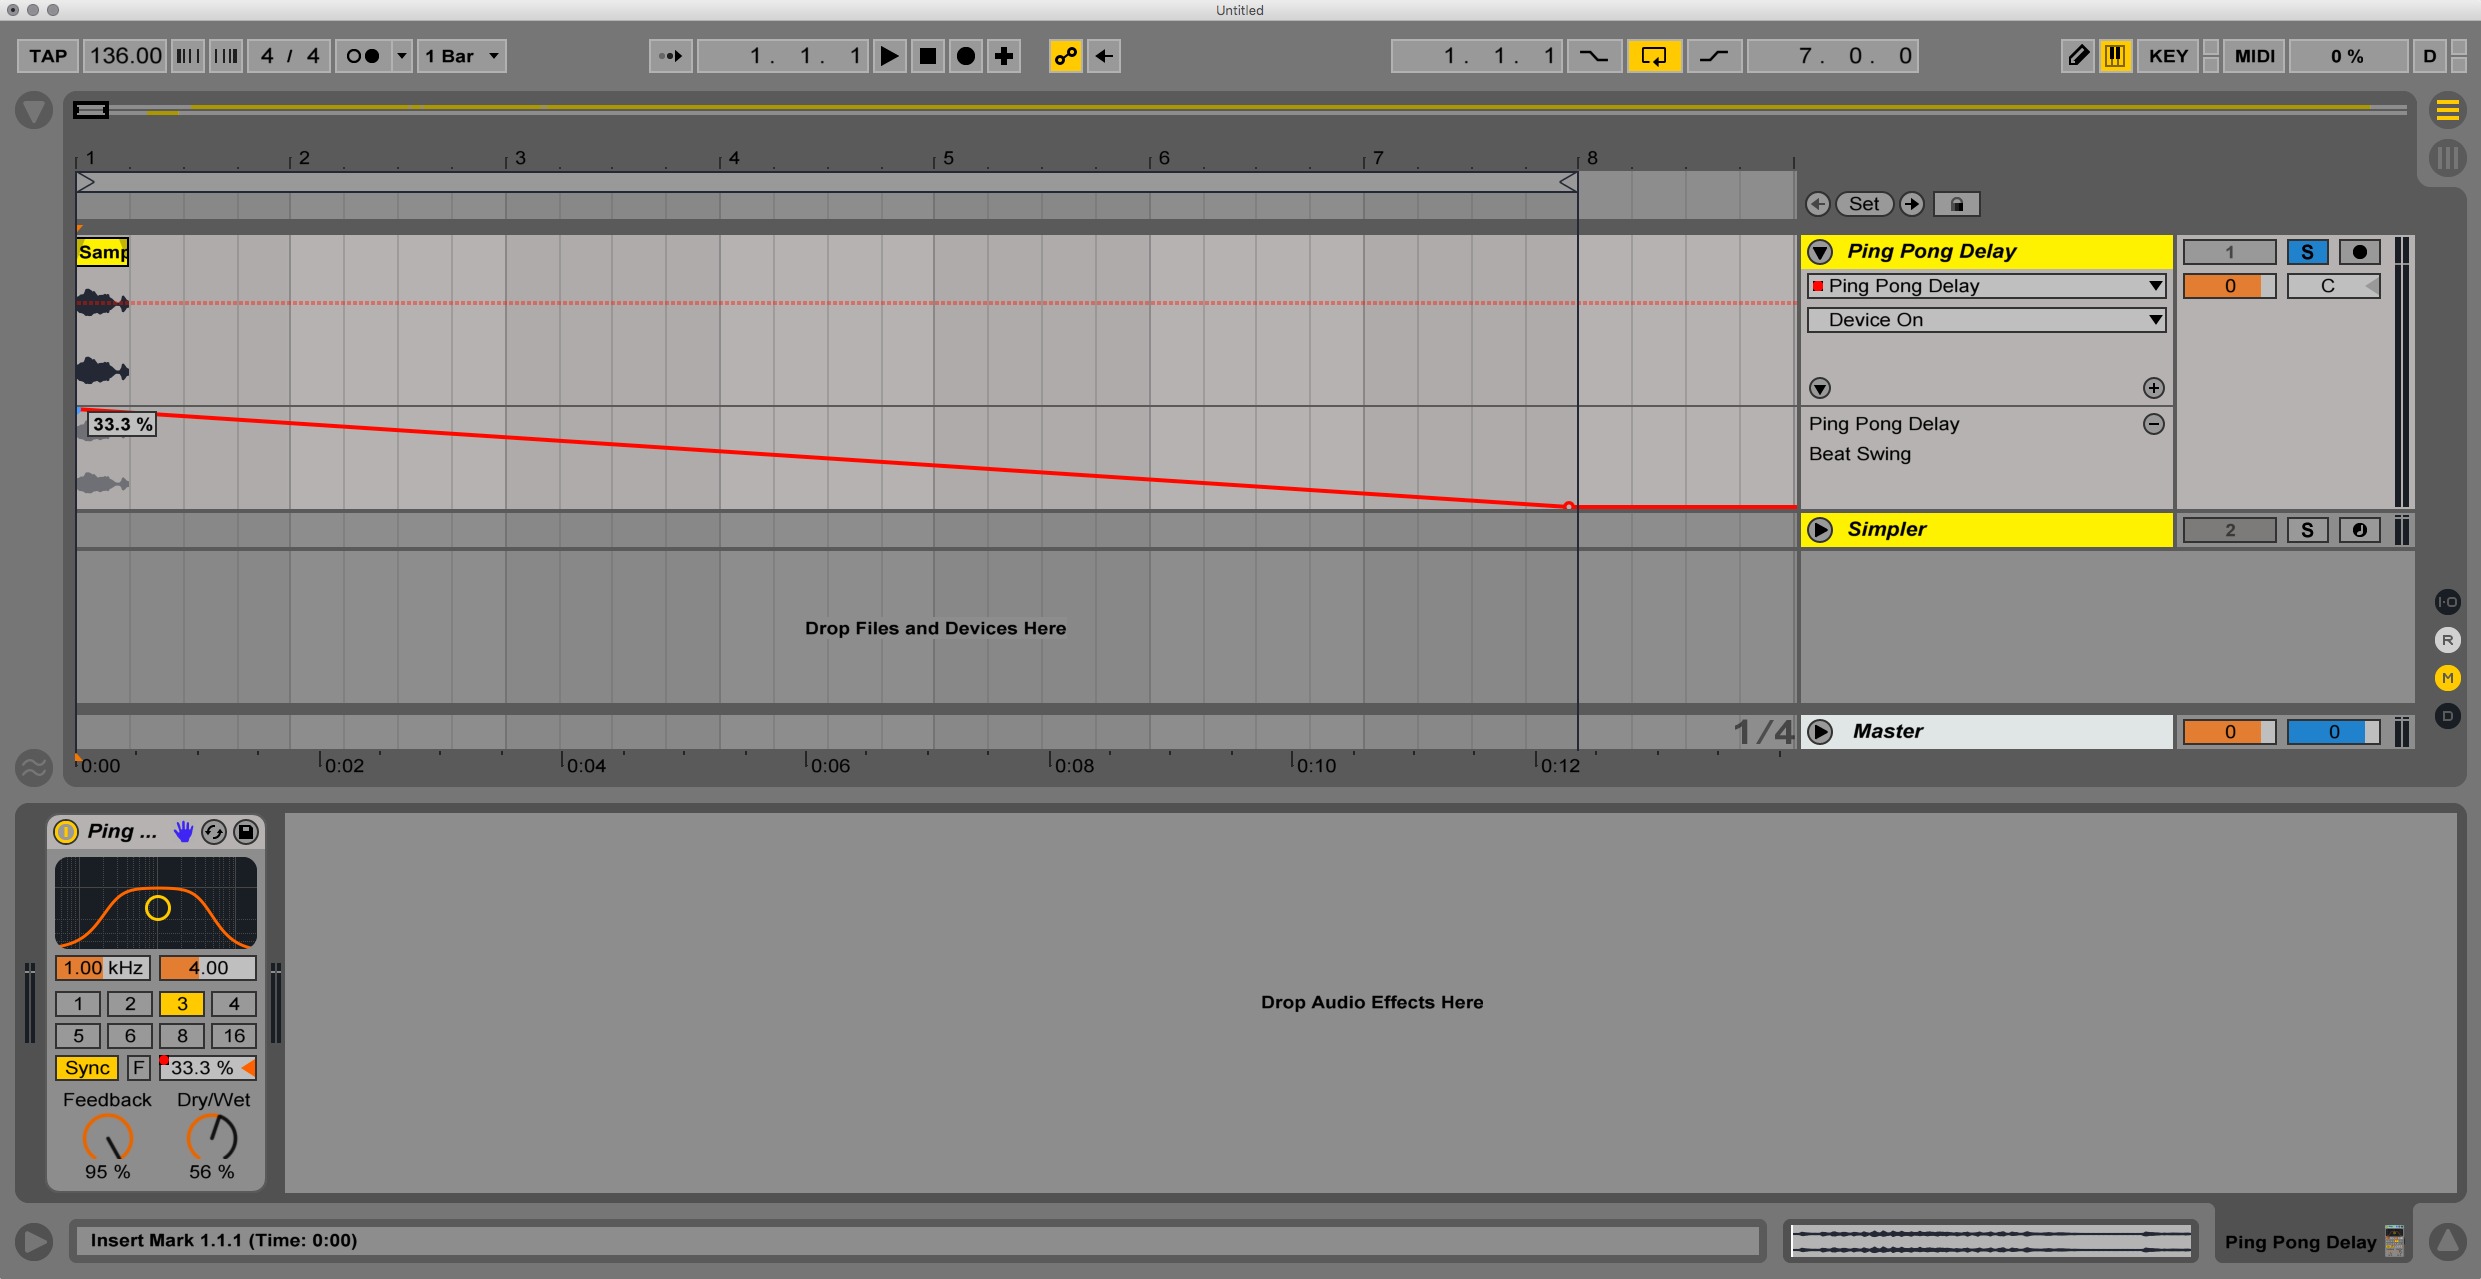
MIDI Mapping
-
Enter MIDI Mapping Mode: With the MIDI settings configured, you can delve into the fascinating realm of MIDI mapping. Enter MIDI mapping mode by clicking on the "MIDI" button in the top-right corner of the Ableton Live interface. This action activates MIDI mapping, allowing you to assign MIDI controller parameters to various elements within Ableton Live.
-
Assign MIDI Controls: Once in MIDI mapping mode, you can click on a parameter within Ableton Live, such as a virtual instrument's filter cutoff or an effect's wet/dry mix, and manipulate a corresponding control on your MIDI controller. This establishes a direct link between the physical controls of your MIDI controller and the virtual parameters within Ableton Live, empowering you to modulate and shape your sounds with tactile finesse.
MIDI Sync and Clock Settings
-
Synchronize MIDI Clock: If you intend to synchronize external MIDI gear or devices with Ableton Live, the MIDI sync and clock settings within the Preferences menu offer comprehensive options for achieving precise synchronization. Whether you're aligning drum machines, sequencers, or external effects, configuring MIDI sync ensures temporal cohesion across your musical arsenal.
-
Fine-Tune MIDI Latency: Within the MIDI settings, you can also address MIDI latency, optimizing the responsiveness of your MIDI controller within Ableton Live. Fine-tuning the MIDI latency settings minimizes the delay between your physical interactions with the controller and the corresponding actions within the software, fostering a fluid and immediate creative workflow.
By meticulously configuring the MIDI settings in Ableton Live, you establish a harmonious synergy between your MIDI controller and the software, elevating your music production experience to new heights of expressiveness and control. With the MIDI settings tailored to your preferences and workflow, you're primed to embark on a sonic odyssey, where the tactile realm of your MIDI controller converges seamlessly with the boundless sonic landscape of Ableton Live.
Step 4: Assign MIDI Controller to Ableton Parameters
Assigning your MIDI controller to Ableton Live's parameters marks a pivotal stage in harnessing the full potential of your music production setup. This process empowers you to establish direct, tactile control over a myriad of elements within Ableton Live, ranging from virtual instrument parameters to mixer controls and effect settings. By seamlessly linking your MIDI controller to Ableton Live's parameters, you unlock a realm of creative possibilities, enabling intuitive manipulation and real-time expression.
MIDI Mapping Mode
To embark on the journey of assigning your MIDI controller to Ableton Live's parameters, navigate to MIDI mapping mode within the software. This mode serves as the gateway to establishing the relationship between the physical controls of your MIDI controller and the virtual elements within Ableton Live's interface.
Parameter Assignment
Once in MIDI mapping mode, click on a parameter within Ableton Live that you wish to control using your MIDI controller. This could encompass a wide array of elements, including the filter cutoff of a virtual synthesizer, the resonance of an audio effect, the volume fader of a track, or even the transport controls for playback and recording.
After selecting the desired parameter, manipulate the corresponding control on your MIDI controller that you intend to assign to the chosen parameter within Ableton Live. This action effectively establishes a direct link between the physical control on your MIDI controller and the virtual parameter in the software, enabling seamless interaction and modulation.
Tactile Expression
The beauty of assigning your MIDI controller to Ableton Live's parameters lies in the realm of tactile expression it unlocks. With this connection established, you can intuitively modulate and shape your sounds, effects, and mix parameters in real time, infusing your music with a dynamic and expressive touch that transcends the confines of traditional mouse and keyboard interaction.
Customized Control
Furthermore, the process of assigning your MIDI controller to Ableton Live's parameters allows for customized control tailored to your unique workflow and creative vision. Whether you prefer to map specific controls for live performance scenarios or sculpt intricate automation movements within your compositions, the flexibility of MIDI mapping empowers you to craft a personalized control interface that aligns with your artistic aspirations.
By assigning your MIDI controller to Ableton Live's parameters, you bridge the gap between the physical realm of tactile control and the boundless sonic canvas of the software, forging a seamless symbiosis that amplifies your creative potential. With this pivotal step completed, you're poised to unleash the full expressive prowess of your MIDI controller within the captivating landscape of Ableton Live, ushering in a new era of dynamic music production and performance.
Step 5: Test MIDI Controller
Once you have completed the setup and configuration of your MIDI controller within Ableton Live, it's essential to conduct a comprehensive testing phase to ensure that the integration is seamless and responsive. Testing your MIDI controller not only validates its connectivity and functionality but also provides valuable insights into its performance within the dynamic environment of Ableton Live.
Functional Validation
The first aspect of testing your MIDI controller involves verifying its basic functionality within Ableton Live. Begin by triggering the keys, pads, knobs, faders, or any other controls on your MIDI controller to ascertain that they are effectively communicating with the software. This initial validation ensures that the MIDI signals are being received and interpreted accurately within Ableton Live, laying the foundation for further exploration and interaction.
Real-Time Interaction
Testing your MIDI controller also involves engaging in real-time interaction with the various elements of Ableton Live. This encompasses playing virtual instruments using the keys or pads, manipulating parameters such as filter cutoff and resonance using the knobs, adjusting track levels with the faders, and triggering clips or scenes within the session view. By immersing yourself in these real-time interactions, you gain a firsthand understanding of how your MIDI controller seamlessly integrates with the software, empowering you to shape and mold your musical creations with precision and expressiveness.
MIDI Mapping Verification
If you have assigned your MIDI controller to specific parameters within Ableton Live using MIDI mapping, it's crucial to verify the accuracy and responsiveness of these assignments during the testing phase. Manipulate the controls on your MIDI controller and observe how they modulate the corresponding parameters within the software. This verification process ensures that the MIDI mappings are functioning as intended, allowing for seamless control and modulation of various elements within Ableton Live.
Latency and Responsiveness
During the testing phase, pay close attention to the latency and responsiveness of your MIDI controller within Ableton Live. Evaluate the delay between your physical interactions with the controller and the corresponding actions within the software. Minimizing latency ensures a fluid and immediate creative workflow, enabling you to engage in expressive performances and precise manipulations without perceptible delays.
By conducting a thorough testing of your MIDI controller within Ableton Live, you validate its seamless integration and functionality, paving the way for a rich and immersive music production experience. This testing phase not only assures the reliability of your MIDI controller but also empowers you to unleash its full potential within the captivating realm of Ableton Live, where the synergy between hardware and software gives rise to boundless creativity and sonic innovation.
Conclusion
In conclusion, the integration of a MIDI controller with Ableton Live heralds a new chapter in the realm of music production, where the convergence of tactile control and digital innovation gives rise to boundless creative possibilities. By following the comprehensive steps outlined in this guide, you've embarked on a journey that transcends the conventional boundaries of music creation, empowering you to sculpt sonic landscapes with precision, expressiveness, and immersive control.
The process began with the fundamental step of connecting your MIDI controller to your computer, establishing a physical link that serves as the conduit for seamless communication between hardware and software. This foundational connection laid the groundwork for the subsequent stages, setting the stage for a harmonious collaboration between your MIDI controller and the captivating environment of Ableton Live.
As you delved into the intricacies of opening Ableton Live and configuring its MIDI settings, you gained insight into the seamless integration of your MIDI controller within the software. Navigating through the preferences and tailoring the MIDI input, output, and synchronization settings provided you with a personalized environment that harmonizes effortlessly with your creative workflow.
The pivotal stage of assigning your MIDI controller to Ableton Live's parameters unlocked a realm of tactile expression and customized control, bridging the gap between the physical realm of your controller and the virtual elements within the software. This process empowered you to sculpt sounds, modulate effects, and shape compositions with an intuitive touch that transcends the confines of traditional interaction methods.
Through the comprehensive testing phase, you validated the seamless integration and functionality of your MIDI controller within Ableton Live, ensuring that it responds with precision and immediacy to your creative impulses. This testing phase not only affirmed the reliability of your setup but also provided valuable insights into the expressive potential of your MIDI controller within the dynamic landscape of music production.
As you conclude this journey of MIDI integration with Ableton Live, you stand poised at the threshold of a realm where the synergy between hardware and software fuels a symphonic collaboration that transcends the boundaries of conventional music production. The seamless integration of your MIDI controller within Ableton Live is not merely a technical achievement but a gateway to boundless creativity, where the tactile realm of your controller converges seamlessly with the sonic canvas of the software, ushering in a new era of dynamic music production and performance.
In this conclusion, the culmination of your journey is not merely the completion of technical setup but the inauguration of a harmonious collaboration between your MIDI controller and the captivating realm of Ableton Live, where the synergy between hardware and software gives rise to boundless creativity and sonic innovation.