Home>Production & Technology>MIDI>UVI Workstation: How To Connect MIDI Controller
MIDI
UVI Workstation: How To Connect MIDI Controller
Modified: February 22, 2024
Learn how to connect your MIDI controller to UVI Workstation and start creating music effortlessly. Explore our step-by-step guide now!
(Many of the links in this article redirect to a specific reviewed product. Your purchase of these products through affiliate links helps to generate commission for AudioLover.com, at no extra cost. Learn more)
Table of Contents
Introduction
The UVI Workstation is a powerful and versatile software instrument that offers a wide range of sounds and features for music production. By integrating a MIDI controller with the UVI Workstation, musicians and producers can elevate their creative process to new heights. MIDI controllers, such as keyboards and pad controllers, provide tactile control over virtual instruments, allowing for expressive performances and precise manipulation of sound parameters.
In this comprehensive guide, we will delve into the seamless process of connecting a MIDI controller to the UVI Workstation. Whether you're a seasoned music producer or a budding enthusiast, understanding how to integrate your MIDI controller with the UVI Workstation is essential for harnessing the full potential of both tools. By the end of this tutorial, you'll be equipped with the knowledge to effortlessly link your MIDI controller to the UVI Workstation and unleash a world of musical possibilities.
Now, let's embark on this journey to unlock the synergy between your MIDI controller and the UVI Workstation. Get ready to immerse yourself in the realm of dynamic music creation and performance as we explore the step-by-step process of connecting and configuring your MIDI controller within the UVI Workstation environment.
Setting up the UVI Workstation
Before diving into the process of connecting a MIDI controller to the UVI Workstation, it's crucial to ensure that the UVI Workstation software is properly set up on your computer. The UVI Workstation serves as the host platform for virtual instruments and sound libraries, providing a robust environment for music production and performance. Here's a comprehensive guide on setting up the UVI Workstation to seamlessly integrate with your MIDI controller.
-
Download and Installation: Begin by visiting the official UVI website to download the UVI Workstation software. Once the download is complete, follow the installation instructions to set up the UVI Workstation on your computer. Ensure that you choose the appropriate installation path and complete the installation process.
-
Authorization: After installing the UVI Workstation, it's essential to authorize the software using the provided serial number or activation key. This step is crucial for unlocking the full functionality of the UVI Workstation and gaining access to its expansive library of virtual instruments and sound presets.
-
Updates and Compatibility: Check for any available updates for the UVI Workstation to ensure that you have the latest version installed. Additionally, verify the compatibility of the UVI Workstation with your operating system to prevent any potential compatibility issues.
-
Sound Libraries: If you have additional UVI sound libraries, such as orchestral instruments, synthesizers, or drum kits, consider installing them at this stage. These sound libraries can greatly enhance the sonic capabilities of the UVI Workstation, providing a rich palette of sounds to explore and integrate with your MIDI controller.
-
Audio Configuration: Configure the audio settings within the UVI Workstation to align with your audio interface and preferred audio output. Ensure that the audio inputs and outputs are properly configured to facilitate seamless communication between the UVI Workstation and your MIDI controller.
By meticulously setting up the UVI Workstation, you establish a solid foundation for integrating your MIDI controller and unleashing the full potential of this dynamic musical partnership. With the UVI Workstation primed and ready, the next step is to seamlessly connect your MIDI controller and embark on a musical journey filled with creativity and expression.
Connecting the MIDI Controller
Now that the UVI Workstation is set up and ready to ignite your musical creativity, the next pivotal step is to establish a seamless connection between your MIDI controller and the UVI Workstation. Whether you're working with a MIDI keyboard, pad controller, or any other MIDI-enabled device, the process of linking your controller to the UVI Workstation is straightforward and essential for harnessing the expressive capabilities of both tools.
Physical Connection
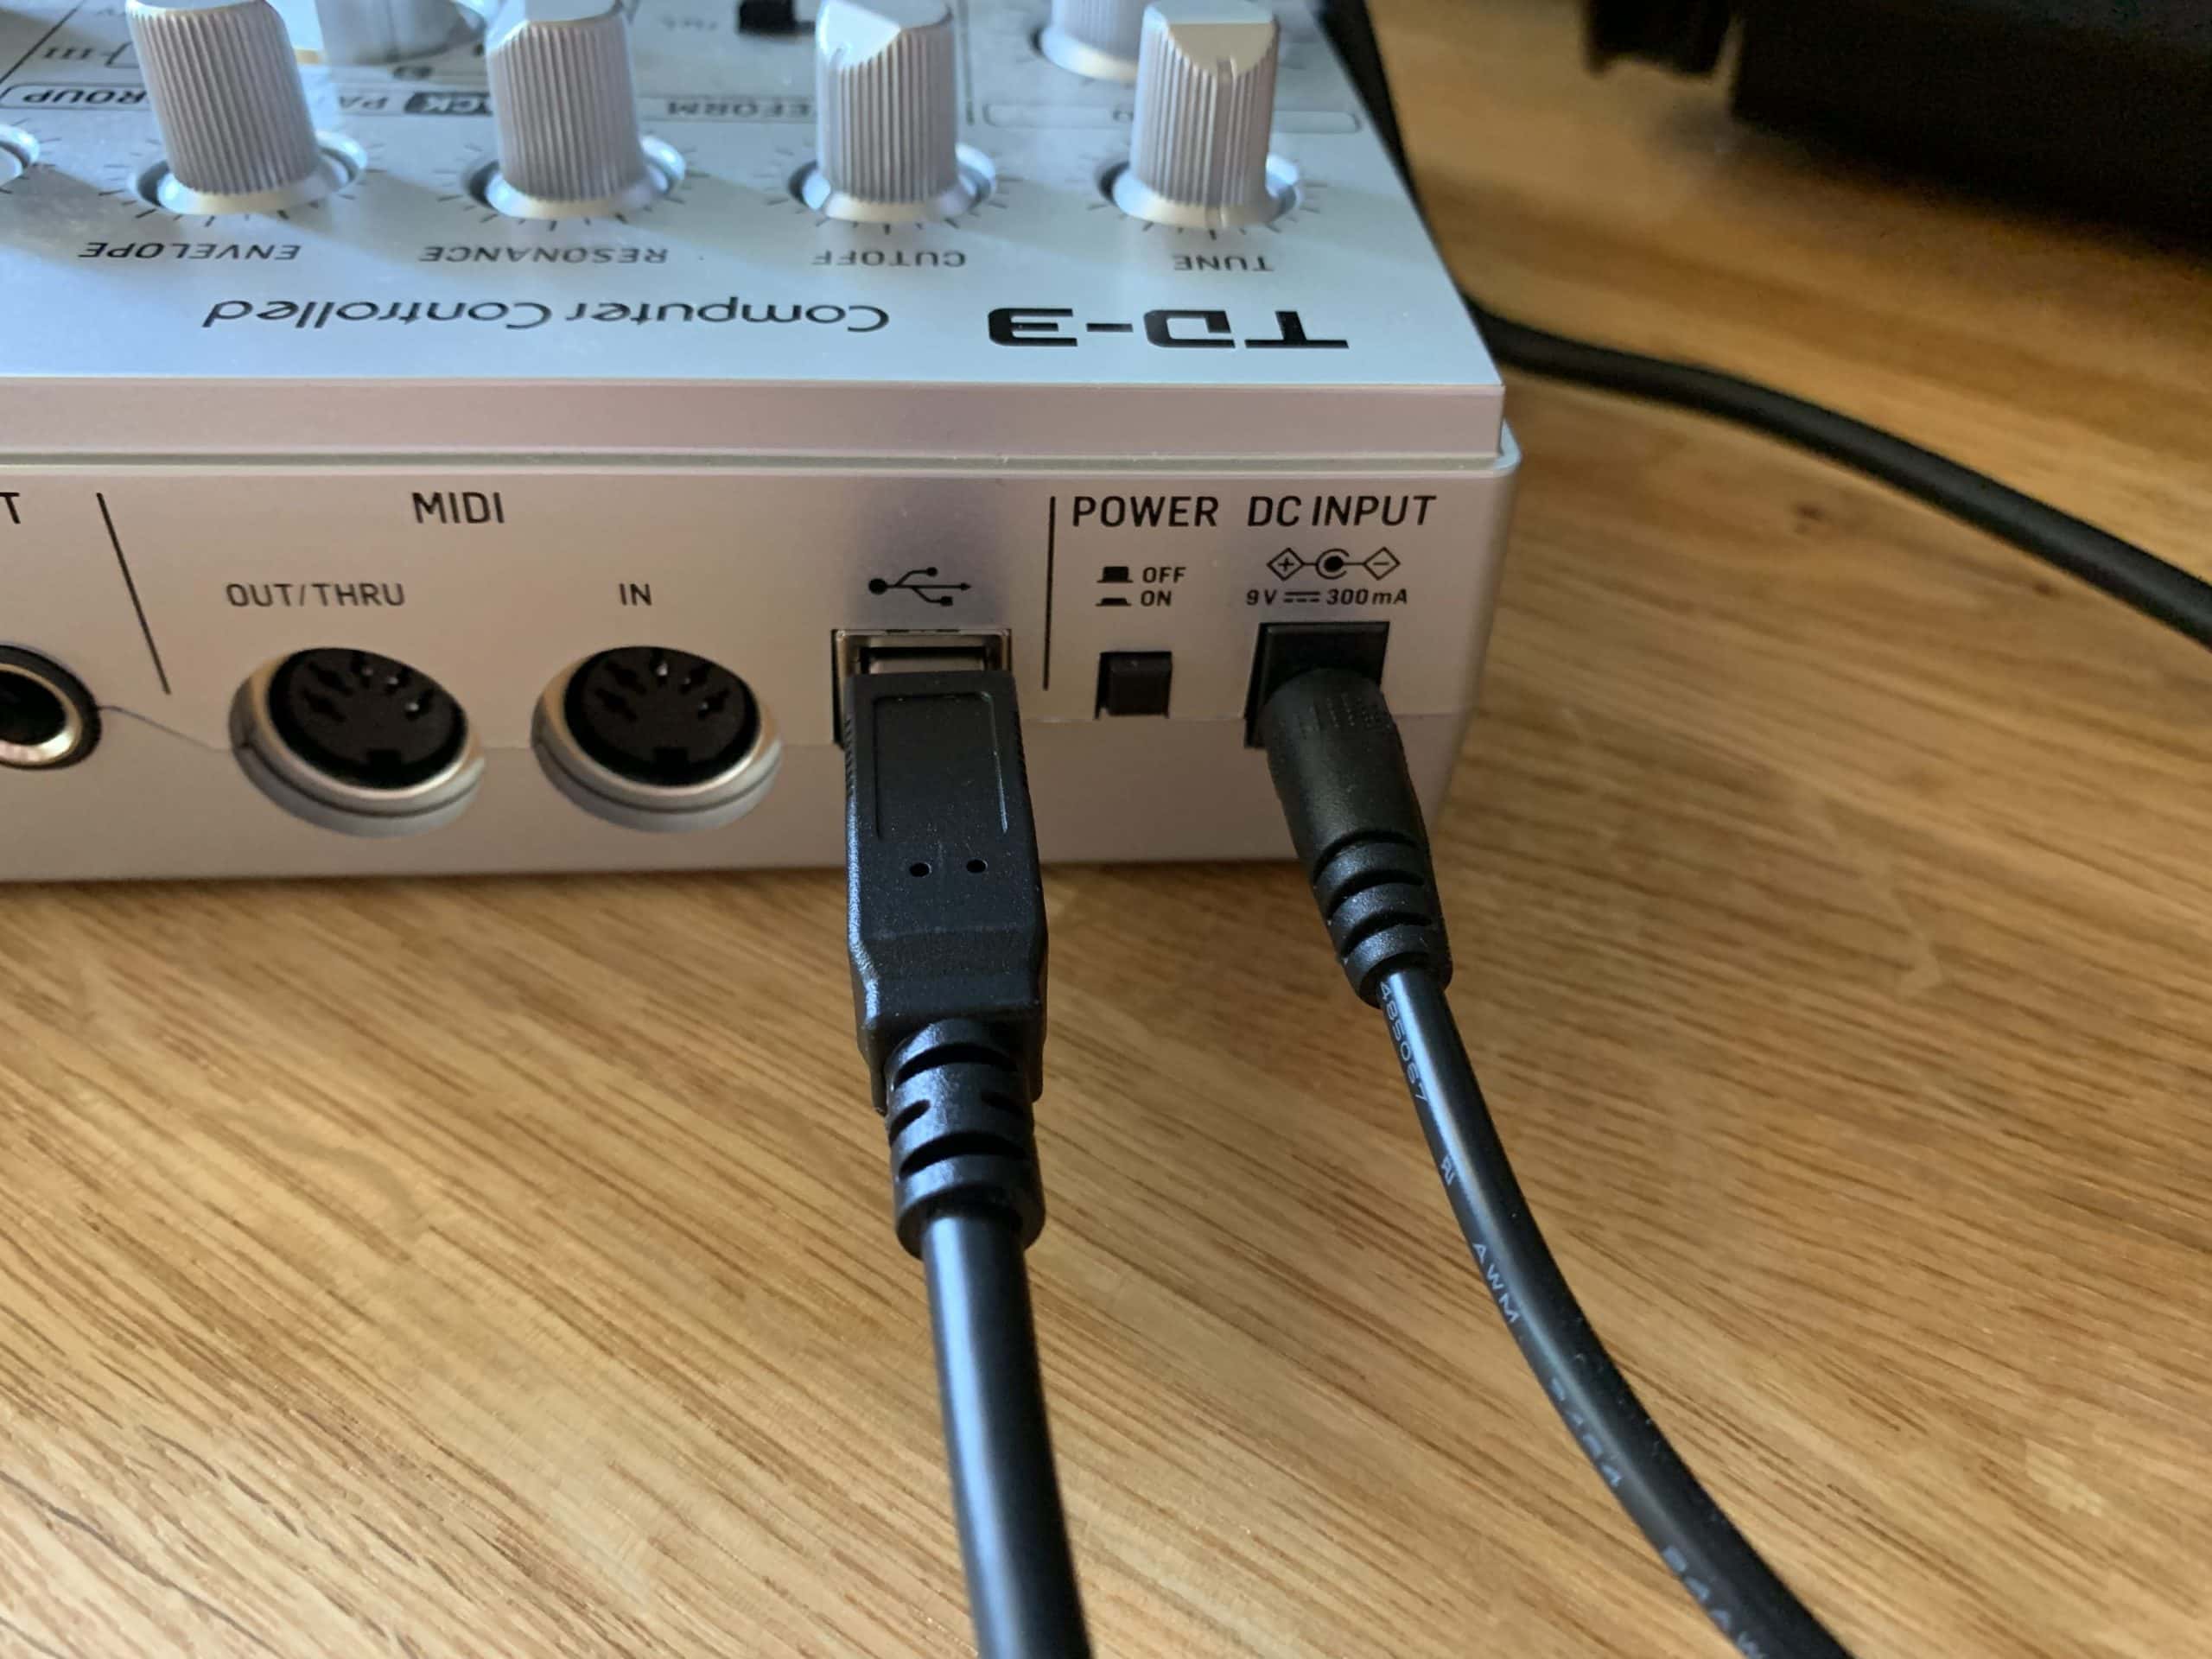
Begin by connecting your MIDI controller to your computer using a USB cable or MIDI interface, depending on the available connectivity options of your MIDI controller. Most modern MIDI controllers feature USB connectivity, allowing for direct plug-and-play functionality with your computer. Once the physical connection is established, your computer should recognize the MIDI controller as a MIDI input device, laying the groundwork for seamless integration with the UVI Workstation.
UVI Workstation Configuration
Within the UVI Workstation software, navigate to the preferences or settings menu to configure the MIDI input settings. Locate the section dedicated to MIDI devices or controllers and ensure that your connected MIDI controller is recognized and selected as the primary input device. This crucial step establishes the communication pathway between your MIDI controller and the UVI Workstation, enabling real-time interaction and control over virtual instruments and sound parameters.
MIDI Mapping
In some cases, you may need to map the MIDI controller's physical controls, such as knobs, faders, and pads, to specific parameters within the UVI Workstation. This process, known as MIDI mapping, allows you to assign various functions and parameters within the UVI Workstation to the corresponding controls on your MIDI controller. By mapping your MIDI controller, you can tailor its functionality to suit your workflow, providing intuitive and tactile control over the UVI Workstation's virtual instruments and effects.
Testing the Connection
Once the MIDI controller is connected and configured within the UVI Workstation, it's time to ensure that the connection is functioning as intended. Play the keys or trigger the pads on your MIDI controller and verify that the UVI Workstation accurately responds to your input. Test the modulation wheel, pitch bend, and any other performance controls on your MIDI controller to confirm that they seamlessly integrate with the UVI Workstation, allowing for expressive and dynamic musical performances.
By successfully connecting your MIDI controller to the UVI Workstation, you've established a direct channel for translating your musical ideas into captivating sounds. The next step involves configuring the MIDI controller within the UVI Workstation to optimize its functionality and unlock a world of creative possibilities. Let's delve into the intricacies of configuring your MIDI controller within the UVI Workstation, empowering you to harness its full potential in your music production endeavors.
Configuring MIDI Controller in UVI Workstation
Configuring your MIDI controller within the UVI Workstation is a pivotal step that empowers you to tailor its functionality to suit your specific music production and performance needs. By customizing the behavior of your MIDI controller within the UVI Workstation, you can optimize its responsiveness, assign control parameters, and seamlessly integrate it into your creative workflow. Let's delve into the intricacies of configuring your MIDI controller within the UVI Workstation, unlocking its full potential as a versatile and expressive tool for music creation.
MIDI Input Settings
Navigate to the MIDI input settings within the UVI Workstation to fine-tune the behavior of your connected MIDI controller. Here, you can specify the MIDI channel assignments, input filtering options, and response curves to ensure that your MIDI controller accurately communicates with the UVI Workstation. Adjusting the MIDI input settings allows you to customize the behavior of your MIDI controller, catering to your unique playing style and performance preferences.
Control Assignments
Take advantage of the UVI Workstation's control assignment features to map the physical controls of your MIDI controller to specific parameters within the software. Whether it's assigning knobs to manipulate filter cutoff frequencies, mapping faders to control volume levels, or linking pads to trigger specific sound samples, the control assignment functionality empowers you to create a personalized interface between your MIDI controller and the UVI Workstation. This level of customization fosters an intuitive and efficient workflow, enabling you to interact with virtual instruments and effects in a manner that aligns with your creative vision.
MIDI Learn Functionality
Explore the MIDI learn functionality within the UVI Workstation, which allows you to dynamically assign MIDI control messages to various parameters in real time. This flexible approach to MIDI mapping enables on-the-fly customization, granting you the freedom to adapt the behavior of your MIDI controller as your creative process unfolds. Whether you're shaping synth sounds, manipulating effects, or triggering rhythmic patterns, the MIDI learn functionality provides a responsive and adaptable method for configuring your MIDI controller within the UVI Workstation.
Preset Integration
Take advantage of preset integration capabilities within the UVI Workstation to streamline the configuration of your MIDI controller. Many virtual instruments and sound libraries within the UVI ecosystem offer dedicated presets designed to optimize the interaction with specific MIDI controllers. By utilizing these presets, you can expedite the configuration process, ensuring seamless integration and enhanced compatibility between your MIDI controller and the UVI Workstation's expansive collection of sounds and instruments.
Expressive Control
Embrace the expressive potential of your MIDI controller within the UVI Workstation by exploring features such as aftertouch, velocity sensitivity, and key scaling. These expressive controls allow you to infuse your performances with nuanced dynamics and articulations, adding a human touch to your music. By configuring these expressive parameters within the UVI Workstation, you can harness the full range of your MIDI controller's capabilities, elevating your musical expressions to new heights.
By meticulously configuring your MIDI controller within the UVI Workstation, you establish a symbiotic relationship between hardware and software, creating a seamless and personalized environment for music production and performance. The tailored integration of your MIDI controller with the UVI Workstation empowers you to unleash your creative potential, shaping sounds with precision and performing with expressive fluidity. With your MIDI controller finely tuned to complement the capabilities of the UVI Workstation, you're poised to embark on a musical journey filled with innovation and inspiration.
Testing the MIDI Controller
Once the MIDI controller is connected and configured within the UVI Workstation, it's essential to validate the integrity of the connection and ensure that the MIDI controller seamlessly interacts with the software. Testing the MIDI controller serves as a crucial step in confirming that the communication between the hardware and software components is robust and responsive, laying the groundwork for expressive performances and precise control over virtual instruments and sound parameters.
Begin the testing process by engaging with the various controls and performance elements of your MIDI controller. Play the keys on a MIDI keyboard or trigger the pads on a pad controller to gauge the responsiveness and accuracy of note triggering within the UVI Workstation. Verify that each key press or pad hit translates into a corresponding sound output from the UVI Workstation, indicating a seamless connection and accurate MIDI input recognition.
Next, explore the modulation wheel, pitch bend, and other performance controls on your MIDI controller to assess their impact on the sound modulation and expression within the UVI Workstation. Manipulate these controls to ascertain that the UVI Workstation accurately captures and responds to the nuanced gestures and movements, allowing for dynamic and emotive musical performances.
Test the sustain pedal input, if available, to confirm its functionality within the UVI Workstation. The sustain pedal plays a crucial role in shaping the sustain and release characteristics of notes, particularly in piano and orchestral instrument simulations. By testing the sustain pedal, you ensure that sustained notes behave as expected, adding depth and realism to your musical performances.
If your MIDI controller features additional performance elements such as aftertouch and velocity sensitivity, thoroughly explore these features within the UVI Workstation. Aftertouch allows for expressive control over parameters based on the pressure applied after a key is struck, while velocity sensitivity modulates the volume and timbre of sounds based on the force of the key press. Testing these expressive elements ensures that your MIDI controller's nuanced performance capabilities are fully leveraged within the UVI Workstation, enriching your musical expressions with subtlety and emotion.
Throughout the testing process, pay close attention to latency, which refers to the delay between triggering a MIDI event on your controller and the corresponding response from the UVI Workstation. Low latency is essential for achieving a natural and immediate response to your performance gestures, fostering a seamless and immersive music production experience.
By thoroughly testing the MIDI controller within the UVI Workstation, you validate the integrity of the connection and confirm that the MIDI controller's performance elements are effectively translated into expressive musical output. This meticulous testing process ensures that your MIDI controller seamlessly integrates with the UVI Workstation, empowering you to engage in creative and dynamic music production with confidence and precision.
Conclusion
In conclusion, the seamless integration of a MIDI controller with the UVI Workstation opens a gateway to boundless creative potential and expressive musical exploration. By following the step-by-step process outlined in this comprehensive guide, you've gained the knowledge and expertise to establish a robust connection between your MIDI controller and the UVI Workstation, paving the way for immersive music production and captivating performances.
The journey began with the meticulous setup of the UVI Workstation, ensuring that the software environment was primed to host a diverse array of virtual instruments and sound libraries. From downloading and installing the UVI Workstation to configuring audio settings and exploring sound libraries, the foundational steps set the stage for a seamless integration with your MIDI controller.
Next, the process of physically connecting the MIDI controller to your computer and configuring it within the UVI Workstation solidified the link between hardware and software. By delving into MIDI input settings, control assignments, and expressive control parameters, you tailored the behavior of your MIDI controller to align with your unique creative vision, fostering an intuitive and personalized workflow.
The comprehensive testing of the MIDI controller within the UVI Workstation served as the ultimate validation of the connection, ensuring that every key press, modulation gesture, and nuanced performance element translated seamlessly into expressive musical output. The testing process not only confirmed the integrity of the connection but also provided assurance that the MIDI controller's performance capabilities were fully leveraged within the UVI Workstation.
As you embark on your musical endeavors with the integrated power of your MIDI controller and the UVI Workstation, remember that the journey does not end here. The synergy between hardware and software is a dynamic and evolving partnership, offering endless opportunities for sonic exploration, creative innovation, and expressive performances. Continuously explore the depths of MIDI mapping, control assignments, and expressive parameters to refine your musical interactions and unlock new dimensions of creativity.
With the knowledge and skills acquired from this guide, you are poised to embark on a musical journey filled with innovation, inspiration, and boundless sonic possibilities. Let the integrated harmony of your MIDI controller and the UVI Workstation propel your musical aspirations to soaring heights, and may your creative endeavors resonate with the unmistakable essence of your artistic vision.