Home>Production & Technology>MP3>How To Add MP3 To FL Studio
MP3
How To Add MP3 To FL Studio
Modified: January 22, 2024
Learn how to seamlessly add MP3 files to FL Studio with our step-by-step guide. Enhance your music production skills and explore the endless possibilities!
(Many of the links in this article redirect to a specific reviewed product. Your purchase of these products through affiliate links helps to generate commission for AudioLover.com, at no extra cost. Learn more)
Table of Contents
Introduction
Welcome to the exciting world of music production with FL Studio! FL Studio, also known as FruityLoops, is a popular digital audio workstation that allows you to create and manipulate music tracks with ease. Whether you’re a beginner or an experienced producer, FL Studio provides a wide range of features and tools to bring your musical ideas to life.
In this article, we will guide you through the process of adding MP3 files to FL Studio. MP3 is a widely used audio file format that ensures high-quality playback while keeping the file size relatively small. By learning how to import and edit MP3 files in FL Studio, you will have the flexibility to incorporate existing audio elements into your projects or work with pre-recorded samples.
Adding MP3 files to your FL Studio projects opens up a whole new world of creative possibilities. You can use MP3 files for sampling, chopping, looping, or even as the foundation for your entire composition. Whether you’re working on a remix, creating an original track, or producing beats, understanding how to incorporate MP3 files into FL Studio is essential.
Throughout this tutorial, we will take you step-by-step through the process of adding MP3 files to FL Studio. You will learn how to import MP3 files, adjust the settings, edit the audio, and ultimately save your project.
Before we dive into the specifics, make sure you have FL Studio installed on your computer. If you don’t have it already, you can download the latest version from the official Image-Line website. Once you have FL Studio up and running, you’ll be ready to start adding MP3 files to your projects and unleash your creativity.
Step 1: Getting Started
Before we begin adding MP3 files to FL Studio, let’s make sure we have everything set up properly. Here are some preliminary steps to get started:
- Launch FL Studio: Open the FL Studio application on your computer. If you have a desktop shortcut, simply double-click it to start the program. If not, you can find FL Studio in your applications or program files folder.
- Create a New Project: Once FL Studio is open, you’ll be greeted with the “New” project window. Here, you can choose various project templates or create a blank project. Select the option that best suits your needs and click “Create.” This will create a new project for you to work with.
- Choose a Project Name and Location: After creating a new project, you’ll be prompted to choose a name and location for it. Give your project a descriptive name and select a folder where you want to save it. This will help you organize your projects and easily locate them later.
- Select a BPM: BPM stands for Beats Per Minute, which determines the tempo or speed of your project. Choose a suitable BPM based on the style or genre of music you’re creating. You can always change the BPM later if needed.
- Choose a Time Signature: The time signature indicates the rhythm and structure of your project. Select the appropriate time signature based on the rhythm you want to create. Common time signatures include 4/4 (four beats per measure) and 3/4 (three beats per measure).
Once you’ve completed these initial setup steps, you’re ready to start adding MP3 files to your FL Studio project. With a solid foundation in place, let’s move on to the next step and learn how to import MP3 files into FL Studio.
Step 2: Opening FL Studio
Now that you have your project set up, it’s time to open FL Studio and prepare it for adding MP3 files. Follow these steps:
- Launch FL Studio: If you haven’t already done so, open the FL Studio application on your computer.
- Loading the Project: When FL Studio opens, you’ll see the main interface with various windows and panels. To load your project, go to the top menu and click on “File,” then select “Open” from the dropdown menu. Navigate to the folder where you saved your project and select the project file. FL Studio will load your project, and you will see all the tracks and settings you previously created.
Once your project is loaded in FL Studio, you can start adding MP3 files to your composition. The next step will guide you through the process of importing MP3 files into FL Studio.
Step 3: Importing the MP3 File
Now that FL Studio is up and running, it’s time to import the MP3 file into your project. Follow these steps:
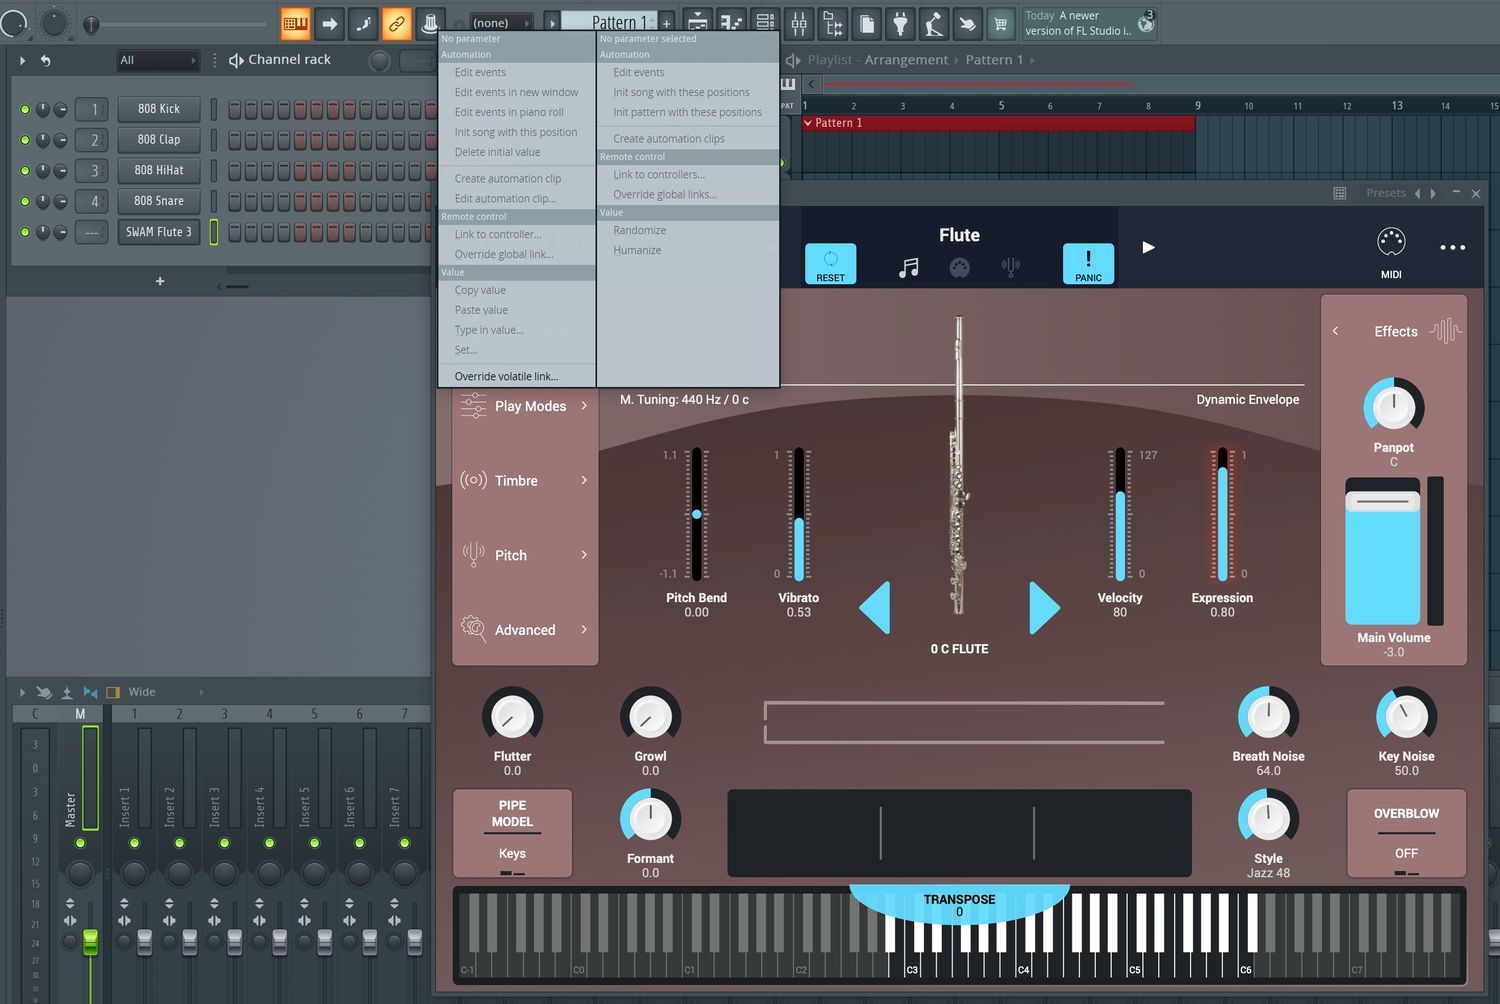
- Select the Channel Rack: In FL Studio, the Channel Rack is where all your instruments and sounds are organized. To open the Channel Rack, click on the “View” menu at the top and select “Channel Rack” from the dropdown list. Alternatively, you can use the shortcut “F6” on your keyboard.
- Locate the Browser: The Browser is where you can access your audio files, samples, and plugins. To open the Browser, click on the “View” menu again and select “Browser” from the dropdown list. Alternatively, you can use the shortcut “F8”. The Browser will appear on the left side of the FL Studio interface.
- Find the MP3 File: Within the Browser, navigate to the folder where your MP3 file is located. You may have pre-organized your files into different folders for easy access. If so, locate the folder that contains the desired MP3 file.
- Drag and Drop: Once you’ve located the MP3 file, simply click and hold the file, then drag it from the Browser onto the Channel Rack. You’ll see a small preview box indicating where the file will be placed.
- Release the Mouse: Release the mouse button to drop the MP3 file onto the Channel Rack. FL Studio will automatically create a new Channel for the MP3 file.
Congratulations! You’ve successfully imported the MP3 file into your FL Studio project. The MP3 file will now appear as a Channel within the Channel Rack. You can use this Channel to manipulate, edit, and apply various effects to the MP3 file.
Before moving on to the next step, take a moment to explore the different options and controls available for your newly imported MP3 file. You can adjust the volume, panning, and apply various effects to shape the sound to your liking.
Now that you have imported the MP3 file, it’s time to make any necessary adjustments to ensure it fits seamlessly into your project. In the next step, we’ll explore how to adjust the MP3 settings in FL Studio.
Step 4: Adjusting the MP3 Settings
After importing the MP3 file into FL Studio, you may need to make some adjustments to ensure it fits perfectly in your project. Here’s how you can adjust the MP3 settings:
- Select the MP3 Channel: In the Channel Rack, locate the Channel that represents the imported MP3 file. Click on it to select it.
- Access the Channel Settings: To access the settings for the selected Channel, go to the Channel Rack menu and click on the small menu icon (three horizontal lines) located at the top left corner of the Channel Rack window. From the dropdown menu, select “Channel Settings”.
- Explore the MP3 Settings: The Channel Settings window will open, displaying various options and controls for the selected MP3 Channel. Here, you can adjust parameters such as volume, panning, pitch, and more. Take your time to explore and experiment with different settings to achieve the desired sound for your MP3 file.
- Apply Effects and Processing: FL Studio offers a wide range of built-in effects and processing tools that can be applied to your MP3 file. You can add effects like reverb, delay, EQ, and compression to enhance the sound and create unique tones. To apply effects, click on the “Mixer” icon located at the top toolbar of FL Studio. This will open the Mixer window, where you can add effects and route the MP3 Channel to specific mixer tracks.
- Experiment and Fine-Tune: Don’t be afraid to experiment and fine-tune the settings to achieve the desired result. Use your ears as a guide and adjust parameters until the MP3 file blends harmoniously with the rest of your project.
By adjusting the MP3 settings in FL Studio, you have the flexibility to customize the sound according to your creative vision. Take your time to explore different options and find the perfect balance for your project.
Now that you have adjusted the MP3 settings, it’s time to dive into the exciting process of editing the MP3 file within FL Studio. In the next step, we’ll explore various editing techniques you can apply to your MP3 file.
Step 5: Editing the MP3 in FL Studio
Once you have imported and adjusted the MP3 file in FL Studio, it’s time to unleash your creativity and start editing the audio. Here are some techniques and tools you can use to edit the MP3 file:
- Trimming and Cutting: If you want to remove certain sections or create shorter loops from the MP3 file, use the “Slice” tool or the “Playlist” view in FL Studio. Simply select the desired section, right-click, and choose “Cut” or “Delete” to trim the audio.
- Looping: To create repeating sections or loops in the MP3 file, you can use the “Playlist” view. Select the section you want to loop, right-click, and choose “Loop” to repeat the selected section indefinitely.
- Time-Stretching: FL Studio offers powerful time-stretching capabilities, allowing you to change the tempo or speed of the MP3 file without affecting the pitch. Right-click on the MP3 Channel, select “Time Stretching” from the dropdown menu, and experiment with different settings to achieve your desired result.
- Applying Fades and Crossfades: To smooth out transitions or create fade-in and fade-out effects, use the “Automation Clips” or the “Channel Settings” window. You can adjust the volume envelope to control the fade or crossfade between different sections of the MP3 file.
- Adding Effects: FL Studio offers a wide range of effects plugins that you can apply to the MP3 file to enhance its sound. Experiment with effects such as reverb, delay, chorus, and distortion to add depth and character to the audio.
- Pitch-Shifting: If you want to change the pitch or key of the MP3 file, use the “Pitcher” plugin or the “Channel Settings” window. This allows you to transpose the audio up or down by a certain number of semitones.
- Automation: FL Studio allows you to automate various parameters of the MP3 file over time. This means you can control parameters such as volume, panning, and effects to create dynamic and evolving audio. Use the “Automation Clips” or the “Channel Settings” window to set up automation for the MP3 file.
These editing techniques give you the power to transform the MP3 file into something unique and customized for your project. Experiment with different combinations of techniques to achieve the desired result and let your creativity run wild.
Once you are satisfied with the edits made to the MP3 file, it’s essential to save your project to preserve your hard work. In the next step, we’ll explore how to save the project in FL Studio.
Step 6: Saving the Project
After you’ve imported, adjusted, and edited the MP3 file in FL Studio, it’s important to save your project to ensure that your progress is preserved. Here’s how you can save your project:
- Go to the File Menu: In the top menu bar of FL Studio, click on the “File” menu.
- Select “Save As” or “Save Project As”: From the dropdown menu, choose either “Save As” or “Save Project As” option. The exact wording may vary depending on the version of FL Studio you’re using.
- Choose a File Name and Location: A dialog box will appear, allowing you to choose a name and location for your project file. It’s a good practice to give your project a descriptive name that reflects its content. Select a folder where you want to save your project, and click “Save”.
By saving your project, you ensure that all the changes, edits, and adjustments you’ve made to the MP3 file and the overall project are retained. This allows you to reopen the project at a later time and continue working on it, or share it with others for collaboration or feedback.
It’s also recommended to save your project periodically as you work on it, to prevent any potential loss of data in case of unexpected issues or computer crashes. You can use the “Save” or “Save As” option in the File menu at any time to save your progress.
Additionally, FL Studio offers options for exporting your project as an audio file, such as WAV, MP3, or other formats. This allows you to create a final mixdown of your project for distribution or further processing. You can explore these options by going to the “File” menu and selecting “Export” or “Export as Audio”.
With your project saved, you can now confidently continue working on it or share it with others to showcase your creativity and musical talent.
Congratulations! You’ve successfully added an MP3 file to FL Studio, adjusted its settings, and edited it to fit your project’s needs. By following the steps outlined in this article, you can unleash your creativity and make the most of FL Studio’s powerful features to create incredible music compositions.
Remember to regularly save your projects and explore different editing techniques to continue refining your skills and creating amazing music. Enjoy the journey of music production and have fun exploring the possibilities with FL Studio!
Thank you for using FL Studio and happy music-making!
Conclusion
Adding MP3 files to FL Studio opens up a world of possibilities for music producers and enthusiasts. With the ability to import, adjust, and edit MP3 files, you have the opportunity to incorporate existing audio elements into your projects, create unique compositions, and unleash your creativity.
In this article, we’ve guided you through the process of adding an MP3 file to FL Studio, covering steps such as getting started, opening FL Studio, importing the MP3 file, adjusting the settings, editing the audio, and finally saving your project. By following these steps, you can seamlessly integrate MP3 files into your projects and create high-quality music tracks.
Throughout the process, FL Studio provides you with a range of powerful tools and features to manipulate and enhance the MP3 file. From trimming and looping to time-stretching and applying effects, you can shape the sound to match your creative vision. The ability to automate parameters and customize the audio further expands your possibilities for creating dynamic and captivating compositions.
Remember, as you explore FL Studio and become more familiar with its capabilities, the only limit to what you can achieve is your imagination. Don’t be afraid to experiment, try new techniques, and let your creativity flow.
Lastly, we emphasize the importance of saving your projects regularly to ensure your hard work is protected. By saving your projects, you can easily revisit them, make adjustments, collaborate with others, or share your music with the world.
Now that you have mastered the process of adding MP3 files to FL Studio, it’s time to dive in and create your own unique musical compositions. Whether you’re a beginner or an experienced producer, FL Studio offers endless possibilities for bringing your musical ideas to life.
Enjoy the journey of music production and embrace the magic of FL Studio. Happy creating!