Home>Production & Technology>MP3>How To Add MP3 To Lmms
MP3
How To Add MP3 To Lmms
Modified: March 5, 2024
Learn how to easily add MP3 files to LMMS and enhance your music production. Step-by-step guide for integrating MP3 format seamlessly into your LMMS workflow.
(Many of the links in this article redirect to a specific reviewed product. Your purchase of these products through affiliate links helps to generate commission for AudioLover.com, at no extra cost. Learn more)
Table of Contents
Introduction
Adding MP3 files to your LMMS (Linux MultiMedia Studio) project can greatly enhance your music production capabilities, allowing you to incorporate high-quality audio tracks into your compositions. Whether you’re a seasoned music producer or just starting out, integrating MP3 files can add depth, texture, and variety to your music.
LMMS is a popular open-source digital audio workstation that offers a wide range of features for creating music. By importing MP3 files, you can access a vast library of sounds, vocals, instruments, and effects to experiment with, enabling you to create unique and professional-sounding tracks.
In this article, we will guide you through the process of adding MP3 files to LMMS effectively. We will explore the steps necessary to import an MP3 file, adjust the settings, arrange the track in your project, edit it to fit your composition, and finally export the finished project.
So, whether you have a specific MP3 track in mind or are looking to explore new sound possibilities, let’s dive into the world of MP3 integration in LMMS and unleash your creativity.
Step 1: Open LMMS
The first step in adding an MP3 file to your LMMS project is to open the LMMS software on your computer. If you haven’t installed LMMS yet, you can download it from the official website and follow the installation instructions for your operating system.
Once LMMS is installed, launch the program by locating the LMMS icon either on your desktop or in your applications folder. Click on the icon to start LMMS.
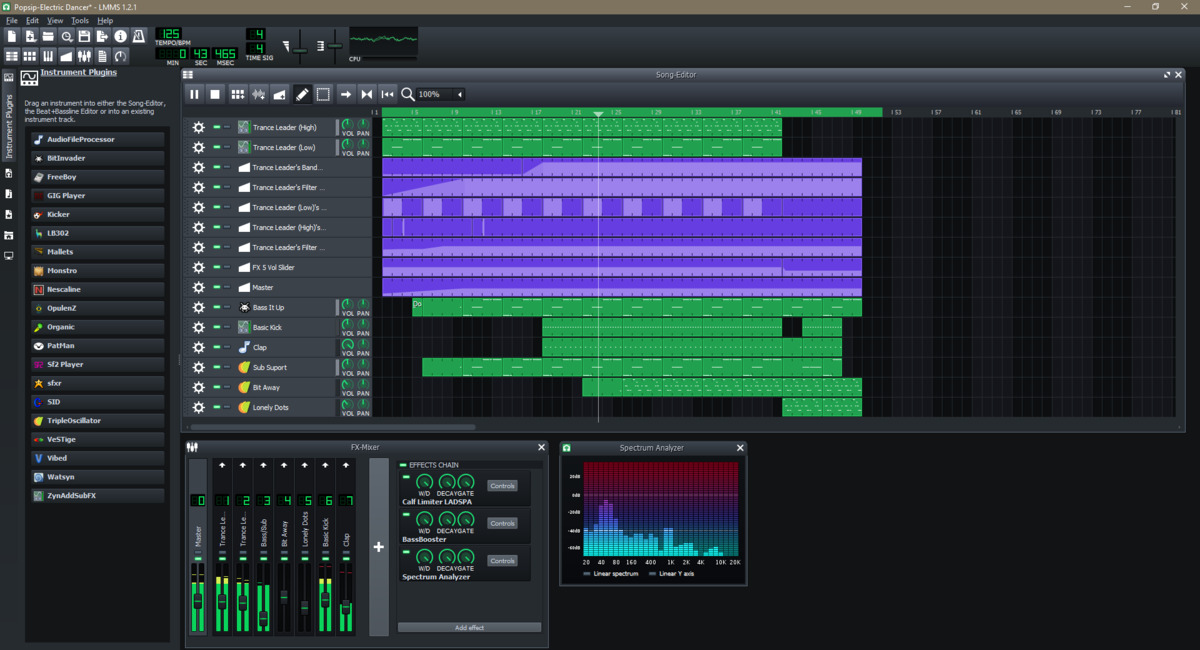
LMMS has a user-friendly interface that allows you to navigate through the different sections and features easily. Take a moment to familiarize yourself with the layout of the software, including the timeline, piano roll, sample browser, and mixer.
Starting a new project in LMMS is simple. You can either create a new project from scratch or open an existing one if you have previously saved your work. To create a new project, click on the “File” tab at the top left of the screen and select “New Project.”
Once you have opened LMMS and created your project, you are ready to import your MP3 file and begin integrating it into your composition.
Now that you have LMMS up and running, let’s move on to the next step: importing your MP3 file.
Step 2: Import MP3 File
Now that you have opened LMMS and created your project, it’s time to import your desired MP3 file. Importing the MP3 file will allow you to use it as a sound source in your project.
- Start by clicking on the “File” tab at the top left of the LMMS interface.
- Select the “Import” option from the dropdown menu.
- Navigate to the location on your computer where the MP3 file is saved.
- Select the desired MP3 file and click “Open” to import it into LMMS.
LMMS will now load the MP3 file into the sample browser, where you can view and select it for further use in your project.
Once the MP3 file is imported into LMMS, it’s important to note that the file doesn’t become embedded within the project. Instead, LMMS creates a reference to the file’s location on your computer. Therefore, it is essential to keep the MP3 file in its original location if you plan to open and work on the project again in the future.
Great! You have successfully imported the MP3 file into LMMS. Now, let’s move on to the next step: adjusting the settings for the MP3 track.
Step 3: Adjust Settings
After importing the MP3 file into LMMS, it’s time to adjust the settings to ensure that the track fits seamlessly into your project. This step involves tweaking various parameters to achieve the desired sound and blend with your composition.
To adjust the settings of the imported MP3 track, follow these steps:
- Locate the imported MP3 file in the sample browser.
- Drag and drop the MP3 file onto the timeline or the desired instrument track in the song editor.
- Click on the instrument track containing the MP3 file to access its settings in the instrument plugins section.
- Adjust the volume, panning, and other effects parameters using the controls provided in the instrument plugins section.
- Experiment with different effects and settings to create the desired sound and integration with your composition. You can apply plugins like reverb, delay, or equalization to enhance the MP3 track further.
- Listen to the track and make any necessary adjustments until you are satisfied with how it blends with the rest of your project.
Remember, each project and MP3 track may require different adjustments based on the desired outcome. Take your time to explore the various settings and effects available in LMMS to achieve the desired sound and balance.
After you have adjusted the settings to your liking, it’s time to move on to the next step: arranging the MP3 track within your project.
Step 4: Arrange MP3 Track
Once you have adjusted the settings of the MP3 track, it’s time to arrange it within your LMMS project. This step involves positioning the MP3 track in the timeline and structuring it in a way that complements the rest of your composition.
To arrange the MP3 track in LMMS, follow these steps:
- Navigate to the timeline where you want to position the MP3 track.
- Click and drag the MP3 track from the instrument track or sample browser onto the desired location in the timeline.
- Resize the MP3 track in the timeline to suit the duration you want it to play within your composition.
- Repeat the process for additional MP3 tracks if you want to incorporate multiple tracks into your project.
- Once the MP3 track is placed in the timeline, you can further adjust its position, trim it, or move it around to create the desired arrangement.
Remember to consider the flow and structure of your composition when arranging the MP3 track. You may want to create an intro, verse, chorus, or bridge sections and position the MP3 track accordingly.
Additionally, you can experiment with layering the MP3 track with other instruments in your project or create variations by duplicating and editing the MP3 track in different sections of your composition.
Take your time to refine and fine-tune the arrangement of the MP3 track to ensure it meshes seamlessly with the rest of your project. Once you’re satisfied with the arrangement, it’s time to move on to the next step: editing the MP3 track to fit your composition.
Step 5: Edit MP3 Track
Editing the MP3 track is an essential step to ensure that it fits perfectly within your LMMS composition. This step involves making adjustments to the MP3 track’s timing, pitch, and other elements to achieve the desired sound and synchronization.
To edit the MP3 track in LMMS, follow these steps:
- Click on the MP3 track within the timeline to select it.
- Use the piano roll or the MIDI editor to make precise adjustments to the timing and pitch of the MP3 track.
- Experiment with different editing techniques like slicing, quantization, or stretching to modify the characteristics of the MP3 track.
- Apply additional effects and plugins to further modify the sound of the MP3 track.
- Listen to the edited MP3 track within the context of your composition to ensure that it flows smoothly and enhances the overall sound.
- If necessary, repeat the editing process for any other MP3 tracks within your project.
Editing the MP3 track gives you flexibility and creative control over how it sounds within your composition. You can adjust the timing to create specific rhythmic patterns, transpose the pitch to fit the key of your composition, or apply effects to create unique textures.
Remember to regularly save your project as you make edits to the MP3 track to avoid losing any changes. It’s also a good idea to experiment and try different editing techniques to see how they transform the sound of the MP3 track and contribute to your project’s overall vibe.
Once you have edited the MP3 track to your satisfaction, it’s time to move on to the final step: exporting the finished project.
Step 6: Export the Project
After putting in all the hard work of adding, adjusting, arranging, and editing the MP3 track in LMMS, it’s time to export your project into a final audio file that can be shared, distributed, or further processed.
To export your LMMS project, follow these steps:
- Make sure you have saved your project so that all recent changes are reflected.
- Click on the “File” tab at the top left of the LMMS interface.
- Select the “Export” option from the dropdown menu.
- Choose the desired audio file format for exporting, such as MP3, WAV, or FLAC.
- Specify the output location and filename for the exported audio file.
- Configure any additional settings, such as audio quality, bit rate, or sample rate, if applicable.
- Click “Export” to start the exporting process.
LMMS will now render and export your project as an audio file in the selected format. The duration of the export process will depend on the complexity and length of your project.
Once the export is complete, you can locate the exported audio file in the specified output location. You now have a standalone audio file of your LMMS project, ready to be shared, uploaded, burned to a CD, or further processed in other audio software.
Congratulations! You have successfully exported your LMMS project with the integrated MP3 track. Take a moment to listen to the exported audio file and ensure that it sounds as intended before sharing or using it in other projects.
Remember to save your LMMS project file separately if you want to make any future changes or modifications. This will allow you to retain all the individual tracks and settings within LMMS for future editing or remixing.
Now that you have exported your finished project, you can share your music with the world or continue exploring the possibilities of LMMS and MP3 integration in future projects.
Conclusion
Adding MP3 files to your LMMS projects can significantly enhance your music production capabilities, allowing you to incorporate high-quality audio tracks into your compositions. By following the steps outlined in this guide, you can seamlessly integrate MP3 files into LMMS and unlock a world of creative possibilities.
We started by opening LMMS and familiarizing ourselves with its interface. We then moved on to importing the desired MP3 file, adjusting the settings to achieve the desired sound, arranging the track within the timeline, editing it to fit the composition, and finally exporting the finished project.
Throughout the process, we emphasized the importance of experimentation and fine-tuning to create a cohesive and professional-sounding final product. LMMS provides a range of tools and effects to help you manipulate and shape the MP3 tracks to your liking.
Remember, each project is unique, and the process may vary depending on your specific goals and preferences. Take the time to explore and experiment with different aspects of LMMS, such as layering multiple MP3 tracks, applying effects, and utilizing the various editing options available to you.
By integrating MP3 files into your LMMS projects, you can elevate your compositions to new heights, adding depth, texture, and variety to your music. Whether you’re a seasoned music producer or just starting out, the ability to incorporate MP3 tracks opens up a world of creative opportunities.
So, dive into the world of MP3 integration in LMMS and let your imagination run wild. Unleash your creativity and see how the addition of MP3 files can transform your musical creations.
Start by gathering your favorite MP3 tracks and experiment with integrating them into your LMMS projects. With practice, you’ll become more adept at seamlessly blending MP3 tracks with original compositions, resulting in unique and captivating musical experiences.
Enjoy the process, trust your instincts, and have fun creating music that speaks to you and resonates with your audience. Happy music-making!