Home>Production & Technology>Music Video>How To Edit Music Video
Music Video
How To Edit Music Video
Modified: February 20, 2024
Learn how to edit music videos and create stunning visuals with our step-by-step guide. Enhance your skills and make your music videos stand out with our expert tips and techniques.
(Many of the links in this article redirect to a specific reviewed product. Your purchase of these products through affiliate links helps to generate commission for AudioLover.com, at no extra cost. Learn more)
Table of Contents
- Introduction
- Equipment Needed for Editing
- Importing and Organizing Footage
- Cutting and Arranging Clips
- Adding Transitions and Effects
- Adjusting Audio Levels
- Adding Text and Graphics
- Incorporating Special Visual Effects
- Color Correction and Grading
- Syncing with Music or Sound Effects
- Exporting and Rendering the Final Video
- Conclusion
Introduction
Music videos have become a powerful and popular medium for artists to express themselves creatively and engage with their audiences. With the rise of digital technology, editing music videos has become more accessible to aspiring filmmakers and musicians. Whether you are a professional videographer or a musician looking to create your own music video, understanding the process of editing can significantly enhance the visual impact of your work.
In this article, we will explore the essential steps and techniques involved in editing music videos. From importing and organizing footage to adding effects and adjusting audio levels, we will cover everything you need to know to create visually stunning and captivating music videos.
Before diving into the nitty-gritty of editing, it is important to note that the success of a music video relies heavily on the synergy between music and visuals. The editing process should enhance and complement the audio, creating a seamless and immersive experience for the viewers.
Whether you are shooting your own footage or working with pre-recorded material, understanding the song’s rhythm, energy, and emotional content is crucial. This understanding will inform your editing decisions and ensure that the visuals align with the music’s mood and message.
Furthermore, it is essential to have a clear vision and concept for your music video before you start editing. This will help guide your creative choices and ensure a cohesive and impactful end product. Whether your vision is narrative-driven, performance-based, or experimental, having a well-defined concept will make the editing process smoother and more focused.
Now that we understand the importance of music-video editing, let’s dive into the necessary equipment and tools needed to get started.
Equipment Needed for Editing
Editing music videos requires certain equipment to ensure a smooth and efficient workflow. Here are the essential tools you will need:
- Computer: A reliable and powerful computer is the cornerstone of video editing. Look for a machine with a fast processor, ample RAM, and a dedicated graphics card to handle the demands of video editing software.
- Editing Software: There are various editing software options available, ranging from professional-grade programs like Adobe Premiere Pro and Final Cut Pro to more beginner-friendly options like iMovie and Filmora. Choose a software that suits your skill level and budget.
- Hard Drive: Since music videos generate a large amount of video and audio data, having sufficient storage space is crucial. Invest in an external hard drive or a high-capacity internal hard drive to store your footage and project files.
- Monitor: A color-calibrated monitor is essential for accurate color grading and ensuring that your video looks the same on different devices. Consider investing in a professional-grade monitor with high resolution and color accuracy.
- Headphones/Speakers: Good-quality headphones or speakers are necessary to accurately monitor and adjust the audio levels in your music video. Choose a pair that provides a clear and balanced sound reproduction.
- Graphics Card: A powerful graphics card can greatly improve the performance of your video editing software, especially when working with high-resolution footage or complex visual effects. Look for a card with ample VRAM and CUDA cores.
- External Audio Interface: If you are working with professional audio equipment or recording your own sound, consider investing in an external audio interface. This will provide higher audio quality and better control over input and output levels.
- Peripherals: A keyboard, mouse, and graphics tablet are essential peripherals for efficient editing. Additionally, a control surface or MIDI controller can offer tactile control over audio mixing and effect parameters.
While having high-quality equipment can enhance your editing experience, it is important to remember that the skill and creativity of the editor are the most critical factors in creating an engaging music video. Focus on developing your editing skills and understanding the principles of visual storytelling.
Now that we have covered the equipment needed for editing, let’s move on to the next step: importing and organizing your footage.
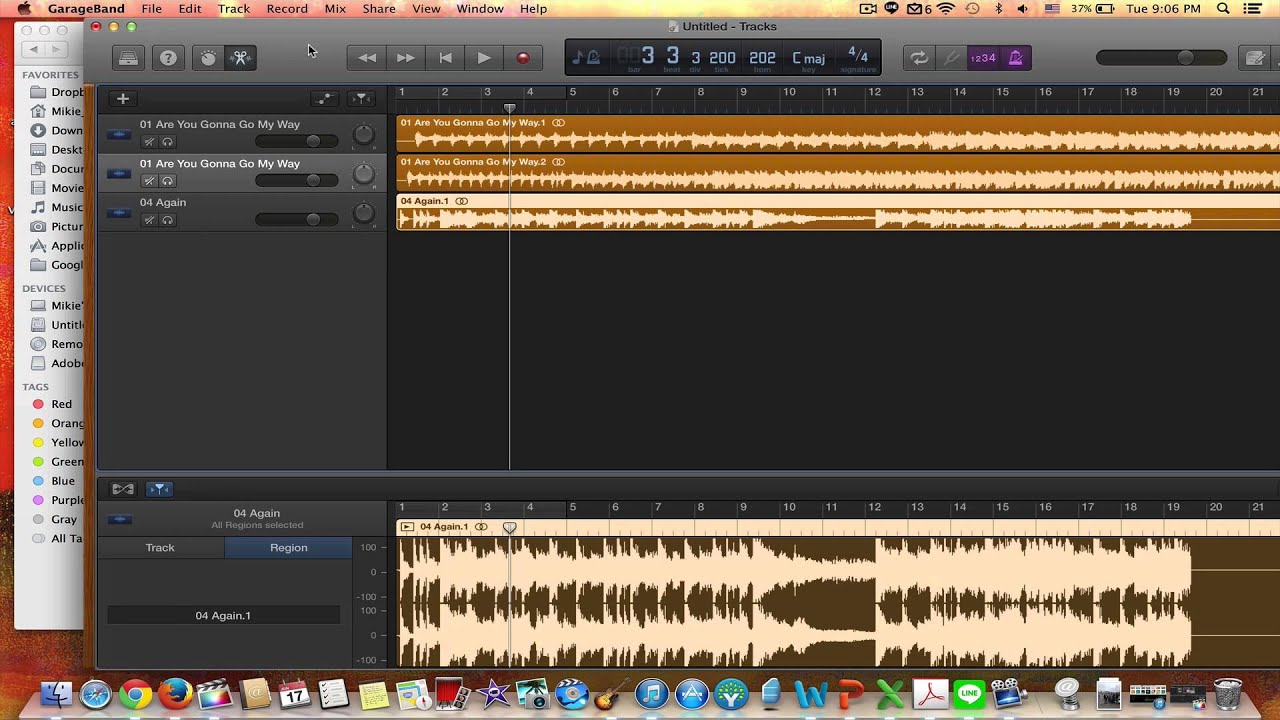
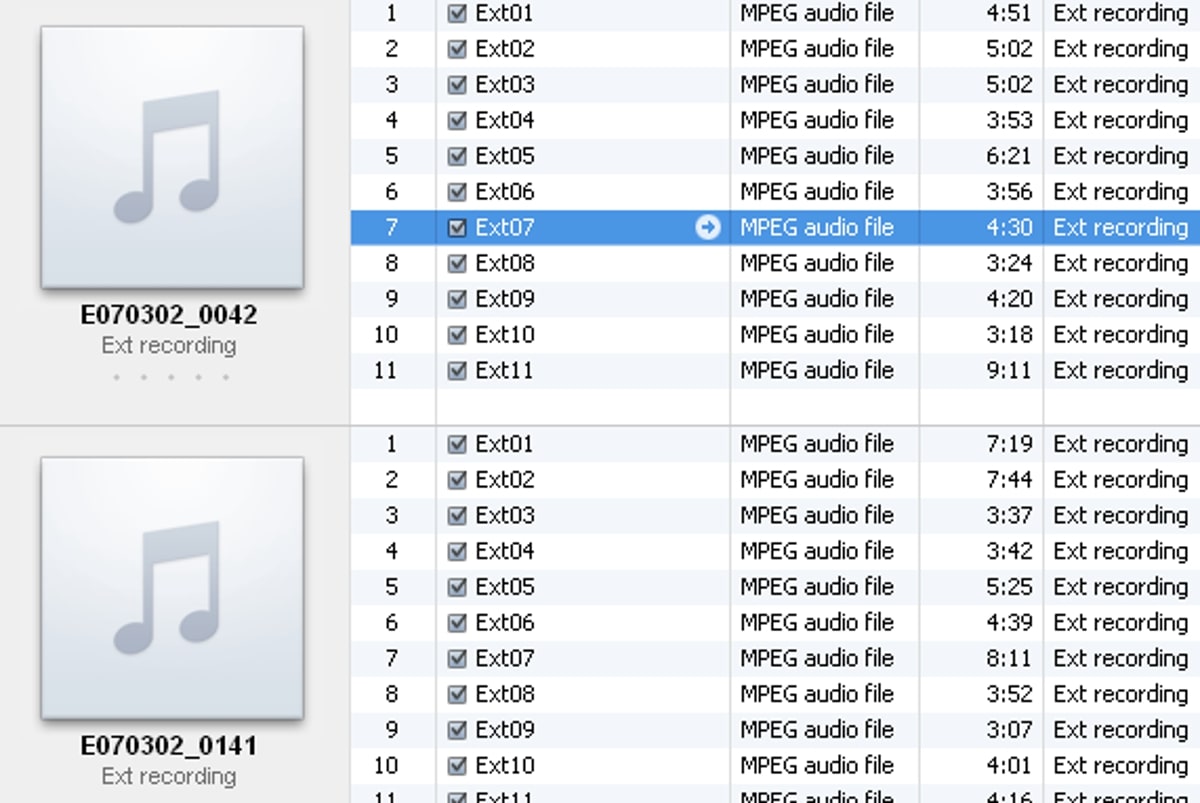
Importing and Organizing Footage
Before you can start editing your music video, you need to import and organize the footage you will be working with. Properly organizing your files will save you time and make the editing process more streamlined. Here’s how you can do it:
- Transferring Footage: If you shot the footage yourself, transfer it from your camera or memory card to your computer. If you’re using pre-recorded footage, make sure it is already accessible on your computer.
- Create a New Project: Open your editing software and create a new project. Name it appropriately and set the project settings (resolution, frame rate, etc.) to match your footage.
- Import Footage: In your editing software, import the footage you will be using in your music video. Organize it into folders or bins based on categories, such as scenes or locations.
- Preview and Select: Once your footage is imported, preview each clip to get a sense of its content and quality. Identify the best takes or moments and mark them as favorites or add them to a “selects” folder.
- Organize on the Timeline: To start organizing your footage on the timeline, create a sequence or timeline where you will be assembling your music video. Drag and drop the selected clips in the desired order to start forming the structure of your video.
- Label and Categorize: As you continue working on your music video, label and categorize the clips on the timeline to make it easier to navigate. Use color-coding or markers to identify different sections or types of shots.
- Additional Organization: Depending on the complexity of your music video, you may need to subdivide your timeline into different sections or create separate timelines for different sequences or effects.
- Backup Your Files: To ensure the safety of your project, regularly save and backup your files. Consider using cloud storage or external hard drives for additional backup options.
By organizing your footage effectively, you will have a clear overview of what you have available and save time searching for specific clips during the editing process. It will also help you maintain a coherent story and flow in your music video.
Now that your footage is imported and organized, it’s time to move on to the next step: cutting and arranging your clips to create the structure of your music video.
Cutting and Arranging Clips
Once you have your footage imported and organized, it’s time to start cutting and arranging clips to create the structure of your music video. This step involves selecting the best moments from your footage and arranging them in a way that matches the rhythm and message of the song. Here’s how you can do it:
- Watch and Analyze: Start by watching your footage and familiarizing yourself with the content. Take note of the different scenes, angles, and moments that stand out to you. Consider the pacing, energy, and mood of the song as you analyze the footage.
- Highlight Key Moments: Identify the key moments in the song that will be the focal points of your music video. These could be the chorus, specific lyrics, or instrumental breaks. Mark these moments as you watch the footage.
- Cut and Trim: Using your editing software, start cutting and trimming the footage to remove any unnecessary or weak moments. Focus on creating a dynamic and engaging visual flow that is in sync with the music.
- Establish the Structure: Determine the overall structure of your music video, such as intro, verse, chorus, bridge, and outro. Place the highlight moments you identified within this structure to guide the viewer’s attention and create a cohesive narrative.
- Experiment with Transitions: Add transitions between each section or scene to create smooth and seamless transitions. Experiment with different types of transitions, such as cuts, fades, or wipes, to enhance the visual flow and convey a specific mood.
- Consider Visual Effects: Depending on the style and concept of your music video, you may want to incorporate visual effects to enhance certain moments or create a particular aesthetic. Experiment with effects like color grading, overlays, or text animations to add visual interest.
- Refine and Fine-Tune: Continuously review and refine the edit of your music video. Pay attention to pacing, timing, and the overall coherence of the video. Make adjustments as needed to ensure a polished and professional result.
Remember, the goal of cutting and arranging clips is to create a visually engaging and cohesive music video that complements the audio. Experiment with different arrangements, transitions, and effects to find the best combination that brings your vision to life.
With your clips cut and arranged, it’s time to move on to the next step: adding transitions and effects to further enhance the visual impact of your music video.
Adding Transitions and Effects
Adding transitions and effects is a crucial step in enhancing the visual impact of your music video. Transitions help smooth the cuts between clips and create a seamless flow, while effects can add artistic flair and enhance the overall aesthetic. Here are some tips for adding transitions and effects:
- Choose Appropriate Transitions: Select transitions that complement the mood and style of your music video. Common transitions include fades, dissolves, wipes, and cuts. Experiment with different options to find the ones that best fit your video.
- Apply Transitions Strategically: Place transitions between clips to create a smooth and visually pleasing flow. Use them to mark the beginning or end of a section, or to emphasize an important moment or change in the music.
- Use Effects Sparingly: While effects can add visual interest, it’s important not to overdo it. Use effects sparingly and purposefully to enhance specific moments or emphasize certain visuals. This will prevent your video from becoming distracting or overwhelming.
- Experiment with Color Grading: Color grading can dramatically alter the mood and tone of your music video. Experiment with different color presets or manually adjust the color balance, saturation, and contrast to create the desired look and feel.
- Consider Text and Graphics: Adding text and graphics can provide additional context, lyrics, or branding to your music video. Use text animations and graphic overlays to make them visually appealing and seamlessly blend them into the video.
- Apply Visual Effects: Depending on the style and concept of your music video, you may want to incorporate visual effects to enhance certain moments or create a specific atmosphere. These effects can include overlays, glitches, or light leaks, among others.
- Preview and Fine-Tune: Continuously review and preview your video with the added transitions and effects. Make adjustments as needed to ensure they enhance the storytelling and visual impact without overwhelming the viewer.
Adding transitions and effects allows you to craft a visually stunning and captivating music video. Remember to use them strategically and purposefully to enhance the overall experience and convey the desired mood.
With the transitions and effects applied, it’s time to move on to the next step: adjusting the audio levels to ensure that the music and other audio elements are well-balanced and enhance the overall viewing experience.
Adjusting Audio Levels
Adjusting the audio levels in your music video is a crucial step to ensure that the music, dialogue, and other audio elements are well-balanced and enhance the overall viewing experience. Here are some tips for adjusting audio levels:
- Review Audio Levels: Start by reviewing the audio levels of your footage. Listen to each clip and ensure that the audio is clear and free from any unwanted background noise or distortion.
- Normalize Audio: Use audio normalization to bring the volume levels of different clips to a consistent level. This will prevent sudden jumps or drops in volume and create a smoother listening experience.
- Lower Background Music During Dialogue: If there are dialogue or voice-over segments in your music video, lower the volume of the background music to ensure clarity and make the dialogue more prominent.
- Adjust Music Levels: Pay attention to the music levels throughout the video. Ensure that the music is impactful and appropriately matches the energy and mood of the visuals. Increase or decrease the volume as necessary to create the desired impact.
- Balance Sound Effects: If you have added sound effects to enhance certain moments, ensure that they are balanced with the music and other audio elements. Adjust their volume levels so that they add interest without overpowering the overall audio mix.
- Utilize Audio Keyframes: Use audio keyframes in your editing software to have precise control over volume adjustments. This allows you to smoothly fade in or fade out elements, create dynamic audio transitions, and emphasize specific moments.
- Monitor and Test: Continuously monitor and test your audio levels throughout the editing process. Listen to your music video on different devices and with various headphones or speakers to ensure the audio translates well across different platforms.
Adjusting the audio levels is essential for creating a well-balanced and immersive viewing experience in your music video. It ensures that the music, dialogue, and other audio elements work together harmoniously to enhance the overall impact of your video.
With the audio levels adjusted, it’s time to move on to the next step: adding text and graphics to provide additional context or visual interest in your music video.
Adding Text and Graphics
Adding text and graphics to your music video can provide additional context, convey messages, and enhance the visual interest of your video. Here are some tips for effectively incorporating text and graphics:
- Identify Opportunities: Assess your music video and identify moments where text or graphics can enhance the storytelling or convey important information. These may include displaying lyrics, showcasing key names or locations, or adding captions or subtitles.
- Choose Appropriate Fonts: Select fonts that align with the style and mood of your music video. Consider using legible fonts that are easy to read, even at smaller sizes, to ensure that the text remains clear and accessible to viewers.
- Create Animations and Effects: Utilize animation features in your editing software to add movement and visual interest to your text and graphics. This might include animating text to appear or disappear, creating dynamic transitions, or adding effects like fades or drops.
- Design Graphic Overlays: If you want to incorporate graphics or visual elements that go beyond text, design custom graphic overlays. These could include logos, symbols, or images that align with the theme or concept of your music video.
- Time Text and Graphics to the Beat: Sync your text and graphics with the rhythm of the music to create a more engaging experience. Match the timing of the appearance and disappearance of text or graphics with the timing of musical beats or key moments.
- Consider Placement: Experiment with different placements for your text and graphics. This could include positioning them in the center, along the bottom, or overlaying them on specific parts of the video. Ensure that the placements do not obstruct important visuals or distract from the main focus.
- Use Transparency and Blending: Adjust the transparency and blending modes of your text and graphic overlays to integrate them seamlessly with the footage. This creates a more cohesive and visually appealing look.
- Preview and Fine-Tune: Continuously review and preview your music video with the added text and graphics. Make adjustments as needed to ensure they enhance the storytelling and visual impact without overpowering the overall video.
Adding text and graphics can elevate the storytelling and visual appeal of your music video. It provides an opportunity to engage viewers, convey messages, and create a more immersive experience.
With the text and graphics incorporated, it’s time to move on to the next step: incorporating special visual effects to enhance certain moments in your music video.
Incorporating Special Visual Effects
Using special visual effects in your music video can add a touch of creativity, enhance specific moments, and create a visually captivating experience. Here are some tips for effectively incorporating special visual effects:
- Identify Key Moments: Analyze your music video and identify moments where special effects can enhance the storytelling or create impact. These could be moments of high energy, emotional intensity, or visual transitions.
- Experiment with Visual Filters: Use visual filters or presets to alter the visual tone and atmosphere of selected clips. Explore options like sepia, black and white, or vintage filters to achieve a desired effect.
- Add Overlays or VFX: Incorporate overlays or visual effects (VFX) to create dynamic elements that enhance or augment the footage. This could include adding particle effects, lens flares, light leaks, or motion graphics.
- Create Unique Transitions: Experiment with unique transition effects between different clips or sections. This might involve using wipe transitions, glitch effects, or split-screen techniques to create eye-catching visual transitions.
- Utilize Green Screen: If you have access to a green screen, incorporate it to composite footage and create unique visual effects. You can replace the green background with images or videos, allowing for endless creative possibilities.
- Experiment with Time Manipulation: Explore time manipulation effects like slow motion or time-lapse to add visual interest and create a sense of drama or impact to specific scenes.
- Blend Visuals and Music: Sync certain visual effects with the music to create a more immersive and synchronized experience. Match the timing of the effects to the beats or rhythm of the music for added impact.
- Avoid Overusing Effects: While special visual effects can be exciting, it’s important to exercise moderation. Avoid overusing effects that may distract or overshadow the overall video. Use them selectively and purposefully to maintain a balanced visual impact.
- Preview and Fine-Tune: Continuously review and preview your music video with the incorporated special visual effects. Make adjustments as needed to ensure they enhance the storytelling and visual impact without overpowering or detracting from the overall video.
Incorporating special visual effects can elevate your music video, adding layers of creativity and enhancing specific moments. Careful consideration and experimentation is key to finding the right effects that align with the mood and message of your video.
With the special visual effects incorporated, it’s time to move on to the next step: color correction and grading to enhance the overall look and mood of your music video.
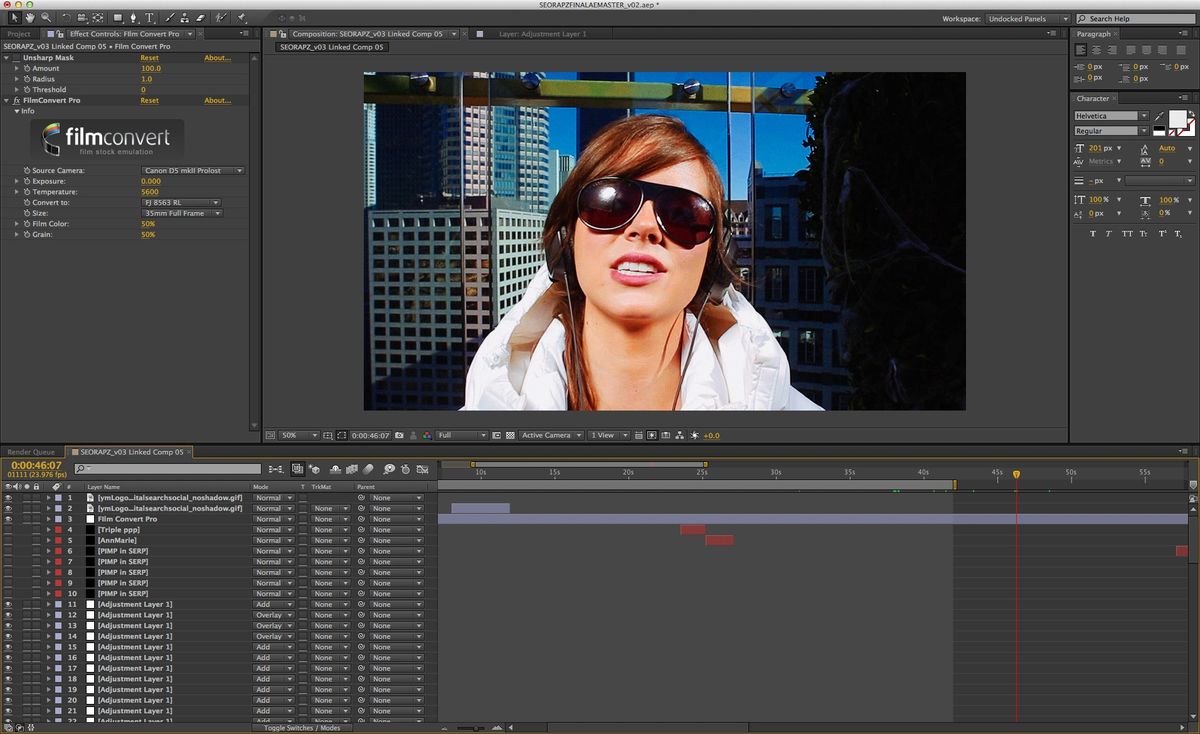
Color Correction and Grading
Color correction and grading are essential steps in the post-production process that can greatly enhance the overall look and mood of your music video. These techniques involve adjusting the colors, contrast, and overall visual tone to achieve a desired aesthetic. Here’s how you can approach color correction and grading:
- Assess Your Footage: Start by analyzing the color and quality of your footage. Identify any inconsistencies, color casts, or exposure issues that need to be addressed.
- Adjust White Balance: Set the appropriate white balance to ensure accurate color representation. This involves neutralizing any unwanted color tints by adjusting the temperature and tint of the footage.
- Correct Exposure: Adjust the exposure levels to balance the brightness and contrast of your footage. Brighten underexposed areas or darken overexposed areas to ensure optimal visibility.
- Enhance Contrast: Manipulate the contrast to make your visuals pop. Increase the difference between light and dark areas to create depth and drama, or decrease it for a softer and more muted look.
- Tweak Saturation and Vibrancy: Adjust the saturation and vibrancy of the colors to achieve a desired effect. Boost the saturation for a vibrant and bold look, or desaturate for a more muted and subtle aesthetic.
- Create a Color Palette: Develop a cohesive color palette that suits the mood and tone of your music video. Experiment with different hues, tones, and color combinations to achieve the desired emotional impact.
- Apply Color Grading: Utilize color grading techniques to enhance the overall look and feel of your video. This involves fine-tuning the colors, tones, and shadows to create a specific atmosphere or evoke a particular emotion.
- Experiment with Looks and Presets: Explore the use of color grading presets or apply custom looks to achieve a unique and cinematic visual style for your music video.
- Consider Selective Color Correction: Isolate specific colors or elements within your footage and make adjustments to enhance or emphasize them. This can be a creative way to draw attention to certain aspects of your video.
- Preview and Fine-Tune: Continuously review and preview your music video with the applied color correction and grading. Make adjustments as needed to ensure a consistent and visually pleasing result across the entire video.
Color correction and grading play a crucial role in establishing the mood, atmosphere, and visual coherence of your music video. They can enhance the emotions conveyed and create a more immersive viewing experience.
With the color correction and grading completed, it’s time to move on to the next step: syncing your music video with the music or sound effects to create a harmonious audio-visual experience.
Syncing with Music or Sound Effects
Synchronizing your music video with the music or sound effects is a crucial step to create a harmonious audio-visual experience. It involves timing the visual elements of your video to match the rhythm, beats, and emotions of the music or sound effects. Here are some tips for syncing your music video:
- Study the Music: Listen to the music or sound effects carefully and analyze its structure, rhythm, and emotional dynamics. Pay attention to the specific beats, transitions, and accents within the audio.
- Identify Key Moments: Determine the key moments in the music or sound effects where you want to emphasize visuals or create a particular impact. These could be moments when the music intensifies, the beat drops, or a significant change occurs.
- Match Cuts to Beats: Coordinate the cuts and transitions in your video with the beats of the music. Time the edits to coincide with the musical rhythm to create a visually engaging experience.
- Emphasize Lyrics or Instruments: If your music video features lyrics or specific instruments, sync the visuals to highlight them. Use visual cues or effects to emphasize the lyrics or showcase the instruments being played.
- Create Visual Transitions: Craft visual transitions that align with the musical transitions or accents. This could involve using wipes, flashes, or other effects that mesh well with the audio.
- Match Energy and Tempo: Adjust the pace and intensity of your visuals to align with the energy and tempo of the music. Increase the speed and visual movement during upbeat sections, and slow down or use more static shots during calmer moments.
- Add Sound Effects: Incorporate sound effects that complement the music or enhance specific visual moments. Ensure that the sound effects are synced precisely with the associated visuals for a seamless audio-visual experience.
- Fine-Tune Timing: Continuously review and refine the timing of your visuals with the music or sound effects. Make adjustments as necessary to maintain a precise synchronization and enhance the overall impact.
Syncing your music video with the music or sound effects brings cohesion and enhances the emotional impact of the visuals. When done effectively, it creates a powerful audio-visual experience that resonates with the viewers.
With your visuals synced to the music or sound effects, it’s time to move on to the final step: exporting and rendering the final video.
Exporting and Rendering the Final Video
After putting in all the hard work into editing, adding effects, and syncing your music video, it’s time to export and render the final video. This step involves converting your edited project into a suitable format for distribution and sharing. Here’s how you can export and render your final video:
- Review Your Edit: Before exporting, carefully review your music video from start to finish. Check for any errors, inconsistencies, or issues that need to be addressed.
- Choose the Right Format and Settings: Select an appropriate video format and resolution for your final export. Consider the platform or medium where your video will be shared. Common formats include MP4, MOV, and AVI.
- Adjust Video Settings: Set the video resolution, frame rate, and bitrate based on your intended output. Higher resolutions and frame rates offer better quality but may result in larger file sizes.
- Optimize for Online Sharing: If you plan to share your music video online, consider optimizing it for streaming platforms or social media. Some platforms have specific requirements for video resolution, aspect ratio, or file size.
- Export Audio Settings: Configure the audio settings for your exported video. Ensure that the audio format, sample rate, and bit depth match your desired output.
- Set the Output Location: Choose a destination folder where your final video will be saved. Consider a location with sufficient storage space and a clear organizational structure.
- Start the Export and Rendering Process: Initiate the export and rendering process in your editing software. Depending on the length and complexity of your video, this may take some time to complete.
- Save a Backup: Once the export is complete, make a backup of your final video file. This ensures that you have a copy in case of accidental loss or corruption.
- Test the Exported Video: Play the exported video file to ensure that it plays smoothly and looks as intended. Check for any audio-video sync issues or visual anomalies.
- Share and Distribute: After confirming the quality of your final video, it’s time to share and distribute it. Upload it to your desired platforms, such as video hosting sites, social media channels, or your own website.
Exporting and rendering the final video is the culmination of your music video editing process. It allows you to showcase your creative work and share it with your audience.
Congratulations! You have completed the journey of editing a music video. Now it’s time to promote your video, engage with your viewers, and continue exploring new ways to express your musical vision through the medium of music videos.
Conclusion
Congratulations on completing the process of editing a music video! Throughout this article, we have explored the essential steps and techniques involved in creating a visually stunning and engaging music video. From importing and organizing footage to adjusting audio levels, adding transitions and effects, and incorporating special visual effects, each step is crucial in crafting a compelling final product. Through proper color correction and grading, and syncing with music or sound effects, you can enhance the overall impact and emotional connection of your video.
Remember, as an artist, your creativity and storytelling abilities are essential in bringing your music video to life. It is important to have a clear vision, develop a concept, and make deliberate choices that align with the mood and message of your music. Pay attention to timing, pacing, and the dynamic interplay between the visuals and audio elements for a truly immersive experience.
Lastly, once you have completed the editing process and rendered the final video, don’t forget to share and promote your work. Utilize social media platforms, video hosting sites, and other distribution channels to reach your audience and connect with them on a deeper level.
Remember to continuously explore new techniques, experiment with different styles, and push the boundaries of creativity. Editing music videos is both a technical and artistic endeavor, and as you gain experience, your editing skills will continue to evolve.
Now that you have the comprehensive knowledge and understanding of editing music videos, it’s time to immerse yourself in the world of music video production. Embrace the possibilities, unleash your creativity, and create music videos that captivate and resonate with viewers.