Home>Production & Technology>Surround Sound>How To Install Surround Sound System
Surround Sound
How To Install Surround Sound System
Modified: February 18, 2024
Learn how to install a surround sound system in your home. Transform your audio experience with expert tips and step-by-step instructions.
(Many of the links in this article redirect to a specific reviewed product. Your purchase of these products through affiliate links helps to generate commission for AudioLover.com, at no extra cost. Learn more)
Table of Contents
Introduction
Welcome to the world of immersive audio experiences with surround sound systems! If you’re a movie and music enthusiast looking to elevate your home entertainment setup, a surround sound system is the perfect addition to your living room or media room. With surround sound, you’ll be able to enjoy a truly cinematic audio experience right in the comfort of your own home.
In this guide, we will walk you through the process of installing a surround sound system step by step. From selecting the right system to configuring and testing it, we’ll cover everything you need to know to create an immersive audio environment that will enhance your movie nights and music sessions.
Before we dive into the installation process, it’s important to mention that setting up a surround sound system requires a bit of planning and preparation. You’ll need to consider factors such as the size and layout of your room, the number and type of speakers you want to install, and how you’ll connect the system to your audio sources. By taking the time to carefully plan and execute the installation, you can ensure optimal audio performance and enjoyment.
So, if you’re ready to transform your entertainment experience and enjoy audio that surrounds you from every direction, let’s get started with the first step: choosing the right surround sound system.
Step 1: Choosing the Right Surround Sound System
When it comes to choosing a surround sound system, there are several factors to consider. The first step is to determine your budget and research the options available within that range. Surround sound systems can range from entry-level setups to more advanced configurations with additional features and speaker options.
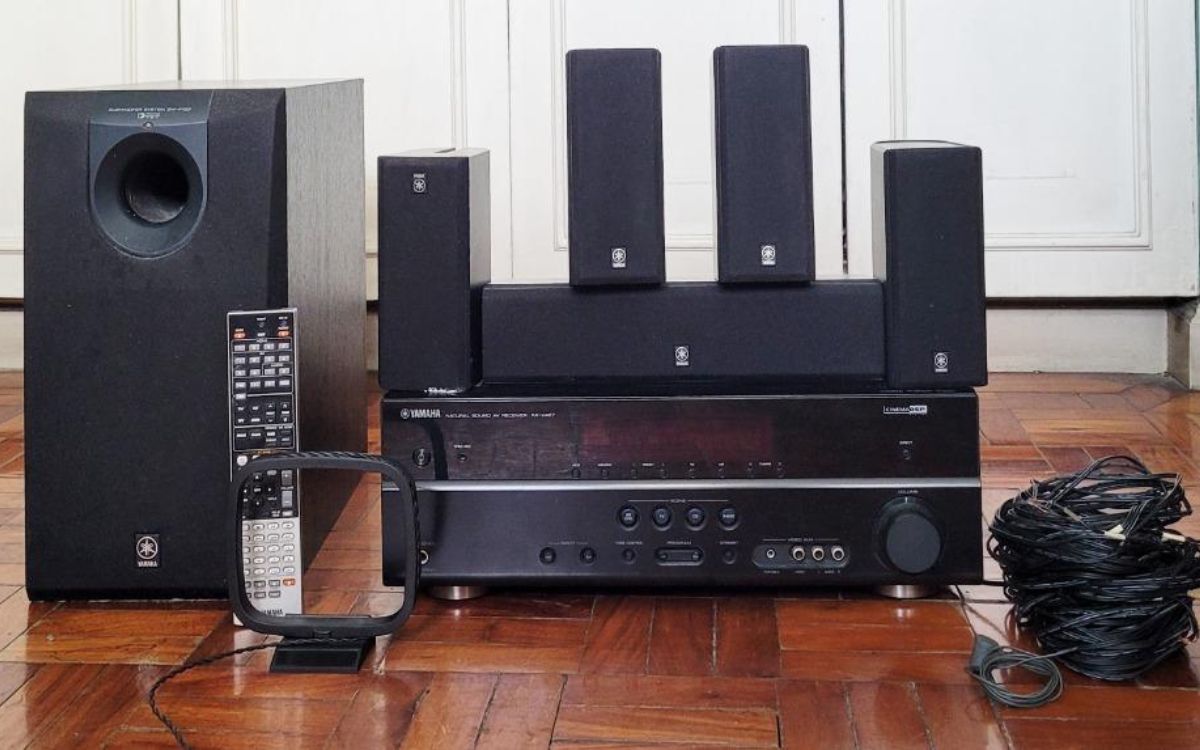
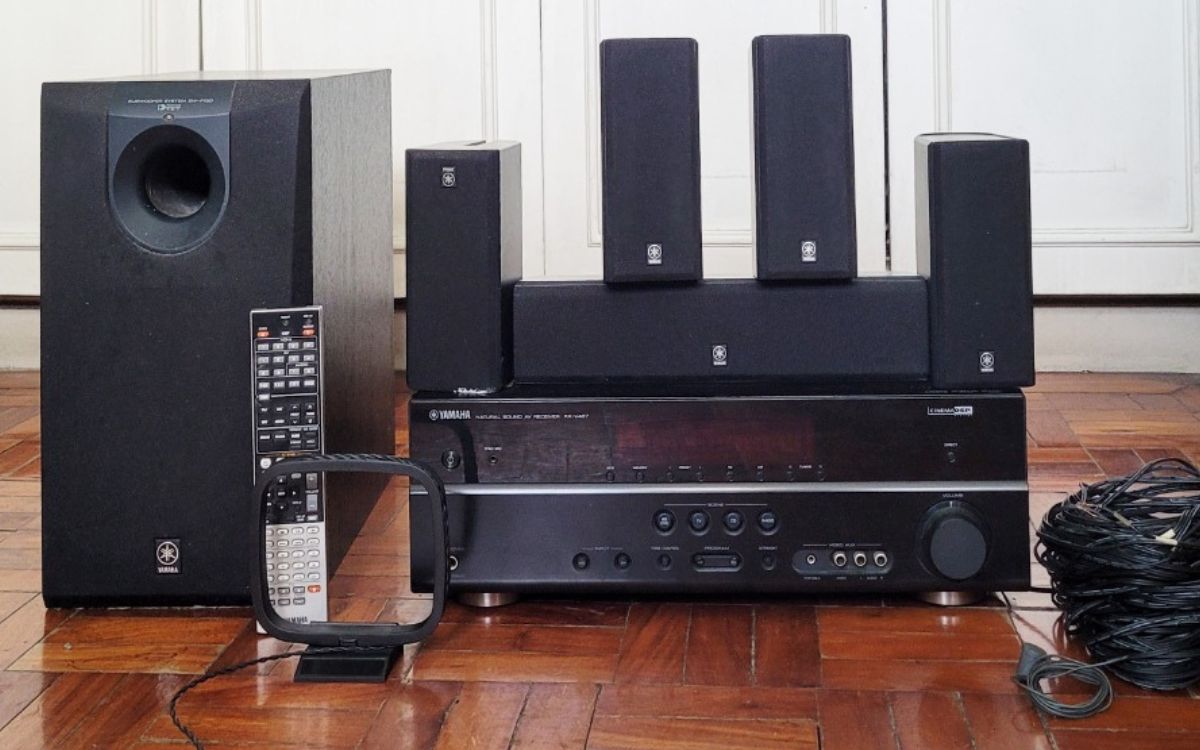
Next, consider the size and layout of your room. This will help you determine the number of speakers you’ll need and whether you should opt for a 5.1, 7.1, or even a 9.1 channel system. 5.1 systems consist of five speakers and a subwoofer, while 7.1 systems add two more surround speakers for enhanced audio immersion. 9.1 systems take it a step further with additional overhead speakers or speakers that simulate overhead sound. Choose a system configuration that suits your room size and personal preferences.
Pay attention to the power and audio quality of the system. Look for a surround sound system with an amplifier or receiver that can provide enough power to drive the speakers and deliver clear and crisp sound. It’s also important to consider the audio formats supported by the system, such as Dolby Atmos or DTS:X, to ensure compatibility with your media sources.
Additionally, consider the connectivity options of the surround sound system. Ensure that it has sufficient inputs and outputs to connect all your audio sources, such as your TV, gaming console, Blu-ray player, or media streaming devices. HDMI, optical, and RCA inputs are commonly found in surround sound systems and offer versatile connectivity options.
Lastly, read reviews and gather feedback from other users to get a better understanding of the performance and reliability of the surround sound system you’re considering. Look for systems that have received positive reviews for their audio quality, ease of setup, and overall user experience.
By taking the time to research and choose the right surround sound system for your needs, you’ll lay a solid foundation for an immersive audio experience that will enhance your movie nights and music listening sessions for years to come.
Step 2: Preparing the Room
Before you start installing your surround sound system, it’s important to prepare the room to optimize its audio performance. Here are a few steps to follow:
1. Clear the space: Remove any furniture, clutter, or obstacles that may obstruct or interfere with the placement of your speakers. This will help ensure that sound waves can travel freely without any obstructions.
2. Consider the room layout: Take note of the room’s layout and dimensions. Ideally, you want to position the main listening area (such as the couch or chairs) in the center of the room, equidistant from each speaker. This will help create a balanced and immersive audio experience.
3. Acoustic treatments: Consider incorporating acoustic treatments to enhance the sound quality in your room. Acoustic panels or foam can help reduce echoes or reverberations, resulting in clearer audio. Place these panels strategically on walls or in corners where sound reflections may be a concern.
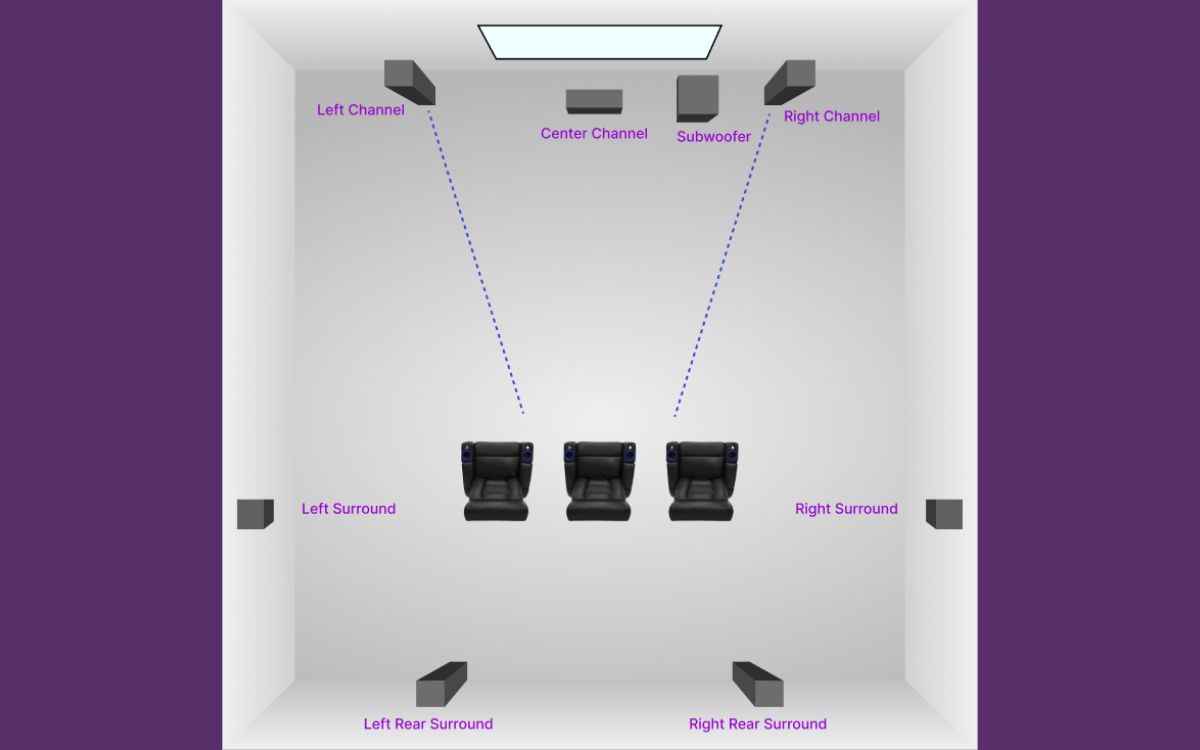
4. Speaker placement: Decide on the placement of your surround sound speakers based on the configuration you have chosen. For a 5.1 system, the front left, center, and right speakers should be positioned in front of the listening area, while the surround speakers should be placed to the sides or slightly behind. The subwoofer can be positioned anywhere in the room to evenly distribute bass frequencies.
5. Wiring considerations: Plan the routing of speaker wires and cables to ensure a clean and organized setup. Avoid running wires across walkways or areas where they may pose a tripping hazard. Utilize cable channels or wire clips to keep the wires tidy and hidden, if possible.
By taking the time to prepare the room for your surround sound system, you’ll ensure optimal audio performance and create an environment that immerses you in sound. With the room ready, you’re now ready to move on to the next step: mounting the speakers.
Step 3: Mounting the Speakers
Mounting the speakers correctly is crucial to achieving the best sound quality and surround effect. Here’s a step-by-step guide on how to mount your surround sound speakers:
1. Determine the speaker placement: Refer to the instructions provided with your surround sound system or consult a professional for recommended speaker placement. Ensure that the speakers are positioned at the appropriate heights and angles to optimize the audio experience.
2. Mark the mounting locations: Use a pencil or masking tape to mark the precise spots where you will mount the speakers. Take measurements and ensure that the speakers are evenly spaced and aligned with the listening area.
3. Check the wall material: Before drilling any holes, determine the type of wall material. If you have drywall, locate the wall studs using a stud finder. For brick or concrete walls, you may need specific tools and anchors designed for those surfaces.
4. Drill pilot holes: Using a drill bit slightly smaller than the size of the mounting screws, drill pilot holes at the marked locations. This will prevent the wall from cracking or splitting when you insert the mounting screws.
5. Attach the mounting brackets: Depending on the type of speakers you have, you may need to attach mounting brackets or brackets that came with the system. Follow the instructions provided to securely attach the brackets to the wall at the pilot hole locations.
6. Mount the speakers: Carefully place the speakers onto the mounting brackets and secure them using the screws or locking mechanisms provided. Ensure that the speakers are level and tightened properly to avoid any vibrations or movement during playback.
7. Conceal the wiring: Once the speakers are mounted, route the speaker wires through the wall or use wire covers to hide them. This will give your setup a clean and professional look. Be sure to leave enough slack in the wiring to easily connect the speakers to the receiver.
Remember to follow the manufacturer’s instructions when mounting your speakers to ensure proper installation and prevent any damage. Once all the speakers are mounted, you’re ready to move on to the next step: connecting the speakers to the receiver.
Step 4: Connecting the Speakers to the Receiver
Now that you have your speakers mounted in the desired locations, it’s time to connect them to the receiver. Follow these steps to ensure proper connectivity:
1. Identify the speaker wires: Each speaker wire consists of two separate strands, one with a positive (+) and the other with a negative (-) terminal. Make sure you can distinguish between the two.
2. Strip the speaker wire: Use wire cutters or strippers to remove a small section of insulation from the ends of each speaker wire. This will expose the bare wire that will be connected to the receiver.
3. Match the wires to the speakers: Look at the back of each speaker and locate the corresponding terminals labeled as positive (+) and negative (-). Connect the positive wire to the positive terminal and the negative wire to the negative terminal. Ensure a secure connection by tightening any screws or clips that hold the wires in place.
4. Connect the other end of the speaker wires to the receiver: Locate the speaker output terminals on the back of the receiver. Match the positive and negative wire colors with the corresponding terminals and insert them, making sure they are securely attached. Repeat this process for all the speakers you have mounted.
5. Double-check the connections: Once all the speakers are connected, double-check the speaker wire connections to ensure they are properly seated and secure. Any loose connections can cause audio distortion or poor sound quality.
6. Test the speaker connections: Before moving on to the next step, it’s a good idea to test the speaker connections. Play a test tone or some audio content to ensure that sound is coming from each speaker in the correct direction. If you encounter any issues, recheck the speaker wire connections or consult the user manual for troubleshooting guidance.
With the speakers properly connected to the receiver, you’re one step closer to enjoying a full surround sound experience. Now, let’s move on to the next step: connecting the receiver to the TV.
Step 5: Connecting the Receiver to the TV
Connecting your receiver to the TV is essential for routing audio and video signals through the surround sound system. Follow these steps to ensure a proper connection:
1. Locate the HDMI ports: On the back of your receiver and TV, locate the HDMI input and output ports. HDMI provides the best audio and video quality and simplifies the connectivity process.
2. Connect the HDMI cable: Take an HDMI cable and plug one end into the HDMI output port on your receiver. Connect the other end to the HDMI input port on your TV. Be sure to note the input label on your TV so you can select the correct HDMI input later.
3. Enable HDMI-CEC if available: HDMI-CEC (Consumer Electronics Control) allows your TV remote to control the receiver, making it easier to switch inputs and adjust volume. Check the settings on both your TV and receiver to enable HDMI-CEC if available.
4. Optional audio connection: If your TV doesn’t support HDMI-ARC (Audio Return Channel), you can connect an optical or coaxial digital audio cable from the TV’s audio output to the corresponding input on the receiver. This allows you to route the TV’s audio through the surround sound system.
5. Power on the devices: Once the connections are made, power on your TV, receiver, and any other connected devices such as a Blu-ray player or gaming console. Make sure the TV is set to the correct HDMI input that you connected the receiver to.
6. Verify the audio settings: Access the audio settings on your TV and select the output mode that corresponds to the connection you made. For example, if you connected via HDMI, select “HDMI” or “External Speakers” as the audio output. This ensures that the TV’s audio is routed through the receiver.
7. Test the audio and video: Play some content on your TV and test the audio and video to ensure that the sound is coming through the surround sound speakers. Adjust the volume levels on the receiver as needed.
By connecting the receiver to your TV, you’ll be able to enjoy a synchronized audio and video experience through your surround sound system. With the connections in place, let’s move on to the next step: configuring the surround sound system.
Step 6: Configuring the Surround Sound System
Configuring your surround sound system ensures that it is optimized for your specific setup and preferences. Follow these steps to configure your system:
1. Access the receiver settings: Using the remote or front panel buttons on your receiver, access the settings menu or setup mode. Look for options related to speaker setup, audio settings, or surround sound configuration.
2. Speaker size and distance settings: In the speaker setup menu, specify the sizes of your speakers (typically small, medium, or large) and input the distances from each speaker to the main listening area. This information helps the receiver calibrate the audio output accordingly.
3. Speaker level calibration: Many receivers have an auto-calibration feature that adjusts the volume level of each speaker to create a balanced soundstage. Follow the on-screen instructions or refer to the user manual to run the calibration process. Alternatively, you can manually adjust the speaker levels by listening to test tones and fine-tuning each speaker’s volume until you achieve the desired balance.
4. Surround sound mode selection: Explore the different surround sound modes available on your receiver, such as Dolby Digital, DTS, or Dolby Atmos. Experiment with different modes to find the one that best suits your content and personal preferences. You can also adjust specific settings within each mode, such as dialogue enhancement or virtual surround sound effects.
5. Subwoofer settings: Adjust the crossover frequency and volume level of your subwoofer to ensure it blends well with the other speakers and delivers the desired amount of bass. This can be done in the audio settings menu of your receiver.
6. Additional audio settings: Take a look at other audio settings in your receiver’s menu, such as equalizer settings, dynamic range control, or dialogue enhancement features. Customize these settings to enhance the audio quality according to your preferences.
7. Save and test the configuration: Once you have made all the necessary adjustments and configurations, save the settings in your receiver. Play some audio or video content and test the surround sound performance. Make any further adjustments if needed, such as fine-tuning individual speaker levels or modifying the surround sound mode.
By properly configuring your surround sound system, you can achieve the optimal audio experience that immerses you in your movies, music, and games. With the configuration complete, it’s time for the final step: testing the surround sound system.
Step 7: Testing the Surround Sound System
After completing the installation and configuration of your surround sound system, it’s time to test its performance and ensure everything is working as expected. Here’s how to test your surround sound system:
1. Play surround sound content: Choose a movie, TV show, or music track that is known for its surround sound effects. This will allow you to fully experience the spatial audio capabilities of your system. Make sure the content you choose supports the audio formats your system is capable of, such as Dolby Atmos or DTS:X.
2. Verify sound from each speaker: During playback, pay close attention to each speaker to ensure that sound is coming from the correct direction. For example, dialogue should be primarily heard from the center channel speaker, while ambient sounds and effects should be distributed throughout the surround speakers. If any speakers are not producing sound or the audio seems unbalanced, revisit the speaker connections and configuration settings.
3. Test channel identification: Some surround sound systems have a channel identification feature that plays a test tone through each speaker individually. Run this test to ensure that sound is being emitted from the correct speaker and that the speaker is positioned and configured correctly.
4. Evaluate surround effects: Listen for the surround sound effects in the content you are playing. These effects should provide a sense of depth and immerse you in the audio environment. For example, you should be able to distinguish sounds coming from behind you if you have rear surround speakers or overhead if you have height speakers or Dolby Atmos-enabled speakers.
5. Adjust speaker settings: If necessary, fine-tune the speaker levels or individual channel volumes to achieve a balanced soundstage. This can be done through the settings menu of your receiver or the level controls on each speaker.
6. Finalize settings: Once you are satisfied with the performance of your surround sound system, save your settings on the receiver so that they are retained for future use. This way, you won’t need to repeat the testing and configuration process every time you use your system.
By thoroughly testing your surround sound system, you can ensure that it is properly set up and delivering the immersive audio experience you desire. Enjoy your new surround sound setup and get ready to be fully immersed in your favorite movies, music, and games!
Conclusion
Congratulations! You have successfully installed and configured your surround sound system, bringing the immersive magic of cinematic audio right into your own home. With the right surround sound system, proper speaker placement, and optimal connections, you can now enjoy a truly captivating audio experience that elevates your movie nights, gaming sessions, and music listening.
Remember, choosing the right surround sound system that fits your budget, room size, and personal preferences is essential. Take the time to plan and research, ensuring you make informed decisions about speaker configuration, amplifier power, and audio formats supported.
With the speakers skillfully mounted and connected to the receiver, you’ve created a foundation for exceptional sound quality. Configuring the surround sound system, including calibrating speaker levels, adjusting surround sound modes, and optimizing settings, further enhances the audio experience according to your specific preferences.
Once your system is up and running, it’s crucial to test its performance by playing content that showcases its surround sound capabilities. Ensure sound is coming from each speaker as intended and that surround effects immerse you in a realistic audio environment.
By following the steps outlined in this guide, you have unlocked the full potential of your surround sound system. Now, sit back, relax, and enjoy the immersive audio experience that brings your entertainment to life with rich, multidimensional sound.
Remember, if at any point you need assistance, consult the user manual, reach out to the manufacturer’s support team, or enlist the help of a professional installer. Happy listening!