Home>Production & Technology>Surround Sound>How To Connect Yamaha Surround Sound System To TV
Surround Sound
How To Connect Yamaha Surround Sound System To TV
Modified: January 22, 2024
Learn how to easily connect your Yamaha surround sound system to your TV and enjoy immersive audio experience. Follow our step-by-step guide for seamless setup.
(Many of the links in this article redirect to a specific reviewed product. Your purchase of these products through affiliate links helps to generate commission for AudioLover.com, at no extra cost. Learn more)
Table of Contents
- Introduction
- Step 1: Gather the necessary cables
- Step 2: Identify the audio output ports on your TV
- Step 3: Connect the audio output of the TV to the Yamaha surround sound system
- Step 4: Configure the audio settings on your TV
- Step 5: Configure the audio settings on your Yamaha surround sound system
- Step 6: Test the connection and enjoy your Yamaha surround sound system
- Conclusion
Introduction
Welcome to the world of immersive audio experience with Yamaha Surround Sound Systems! If you’re looking to enhance your TV viewing or gaming experience, connecting your Yamaha surround sound system to your TV is a game-changer. The combination of crystal-clear audio and enveloping surround sound will transport you into the heart of the action.
Yamaha is renowned for its high-quality audio equipment, and their surround sound systems are no exception. By seamlessly connecting your Yamaha system to your TV, you’ll be able to enjoy a cinematic audio experience right in the comfort of your own home.
Don’t worry if you’re not tech-savvy, as connecting your Yamaha surround sound system to your TV is easier than you think. In this guide, we’ll take you through a step-by-step process to ensure that you have all the information you need to successfully set up your system.
So, whether you’re a movie enthusiast, a gamer, or simply someone who appreciates amazing sound quality, you’re in the right place. Let’s dive into the world of Yamaha surround sound systems and learn how to connect them to your TV!
Step 1: Gather the necessary cables
Before you can connect your Yamaha surround sound system to your TV, you’ll need to gather the necessary cables. Here are the cables you’ll typically need:
- HDMI cable: This is the most common and recommended method of connecting your TV to your Yamaha surround sound system. HDMI cables transmit both high-quality audio and video signals, providing a seamless connection between devices. Make sure you have an HDMI cable that is long enough to reach from your TV to your Yamaha system.
- Optical audio cable: If your TV doesn’t have an HDMI ARC (Audio Return Channel) port, you’ll need an optical audio cable. This cable transfers high-quality digital audio signals from your TV to your Yamaha system.
- RCA cables: Some older TVs and Yamaha surround sound systems may have RCA ports. If that’s the case, you’ll need RCA cables to connect the audio output of your TV to the audio input of your Yamaha system.
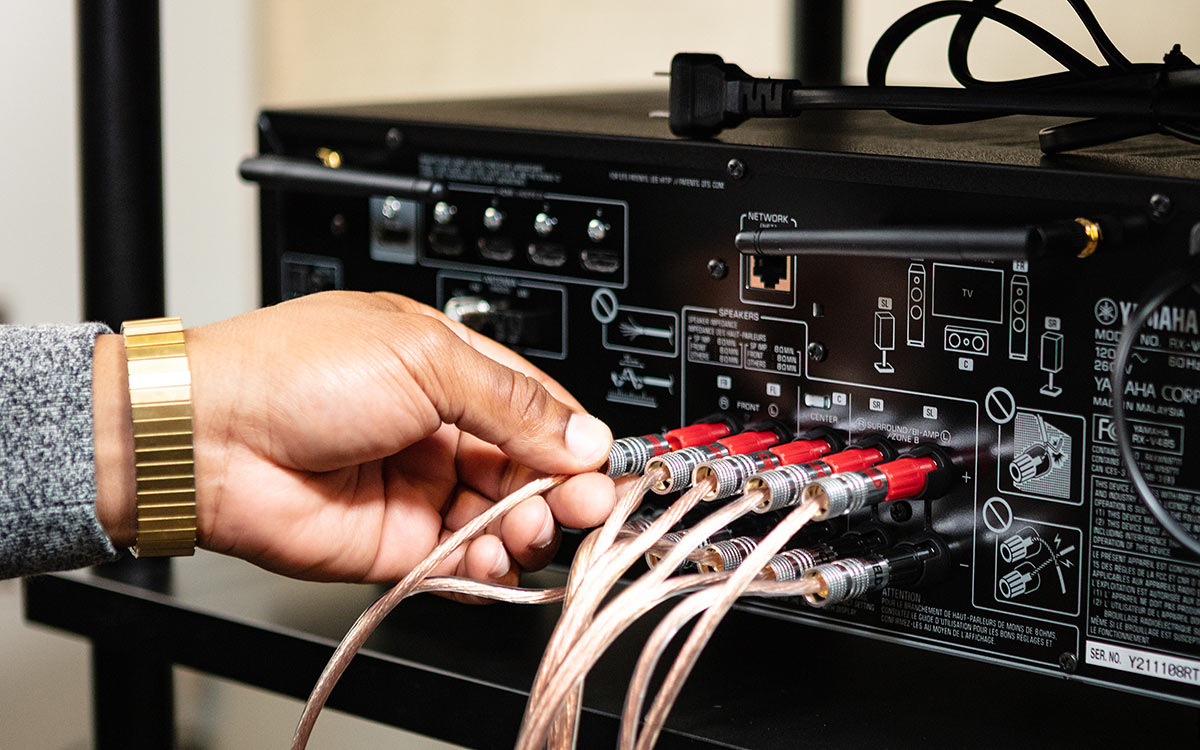
- Speaker wire: Depending on the type of Yamaha surround sound system you have, you may need speaker wire to connect the speakers to the main unit. Consult your Yamaha system’s manual or documentation to determine if speaker wire is necessary.
Once you have gathered all the necessary cables, you’re ready to move on to the next step of connecting your Yamaha surround sound system to your TV. Remember that the type of cables you need may vary depending on your specific TV model and Yamaha system, so it’s always a good idea to consult the user manuals or documentation for both devices.
Now that you have the cables in hand, let’s move on to the next step of the setup process.
Step 2: Identify the audio output ports on your TV
Before you can connect your Yamaha surround sound system to your TV, it’s important to identify the audio output ports on your TV. These ports will vary depending on the make and model of your television, but there are a few common types you may encounter:
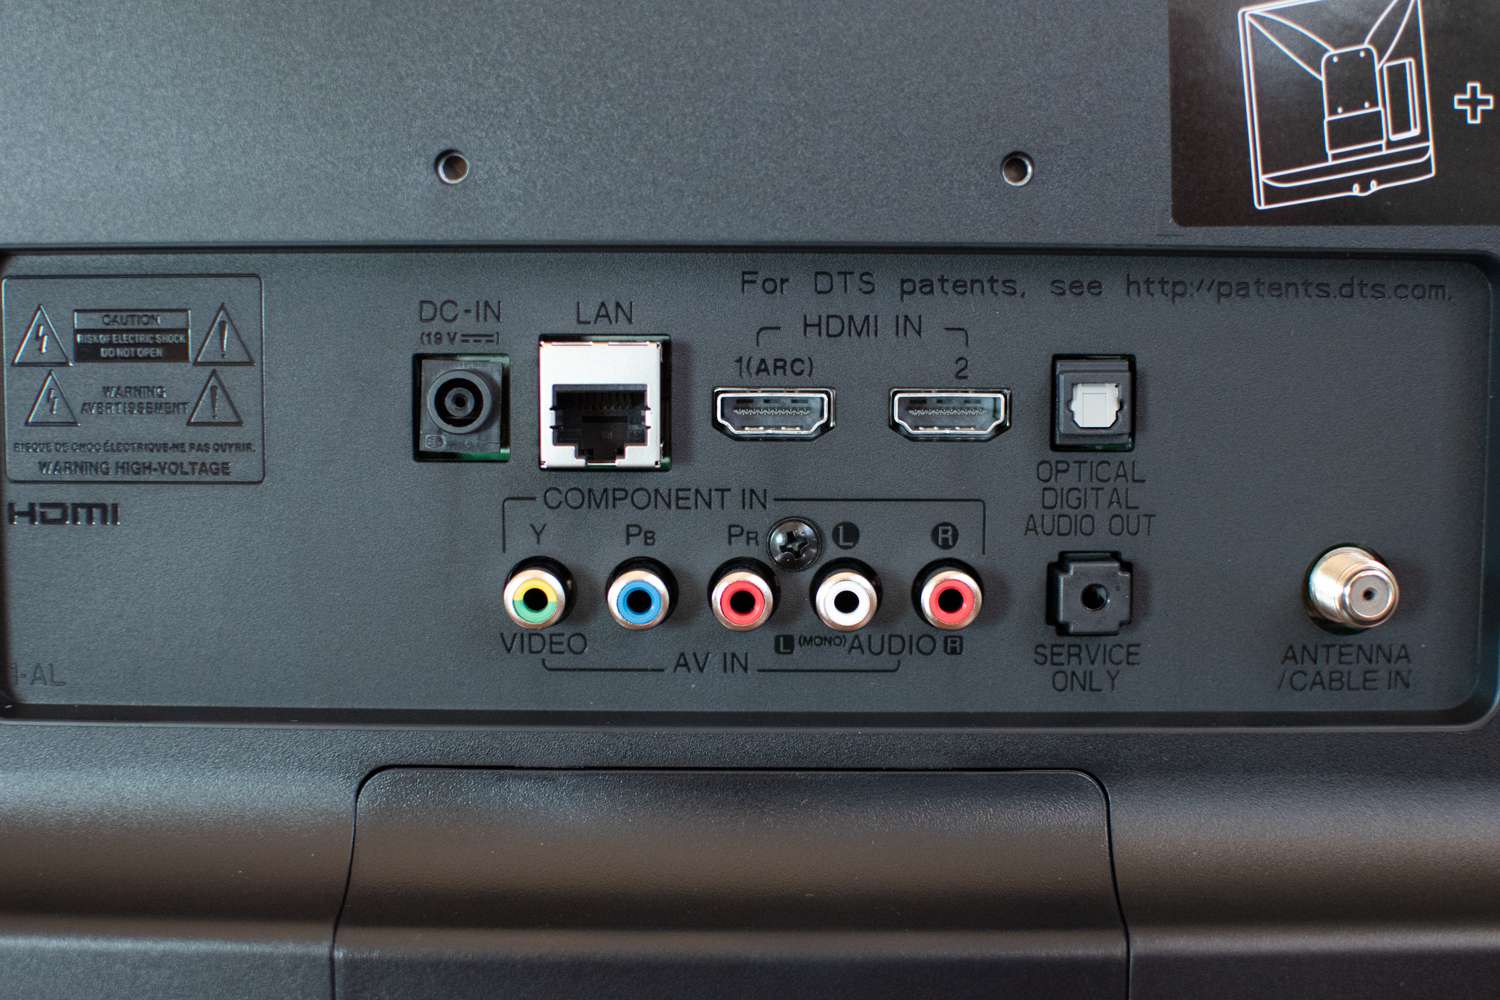
- HDMI ARC (Audio Return Channel) port: This port allows for both audio and video signals to be transmitted through a single HDMI cable. It is the preferred method of connection as it simplifies the setup process and provides high-quality audio. Look for an HDMI port labeled with “ARC” or consult your TV’s user manual for assistance.
- Optical audio output: If your TV does not have an HDMI ARC port, it may have an optical audio output. This port uses a square-shaped connector and is commonly labeled as “OPTICAL” or “DIGITAL AUDIO OUT.” Optical audio cables are used to transmit digital audio signals to your Yamaha surround sound system.
- RCA audio output: Older TVs may have RCA audio output ports, which consist of red and white connectors. They are often labeled as “AUDIO OUT” or “RCA OUT.” RCA cables are used to transmit analog audio signals to your Yamaha system.
Take a close look at the back or side of your TV to identify the available audio output ports. If you’re having trouble locating them, consult your TV’s user manual or visit the manufacturer’s website for detailed information.
Once you have identified the audio output ports on your TV, you’re ready to move on to the next step of connecting your Yamaha surround sound system. Understanding the available audio output options will help you choose the appropriate cables and ensure a successful connection.
Now that you know where to find the audio output ports on your TV, let’s proceed to the next step of the setup process.
Step 3: Connect the audio output of the TV to the Yamaha surround sound system
Now that you have identified the audio output ports on your TV, it’s time to connect them to your Yamaha surround sound system. The method of connection will depend on the ports available on both your TV and Yamaha system. Here are the most common scenarios:
- HDMI ARC connection: If your TV has an HDMI ARC port and your Yamaha surround sound system has an HDMI ARC port as well, this is the preferred method of connection. Simply connect one end of the HDMI cable to the HDMI ARC port on your TV, and the other end to the HDMI ARC port on your Yamaha system. This single cable will transmit both audio and video signals, simplifying the setup process.
- Optical audio connection: If your TV has an optical audio output and your Yamaha system has an optical audio input, you can use an optical audio cable. Connect one end of the optical audio cable to the optical audio output port on your TV, and the other end to the optical audio input port on your Yamaha system. Make sure to align the connectors properly and tighten the screws if necessary for a secure connection.
- RCA audio connection: If your TV and Yamaha system both have RCA audio ports, you can use RCA cables for the connection. Connect the red end of the RCA cable to the right audio output port on your TV, and the white end to the left audio output port. Then, connect the other end of the RCA cable to the corresponding audio input ports on your Yamaha system. Ensure that the cables are securely connected.
If your TV and Yamaha surround sound system have different types of audio ports, you may need to use an adapter or converter to make the connection. These adapters are widely available and can be purchased at electronics stores or online.
Once you have connected the audio output of your TV to the corresponding input on your Yamaha system, you have successfully completed the connection between the two devices. The audio signals from your TV will now be transmitted to your Yamaha surround sound system for a truly immersive audio experience.
Now that the connection is established, let’s move on to the next step of configuring the audio settings on your TV.
Step 4: Configure the audio settings on your TV
After connecting the audio output of your TV to your Yamaha surround sound system, it’s important to configure the audio settings on your TV to ensure optimal performance. The exact steps may vary depending on your TV’s make and model, but here are some general guidelines:
- Access the audio settings menu: Use your TV remote to navigate to the settings menu. Look for options such as “Sound,” “Audio,” or “Settings.”
- Select the audio output mode: In the audio settings menu, locate the option to select the audio output mode. Choose the option that corresponds to the connection you made in Step 3. For example, if you connected the HDMI ARC port, select “HDMI ARC” as the output mode.
- Enable audio passthrough: Some TVs have a feature called audio passthrough, which allows the audio signal to pass directly to the connected audio system without any modifications. If your TV has this option, enable it for the best audio quality.
- Adjust volume control: Depending on your TV, you may have the option to control the volume level from both your TV and your Yamaha system. To avoid any conflicts, it’s recommended to set the TV’s volume control to a fixed level and use the volume control on your Yamaha system to adjust the audio output.
Be sure to refer to your TV’s user manual or online documentation for specific instructions on accessing and configuring the audio settings. The interface may vary across different TV brands and models.
Once you have configured the audio settings on your TV, you’re one step closer to enjoying the immersive sound experience of your Yamaha surround sound system. However, there are still a few more steps to complete the setup process.
Next, let’s move on to configuring the audio settings on your Yamaha surround sound system.
Step 5: Configure the audio settings on your Yamaha surround sound system
Now that you have configured the audio settings on your TV, it’s time to configure the audio settings on your Yamaha surround sound system. These settings will ensure that you get the best sound quality and take full advantage of the features offered by your Yamaha system. Here’s how you can do it:
- Access the settings menu: On your Yamaha system’s remote control, locate the button or menu option that allows you to access the settings menu. It is usually labeled as “Settings,” “Setup,” or “Menu.”
- Navigate to the audio settings: In the settings menu, navigate to the audio settings section. You may find options such as “Audio,” “Sound,” or “Setup.”
- Select the input source: In the audio settings, select the input source that corresponds to the connection you made in Step 3. For example, if you connected the HDMI ARC port, select the HDMI ARC input source.
- Choose the audio format: Depending on your Yamaha system and the audio capabilities of your TV, you may have the option to choose the audio format. Select the format that supports surround sound, such as Dolby Digital or DTS, for an immersive audio experience.
- Adjust the speaker settings: If your Yamaha system allows for individual speaker settings, you can fine-tune the sound output from each speaker. This includes adjusting the speaker size, distance, level, and other audio parameters according to your preference.
It’s important to note that the available settings and options may vary depending on your specific Yamaha surround sound system model. Refer to the user manual or online documentation provided by Yamaha for detailed instructions on accessing and configuring the audio settings.
Once you have configured the audio settings on your Yamaha system, you’re almost ready to enjoy the immersive surround sound experience. But before that, it’s crucial to test the connection and ensure everything is working properly.
Let’s move on to the final step of testing the connection and enjoying your Yamaha surround sound system!
Step 6: Test the connection and enjoy your Yamaha surround sound system
Congratulations! You have successfully connected and configured your Yamaha surround sound system to your TV. Now, it’s time to test the connection and immerse yourself in the captivating audio experience. Here’s what you need to do:
- Turn on your TV and Yamaha system: Ensure that both your TV and Yamaha surround sound system are powered on.
- Select the appropriate input source: On your TV, select the input source that corresponds to the connected Yamaha system. For example, if you connected the HDMI ARC port, choose the HDMI ARC input source.
- Play audio or video content: Play your favorite audio or video content on your TV. This could be a movie, TV show, music video, or even a video game. The sound should now be played through your Yamaha surround sound system.
- Check the sound output: Listen carefully to the audio output from your Yamaha system. Ensure that sound is coming from all the speakers and that the volume levels are balanced. Adjust the volume using the Yamaha system’s remote control for the desired level.
- Test surround sound effects: To fully experience the capabilities of your Yamaha surround sound system, play content specifically designed for surround sound. This could be a Blu-ray movie with Dolby Atmos or DTS:X audio, or a video game that supports immersive audio. Pay attention to the spatial sound effects and the way the sound fills the room.
- Make any necessary adjustments: If you notice any issues with the sound, such as uneven volume levels or missing audio channels, revisit the audio settings on both your TV and Yamaha system. Double-check the connections to ensure they are secure and properly configured.
Once you are satisfied with the sound output and everything is working as expected, sit back, relax, and enjoy the incredible audio experience that your Yamaha surround sound system has to offer. Whether you’re watching movies, playing games, or enjoying your favorite music, the immersive soundstage will enhance your entertainment experience like never before.
Remember, if you ever want to make changes to the audio settings or connect additional devices to your Yamaha system, refer to the user manual or online documentation provided by Yamaha for detailed instructions.
Now that you have successfully completed the setup process and tested the connection, it’s time to sit back, relax, and immerse yourself in the breathtaking audio experience delivered by your Yamaha surround sound system.
Enjoy!
Conclusion
Congratulations on successfully connecting and setting up your Yamaha surround sound system with your TV! By following the step-by-step instructions outlined in this guide, you have unlocked the potential for an immersive audio experience right in the comfort of your own home.
By gathering the necessary cables, identifying the audio output ports on your TV, and making the proper connections, you have established the foundation for high-quality sound reproduction. Configuring the audio settings on both your TV and Yamaha system ensures optimal performance, allowing you to fine-tune the audio output to your liking.
With the connection tested and everything in place, you can now enjoy the captivating soundstage and surround sound effects that your Yamaha system delivers. Whether you’re watching movies, playing games, or listening to music, the enhanced audio experience will enhance your entertainment and immerse you in the action.
Remember, should you ever want to make changes to the audio settings or connect additional devices, consult the user manual or online documentation provided by Yamaha for detailed instructions specific to your surround sound system model.
With your Yamaha surround sound system connected to your TV, get ready to rediscover your favorite movies, games, and music in a whole new way. Sit back, relax, and let the rich and immersive sound transport you to another world.
Enjoy the audio journey!