Home>Production & Technology>Surround Sound>How To Install Surround Sound Speakers In Ceiling
Surround Sound
How To Install Surround Sound Speakers In Ceiling
Modified: January 22, 2024
Learn how to install surround sound speakers in your ceiling to create the ultimate immersive audio experience. Transform your home theater with our step-by-step guide.
(Many of the links in this article redirect to a specific reviewed product. Your purchase of these products through affiliate links helps to generate commission for AudioLover.com, at no extra cost. Learn more)
Table of Contents
- Introduction
- Step 1: Preparing the Tools and Materials
- Step 2: Choosing the Ideal Speaker Placement
- Step 3: Finding the Right Wiring Path
- Step 4: Cutting the Speaker Holes
- Step 5: Running the Speaker Wires
- Step 6: Installing the Mounting Brackets
- Step 7: Mounting the Ceiling Speakers
- Step 8: Connecting the Speakers to the Receiver
- Step 9: Testing the Surround Sound System
- Conclusion
Introduction
Welcome to the world of immersive audio experiences with surround sound speakers in your ceiling. Whether you are a movie enthusiast, a gamer, or a music lover, a properly installed surround sound system can take your entertainment to the next level. With audio coming from every direction, you’ll feel like you’re right in the middle of the action.
This step-by-step guide will walk you through the process of installing surround sound speakers in your ceiling, creating a sleek and seamless audio setup in your home. While the task may seem daunting at first, with the right tools and a little patience, you can achieve professional-grade sound quality without compromising the aesthetics of your space.
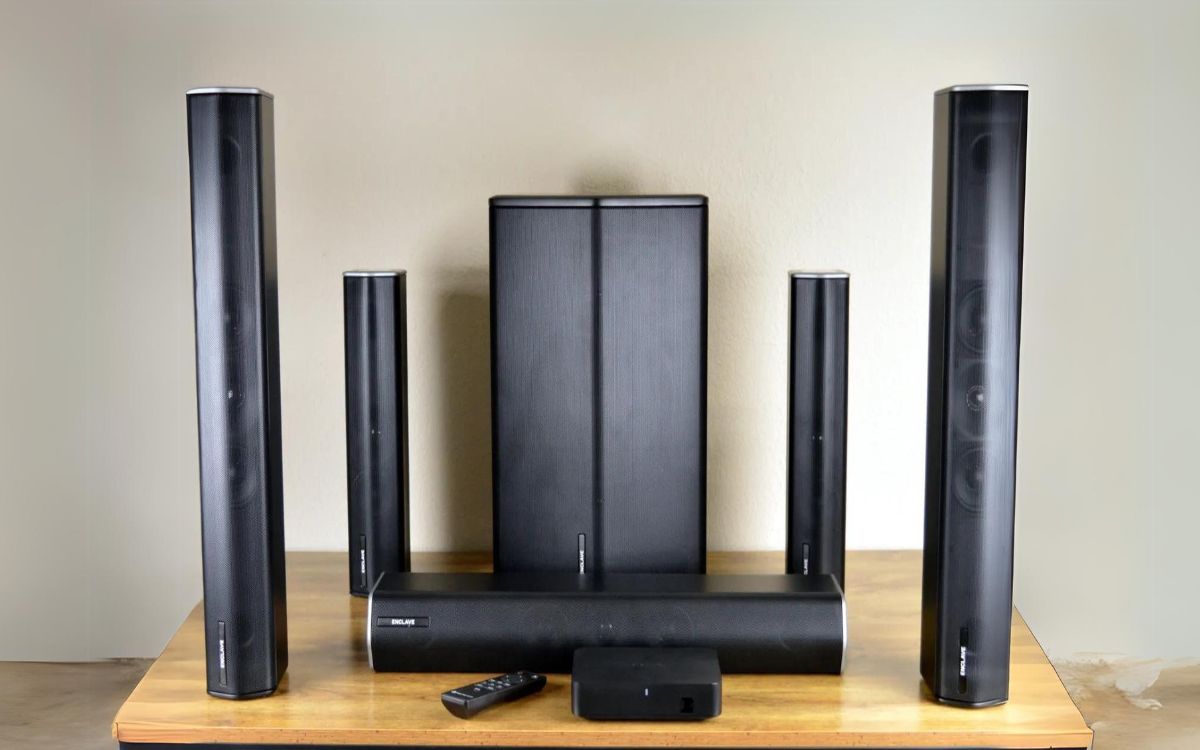
Before we dive into the installation process, it’s essential to understand the different components involved in a surround sound system. Typically, a surround sound setup consists of several speakers strategically placed around the room to create an immersive audio experience. This includes a center channel speaker, front left and right speakers, rear left and right speakers, and a subwoofer to provide deep bass frequencies.
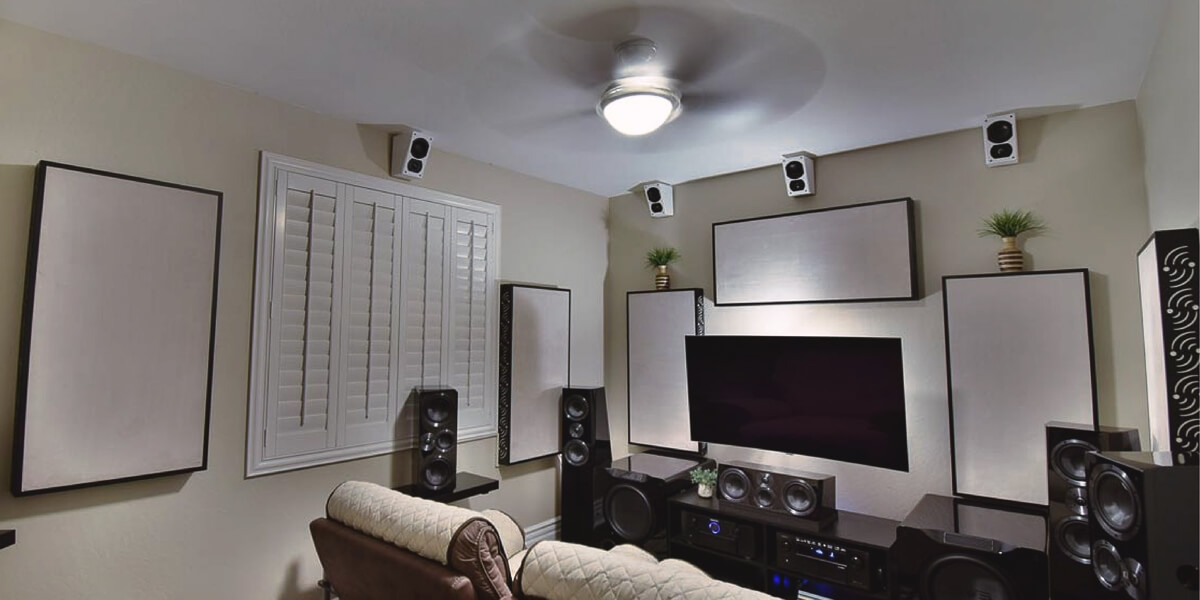
The beauty of installing surround sound speakers in the ceiling is that it allows for a cleaner look, with no unsightly wires or bulky speakers cluttering your living space. Instead, the speakers seamlessly blend into the ceiling, providing a discreet yet powerful audio solution.
Now that we’ve covered the basics, let’s move on to step one: preparing the tools and materials you’ll need to successfully install your surround sound speakers in the ceiling.
Step 1: Preparing the Tools and Materials
Before you can start installing your surround sound speakers in the ceiling, it’s important to gather all the necessary tools and materials. Having everything you need on hand will make the installation process much smoother and more efficient.
Here’s a list of essential tools and materials you’ll need:
- Tape Measure: This will help you accurately measure the distance between speakers and ensure proper placement.
- Stud Finder: Use a stud finder to locate ceiling joists, as they will provide the necessary support for your speakers.
- Drill: A drill will be needed to create holes for wiring and mounting brackets.
- Keyhole Saw: To cut speaker holes in the ceiling, you’ll need a keyhole saw or a drywall saw.
- Fish Tape: Fish tape will assist you in running speaker wires through the walls or ceiling.
- Screwdriver: A screwdriver is required for attaching mounting brackets and connecting speaker wires to the speakers.
- Wire Cutters: These are necessary for cutting and stripping speaker wire.
- Ceiling Speaker Mounting Brackets: These brackets will securely hold the speakers in place.
- Speaker Wire: Ensure you have enough speaker wire to connect each speaker to the surround sound receiver.
- Level: A level will help you ensure that your speakers are properly aligned and mounted.
It’s always a good idea to double-check the compatibility of your speakers with your surround sound receiver and make sure you have any additional cables or adapters required for connection.
Once you have gathered all the necessary tools and materials, you are ready to move on to the next step: choosing the ideal speaker placement.
Step 2: Choosing the Ideal Speaker Placement
Choosing the right placement for your surround sound speakers is crucial to achieve optimal audio performance and create an immersive experience. The configuration you choose will depend on the size and layout of your room, as well as your personal preferences. Here are a few key considerations to help you determine the ideal speaker placement:
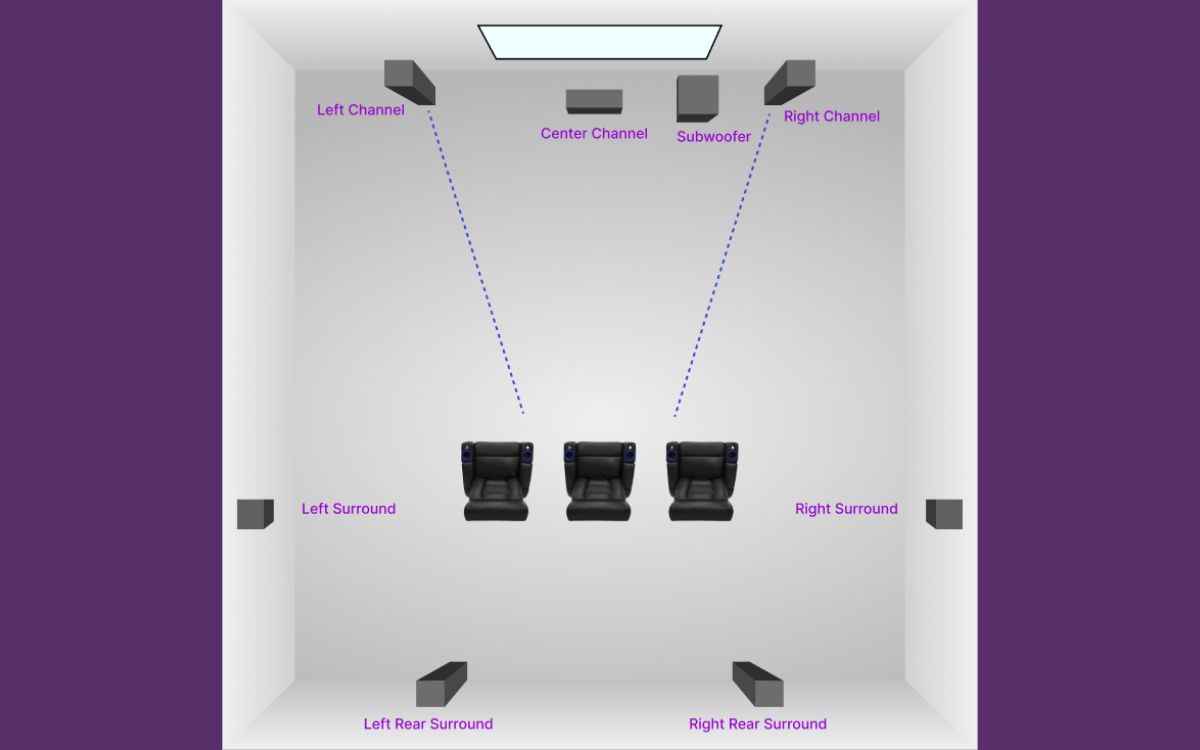
1. Front and Center: The center channel speaker should be positioned directly above or below the television, preferably at ear level when seated. The front left and right speakers should be placed equidistant from the center channel speaker, forming an arc with the listener in the center.
2. Rear Speakers: The rear speakers, also known as surround speakers, should be placed behind the listening area. Ideally, they should be positioned slightly above ear level and spaced apart to create a wide soundstage. If you have a 7.1 surround sound system, you will also have two additional speakers for side surround sound effects.
3. Height Channels: For a more immersive audio experience, you can consider adding height channels to your surround sound system. These speakers are mounted high on the walls or in the ceiling, creating a vertical sound dimension. They can provide overhead sound effects, enhancing the sense of depth and realism.
4. Subwoofer Placement: The subwoofer, responsible for reproducing low-frequency sounds, can be placed anywhere in the room to achieve optimal bass response. Experiment with different locations to find the spot that provides the best balance between deep, powerful bass and smooth integration with the rest of the speakers.
To determine the exact placement, it’s helpful to envision an imaginary circle around the listening area. Use a tape measure to ensure accurate distances between the speakers and the listening position. You can also use a surround sound setup or calibration tool, often included with your receiver, to fine-tune the speaker distances and sound levels.
Remember to consider any physical obstructions, such as furniture or windows, that could affect the sound quality. Experimenting with different placements and adjusting the angles of the speakers can help optimize the audio performance.
Once you have chosen the ideal speaker placement, you are ready to move on to the next step: finding the right wiring path.
Step 3: Finding the Right Wiring Path
Running speaker wires from your surround sound receiver to the speakers in the ceiling requires careful planning and consideration of the best wiring path. Here are some steps to help you find the right wiring path for your installation:
1. Check the Attic: If your home has an accessible attic above the room where you’re installing the speakers, it can be an excellent route for running the speaker wires. Check if there are existing pathways or conduits that can accommodate the wires, ensuring a clean and hidden installation.
2. Use Wall Cavities: Another option is to run the wires through the wall cavities. Determine the path from the receiver location to the ceiling speakers and identify areas where you can access the wall cavity, such as behind furniture or through crawl spaces.
3. Consider Existing Cable Runs: Take advantage of any existing cable runs, such as TV cables or Ethernet cables, to minimize the need for additional drilling. This can help maintain a cleaner and more organized look.
4. Use Fish Tape or Wire Pulling Tools: To run the speaker wires through walls or ceiling spaces, use fish tape or wire pulling tools. These tools allow you to navigate through tight spaces, making it easier to route the wires where you want them.
5. Avoid Electrical Interference: When running speaker wires, ensure they are separated from electrical wires to avoid interference and maintain optimal audio quality. Keep a distance of at least 6 inches between speaker wires and electrical lines.
6. Plan for Future Upgrades: Consider future upgrades or changes to your speaker system when planning the wiring path. Leave some slack in the wires to accommodate any modifications or additions down the line.
It’s essential to follow safety precautions when working with wiring, such as turning off the power to the room or using a non-contact voltage detector to ensure there are no live wires in the area where you’ll be drilling or pulling wires.
Once you have determined the best wiring path, you can proceed to the next step: cutting the speaker holes in the ceiling.
Step 4: Cutting the Speaker Holes
Now that you have planned the wiring path, it’s time to cut the speaker holes in your ceiling to accommodate the surround sound speakers. Follow these steps to ensure a clean and precise installation:
1. Mark the Speaker Locations: Use a tape measure, level, and pencil to mark the exact locations where you want to install the ceiling speakers. Ensure that the placement aligns with your chosen speaker configuration and the designated wiring path.
2. Choose the Right Size Hole Saw: Depending on the size of your speakers, select an appropriate hole saw attachment for your drill. It should match the diameter specified by the manufacturer of your speakers. It’s a good idea to double-check the hole size before cutting.
3. Protect the Area: Place drop cloths or plastic sheets on the floor to catch any debris or dust that may fall during the cutting process. This will help protect your furniture and make cleanup easier.
4. Cut the Holes: Attach the hole saw to your drill and carefully cut through the ceiling using slow and steady pressure. Start at the marked center point and rotate the saw in a clockwise direction. Be mindful of any electrical or plumbing lines in the ceiling and avoid cutting into them.
5. Clean up the Debris: Once the holes are cut, remove any debris or dust from the ceiling and surrounding area. Use a vacuum or a brush to ensure a clean work surface before proceeding to the next step.
It’s important to remember that if you are uncomfortable or unsure about cutting the holes yourself, it’s best to consult a professional installer who can ensure precision and minimize any potential damage.
With the speaker holes cut, you’re ready to move on to the next step: running the speaker wires through the designated pathway.
Step 5: Running the Speaker Wires
Now that you have the speaker holes cut, it’s time to run the speaker wires from the surround sound receiver to the ceiling speakers. Follow these steps to ensure a proper and organized wire installation:
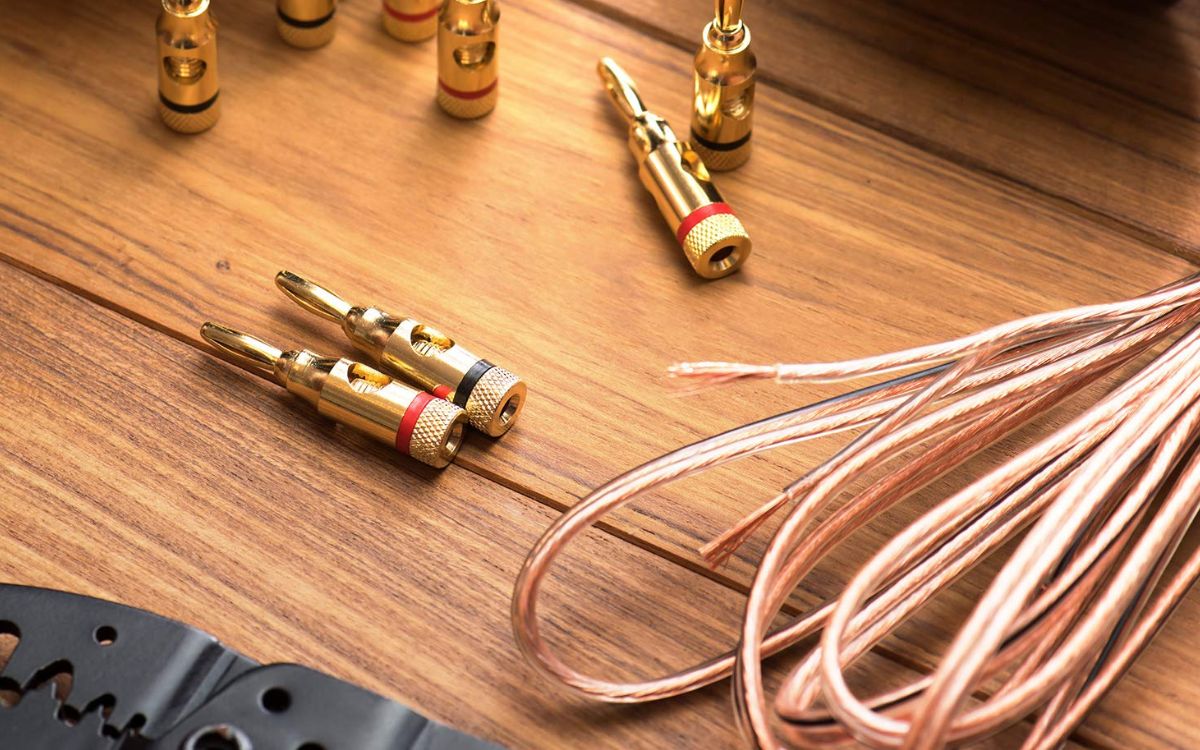
1. Measure and Cut the Wires: Measure the distance between your receiver and each speaker location. Add some extra length to account for any necessary slack. Using wire cutters, trim the speaker wires to the appropriate lengths.
2. Prepare the Wires: Strip about half an inch of insulation off the ends of the speaker wires to expose the bare copper strands. This will ensure a clean and proper connection to the speakers and the receiver.
3. Run the Wires Along the Designated Pathway: Utilize the wiring path you established earlier to guide the speaker wires towards the speaker holes in the ceiling. Use fish tape or wire pulling tools to navigate through walls, ceilings, or conduits. Be careful not to damage the wires during this process.
4. Secure the Wires: As you run the speaker wires, use wire clips or staples to secure them along the walls or ceiling. This will keep the wires neat and prevent them from sagging or getting in the way of other components. Be cautious to avoid nailing or stapling through the wires.
5. Leave Some Slack: Leave a bit of slack in the wires near the speaker holes and at the receiver end. This will allow for flexibility in positioning the speakers and ease of future adjustments.
6. Label the Wires: To avoid confusion during the speaker installation process, label the ends of the speaker wires indicating the specific speaker they are intended for, such as “Front Right,” “Rear Left,” etc. This will simplify the connection process later on.
Double-check that you have connected the positive (+) and negative (-) wires correctly. Consistency in wiring polarity is crucial for proper audio output across all speakers.
With the speaker wires successfully run and prepared, you’re now ready to move on to the next step: installing the mounting brackets for the ceiling speakers.
Step 6: Installing the Mounting Brackets
With the speaker wires in place, it’s time to install the mounting brackets that will securely hold your ceiling speakers. Follow these steps to ensure a proper and stable installation:
1. Position the Mounting Brackets: Based on your speaker placement plan, hold each mounting bracket up to the corresponding speaker hole in the ceiling. Ensure that the brackets are aligned correctly and securely fit within the hole without any obstruction.
2. Mark the Screw Hole Locations: Use a pencil or marker to mark the screw hole locations on the ceiling. Typically, mounting brackets have multiple screw holes for different speaker models. Ensure the holes are evenly distributed and aligned with the bracket.
3. Drill Pilot Holes: Using a drill bit slightly smaller than the size of the screws provided with the mounting brackets, drill pilot holes into the marked screw hole locations. Pilot holes will prevent the ceiling from splitting or cracking when you insert the screws.
4. Attach the Mounting Brackets: Line up the mounting brackets with the pilot holes and use a screwdriver or drill to secure them to the ceiling. Make sure the brackets are firmly attached and level with the ceiling surface.
5. Repeat for Each Speaker: Repeat the above steps for each ceiling speaker, ensuring that the mounting brackets are consistently positioned and securely installed.
It’s crucial to consult the speaker manufacturer’s instructions to ensure proper installation of the mounting brackets. Some speakers may have specific mounting requirements, and following the guidelines will help maintain the integrity of the speakers and minimize any potential damage.
Once all the mounting brackets are securely installed, you’re ready to move on to the next step: mounting the ceiling speakers into the brackets.
Step 7: Mounting the Ceiling Speakers
With the mounting brackets in place, it’s time to mount the ceiling speakers and secure them for optimal audio performance. Follow these steps to ensure a proper and stable installation:
1. Prepare the Speakers: Remove the grilles or covers from the speakers, if they are detachable. This will give you access to the mounting points and make it easier to attach the speakers to the brackets.
2. Align the Speakers: Hold each speaker up to its corresponding mounting bracket, aligning the screw holes on the speaker with those on the bracket. Ensure that the speakers fit snugly and securely onto the brackets.
3. Attach the Speakers: Insert the screws provided by the speaker manufacturer through the screw holes on the speakers and into the corresponding holes on the mounting brackets. Use a screwdriver or a drill to tighten the screws, but be careful not to overtighten and damage the speaker or bracket.
4. Test Stability: Gently give the installed speakers a slight twist or nudge to ensure they are securely mounted and do not move or rotate. If any speaker feels loose or unstable, recheck the mounting screws and tighten as needed.
5. Replace the Grilles: Once all the speakers are securely mounted, replace the grilles or covers onto the speakers. This will not only provide a finished look but also help protect the internal components of the speakers from dust and damage.
It’s important to follow the speaker manufacturer’s instructions for mounting and securing the speakers. Some speakers may have specific guidelines regarding orientation, angling, or tightening of screws.
With the ceiling speakers mounted and secured, you’re now ready to move on to the next step: connecting the speakers to the surround sound receiver.
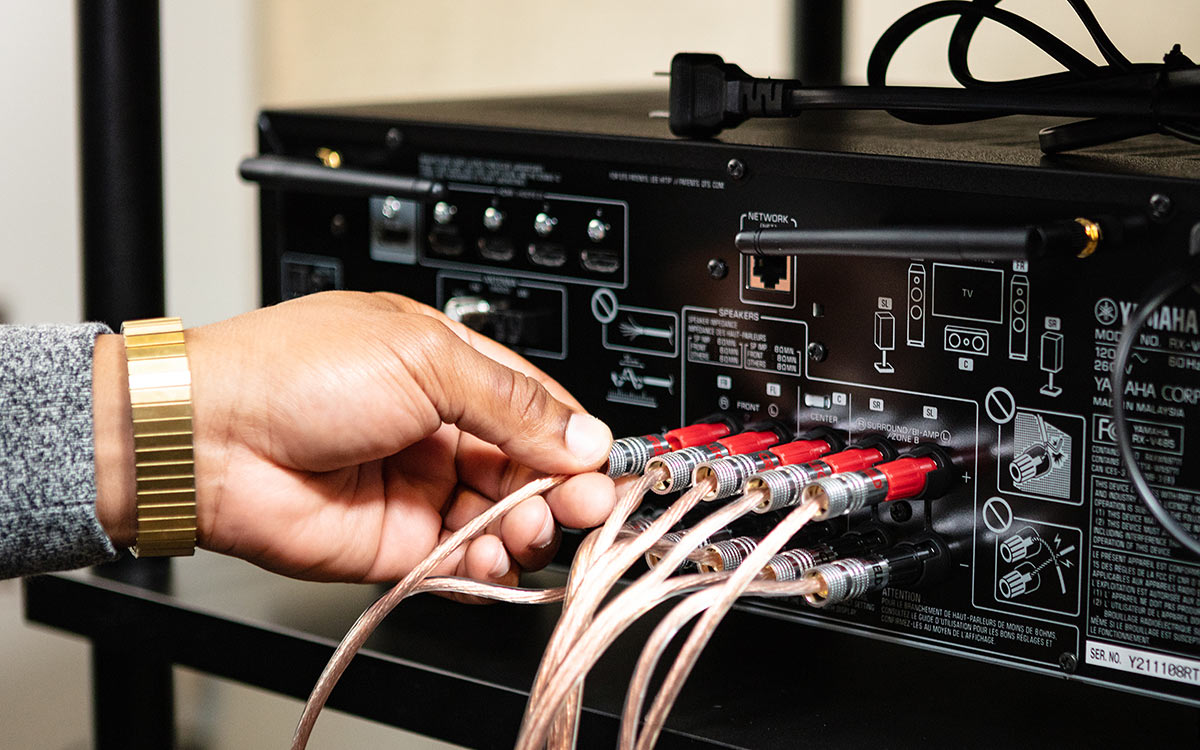
Step 8: Connecting the Speakers to the Receiver
Now that your ceiling speakers are securely mounted, it’s time to connect them to the surround sound receiver. Follow these steps to ensure proper and accurate speaker connections:
1. Identify Speaker Outputs: Locate the speaker outputs on the back of your surround sound receiver. These outputs are usually labeled with abbreviations such as FL (Front Left), FR (Front Right), C (Center), RL (Rear Left), RR (Rear Right), and SW (Subwoofer).
2. Connect the Speaker Wires: Take the labeled speaker wires and match them to the corresponding speaker outputs on the receiver. For example, connect the wire labeled “Front Left” to the FL output on the receiver and so on. Ensure a proper connection by inserting the bare wire or banana plug into the corresponding terminals on the receiver.
3. Double-Check Polarity: Pay attention to the polarity of the speaker wires. Each wire has a positive (+) and negative (-) end. Ensure that you connect the positive end of each wire to the positive terminal on the speaker and receiver, and the negative end to the negative terminal. Maintaining consistent polarity throughout the installation is crucial for proper audio reproduction.
4. Connect the Subwoofer: If you have a subwoofer in your surround sound system, connect the subwoofer cable to the SW output on the receiver. The subwoofer cable typically has an RCA connector that plugs into the corresponding input on the subwoofer.
5. Secure the Connections: Once all the speaker wires and subwoofer cable are connected, ensure that each connection is secure and properly tightened. Loose connections can result in poor audio quality or intermittent sound.
6. Power Up and Test: Power on your surround sound receiver and test each speaker to ensure it is producing sound. You can do this by playing a test tone or audio source that cycles through each speaker individually. Check that sound is coming from the correct speakers, and adjust the speaker settings in your receiver’s menu if necessary.
It’s recommended to consult the user manual of your surround sound receiver for specific instructions on connecting speakers. Also, refer to the speaker manufacturer’s documentation for any unique requirements or recommendations.
With the speakers successfully connected to the receiver, you’re now ready to move on to the final step: testing the surround sound system.
Step 9: Testing the Surround Sound System
Now that all the speakers are properly connected, it’s time to test your surround sound system and ensure that everything is functioning as intended. Follow these steps to test and fine-tune your audio setup:
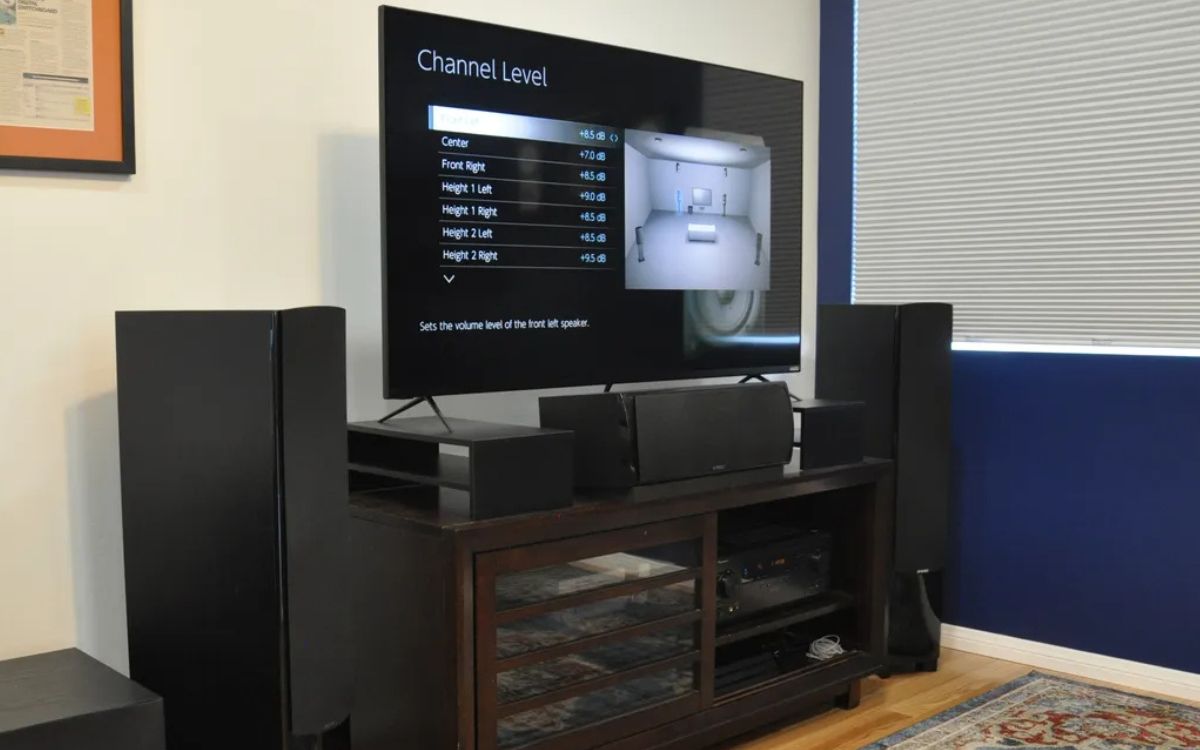
1. Configure Audio Settings: Access the audio settings on your surround sound receiver and verify that the speaker configuration is correctly set. Ensure that the receiver recognizes the correct number of speakers (e.g., 5.1 or 7.1) and that it is configured for the appropriate speaker layout.
2. Calibration and Setup: Many surround sound receivers come with an automatic speaker calibration system. Follow the instructions in your receiver’s manual to initiate the calibration process. This will help optimize the audio performance by adjusting speaker levels and distances to match your room’s acoustics.
3. Test Each Speaker: Play test tones or audio content specifically designed for testing surround sound systems. Ensure that audio is coming from the correct speakers and that each speaker is producing sound at the expected volume. Verify that the sound quality is clear and well-balanced across all speakers.
4. Fine-Tune the Sound: Adjust the speaker levels, tone controls, or equalizer settings on your receiver to achieve the desired audio experience. Listen to various types of media, such as movies, music, and games, to assess the overall performance and make any necessary adjustments to suit your preferences.
5. Check Surround Effects: Test the surround effects by playing content specifically designed to showcase surround sound capabilities. Pay attention to how sounds move across the speakers, creating a more immersive experience. Ensure that the surround effects are working correctly, providing a sense of depth, directionality, and spatial accuracy.
6. Troubleshooting: If you encounter any issues during the testing process, double-check the speaker connections and the receiver’s settings. Ensure that all cables are securely plugged in, and there are no loose connections. If problems persist, consult the troubleshooting section of your receiver’s manual or contact customer support for guidance.
By thoroughly testing and fine-tuning your surround sound system, you can fully enjoy the immersive audio experience it offers. Take the time to experiment with different media and adjust settings to personalize your surround sound setup to your liking.
Congratulations! With successful testing and adjustments completed, you have completed the installation of your surround sound system. Now you can sit back, relax, and immerse yourself in the captivating audio experience that surround sound provides.
Conclusion
Congratulations on successfully installing your surround sound speakers in the ceiling! By following the step-by-step guide outlined in this article, you have transformed your space into an immersive audio haven. Now, every movie, game, or music session will transport you into a world of captivating sound.
From preparing the necessary tools and materials to finding the ideal speaker placement, running speaker wires, installing mounting brackets, connecting the speakers to the receiver, and testing the system, you have completed each crucial step with care and precision. The result is a sleek, clutter-free setup that seamlessly blends audio performance with the aesthetics of your space.
Remember, fine-tuning and adjusting your system’s audio settings are important to fully maximize the potential of your surround sound setup. Take the time to experiment with different media types, adjust speaker levels, and customize the sound to your liking. This will ensure that your surround sound system delivers the optimal audio experience for your specific preferences and room acoustics.
Whether you’re watching your favorite movies, engaging in intense gaming sessions, or listening to your favorite music, your new surround sound system will elevate your entertainment to new heights. Immerse yourself in rich, detailed audio that surrounds you from all directions, bringing your media to life like never before.
Stay updated with the latest advancements in audio technology and enhance your surround sound experience further by exploring features such as Dolby Atmos or DTS:X for even more immersive and three-dimensional soundscapes.
Now that you have mastered the installation process, feel free to share your newfound knowledge with friends or family who may be interested in setting up their own surround sound system.
Enjoy the incredible audio journey that your surround sound system provides, and get ready to be swept away by the power and depth of the soundscape that surrounds you!