Home>Devices & Equipment>Earbuds>How To Clean Out Earbuds
Earbuds
How To Clean Out Earbuds
Published: December 20, 2023
Learn how to clean out earbuds effectively and maintain their quality. Discover simple tips and tricks to remove dirt and debris from your earbuds for optimal performance.
(Many of the links in this article redirect to a specific reviewed product. Your purchase of these products through affiliate links helps to generate commission for AudioLover.com, at no extra cost. Learn more)
Table of Contents
Introduction
Earbuds have become a ubiquitous accessory in today’s tech-savvy world. Whether you use them for listening to music, watching movies, or taking calls, it’s essential to keep them clean and well-maintained to ensure optimal sound quality and prevent any potential health concerns.
Regular cleaning of your earbuds not only extends their lifespan but also helps to remove dirt, debris, and bacteria that can accumulate over time. By following a few simple steps, you can easily clean out your earbuds and keep them in tip-top shape.
In this article, we’ll guide you through the process of cleaning your earbuds effectively. We’ll cover the necessary supplies you’ll need, step-by-step instructions on how to clean the ear tips and earbuds themselves, and essential tips for drying and reassembling them afterwards.
So, let’s dive in and discover the best practices for cleaning and maintaining your earbuds!
Step 1: Gather necessary supplies
Before you begin cleaning your earbuds, it’s essential to gather all the necessary supplies. Here’s a list of items you’ll need:
- Microfiber cloth or cotton swabs
- Mild soap or cleaning solution (preferably alcohol-free)
- Warm water
- Small brush with soft bristles
- Isopropyl alcohol (optional)
Microfiber cloths are great for wiping away smudges and dirt without scratching the surfaces of your earbuds. Cotton swabs can be used to clean smaller, hard-to-reach areas.
When it comes to cleaning solutions, it’s best to use a mild soap or specially formulated cleaning solution that is safe for electronics. Avoid using harsh chemicals or alcohol-based solutions, as they can damage the delicate components of your earbuds.
If you prefer to use isopropyl alcohol for extra disinfection, make sure to dilute it with water (50/50 ratio) and use it sparingly. Excessive use of alcohol can potentially damage the rubber or plastic parts of your earbuds.
Lastly, a small brush with soft bristles will come in handy for removing stubborn debris or dirt from the crevices of your earbuds.
Once you have gathered all of these supplies, you are ready to move on to the next step: removing the ear tips.
Step 2: Remove the ear tips
Now that you have the necessary supplies, it’s time to remove the ear tips from your earbuds. The ear tips are the silicone or foam coverings that fit into your ears, providing comfort and a secure fit. Follow these steps to remove them:
- Gently hold the earbud between your thumb and index finger.
- Locate the base of the ear tip, where it connects to the earbud.
- Using a gentle twisting motion, rotate the ear tip counterclockwise until it starts to loosen.
- Once it’s loose enough, carefully pull the ear tip away from the earbud.
- Repeat the process for the other earbud.
Be careful not to apply too much force or pull on the ear tip forcefully, as this can damage the earbud or cause the ear tip to tear. If you’re having trouble removing the ear tip, try using a twisting motion again, or gently wiggling it back and forth until it loosens.
Once both ear tips are removed, set them aside. We’ll clean them in the next step.
Remember, it’s important to remove the ear tips before cleaning the earbuds themselves, as this allows for a more thorough cleaning and prevents damage to the ear tips during the process.
Now that you have successfully removed the ear tips, let’s move on to cleaning them in the following step.
Step 3: Clean the ear tips
Now that you have removed the ear tips, it’s time to clean them to ensure that they are free from dirt, oils, and bacteria. Follow these steps to clean the ear tips effectively:
- Fill a small bowl or sink with warm water.
- Add a few drops of mild soap or cleaning solution to the water.
- Gently place the ear tips into the soapy water and let them soak for a few minutes. This will help loosen any debris or buildup.
- Using your fingers or a soft brush, gently scrub the ear tips in the soapy water. Pay attention to any areas with visible dirt or grime.
- Rinse the ear tips thoroughly under warm running water to remove any soap residue.
- Inspect the ear tips for any remaining dirt or debris. If necessary, repeat the cleaning process until they are completely clean.
- Once the ear tips are clean, gently pat them dry with a clean towel or let them air dry completely.
It’s important to note that not all ear tips are waterproof or suitable for soaking. If you have foam ear tips, they may require a different cleaning method. Check the manufacturer’s instructions or packaging for specific cleaning guidelines for foam ear tips.
If you notice that the ear tips have become worn out or damaged during the cleaning process, it’s a good idea to replace them with new ones. This will ensure a comfortable fit and optimal sound quality.
Now that the ear tips are clean and dry, we can move on to cleaning the earbuds themselves in the next step.
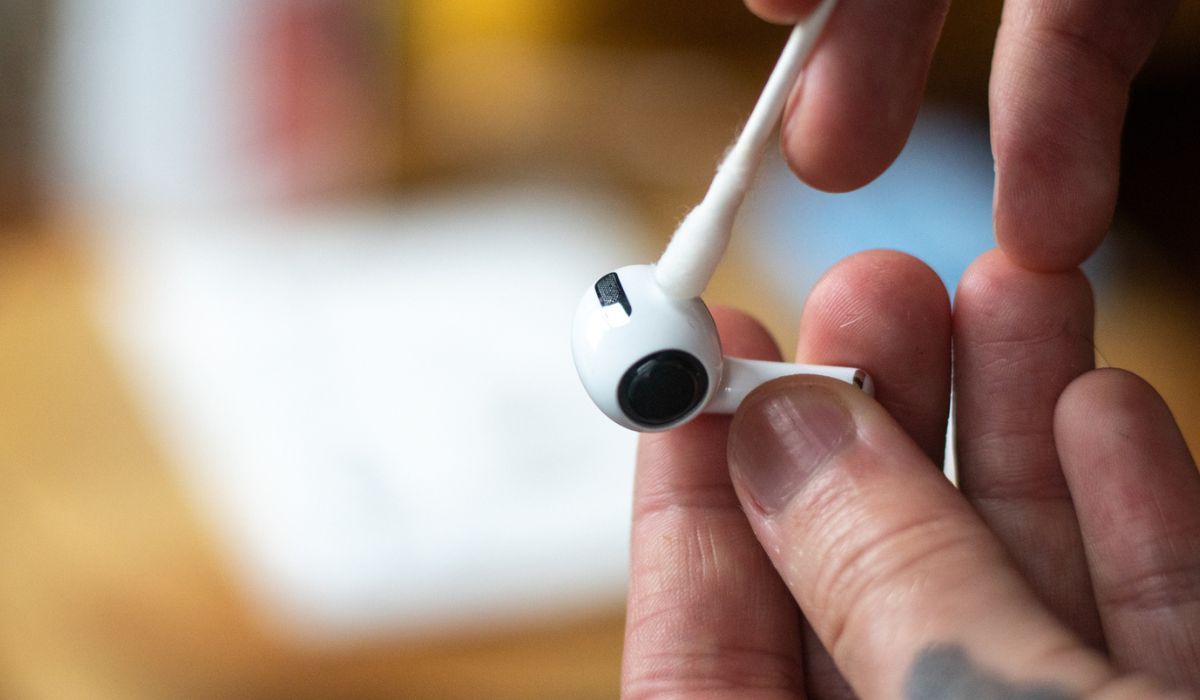
Step 4: Clean the earbuds
With the ear tips clean and dry, it’s time to focus on cleaning the earbuds themselves. Follow these steps to effectively clean your earbuds:
- Take a microfiber cloth or a cotton swab and dampen it slightly with water. Make sure to wring out any excess moisture.
- Gently wipe the outer surfaces of the earbuds to remove any dirt, dust, or smudges. Pay attention to the areas around the audio drivers and the connection points.
- If there are any stubborn stains or residue on the earbuds, you can dampen the cloth or swab with a mild cleaning solution. However, make sure the cleaning solution is safe for electronics and avoid getting excessive moisture on the earbuds.
- For small crevices or hard-to-reach areas, use a soft-bristled brush to gently remove any debris or dirt. Be careful not to apply too much pressure or use any abrasive materials that could scratch the surface of the earbuds.
- Once you have cleaned the earbuds, use a dry microfiber cloth or cotton swab to remove any excess moisture and ensure they are completely dry.
It’s important to avoid using excessive moisture or cleaning solutions that could damage the internal components of the earbuds. Also, make sure to avoid getting any liquid into the earbud’s sound ports or charging ports.
If you prefer to have an extra level of disinfection, you can lightly dampen a cloth or swab with isopropyl alcohol and gently wipe the surfaces of the earbuds. However, be cautious and use alcohol sparingly to prevent any damage to the earbuds.
Now that you have effectively cleaned the earbuds, it’s time to move on to the final step: drying and reassembling them.
Step 5: Dry and assemble the earbuds
After cleaning the earbuds, it’s important to ensure they are completely dry before reassembling them. Follow these steps to dry and assemble the earbuds:
- Take a clean, dry microfiber cloth or towel and gently wipe any remaining moisture from the earbuds. Pay close attention to the nooks and crevices where moisture can accumulate.
- Let the earbuds air dry for at least 10-15 minutes to ensure that all moisture has evaporated. Avoid using a hairdryer or any other heat source, as excessive heat can damage the internal components.
- Once the earbuds are dry, it’s time to reattach the ear tips. Take each ear tip and align it with the corresponding earbud, making sure it fits securely and comfortably.
- Gently twist the ear tip clockwise until it is securely in place. Ensure that the ear tip is centered and covers the speaker on the earbud.
- Repeat the process for the other earbud, ensuring both ear tips are properly attached.
Once you have reassembled the earbuds, give them a quick visual inspection to ensure that everything is in place and there are no loose or misaligned parts. Test the fit and comfort of the earbuds to ensure they sit snugly in your ears without causing any discomfort.
Remember that proper hygiene is crucial in maintaining the cleanliness of your earbuds. It’s a good practice to clean your earbuds regularly, especially if you use them frequently or share them with others. By following these steps, you can keep your earbuds clean, hygienic, and in optimal working condition.
With your clean and assembled earbuds ready, you can now enjoy your favorite music, movies, or podcasts with improved sound quality and comfort!
Conclusion
Cleaning your earbuds is an essential task to maintain their performance, longevity, and hygiene. By following the step-by-step process outlined in this article, you can ensure that your earbuds remain in optimal condition and provide you with the best audio experience.
Remember to gather the necessary supplies, remove the ear tips, clean them thoroughly, and then proceed to clean the earbuds themselves. Take care to use mild cleaning solutions, avoid excessive moisture, and be gentle when handling the delicate components of your earbuds.
Regular cleaning of your earbuds not only removes dirt and debris but also helps to prevent the build-up of bacteria, which can be harmful to your ear health. Additionally, clean earbuds can help to maintain sound quality, ensuring that you can enjoy your favorite music or podcasts with clarity and precision.
Make it a habit to clean your earbuds at least once a month or more frequently if you use them daily or engage in activities that expose them to dirt or sweat. By incorporating this cleaning routine into your maintenance regimen, you can prolong the lifespan of your earbuds and ensure that they continue to provide you with an exceptional audio experience for years to come.
So, don’t neglect the cleanliness of your earbuds. Take the time to clean and care for them, and you’ll be rewarded with clear sound, comfort, and peace of mind.