Home>Devices & Equipment>Music Box>How To Build Music Box Orpheus Am601
Music Box
How To Build Music Box Orpheus Am601
Modified: January 22, 2024
Learn how to build your very own Music Box Orpheus AM601 and create enchanting melodies. Easy step-by-step guide for music enthusiasts!
(Many of the links in this article redirect to a specific reviewed product. Your purchase of these products through affiliate links helps to generate commission for AudioLover.com, at no extra cost. Learn more)
Table of Contents
- Introduction
- Materials Needed
- Step 1: Gathering the Components
- Step 2: Assembling the Music Box Mechanism
- Step 3: Building the Music Box Casing
- Step 4: Installing the Music Box Mechanism into the Casing
- Step 5: Wiring the Music Box
- Step 6: Testing and Troubleshooting
- Step 7: Customizing Your Music Box
- Conclusion
Introduction
Welcome to the fascinating world of music boxes! These charming devices have captivated people for centuries with their melodious tunes and intricate designs. Whether you’re an avid collector or simply have a passion for DIY projects, building your own music box can be a rewarding and creative endeavor.
In this article, we will guide you through the process of building a Music Box Orpheus AM601, a popular and versatile music box kit. This kit provides all the necessary components to create a beautiful music box that will delight your senses and bring joy to anyone who hears its enchanting melodies.
Building a music box is a fantastic way to explore your creativity and showcase your craftsmanship. It allows you to appreciate the intricate mechanisms that produce the delightful sounds and immerse yourself in the world of mechanical music. Whether you’re a beginner or an experienced hobbyist, this project is sure to be an enjoyable and fulfilling experience.
Throughout this article, we will provide a step-by-step guide on how to assemble and customize your Music Box Orpheus AM601. We will cover everything from gathering the necessary components to troubleshooting and testing the final product. So, grab your tools, unleash your creativity, and let’s dive into the fascinating world of music box making!
Materials Needed
Before you embark on your music box building journey, it is important to gather all the necessary materials and tools. Here is a list of what you will need to build your Music Box Orpheus AM601:
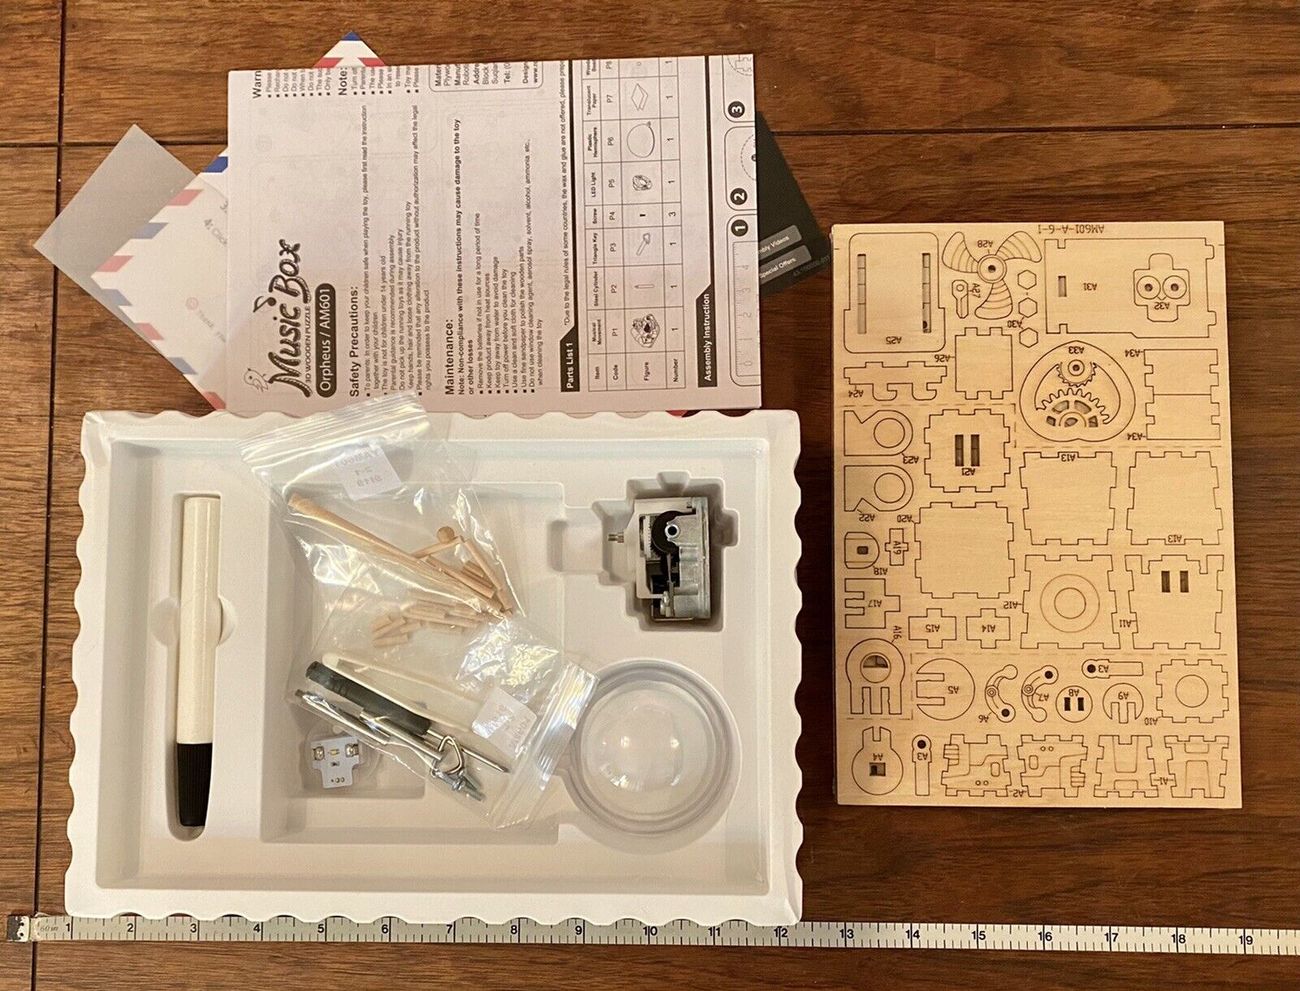
- Music Box Kit: The Music Box Orpheus AM601 kit, which includes the music box mechanism, a winding key, and various other components.
- Wood or Acrylic Sheet: Choose a sheet for the casing of your music box. You can opt for different types of wood, such as pine or plywood, or experiment with an acrylic sheet for a contemporary look.
- Cutting Tools: Depending on the material you choose for your casing, you will need appropriate cutting tools such as a saw, jigsaw, or laser cutter.
- Sandpaper and Wood Finish: To smooth out any rough edges and give your casing a polished look, you’ll need sandpaper of various grits. Additionally, choose a wood finish or paint to protect and enhance the beauty of your music box.
- Drill or Punch: You will need a drill or a punch to create holes in the casing for the winding key, the music box mechanism, and any additional decorations or embellishments.
- Small Screwdriver: A small screwdriver will be necessary to attach the music box mechanism securely to the casing.
- Wire Cutters and Strippers: These tools will come in handy when wiring the music box. They will help you cut and strip the wires to the appropriate length.
- Electrical Wires: You will need electrical wires to connect the music box mechanism to the speaker or any additional electronic components you choose to add.
- Soldering Iron: If you have experience with soldering, a soldering iron will be useful for creating solid and reliable connections between the wires.
- Solder and Flux: These are essential if you plan to solder the wires together. Make sure to choose high-quality solder and flux for optimal results.
- Speaker: If the music box kit does not come with a built-in speaker, you will need to purchase a small speaker to produce the sound.
- Batteries or Power Supply: Depending on your preference, you will need batteries to power the music box or a power supply to keep it running continuously.
Having all these materials and tools at hand before starting your project will ensure a smooth and enjoyable building experience. Now, let’s move on to the next step: gathering the components for your Music Box Orpheus AM601!
Step 1: Gathering the Components
Now that you have all the necessary materials and tools, it’s time to gather the components for your Music Box Orpheus AM601. The music box kit should come with the majority of the required components, but there are a few additional items you may want to consider:
- Music Box Kit: Start by ensuring you have the Music Box Orpheus AM601 kit. This kit typically includes the music box mechanism, a winding key, and various other components needed to create the music box.
- Casing Material: Choose the material for your casing, such as wood or acrylic sheet, based on your personal preference and desired aesthetic. Make sure to have the appropriate cutting tools for the selected material.
- Decorative Elements: Consider adding decorative elements to personalize your music box. This could include small figurines, crystals, or even custom engravings on the casing.
- Speaker: Check if the music box kit includes a built-in speaker. If not, you will need to purchase a small speaker separately to produce the sound.
- Batteries or Power Supply: Determine whether the kit requires batteries or can be powered through a power supply. Make sure to have the appropriate batteries or power supply on hand.
- Additional Tools: Assess if there are any additional tools or materials specific to the model you are building. Consult the instruction manual or online resources for any specific requirements.
Before proceeding, double-check that you have all the components listed above. It’s always a good idea to review the instructions thoroughly to ensure a smooth building process.
Now that you have gathered all the necessary components, you’re ready to move on to the next step: assembling the music box mechanism. In the following section, we will guide you through the process, so let’s get started!
Step 2: Assembling the Music Box Mechanism
With all the components gathered, it’s time to dive into assembling the music box mechanism. This step is crucial as it forms the heart of your music box, responsible for creating the beautiful melodies that will fill the air. Follow these steps to ensure a successful assembly:
- Prepare a clean workspace: Start by setting up a clean and clutter-free workspace. This will make it easier to work with small components without the risk of losing or damaging them.
- Refer to the instruction manual: Carefully read the instruction manual provided with your music box kit. Familiarize yourself with the different components and their functions. This will give you a clear understanding of how everything fits together.
- Identify the different parts: Lay out all the pieces of the music box mechanism in front of you. Recognize the essential components such as the cylinder, comb, gear train, and flywheel.
- Assemble the gear train: Start by connecting the gears of the gear train according to the instructions. Carefully align the teeth of each gear and secure them in place. This step is crucial for ensuring the smooth movement of the mechanism.
- Attach the comb and cylinder: Once the gear train is assembled, attach the comb to the music box mechanism using the designated screws or clips. Then, carefully place the cylinder in its designated position, ensuring it is aligned properly with the comb. The cylinder contains the pins that will produce different notes when the mechanism is activated.
- Secure the flywheel: The flywheel is responsible for winding the music box mechanism. Attach it securely to the designated position and ensure that it rotates freely without any obstruction.
- Test the mechanism: Before proceeding to the next step, give the mechanism a test run. Wind up the mechanism using the winding key and listen to the beautiful melodies produced by the pins striking the comb. Make any necessary adjustments if you notice any issues with the sound or movement.
Remember to take your time during the assembly process and handle the delicate components with care. Following the instructions precisely will ensure a smoothly functioning music box mechanism.
Now that you have successfully assembled the music box mechanism, it’s time to move on to the next step: building the music box casing. Continue reading to discover how to create a beautiful and unique casing for your music box.
Step 3: Building the Music Box Casing
Now that you have assembled the music box mechanism, it’s time to focus on building the casing for your Music Box Orpheus AM601. The casing not only provides protection to the delicate components but also adds aesthetic appeal to your music box. Follow these steps to create a beautiful and sturdy casing:
- Choose the Material: Decide on the material you want to use for the casing. Wood is a popular choice due to its timeless elegance, but you can also consider using an acrylic sheet for a modern touch. Make sure the material is sturdy enough to support the weight of the mechanism.
- Measure and Mark: Start by measuring and marking the dimensions of the casing according to the size of your music box mechanism. Take into consideration the width, height, and depth of the mechanism to ensure a proper fit.
- Cut the Material: Using the appropriate cutting tools, carefully cut out the pieces for the top, bottom, and sides of the casing based on your measurements. Take your time to ensure clean and precise cuts.
- Smooth the Edges: Use sandpaper of various grits to smooth out any rough edges on the cut pieces. This will give your casing a polished and professional finish.
- Assemble the Casing: Depending on the design of your casing, you may need to use screws, nails, or adhesives to join the cut pieces together. Follow the appropriate assembly method to ensure a sturdy and secure casing.
- Create Access Points: Drill or punch holes in the casing for the winding key and any other desired access points for the music box mechanism. Take care to align the holes with the corresponding components.
- Add Decorative Elements: Consider adding decorative elements to personalize your music box casing. You can engrave the wood, paint designs, or attach small figurines or crystals to add your own touch to the overall look of the music box.
- Apply Finishing Touches: Once you are satisfied with the assembly and decorations, apply a protective finish or paint to the casing. This will not only help to preserve the wood but also enhance the overall appearance.
Remember to take your time and pay attention to detail during the construction of the casing. A well-built and visually appealing casing will complement the beautiful melodies produced by the music box mechanism.
Now that you have created a sturdy and visually pleasing casing, it’s time to proceed to the next step: installing the music box mechanism into the casing. Stay tuned to learn how to bring your music box to life!
Step 4: Installing the Music Box Mechanism into the Casing
Now that you have built the casing for your Music Box Orpheus AM601, it’s time to bring it to life by installing the music box mechanism. Follow these steps to ensure a secure and functional installation:
- Prepare the Casing: Ensure that the inside of the casing is clean and free from any debris or rough edges. This will provide a smooth surface for the music box mechanism to be installed.
- Align the Mechanism: Carefully place the music box mechanism into the designated space inside the casing. Make sure it is positioned correctly and aligned properly with any access points or holes previously created.
- Secure the Mechanism: Once the mechanism is in place, use a small screwdriver to attach it securely to the casing. Depending on the design of your music box, there may be screws or clips provided in the kit to help with the installation process.
- Test the Movement: After securing the mechanism, give it a test run. Wind up the music box using the winding key and make sure that the mechanism moves smoothly and without any obstructions. Listen to the melodies produced by the pins striking the comb to ensure everything is working as expected.
- Make Adjustments: If you encounter any issues during the testing phase, carefully analyze the problem and make any necessary adjustments. This could involve readjusting the position of the mechanism, ensuring proper alignment, or checking for any loose connections.
It’s important to ensure that the music box mechanism is installed securely and operates smoothly within the casing. Taking the time to test and make any necessary adjustments will result in an optimal listening experience and prolong the lifespan of your music box.
Now that the music box mechanism is successfully installed, it’s time to move on to the next step: wiring the music box to bring the melodies to life. Stay tuned for the next section to learn how to wire the components together!
Step 5: Wiring the Music Box
Wiring the components of your Music Box Orpheus AM601 is an essential step to connect the music box mechanism to the speaker or any additional electronic components you plan to add. Follow these steps to ensure a proper and efficient wiring setup:
- Gather the Necessary Tools: Before you begin wiring, gather the wire cutters, wire strippers, soldering iron (if needed), solder, flux, and electrical wires of appropriate length and gauge for your project.
- Plan the Wiring Layout: Carefully plan the layout of the wiring. Determine the path the wires will take from the music box mechanism to the speaker or any other connected components. This will help ensure a clean and organized wiring setup.
- Strip the Wires: Use the wire strippers to remove a small section of insulation from the ends of the electrical wires. Make sure to strip just enough to expose the bare wire without damaging the conductor.
- Connect the Wires: Start by connecting the appropriate wires from the music box mechanism to the speaker or any other electronic components as per the given instructions. Ensure that the connections are secure to avoid any loose or weak connections.
- Solder the Wires (optional): If you are comfortable with soldering, use a soldering iron and solder to create a strong and reliable connection between the wires. Apply flux to the stripped ends of the wires, heat the joint with the soldering iron, and then apply solder to the joint to bond the wires together.
- Organize and Secure the Wires: Once the connections are made, organize and secure the wires using cable ties or electrical tape. This will prevent any tangling and ensure a neat and organized appearance.
- Test the Wiring: After completing the wiring process, give your music box a test run. Power it on and listen for the beautiful melodies produced by the music box mechanism. If the sound is clear and without any issues, then your wiring setup is successful.
Remember to exercise caution when working with electrical components. Ensure that the power is turned off and follow proper safety guidelines to avoid any mishaps.
Now that your music box is wired and the components are connected, it’s time to move on to the next step: testing and troubleshooting. Continue reading for guidance on how to ensure your music box is functioning optimally.
Step 6: Testing and Troubleshooting
Once you have completed the wiring process and connected all the components of your Music Box Orpheus AM601, it’s important to thoroughly test and troubleshoot the system to ensure optimal performance. Here are the steps to follow:
- Power On the Music Box: Connect the power source, whether it be batteries or a power supply, to activate the music box mechanism.
- Listen for Melodies: Pay close attention to the sound produced by the music box mechanism. Ensure that the melodies are clear, pleasant, and in tune. If the sound is distorted or lacks quality, there may be an issue that needs troubleshooting.
- Check the Connections: Inspect all the wiring connections and ensure they are secure and properly connected. Look for any loose wires, detached solder joints, or frayed insulation that may be causing issues with the sound quality.
- Inspect the Mechanism: Examine the music box mechanism for any signs of misalignment or mechanical problems. Ensure that the comb, cylinder, and gears are properly positioned and functioning smoothly.
- Make Adjustments: If you encounter any issues during the testing phase, make the necessary adjustments. This could involve realigning components, tightening loose connections, or addressing any mechanical faults.
- Consult the Instruction Manual: If you are unable to resolve the issue through troubleshooting, refer to the instruction manual for specific guidance or seek online resources for troubleshooting tips and solutions.
- Seek Professional Help: If all attempts at troubleshooting are unsuccessful, consider seeking assistance from a professional or contacting the manufacturer for further support.
Remember to be patient and persistent when troubleshooting any issues that may arise. With careful inspection and adjustments, you can ensure that your Music Box Orpheus AM601 operates smoothly with beautiful melodies.
Now that you have tested and resolved any potential issues, you’re ready to proceed to the final step: customizing your music box to add a personal touch. Read on to learn how to make your music box truly unique!
Step 7: Customizing Your Music Box
Now that you have successfully built and tested your Music Box Orpheus AM601, it’s time to add a personal touch and make it uniquely yours. Customizing your music box allows you to showcase your creativity and create a one-of-a-kind piece. Here are some ideas to inspire your customization:
- Decorate the Casing: Consider painting or staining the wood casing to match your personal style. You can also add decorative elements such as engravings, decals, or hand-painted designs.
- Add Embellishments: Enhance the aesthetics of your music box by adding small figurines, crystals, or other embellishments that reflect your interests, hobbies, or memories.
- Engrave or Etch: If you have access to engraving or etching tools, personalize the casing with names, dates, quotes, or intricate designs that hold meaning to you.
- Experiment with Different Materials: Instead of using traditional wood casing, consider using alternative materials such as acrylic, glass, or metal for a contemporary or industrial look.
- Add Lighting Effects: Install LED lights inside the casing to create a captivating illumination effect. You can choose different colors or even make the lights pulse or change with the rhythm of the music.
- Create a Display Stand: Design and build a display stand to showcase your music box when it’s not in use. You can make it out of wood, acrylic, or any other material that complements the overall aesthetic.
- Record Your Own Melodies: If you have a knack for music, consider recording your own melodies and replacing the pre-installed ones. This adds a personal touch and allows you to showcase your musical talents.
Don’t be afraid to let your imagination run wild when customizing your music box. The goal is to create something that not only sounds beautiful but also visually represents your unique style and personality.
Finally, remember to take pride in your customized Music Box Orpheus AM601 and display it proudly in your home or gift it to someone special. Your creation is a testament to your creativity and craftsmanship!
Congratulations on building your own music box and customizing it to perfection. You have now completed all the steps to create a truly special and personalized Music Box Orpheus AM601. Enjoy the enchanting melodies it produces and the joy it brings to those who listen.
Happy music box making!
Conclusion
Building your own Music Box Orpheus AM601 is a rewarding and creative journey that allows you to explore the intricate world of mechanical music. Throughout this article, we have guided you through the step-by-step process of building, customizing, and personalizing your music box. From gathering the components and assembling the mechanism to constructing the casing, wiring the components, and troubleshooting any potential issues, you’ve learned how to create a beautiful music box that will bring joy to your life.
By following the instructions and adding your own personal touch, you’ve created a unique piece that reflects your creativity and craftsmanship. Whether you choose to keep it for yourself or gift it to a loved one, your Music Box Orpheus AM601 will enchant everyone with its melodious tunes.
Remember to take your time at each step, paying attention to detail and ensuring that everything is securely connected and functioning as intended. With patience and perseverance, you’ve successfully built a music box that will be the centerpiece of any room.
Now, it’s time to sit back, relax, and enjoy the beautiful sounds produced by your custom music box. Let the melodies transport you to a world of tranquility and wonder as you appreciate the craftsmanship you’ve put into building this masterpiece.
Don’t be afraid to continue exploring the world of music box making and experimenting with different designs, materials, and melodies. With the skills and knowledge you’ve gained, the possibilities are endless.
Congratulations on your journey of creating your own Music Box Orpheus AM601. Embrace the joy of music and the satisfaction of building something truly remarkable with your own hands.
Happy listening!