Home>Devices & Equipment>Turntable>How To Remove Dust Cover Hinges On Technics Turntable

Turntable
How To Remove Dust Cover Hinges On Technics Turntable
Modified: January 22, 2024
Learn how to easily remove dust cover hinges on your Technics turntable. Enhance the performance of your beloved turntable with this simple guide.
(Many of the links in this article redirect to a specific reviewed product. Your purchase of these products through affiliate links helps to generate commission for AudioLover.com, at no extra cost. Learn more)
Table of Contents
- Introduction
- Step 1: Gather the necessary tools
- Step 2: Power off and unplug the turntable
- Step 3: Locate the dust cover hinges
- Step 4: Remove the screws securing the hinges
- Step 5: Lift off the dust cover
- Step 6: Clean or replace the hinges (optional)
- Step 7: Reattach the dust cover hinges
- Step 8: Test the movement of the dust cover
- Step 9: Power on and enjoy your turntable
- Conclusion
Introduction
Welcome to the world of turntables, where the music comes alive through the gentle rotation of vinyl records. If you own a Technics turntable, you are already familiar with its outstanding sound quality and sleek design. However, over time, you may notice that the dust cover hinges on your Technics turntable start to malfunction or become worn out. Fortunately, you don’t have to worry as removing and replacing these hinges is a relatively simple process that you can do yourself.
In this article, we will guide you through the step-by-step process of removing and replacing the dust cover hinges on your Technics turntable. Whether you are a seasoned vinyl enthusiast or new to the world of turntables, this guide will assist you in maintaining and restoring the functionality of your beloved Technics turntable.
Before we dive into the steps, it is important to note that these instructions are specific to Technics turntables, but the general principles can be applied to other turntable models as well. Make sure to reference your turntable’s manual for any specific instructions or consult with a professional if you are unsure about the process.
Step 1: Gather the necessary tools
Before you begin removing the dust cover hinges on your Technics turntable, it is essential to gather all the necessary tools. Having the right tools will make the process much smoother and ensure that you can complete the task without any hiccups. Here are the tools you will need:
- Screwdriver: You will need a screwdriver that matches the type of screws used on your turntable. Check the size and type of screws on your dust cover hinges to determine the appropriate screwdriver.
- Clean cloth: It’s always a good idea to have a clean cloth handy to wipe away any dust or dirt that may accumulate during the process.
- Tweezers (optional): If you encounter any small screws or debris that are difficult to remove, tweezers can be helpful in carefully extracting them.
Once you have gathered these tools, you are ready to proceed to the next step.
Step 2: Power off and unplug the turntable
Before you begin working on your turntable, it is crucial to ensure your safety by powering off and unplugging the device. This step will prevent any accidental damage to the turntable’s components and reduce the risk of electrical shock.
Here’s how you can safely power off and unplug your Technics turntable:
- Power off the turntable: Locate the power button on your Technics turntable and switch it off. This will cut the power supply to the device and prevent any electrical current from flowing through its circuits.
- Unplug the power cord: Once the turntable is powered off, unplug the power cord from the wall outlet or power strip. This step ensures that there is no connection to the electrical source and eliminates any risk of electric shock.
Always remember to exercise caution when working with electronic devices and follow proper safety protocols. Turning off and unplugging the turntable is a necessary precautionary measure to keep yourself and your equipment safe during the hinge removal process.
Now that your turntable is safely powered off and unplugged, you can proceed to the next step of removing the dust cover hinges.
Step 3: Locate the dust cover hinges
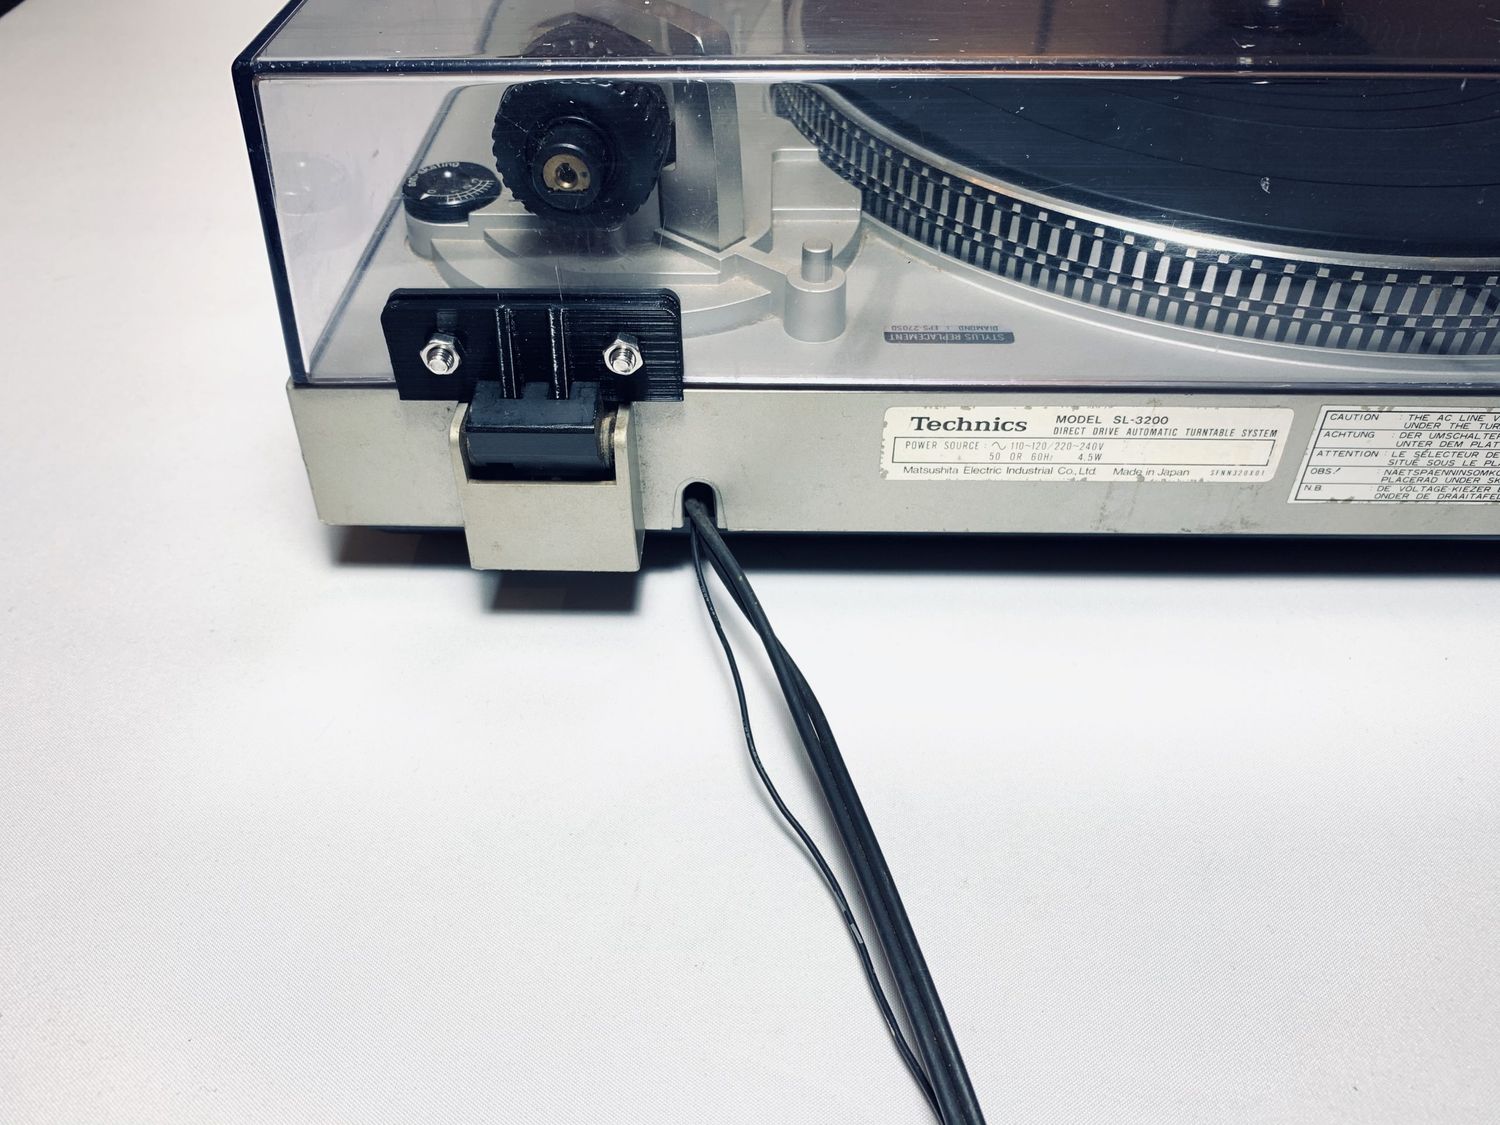
Once you have powered off and unplugged your Technics turntable, it’s time to locate the dust cover hinges. The hinges are the mechanisms that allow the dust cover to open and close smoothly. They are typically located on the backside of the turntable, near the edges of the dust cover.
To locate the dust cover hinges, follow these steps:
- Inspect the backside of the turntable: Take a close look at the backside of your Technics turntable. The dust cover hinges are usually positioned near the corners of the turntable body.
- Identify the hinge attachment points: Look for small screws or fasteners that are holding the hinges in place. These attachment points will indicate the location of the hinges.
- Check the dust cover: When the turntable is not in use, the dust cover is kept closed, covering the record platter. Gently lift the dust cover to reveal the hinges beneath it. Take note of any visible screws or brackets that are securing the hinges.
Locating the dust cover hinges is a crucial step in the process as it will guide you on where to focus your efforts when removing the hinges. By familiarizing yourself with the hinge attachment points and their position, you will be better equipped to proceed with the next steps.
Once you have located the dust cover hinges, you are ready to move on to the next step of removing the screws securing the hinges.
Step 4: Remove the screws securing the hinges
Now that you have located the dust cover hinges on your Technics turntable, it’s time to remove the screws that secure them in place. By removing these screws, you will be able to detach the hinges from the turntable body and proceed with the hinge removal process. Here’s how you can remove the screws:
- Select the appropriate screwdriver: Depending on the type of screws used on your turntable, choose the screwdriver that matches their size and type. This will ensure that you have a secure grip and can easily unscrew the hinges.
- Position your screwdriver: Place the tip of your screwdriver into the head of the first screw securing the hinge. Apply gentle pressure in an anti-clockwise direction to loosen the screw.
- Unscrew the hinge screws: Continue turning the screwdriver anti-clockwise until the screw becomes loose. Repeat this process for the remaining screws that are holding the hinges in place. Set the screws aside in a safe place for later reassembly.
- Detach the hinges: Once all the screws are removed, you can carefully detach the hinges from the turntable body. Gently lift the dust cover while holding onto the hinges to prevent any damage or accidental dropping.
It’s important to handle the screws with care to avoid misplacing or losing them. Keeping the screws organized and in a secure location will ensure that you can easily reattach the hinges later on.
With the screws removed and the hinges detached, you are now ready to move on to the next step of lifting off the dust cover.
Step 5: Lift off the dust cover
With the dust cover hinges now detached from the turntable, it’s time to lift off the dust cover itself. By removing the dust cover, you will have better access to clean or replace the hinges if necessary. Here’s how you can lift off the dust cover:
- Hold the dust cover: Firmly grip both sides of the dust cover with your hands. Ensure that you have a secure grip to prevent dropping or damaging the cover.
- Lift the dust cover: Gently and steadily lift the dust cover upwards. Be cautious of any cables or wires that may be connected to the turntable. Carefully move them aside or untangle them to allow for a smooth removal of the dust cover.
- Set aside the dust cover: Once the dust cover is lifted off, place it on a clean and soft surface, such as a towel or a tablecloth. This will prevent any scratches or damage to the cover’s surface.
With the dust cover now removed from the turntable, you have a clear view of the hinges and the turntable’s platter. You can proceed to the next steps of cleaning or replacing the hinges, depending on their condition and your preference.
Remember to handle the dust cover with care to avoid any accidental drops or bumps. The dust cover is an essential component of your turntable, and proper handling will ensure its longevity.
Now that the dust cover has been lifted off, you can continue with cleaning or replacing the hinges, which we will cover in the next step.
Step 6: Clean or replace the hinges (optional)
After removing the dust cover and detaching the hinges, you have the option to clean or replace the hinges if needed. This step is optional but recommended to ensure optimal functionality and longevity of the hinges. Here are the guidelines for cleaning or replacing the hinges:
- Cleaning the hinges: If the hinges are dirty or have accumulated debris over time, you can clean them using a soft cloth or a cotton swab. Gently wipe away any dust or dirt on the hinges, making sure to reach all the nooks and crannies. You can also use a mild cleaning solution if necessary, but make sure to dry the hinges thoroughly afterwards.
- Replacing the hinges: If the hinges are damaged, rusted, or no longer functioning properly, it may be necessary to replace them. To do this, you will need to purchase replacement hinges that are compatible with your Technics turntable model. Follow the manufacturer’s instructions or consult a professional if you are unsure about the hinge replacement process.
Remember to handle the hinges with care, especially if you are replacing them. Avoid bending or forcing the hinges, as this may cause further damage to your turntable.
It’s important to note that not all turntables have easily replaceable hinges. Some models may require more complex disassembly and professional assistance. Refer to your turntable’s manual or consult with a technician if you are unsure about the hinge replacement process.
Once you have cleaned or replaced the hinges (if necessary), you can proceed to the next step of reattaching the dust cover hinges.
Step 7: Reattach the dust cover hinges
After cleaning or replacing the hinges, it’s time to reattach them to the Technics turntable. Properly securing the hinges ensures that the dust cover opens and closes smoothly, protecting your turntable and vinyl records. Here’s how you can reattach the dust cover hinges:
- Position the hinges: Take the hinges and align them with the hinge attachment points on the backside of the turntable. Make sure the screw holes on the hinges line up with the corresponding holes on the turntable.
- Insert the screws: Once the hinges are properly positioned, insert the screws through the hinge holes and into the attachment points on the turntable. Begin with one screw and loosely tighten it, then move on to the remaining screws. This will allow for adjustments if needed.
- Tighten the screws: Using your screwdriver, gradually tighten each screw in a clockwise direction until they are securely fastened. Avoid overtightening, as this may cause damage to the hinges or the turntable.
It’s important to ensure that the hinges are aligned properly and firmly attached to the turntable. This will ensure that the dust cover operates smoothly and effectively protects your turntable’s components.
Once the screws are tightened and the hinges are securely attached, you can move on to the next step of testing the movement of the dust cover.
Step 8: Test the movement of the dust cover
Now that you have reattached the hinges, it’s time to test the movement of the dust cover on your Technics turntable. This step ensures that the dust cover opens and closes smoothly and that the hinges are properly installed. Follow these instructions to test the movement of the dust cover:
- Gently lower the dust cover: Carefully lower the dust cover back onto the turntable, ensuring that it aligns correctly with the hinges.
- Open the dust cover: Gradually lift the dust cover to the fully open position. Observe the movement of the cover as it opens and check for any resistance or misalignment.
- Close the dust cover: Slowly lower the dust cover back down to the closed position. Again, pay attention to the movement and ensure that it closes smoothly without any issues.
During the testing process, listen for any unusual sounds or irregularities in the movement of the dust cover. If you notice any problems, such as sticking or difficulty in opening or closing, you may need to readjust the hinges or seek professional assistance.
By testing the movement of the dust cover, you can ensure that it operates properly and provides the necessary protection for your turntable and vinyl records. A smoothly functioning dust cover adds to the overall user experience and helps maintain the longevity of your Technics turntable.
If the dust cover moves smoothly without any issues, you can proceed to the final step of powering on your turntable and enjoying your vinyl collection.
Step 9: Power on and enjoy your turntable
Congratulations! You have successfully completed the process of removing and reattaching the dust cover hinges on your Technics turntable. Now, it’s time to power on your turntable and immerse yourself in the joy of vinyl music. Here’s how you can do it:
- Plug in and power on: Connect the power cord back to the turntable and plug it into a power outlet.
- Turn on the turntable: Locate the power switch on your Technics turntable and switch it on. The turntable should power up, and you will see the platter rotating, ready to play your favorite vinyl records.
- Place a record: Carefully remove the record from its sleeve and place it onto the platter. Make sure to handle the record by the edges to avoid smudges or scratches.
- Lower the dust cover: If you’re ready to start playing your record, gently lower the dust cover onto the turntable. This will protect the record and minimize any potential dust or debris from interfering with the playback.
- Enjoy the music: Once the dust cover is in place, you can operate the turntable as usual. Use the cueing lever to carefully lower the stylus onto the record, and let the music fill the room as you indulge in the rich, analog sound.
Remember to always handle your vinyl records with care to prevent any damage that could affect their playability. Keep your turntable clean and dust-free for the best audio experience.
Now that you have successfully completed the process of removing and reattaching the dust cover hinges, sit back, relax, and enjoy the wonderful world of vinyl music with your Technics turntable.
Conclusion
Congratulations on successfully removing and reattaching the dust cover hinges on your Technics turntable! By following the steps outlined in this guide, you have not only restored the functionality of your dust cover but also gained valuable knowledge about the maintenance of your turntable.
The dust cover hinges play a crucial role in protecting your turntable and vinyl records from dust, dirt, and potential damage. By regularly inspecting and maintaining these hinges, you can ensure that your Technics turntable continues to provide you with high-quality, enjoyable listening experiences.
Remember, the process of removing and reattaching the dust cover hinges is not purely a mechanical task. It allows you to engage with your turntable and take pride in caring for your audio equipment. It’s an opportunity to appreciate and connect with the analog world of vinyl music.
Now that you have completed the steps, take some time to enjoy your turntable. Listen to your favorite records, explore new artists, and immerse yourself in the unique sound and experience that vinyl records offer.
Lastly, always refer to your turntable’s manual or seek professional assistance if you encounter any difficulties or have specific concerns about the hinge removal or installation process. Each turntable model may have its own nuances that require specific instructions.
Thank you for joining us on this journey to maintain and enhance your Technics turntable. We hope you continue to enjoy the beauty and nostalgia of vinyl music for years to come!

