Home>Events & Info>Playback>Get Smooth Playback When Recording In Obs
Playback
Get Smooth Playback When Recording In Obs
Published: November 6, 2023
Improve your recording experience with smooth playback in OBS. Boost your workflow efficiency and enhance your video content creation.
(Many of the links in this article redirect to a specific reviewed product. Your purchase of these products through affiliate links helps to generate commission for AudioLover.com, at no extra cost. Learn more)
Table of Contents
- Introduction
- Step 1: Adjusting OBS Settings
- Step 2: Optimizing your Hardware
- Step 3: Adjusting Video Output Settings
- Step 4: Optimizing Audio Settings
- Step 5: Using Plugins and Filters
- Step 6: Managing Sources and Scenes
- Step 7: Recording to an SSD
- Step 8: Network Optimization
- Step 9: Troubleshooting Common Issues
- Conclusion
Introduction
When it comes to recording smooth gameplay or live streaming your content, OBS (Open Broadcaster Software) is a popular and powerful tool. However, ensuring smooth playback during your recordings can sometimes be a challenge.
In this article, we will explore various steps and techniques to help you optimize OBS settings, hardware, and other factors to achieve smooth playback when recording in OBS. Whether you’re a gamer, content creator, or just looking to record your computer screen, these tips will help you enhance the recording experience and deliver high-quality videos.
From adjusting OBS settings to optimizing audio and video output, and managing sources and scenes, we will cover all aspects to ensure smooth and seamless playback. Additionally, we will explore using plugins and filters, recording to a solid-state drive (SSD), and network optimization.
If you’ve ever experienced lag, frame drops, or choppiness in your OBS recordings, this guide is for you. By following these steps, you can significantly improve the performance and quality of your recordings, delivering a professional and polished final product.
So, let’s dive in and learn how to get smooth playback when recording in OBS.
Step 1: Adjusting OBS Settings
Before jumping into recording, it’s important to ensure that OBS is configured optimally. Adjusting OBS settings can vastly improve the performance and smoothness of your recordings. Let’s explore the key settings you should consider:
- Video Settings: Start by navigating to “Settings” in OBS and selecting the “Video” tab. Here, you can set your base canvas resolution and output (scaled) resolution. It is recommended to use a base canvas resolution that matches your monitor’s native resolution and an output resolution that suits your recording needs.
- Encoder: Under the “Output” tab in the settings, choose the appropriate encoder for your system. The two popular options are “Software (x264)” and “Hardware (NVENC)”. If your system has a dedicated graphics card, using the hardware encoder (NVENC) can offload the encoding process from your CPU, resulting in improved performance.
- Bitrate: Bitrate determines the amount of data streaming through OBS. Too low of a bitrate can result in pixelation, while too high can cause buffering or dropped frames. Finding the right balance is crucial. Start with a bitrate around 2500-5000 kbps and adjust as needed.
- Advanced Settings: In the “Advanced” tab, consider enabling “Use Previews” to improve performance when working with multiple scenes or sources. Additionally, using the “Performance Mode” checkbox can allocate more resources to OBS, optimizing its performance during recordings.
Adjusting OBS settings can significantly impact the quality and smoothness of your recordings. Take some time to experiment with different settings and find the configuration that works best for your system and recording requirements.
Step 2: Optimizing your Hardware
In addition to adjusting OBS settings, optimizing your hardware is crucial for achieving smooth playback during recordings. Here are some key considerations:
- CPU Performance: OBS relies heavily on your CPU for encoding and processing. Ensure that your CPU is capable of handling the encoding workload without maxing out its capacity. Upgrading to a more powerful CPU can greatly improve performance.
- Memory (RAM): Sufficient RAM is essential for smooth recordings. If your system is running low on memory, it can result in lag and frame drops. Ensure that you have enough RAM to handle both OBS and your recording software simultaneously.
- Graphics Card: A dedicated graphics card can significantly improve OBS performance, especially when using the hardware encoder. Consider investing in a graphics card that supports hardware encoding (e.g., NVIDIA NVENC or AMD VCE) for smoother recordings.
- Storage: Recording large video files requires fast storage to avoid bottlenecks. Consider using a solid-state drive (SSD) for storing your recordings. SSDs offer faster read and write speeds compared to traditional hard drives, resulting in smoother playback and reduced loading times.
By optimizing your hardware, you can ensure that OBS has the necessary resources to handle the encoding and processing tasks efficiently. Upgrading components such as your CPU, RAM, graphics card, and storage can make a significant difference in the quality and smoothness of your recordings.
Step 3: Adjusting Video Output Settings
When it comes to recording in OBS, adjusting the video output settings can significantly impact the quality and smoothness of your recordings. Here are some key considerations:
- Resolution: Choose the appropriate resolution for your recordings. If you’re recording gameplay, it is recommended to use the native resolution of your display. However, if you’re recording for a specific platform or need smaller file sizes, consider reducing the resolution accordingly.
- Frame Rate: The frame rate determines the number of frames captured per second. Higher frame rates result in smoother playback, but it can also increase the file size. Depending on your recording needs and the capabilities of your system, choose a frame rate that balances smoothness and file size.
- Keyframe Interval: Keyframes are complete frames that serve as reference points for the video encoder. It is recommended to set the keyframe interval to a value that is a multiple of the frame rate. This ensures better compression and smoother playback.
- Video Codec: OBS supports various video codecs such as H.264 and HEVC. The choice of codec can impact the quality and performance of your recordings. H.264 is the most widely supported and offers a good balance between quality and file size. Experiment with different codecs to find the one that works best for your needs.
By adjusting the video output settings in OBS, you can optimize the recording quality, file size, and playback smoothness. It is important to find the right balance based on your recording needs and the capabilities of your hardware.
Step 4: Optimizing Audio Settings
While video quality is important, don’t overlook the importance of audio when it comes to recording in OBS. Optimizing your audio settings can greatly enhance the overall recording experience. Here are some tips to get you started:
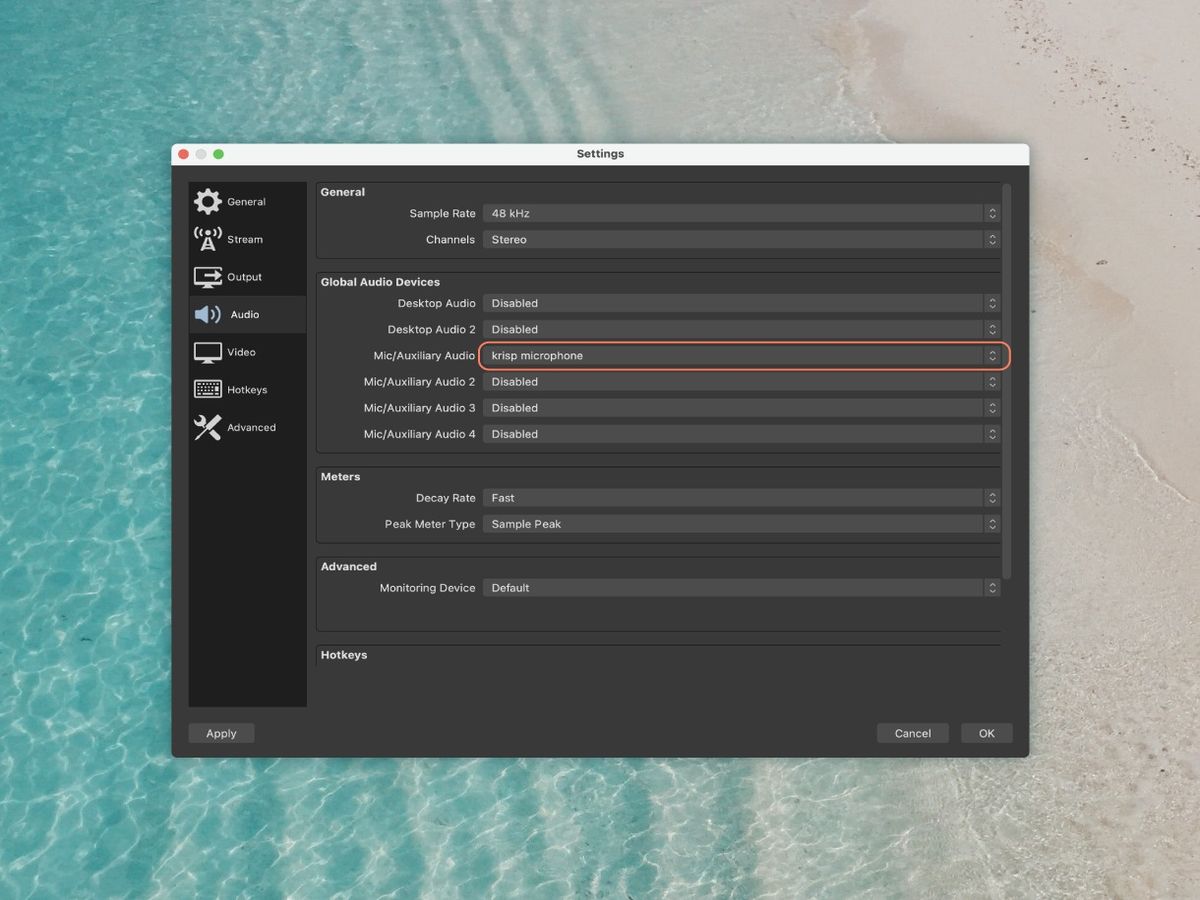
- Audio Devices: Start by selecting the appropriate audio devices in OBS. Ensure that your microphone and other audio sources are properly configured and that their levels are set correctly.
- Sample Rate: The sample rate determines the number of audio samples captured per second. Higher sample rates can improve audio clarity, but it can also increase the file size. Consider using a sample rate of 44.1 kHz or 48 kHz, which are standard rates for most audio recordings.
- Audio Bitrate: Similar to video bitrate, audio bitrate impacts the quality and file size. A higher audio bitrate generally results in better audio quality but can increase the file size. Using a bitrate of 128 kbps or higher is recommended for good audio quality.
- Noise Reduction and Filters: OBS offers various audio filters, such as noise reduction, compression, and equalization, to enhance audio quality. Experiment with these filters to improve the clarity and balance of your recordings.
- Audio Levels: Ensuring that your audio levels are set properly is crucial. Avoid clipping by adjusting the microphone input levels and monitoring the audio meter in OBS. It is recommended to aim for audio levels that peak around -6 dB to -12 dB to avoid distortion.
By optimizing your audio settings in OBS, you can achieve crisp and clear audio recordings, improving the overall quality of your content. Take some time to experiment with different settings and audio filters to find what works best for your recordings.
Step 5: Using Plugins and Filters
OBS provides a wide range of plugins and filters that can enhance your recordings and add special effects. By leveraging these features, you can take your recordings to the next level. Here’s how:
- Visual Filters and Effects: OBS offers various visual filters and effects that can be applied to your video sources. Experiment with options like color correction, chroma key (green screen), sharpening, and blur to enhance the visuals of your recordings.
- Audio Filters: In addition to the built-in audio filters, you can also explore third-party plugins to further enhance your audio quality. Plugins like noise gates, de-essers, and reverb can help improve the clarity and professional sound of your recordings.
- Transitions: OBS also supports scene transitions, allowing you to create smooth transitions between different scenes or sources. By adding transitions like fade, swipe, or slide, you can make your recordings visually appealing and seamless.
- Custom Scripts: For more advanced users, OBS supports custom scripts that can extend its functionality. You can write and add scripts to automate certain tasks or create unique effects that are not available through the default OBS features.
By utilizing plugins and filters in OBS, you can add a personal touch to your recordings, making them more engaging and visually appealing. Take advantage of the available options and get creative with your content.
It’s worth noting that while plugins and filters can enhance your recordings, be mindful not to overdo it. Use them judiciously to maintain a clean and professional look for your content.
Step 6: Managing Sources and Scenes
Efficiently managing sources and scenes in OBS is essential for a smooth recording experience. By properly organizing and configuring your sources and scenes, you can easily switch between different content and maintain a professional look. Here’s how to do it:
- Sources: Sources are the individual elements that make up your recording, such as video capture devices, images, text, or browser windows. Keep your sources well-organized by using descriptive names and grouping them logically.
- Scenes: Scenes are collections of sources that represent different setups or layouts for your recordings. Create scenes for specific content, such as a gameplay scene or a webcam overlay scene. Being organized with scenes allows you to switch seamlessly between different setups during your recording.
- Hotkeys: Set up hotkeys to quickly switch between scenes, start or stop recordings, or perform other actions in OBS. Hotkeys can greatly improve workflow efficiency, especially during live recordings or while switching between different content on the fly.
- Preview and Studio Mode: OBS offers a Preview mode that allows you to preview your scene changes before they are pushed to the live output. This is particularly useful when you want to make sure everything looks as expected before switching scenes. Additionally, Studio mode provides a more advanced interface for managing scenes and sources, making it easier to create professional-quality recordings.
By effectively managing sources and scenes in OBS, you can create a streamlined and visually appealing recording experience. Spend some time organizing your sources, creating scenes for different content setups, and utilizing hotkeys to optimize your workflow.
Remember, a well-organized setup not only simplifies the recording process but also allows you to focus on creating high-quality content without any distractions.
Step 7: Recording to an SSD
Recording your OBS footage to an SSD (solid-state drive) can significantly improve the performance and smoothness of your recordings. Compared to traditional hard drives, SSDs offer faster read and write speeds, resulting in reduced loading times and improved data transfer rates. Here’s why recording to an SSD is advantageous:
- Fast Write Speeds: SSDs have much faster write speeds compared to traditional hard drives. This means that your OBS recordings can be written to the SSD more quickly, minimizing the chance of dropped frames and ensuring a smooth recording experience.
- Reduced Loading Times: When recording to an SSD, accessing recorded files for editing or playback becomes faster. SSDs have faster read speeds, allowing you to navigate through the footage quickly and efficiently, enhancing your editing workflow.
- Stability and Durability: SSDs have no moving parts, making them more resistant to physical damage caused by impacts or vibrations. This durability ensures that your recorded footage is safer, reducing the risk of data loss or corruption.
- Compatibility: SSDs are compatible with most modern computers and are available in various form factors, such as PCIe, M.2, and SATA. This flexibility allows you to choose the SSD that suits your system and easily integrate it into your recording setup.
When choosing an SSD for recording your OBS footage, look for one with ample storage capacity and good sustained write speeds. This will ensure that you have sufficient space for your recordings and that the SSD can handle the constant writing of data without performance degradation.
By recording to an SSD, you can optimize your recording workflow, reduce the chances of dropped frames, and improve the overall smoothness and performance of your OBS recordings.
Step 8: Network Optimization
While network optimization may not directly impact the smoothness of your OBS recordings, it is still an important consideration, especially if you’re live streaming your content. A stable and fast internet connection can ensure that your viewers have a seamless viewing experience. Here are some steps to optimize your network:
- Test your Internet Speed: Run a speed test to determine your upload speed. A stable and reliable upload speed is crucial for live streaming. Ensure that your internet service provider offers sufficient upload bandwidth for your streaming needs.
- Wired Connection: Whenever possible, use a wired Ethernet connection instead of relying on Wi-Fi. Wired connections offer more stability and consistent speed, minimizing the chances of dropped frames or lag during your live streams.
- Close Background Applications: Close any unnecessary applications and processes that may use up your network bandwidth. Background downloads, updates, or streaming services consuming bandwidth can impact your OBS performance and live stream quality.
- Network Quality of Service (QoS): If your router supports it, enable Quality of Service (QoS) settings. This feature prioritizes certain types of traffic, such as your OBS streaming data, over other less important data. This can help maintain a stable and smooth connection during your live stream.
- Optimize Streaming Settings: In OBS, adjust your streaming settings to match your internet connection. For example, set the appropriate bitrate and resolution, considering your available upload speed. This will help prevent buffering and ensure a smoother streaming experience.
By optimizing your network for streaming in OBS, you can provide your viewers with a seamless and high-quality viewing experience. A stable internet connection and proper network management are key factors in minimizing interruptions and maintaining a smooth live stream.
Step 9: Troubleshooting Common Issues
While OBS is a powerful tool, there may be times when you encounter common issues that affect the smoothness of your recordings. Here are some troubleshooting tips to address these issues:
- Reducing CPU Load: If you notice high CPU usage during recordings, try adjusting the video settings in OBS to reduce the load. This can include lowering the resolution, reducing the frame rate, or using a hardware encoder if available.
- Updating OBS and Drivers: Ensure that you are using the latest version of OBS and that your GPU drivers are up to date. Outdated software or drivers can cause compatibility issues or performance problems.
- Checking for Overheating: Excessive heat can affect the performance of your CPU and GPU, leading to dropped frames or lag. Monitor your system’s temperature using software tools and ensure that your computer is properly cooled. Consider cleaning out any dust buildup from your system.
- Background Processes: Close any unnecessary background processes or applications that may be consuming system resources. These processes can interfere with OBS and impact performance.
- Adjusting Audio Settings: If you encounter audio synchronization issues, try adjusting the audio settings in OBS. You can experiment with different audio synchronization offsets to align the audio properly with the video.
- Testing with Different Themes/Themes: OBS allows you to use different themes and designs for your recording interface. Sometimes, certain themes can cause performance issues. Test different themes and layouts to see if it improves the smoothness of your recordings.
It’s important to note that troubleshooting may require some trial and error, as each system configuration is unique. If you encounter persistent issues, consider seeking help from the OBS community forums or support channels to get specific assistance for your setup.
By troubleshooting and addressing common issues that can affect the smoothness of your recordings, you can ensure a more reliable and enjoyable recording experience.
Conclusion
Recording in OBS can be a rewarding experience, allowing you to capture high-quality gameplay, create engaging content, or host live streams. However, achieving smooth playback during recordings requires careful optimization and configuration. By following the steps outlined in this guide, you can greatly improve the performance and quality of your recordings.
We started by adjusting OBS settings, fine-tuning options like video resolution, encoder, and bitrate. Next, we explored optimizing hardware components, such as CPU, RAM, and graphics card, to ensure they can handle the recording process effectively. Adjusting video output settings and optimizing audio settings were also crucial steps to enhance the visual and audio quality of your recordings.
We then delved into utilizing plugins and filters, which can add special effects and enhance the overall look and sound of your recordings. Managing sources and scenes effectively allows for smooth transitions and seamless content switching. Recording to an SSD can improve performance and reduce loading times, while network optimization ensures a stable and fast internet connection for live streaming.
Finally, we discussed troubleshooting common issues that may arise during recordings, providing valuable tips to address them and maintain smooth playback. By addressing these concerns, you can overcome obstacles that may hinder your recording experience.
Remember, optimizing OBS for smooth playback is a constant process of fine-tuning and adjusting settings to suit your specific needs and hardware capabilities. Keep experimenting, stay updated with OBS developments, and seek help when needed to achieve the best possible recording results.
With these techniques in your arsenal, you can capture stunning recordings, provide exceptional content, and deliver a superior viewing experience to your audience.