Home>Events & Info>Playback>How To Get Mic Playback G430
Playback
How To Get Mic Playback G430
Modified: January 22, 2024
Learn how to enable mic playback on your G430 headset and enjoy crystal clear audio while gaming or making voice calls. Follow these simple instructions to enhance your audio experience.
(Many of the links in this article redirect to a specific reviewed product. Your purchase of these products through affiliate links helps to generate commission for AudioLover.com, at no extra cost. Learn more)
Table of Contents
Introduction
Welcome to this comprehensive guide on how to get microphone playback on your G430 headset. Whether you’re using it for gaming, virtual meetings, or voice chat, ensuring that your microphone is set up properly is crucial for clear and crisp audio communication. The G430 is a popular headset known for its high-quality sound and built-in microphone, making it a top choice for gamers and professionals alike.
In this article, we will walk you through the step-by-step process of connecting your G430 headset to your computer and enabling microphone playback. We will cover everything from the initial setup to adjusting the microphone levels and testing the playback. By the end of this guide, you’ll be able to enjoy the full functionality of your G430 headset and communicate effortlessly with others.
Before we dive into the steps, it’s important to note that this guide is specifically tailored for Windows users. If you are using a different operating system, some of the steps or settings may vary. However, the general process should be quite similar across different platforms.
With that said, let’s get started with the first step: connecting your G430 headset to your computer.
Step 1: Connect the G430 headset to your computer
The first step in getting microphone playback on your G430 headset is to ensure that it is properly connected to your computer. Follow these simple instructions:
- Locate the USB cable that came with your G430 headset.
- Plug one end of the USB cable into the USB port on your computer.
- Connect the other end of the USB cable to the USB adapter that is attached to the G430 headset cable.
- Insert the audio jacks of your G430 headset into the corresponding audio input and output ports on your computer. The green plug is for audio output, and the pink plug is for the microphone input.
- Make sure all the connections are secure and properly inserted.
Once you have successfully connected your G430 headset to your computer, you’re ready to move on to the next step.
Remember, it’s crucial to ensure that all the connections are secure to avoid any audio or microphone playback issues. If you’re experiencing any difficulties, double-check the connections and try reconnecting the headset to your computer. It’s also worth checking if the USB ports and audio input/output ports on your computer are functioning correctly.
Now that you’ve connected your G430 headset to your computer, it’s time to move on to the next step: opening the sound settings.
Step 2: Open the sound settings
In order to enable microphone playback on your G430 headset, you need to access the sound settings on your computer. Follow these steps to open the sound settings:
- Right-click on the speaker icon in the system tray located at the bottom right corner of your screen.
- A context menu will appear. Click on “Open Sound Settings” or “Playback devices,” depending on your operating system.
- This will open the Sound settings window, where you can configure your audio devices.
Alternatively, you can also access the sound settings by following these steps:
- Click on the Start menu and open the Control Panel.
- Search for “Sound” in the Control Panel search bar.
- Click on “Sound” or “Manage audio devices” in the search results to open the Sound settings.
Once you have successfully opened the sound settings, you’re ready to proceed to the next step of selecting the G430 headset as the playback device.
By opening the sound settings, you gain access to various audio options and settings that allow you to configure and manage your audio devices. This is where you can select the specific device you want to use for audio playback and recording.
Now that you have opened the sound settings, it’s time to move on to the next step: selecting the G430 headset as the playback device.
Step 3: Select the G430 headset as the playback device
Now that you have opened the sound settings on your computer, it’s time to select the G430 headset as the playback device. Follow these steps:
- In the Sound settings window, click on the “Playback” tab.
- You will see a list of available playback devices. Look for the G430 headset in the list.
- Once you locate the G430 headset, right-click on it and select “Set as Default Device” or “Set as Default Playback Device.” This will set the G430 headset as the default playback device for your computer.
- If there are any other devices listed in the playback devices list, you can right-click on them and select “Disable” to prevent audio playback through those devices.
- Click on “OK” or “Apply” to save the changes and close the sound settings window.
By selecting the G430 headset as the playback device, you ensure that audio from your computer will be played through the headset. This is essential to hear any microphone playback or other audio sources through the G430 headset.
It’s important to note that making the G430 headset the default playback device may disable audio playback through other devices such as speakers or other headphones. You can always switch back to your preferred playback device by following the same steps and selecting the desired device as the default.
Now that you have successfully set the G430 headset as the playback device, it’s time to move on to the next step: adjusting the microphone levels.
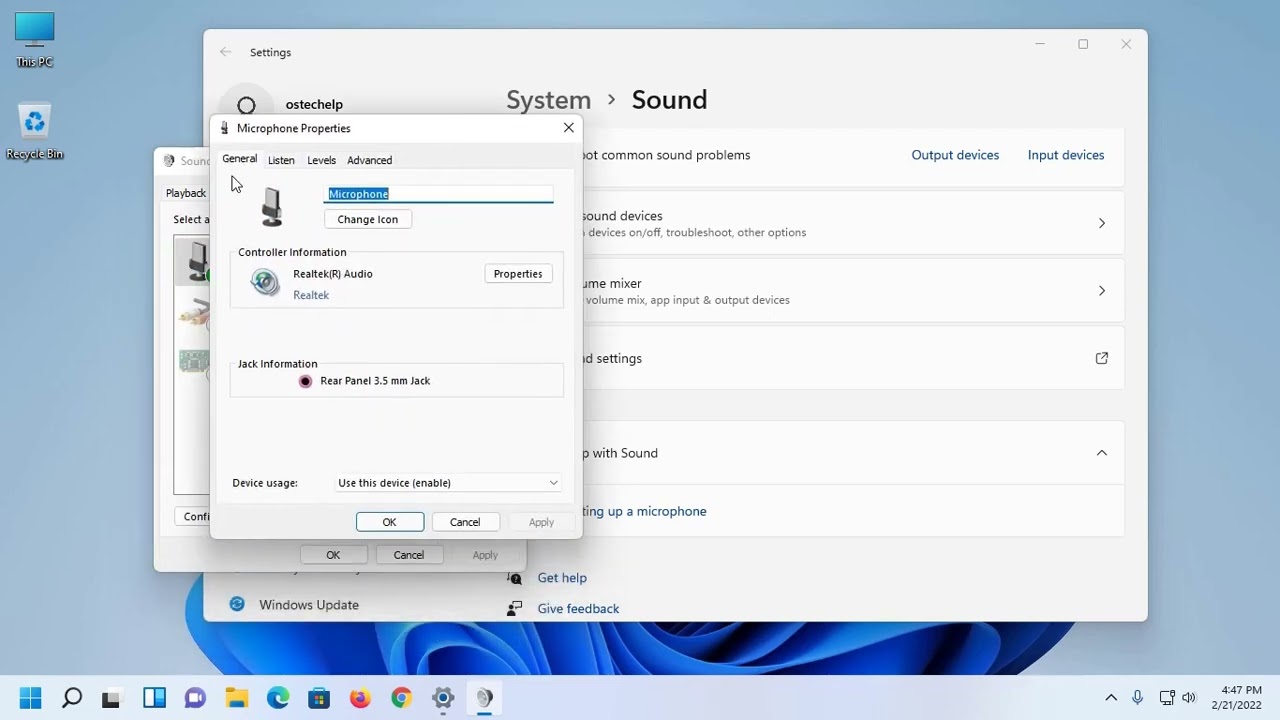
Step 4: Adjust the microphone levels
Once you have set the G430 headset as the playback device, it’s important to adjust the microphone levels to ensure optimal audio quality during playback. Follow these steps to adjust the microphone levels:
- Go back to the sound settings on your computer.
- Click on the “Recording” or “Input” tab in the Sound settings window.
- Locate the G430 headset in the list of available recording devices.
- Once you find the G430 headset, right-click on it and select “Properties” or “Settings.”
- In the properties or settings window, you will find a slider or volume control for adjusting the microphone levels.
- Drag the slider or adjust the volume control to increase or decrease the microphone levels according to your preference.
- You can also click on the “Levels” tab in the properties or settings window to access additional options and fine-tune the microphone levels.
- Click on “OK” or “Apply” to save the changes.
By adjusting the microphone levels, you can control the sensitivity of the microphone on the G430 headset. Higher levels may pick up more ambient noise, while lower levels may result in a quieter recording. Finding the right balance will ensure clear and accurate microphone playback.
It’s recommended to test the microphone playback after adjusting the levels to ensure that the audio quality is satisfactory. You can move on to the next step to learn how to test the microphone playback on your G430 headset.
Now that you have adjusted the microphone levels, it’s time to move on to the final step: testing the microphone playback.
Step 5: Test the microphone playback
Testing the microphone playback on your G430 headset is crucial to ensure that it is functioning correctly and producing clear audio output. Follow these steps to test the microphone playback:
- Open any application on your computer that allows audio recording, such as a voice recording software or a communication application.
- Make sure the G430 headset is selected as the input or recording device within the application’s settings.
- Say something into the microphone on your G430 headset and check if the audio is being captured.
- Play back the recorded audio and listen for any distortions, background noise, or issues with the microphone playback.
- If you encounter any problems, go back to the sound settings and double-check the microphone levels and device settings.
- Make any necessary adjustments to the microphone levels or settings to improve the playback quality.
It’s recommended to record a sample audio and play it back at different volume levels to assess the clarity and quality of the microphone playback on your G430 headset. This will help you identify any issues and fine-tune the settings accordingly.
If you are still experiencing problems with the microphone playback, you may need to update your audio drivers or consult the support resources provided by the manufacturer of the G430 headset or your computer’s operating system.
By testing the microphone playback, you can ensure that your G430 headset is working as intended and producing high-quality audio input and output. This step is crucial for a seamless and enjoyable communication experience.
With the microphone playback tested and validated, you have successfully completed the steps to get microphone playback on your G430 headset. Congratulations!
Now you can enjoy crystal-clear audio communication during your gaming sessions, virtual meetings, or everyday voice chats. Remember to periodically check the microphone levels and settings to maintain optimal performance and make adjustments as needed.
Thank you for following this guide. If you have any further questions or require additional assistance, feel free to consult the G430 headset documentation or reach out to the manufacturer’s support team.
Happy gaming and communication!
Conclusion
Setting up microphone playback on your G430 headset is a simple process that requires a few easy steps. By following this comprehensive guide, you have learned how to connect the G430 headset to your computer, open the sound settings, select the headset as the playback device, adjust the microphone levels, and test the microphone playback.
By ensuring that your G430 headset is properly connected, selecting it as the default playback device, and adjusting the microphone levels, you can enjoy clear and high-quality audio communication during gaming sessions, virtual meetings, and voice chats.
Remember to double-check the connections, test the microphone playback, and make necessary adjustments to achieve the best performance from your G430 headset. Additionally, periodically checking for driver updates and consulting the manufacturer’s support resources can help address any potential issues you may encounter along the way.
With microphone playback successfully set up on your G430 headset, you can now fully immerse yourself in your gaming adventures, collaborate effectively in virtual meetings, and interact seamlessly with others during voice chats. Enjoy the improved audio experience and the convenience that the G430 headset brings to your communication activities.
Thank you for following this guide. If you have any further questions or need further assistance, don’t hesitate to consult the G430 headset’s documentation or reach out to the manufacturer’s support team. Now, go ahead and enjoy your enhanced audio experience with your G430 headset!