Home>Events & Info>Playback>How To Mute Audio Playback On Streamlabs Obs

Playback
How To Mute Audio Playback On Streamlabs Obs
Published: November 23, 2023
Learn how to mute audio playback on Streamlabs OBS with this step-by-step tutorial. Keep your stream professional and glitch-free with these easy tips.
(Many of the links in this article redirect to a specific reviewed product. Your purchase of these products through affiliate links helps to generate commission for AudioLover.com, at no extra cost. Learn more)
Table of Contents
Introduction
Welcome to this guide on how to mute audio playback on Streamlabs OBS! Streamlabs OBS is a popular streaming software that allows users to easily customize their live broadcasts. One important aspect of any streaming setup is controlling the audio, including the ability to mute it when needed.
There are various situations where muting audio playback on Streamlabs OBS can be beneficial. For example, you may want to mute the game sound momentarily to address your viewers or take a break from speaking. Additionally, muting audio playback can be helpful if you encounter any audio issues during your stream.
In this article, we will walk you through the steps to mute audio playback on Streamlabs OBS. Whether you are a seasoned streamer or just starting out, this guide will help you have better control over your live broadcasts.
Before we dive into the step-by-step instructions, it’s important to note that this guide assumes that you have already set up Streamlabs OBS on your computer. Make sure you have the latest version of Streamlabs OBS installed and running before proceeding.
Now, let’s get started by launching Streamlabs OBS and navigating to the appropriate settings to mute audio playback.
Step 1: Launching Streamlabs OBS
The first step in muting audio playback on Streamlabs OBS is to launch the software on your computer.
If you haven’t already installed Streamlabs OBS, you can download it from the official website and follow the installation instructions.
Once Streamlabs OBS is installed on your computer, locate the application icon and double-click it to launch the software.
After launching Streamlabs OBS, you will be greeted with the main window of the software, which is where you can customize your streaming setup and access various settings.
Take a moment to familiarize yourself with the interface. You will notice different sections such as Scenes, Sources, Mixer, and Controls. These sections allow you to manage different aspects of your live stream, including audio playback.
Now that you have successfully launched Streamlabs OBS, let’s proceed to the next step, where we will navigate to the Mixer tab to access the audio settings.
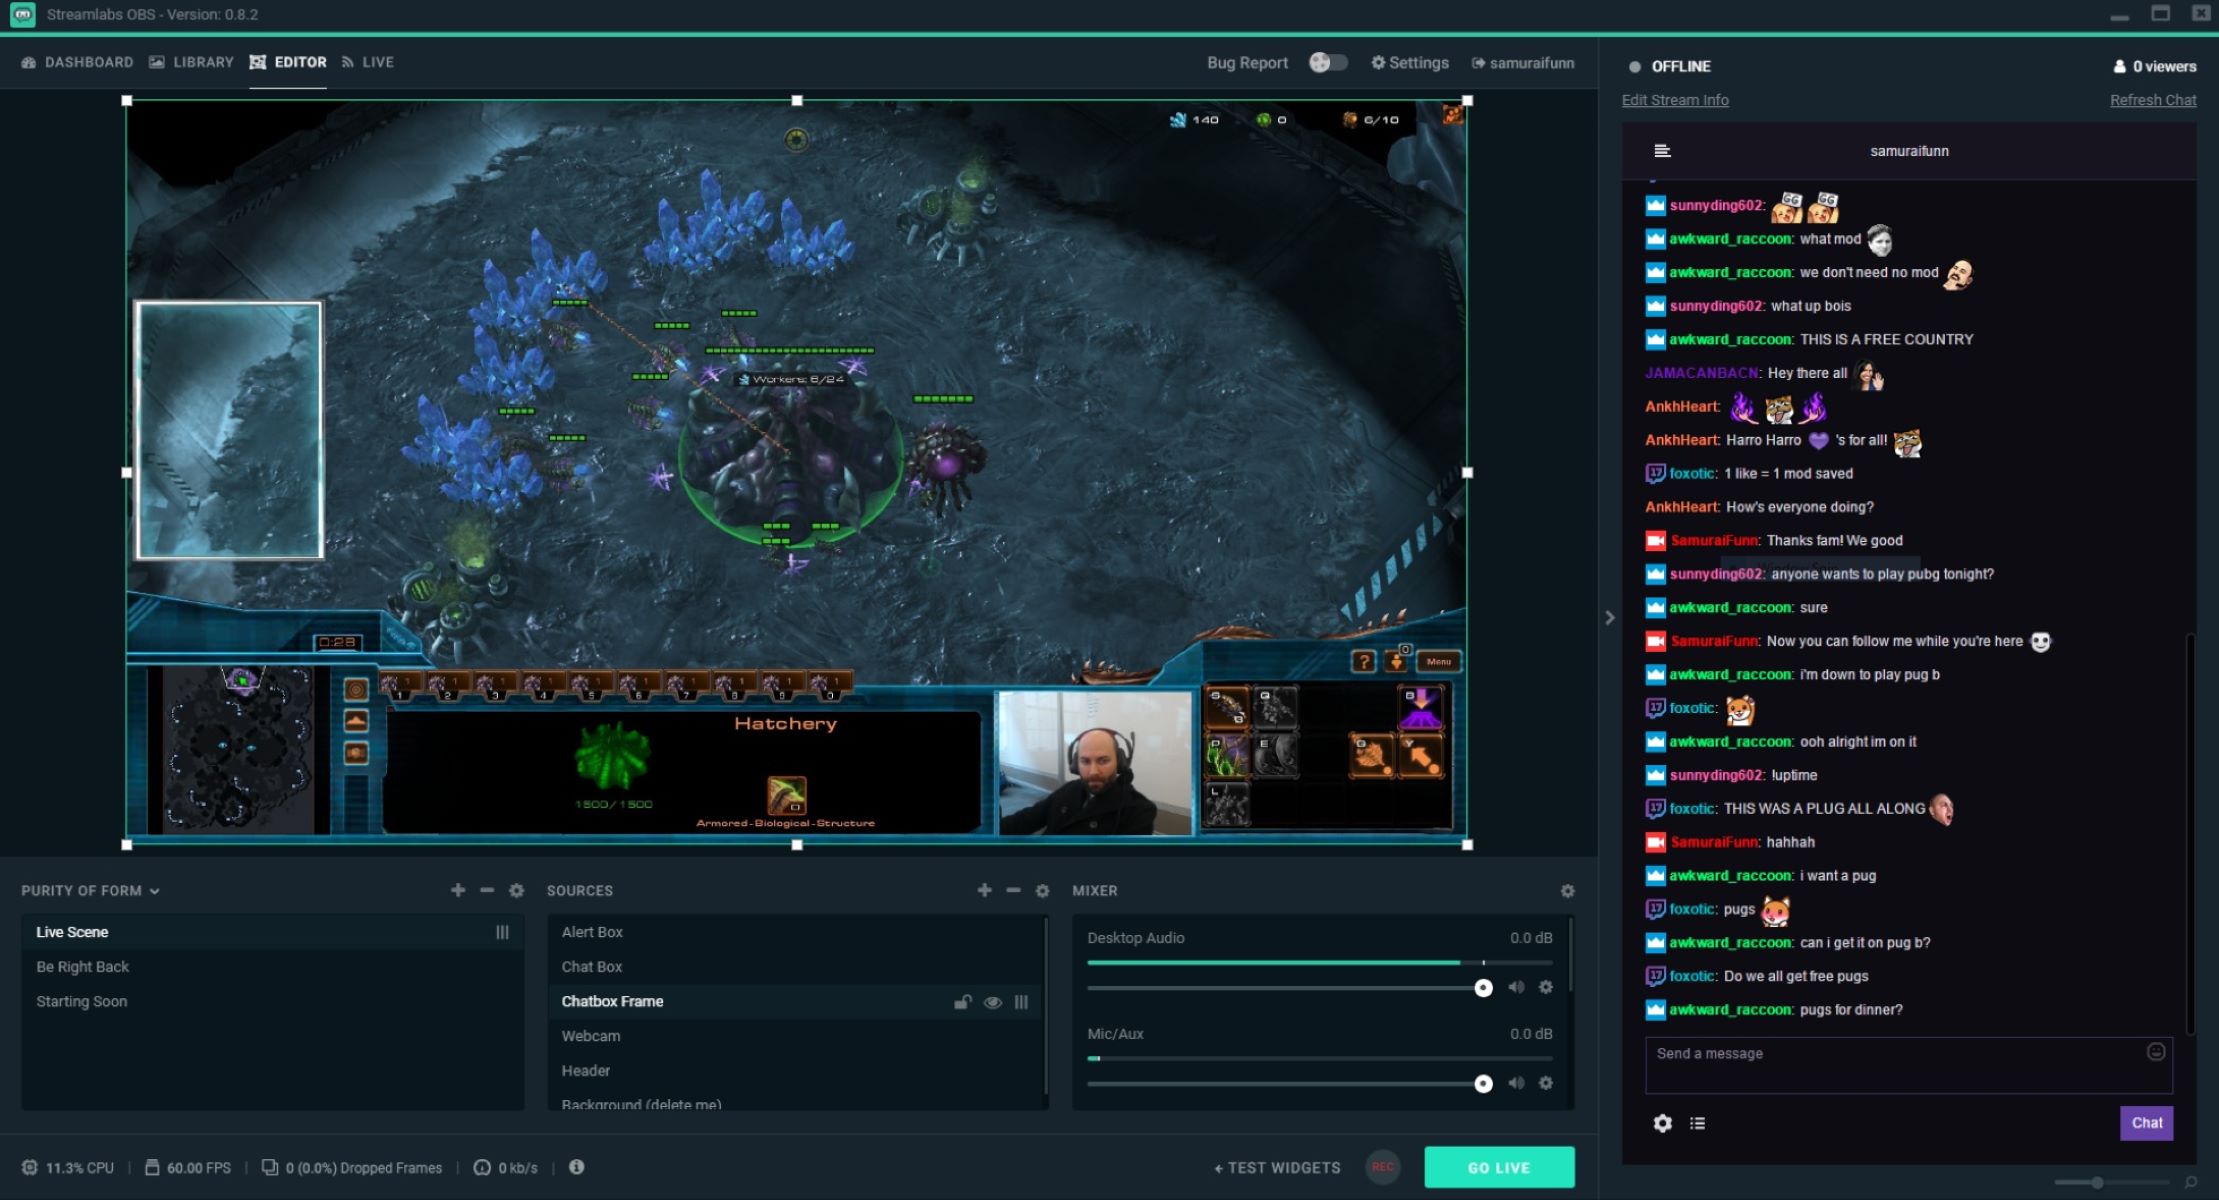
Step 2: Navigating to the Mixer Tab
Once Streamlabs OBS is launched, the next step is to navigate to the Mixer tab, where you can access the audio settings and adjust the levels.
To find the Mixer tab, look towards the bottom part of the Streamlabs OBS interface. You will see a row of tabs, including Scenes, Sources, Mixer, and Controls. Click on the Mixer tab to proceed.
By clicking on the Mixer tab, you will be taken to the Mixer section of Streamlabs OBS. Here, you will find various audio controls and settings to manage the audio sources in your stream.
Take a moment to explore the Mixer tab. You will see different audio sources listed, such as Desktop Audio, Mic/Aux, and any other audio sources you have added to your stream. These sources represent the different audio elements that can be heard during your live broadcasts.
It’s important to note that each audio source can be individually adjusted and controlled in terms of volume, mute status, and more.
Now that you have successfully navigated to the Mixer tab, let’s move on to the next step, where we will learn how to adjust the audio levels in Streamlabs OBS.
Step 3: Adjusting Audio Levels
After navigating to the Mixer tab in Streamlabs OBS, you can begin adjusting the audio levels to ensure a balanced and optimal sound for your live stream.
To adjust the audio levels, locate the audio sources listed in the Mixer section. These sources include Desktop Audio, Mic/Aux, and any additional audio sources you have added to your stream.
To increase or decrease the volume of an audio source, simply drag the corresponding slider to the left or right. Moving the slider to the right will increase the volume, while moving it to the left will decrease the volume.
This step is crucial in maintaining a good mix between different audio elements, such as the game sound, microphone input, and any other audio sources you have added. It’s essential to find the right balance so that your viewers can hear you clearly without being overwhelmed by other sounds.
Additionally, you may also want to consider adjusting the individual audio sources’ volume in relation to each other. For example, if the game sound is too loud compared to your microphone input, you can lower the volume of the game audio while keeping the microphone volume at an appropriate level.
Remember to test the audio levels while live streaming or recording to ensure that they are suitable for your audience. You can do this by using the Preview Stream feature in Streamlabs OBS or by having a friend or viewer provide feedback.
With the audio levels adjusted to your liking, you can now proceed to the next step, where we will learn how to mute audio playback in Streamlabs OBS.
Step 4: Muting Audio Playback
Now that you have adjusted the audio levels in Streamlabs OBS, let’s move on to muting the audio playback when needed.
To mute audio playback in Streamlabs OBS, you have a couple of options depending on your specific requirements:
- Mute individual audio sources: If you want to mute a specific audio source, such as the game sound or a particular microphone input, you can do so by clicking on the mute icon next to the corresponding audio source in the Mixer tab. When the icon turns red or displays a crossed-out speaker symbol, it indicates that the audio source is muted.
- Mute all audio sources: If you prefer to mute all audio sources at once, you can use the master mute button located at the bottom right corner of the Mixer tab. By clicking on this button, you can quickly mute or unmute all audio sources simultaneously. When the button displays a red crossed-out speaker symbol, it means that all audio sources are muted.
Remember to unmute the audio sources or master mute button whenever you are ready to resume audio playback.
It’s important to note that muting audio playback can be helpful in various scenarios, such as taking a break from speaking, addressing your viewers without game sounds in the background, or troubleshooting any audio issues that may arise during your live stream.
With the ability to easily mute audio playback in Streamlabs OBS, you have more control over the audio experience for your viewers.
Now that you know how to mute audio playback in Streamlabs OBS, let’s proceed to the final step, where we will test the audio mute functionality to ensure it is working as expected.
Step 5: Testing the Audio Mute
After muting the audio playback in Streamlabs OBS, it’s important to test the functionality to ensure that the audio is muted as expected.
To test the audio mute, follow these steps:
- Start your live stream or recording in Streamlabs OBS.
- Check that the audio sources you want to mute are indeed muted. You can verify this by looking at the mute icons next to each audio source in the Mixer tab. If they are red or display a crossed-out speaker symbol, it indicates that the audio sources are muted.
- Say a few words or engage in gameplay that would normally generate sound.
- Monitor the audio output to confirm that the game sound or any other muted audio sources are not being heard. You can use headphones or listen through the speakers to ensure that the audio is muted.
If the audio mute is successful and you cannot hear any sound from the muted audio sources, congratulations! You have successfully muted audio playback in Streamlabs OBS.
If, however, you still hear audio from the muted sources, double-check that the correct audio sources are muted and that the mute icons are displayed accordingly. It’s possible that you may have missed muting an audio source or that there is an issue with the software’s settings.
If you encounter any difficulties in muting the audio playback, don’t hesitate to consult the Streamlabs OBS documentation or seek support from the Streamlabs community for further assistance.
By thoroughly testing the audio mute functionality, you can ensure that your live stream or recording is free from unwanted audio interruptions.
With the audio mute tested and working as intended, you now have full control over when and how you want audio playback to be heard during your live broadcasts.
Congratulations on successfully muting audio playback in Streamlabs OBS! Now you can confidently manage your audio settings to create the best possible streaming experience for your viewers.
As a final note, remember to regularly check and adjust your audio settings as needed to maintain optimal sound quality and ensure a professional and enjoyable streaming experience.
Thank you for following this guide, and happy streaming!
Conclusion
In this guide, we have covered the steps to effectively mute audio playback on Streamlabs OBS. By following these steps, you can seamlessly control the audio experience during your live broadcasts, ensuring clear communication and a distraction-free stream.
We began by launching Streamlabs OBS and navigating to the Mixer tab, where the audio settings can be accessed. From there, we learned how to adjust the audio levels to create a well-balanced mix in your stream.
Next, we explored different methods to mute audio playback in Streamlabs OBS, including muting individual audio sources or muting all audio sources simultaneously using the master mute button.
Finally, we emphasized the importance of testing the audio mute functionality to ensure that the audio is correctly muted when needed. By following the provided steps, you can verify that the muted audio sources remain silent during your live stream or recording.
Having the ability to effectively mute audio playback in Streamlabs OBS gives you greater control over your live broadcasts. It allows you to address your viewers without game sounds in the background, take breaks from speaking, and troubleshoot any audio issues that may arise.
Remember to regularly check and adjust your audio settings to maintain optimal sound quality and create the best streaming experience for your audience.
We hope this guide has been helpful in illustrating how to successfully mute audio playback on Streamlabs OBS. Apply these techniques to enhance your streaming setup, engage with your viewers, and deliver high-quality content.
Thank you for reading, and happy streaming!