Home>Production & Technology>Stereo>How To Build A Stereo Cabinet
Stereo
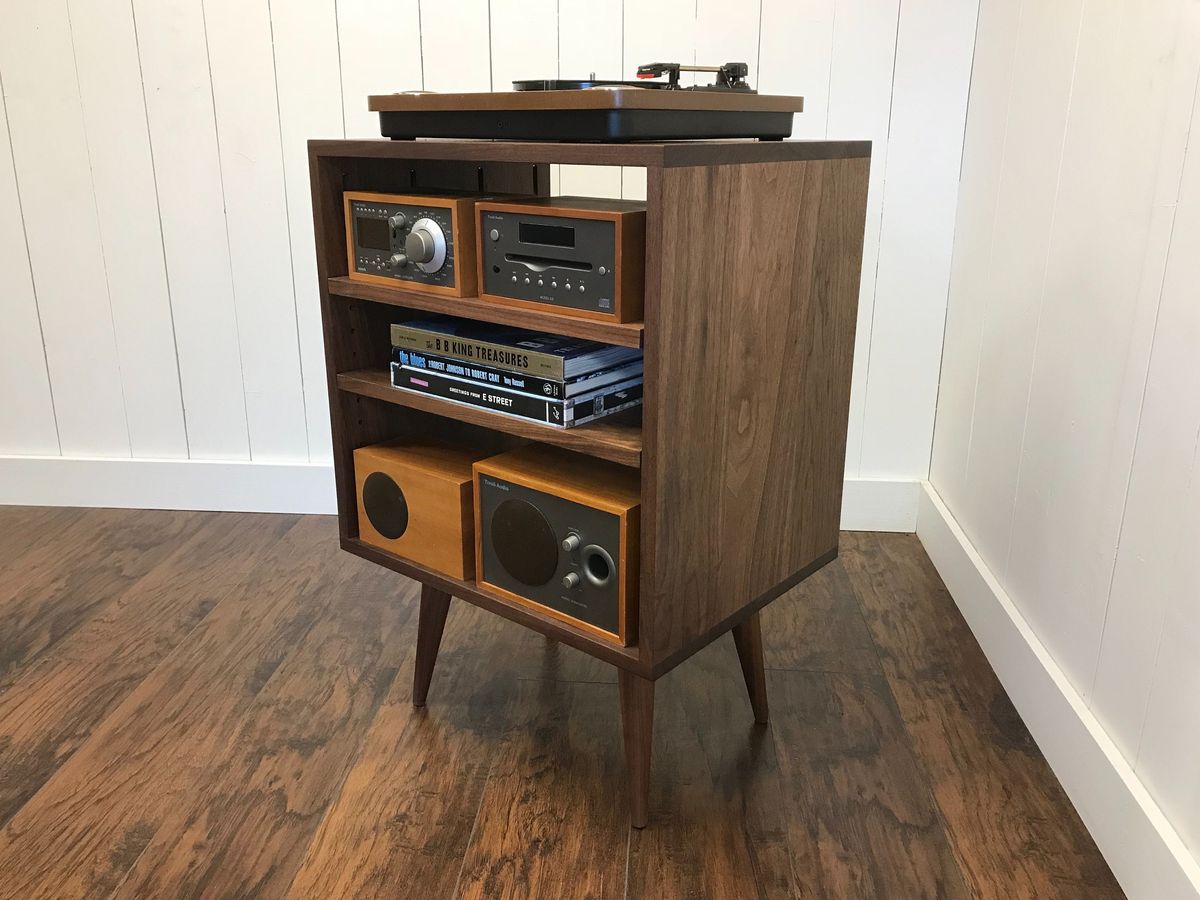
How To Build A Stereo Cabinet
Published: November 24, 2023
Learn how to build a durable and stylish stereo cabinet to showcase your audio equipment. Step-by-step instructions for a DIY project that stands out.
(Many of the links in this article redirect to a specific reviewed product. Your purchase of these products through affiliate links helps to generate commission for AudioLover.com, at no extra cost. Learn more)
Table of Contents
Introduction
Welcome to the world of high-quality sound and immersive music experiences. If you are an audiophile or just someone who appreciates great sound, you understand the importance of a well-designed stereo system. A stereo cabinet plays a crucial role in not only organizing and protecting your audio equipment but also enhancing the overall aesthetic of your space.
Building your own stereo cabinet can be a rewarding and cost-effective project. Not only will it allow you to customize the design to meet your specific needs, but it will also provide a sense of accomplishment each time you enjoy your favorite tunes.
In this article, we will guide you through the process of building a stereo cabinet from scratch. We will discuss the materials you’ll need, the steps involved, and the finishing touches that will turn your creation into a piece of art. Whether you are a seasoned DIY enthusiast or a beginner looking for a new project, this guide is for you.
Before we dive into the details, it is crucial to note that building a stereo cabinet requires some basic woodworking skills and access to tools like a saw, drill, and sander. If you are new to woodworking, don’t worry. This project can still be a great opportunity to learn and develop your skills.
So, are you ready to embark on this exciting journey of building your own stereo cabinet? Let’s get started!
Materials Needed
Before you begin building your stereo cabinet, it’s important to gather all the necessary materials. Here is a list of items you’ll need to complete the project:
- Plywood sheets or solid wood boards for the cabinet frame and shelves
- Measuring tape and a square for accurate measurements
- Saw to cut the wood to size
- Screwdriver or drill for assembly
- Sandpaper or sander for smoothing rough edges
- Wood glue for joining pieces together
- Wood filler for repairing any imperfections
- Paint or stain for finishing the cabinet
- Brushes or rollers for applying the paint or stain
- Hinges or sliders for installing doors or panels
- Knobs or handles for easy access
- Level for ensuring the cabinet is balanced and straight
These are the basic materials needed to construct a stereo cabinet. Depending on your design preferences and the specific features you want to incorporate, you might need additional materials such as decorative trim, cable management solutions, or speaker grilles.
It’s also important to consider the size and weight of your audio equipment when selecting the materials. Ensure that the chosen wood is sturdy enough to support the weight of your speakers, amplifiers, and other components.
Lastly, don’t forget to prioritize safety by using appropriate protective gear such as goggles, gloves, and a dust mask, especially when working with power tools and chemicals.
Now that you have all the materials ready, let’s proceed to the next step: planning your stereo cabinet!
Step 1: Planning
Before you start cutting and assembling the wood, it’s essential to spend some time planning your stereo cabinet. Planning allows you to visualize the final product, make important design decisions, and ensure that the cabinet will meet your specific needs. Here are the key aspects to consider during the planning phase:
1. Purpose and Functionality: Determine the purpose and functionality of your stereo cabinet. Are you looking to display your equipment prominently or keep it concealed? Do you need additional storage for vinyl records or other accessories? Understanding your specific needs will help you design a cabinet that serves its purpose efficiently.
2. Dimensions and Layout: Measure the space where you plan to place the stereo cabinet and consider the dimensions of your audio equipment. Take accurate measurements to ensure that the cabinet fits perfectly in the desired location and that there is sufficient space for ventilation and cable management.
3. Design and Style: Choose a design and style that complements your existing decor or aligns with your personal taste. Whether you prefer a traditional, modern, or rustic look, select the appropriate materials and finishes that achieve the desired aesthetic appeal.
4. Accessibility and Organization: Consider how you want to organize your stereo equipment within the cabinet. Will you need adjustable shelves or compartments of different sizes? Plan the internal layout to ensure easy access to the components and convenient cable routing.
5. Ventilation and Acoustics: Proper ventilation is vital to prevent the audio equipment from overheating. Plan for ventilation holes or slots that allow airflow, ensuring the longevity and performance of your electronics. Additionally, consider incorporating materials or features that minimize vibrations and enhance sound quality.
6. Budget and Timeline: Determine your budget and project timeline. This will help you make decisions on the type of materials to use, any additional features or accessories, and the overall complexity of the design.
By taking the time to plan your stereo cabinet, you can avoid costly mistakes and ensure a smooth construction process. Once you have a clear vision of what you want to achieve, it’s time to move on to step two: measurements and cutting.
Step 2: Measurements and Cutting
With your plan in hand, it’s time to start bringing your stereo cabinet to life through precise measurements and cutting. This step is crucial to ensure that all the pieces fit together seamlessly and create a sturdy structure. Here’s how to proceed:
1. Gather your tools: Before you begin, collect all the necessary tools such as a measuring tape, square, and a saw. Having these tools handy will make the process much smoother and more accurate.
2. Measure and mark: Using your measurements from the planning phase, mark the dimensions of each piece on the wood. Double-check your measurements to ensure accuracy, as even a slight error can affect the overall fit and stability of the cabinet.
3. Cut the pieces: With your marked measurements, carefully cut each piece of wood using a saw. Take your time and use steady, controlled motions to achieve clean and precise cuts. If you are not confident in your cutting skills, consider enlisting the help of a friend or a professional.
4. Smooth the edges: After cutting the pieces, use sandpaper or a sander to smooth any rough edges or imperfections. This step not only enhances the appearance of the cabinet but also prevents splinters and ensures a safe working environment.
5. Label the pieces: To avoid confusion during assembly, label each cut piece according to its designated position in the cabinet. This will save you time and frustration when it comes to putting everything together.
6. Test the fit: Before proceeding to the next step, test the fit of the pieces together to ensure they align correctly. Make any necessary adjustments or recuts if required.
Remember, accuracy is key during the measurement and cutting stage. Taking the time to measure twice and cut once will save you from potential pitfalls later in the construction process. Once you are satisfied with the measurements and cuts, you are ready to move on to step three: assembly.
Step 3: Assembly
Now that you have all the pieces cut and ready, it’s time to assemble your stereo cabinet. The assembly process is where your vision starts to take shape, and the cabinet starts to come to life. Here are the steps to follow:
1. Lay out the pieces: Begin by laying out all the labeled pieces in the order of assembly. This will help you visualize how they fit together and ensure you have everything you need.
2. Start with the frame: Begin by assembling the main frame of the cabinet. Use wood glue and screws to join the pieces together securely. Ensure that the corners are square and align the pieces according to your measurements.
3. Add the shelves and dividers: Once the frame is assembled, add the shelves and dividers according to your design. Use wood glue and screws to attach them securely to the frame. Ensure that they are level and properly aligned.
4. Install reinforcement: Depending on the size and weight of your audio equipment, you may need to add reinforcement to ensure the cabinet can support the load. Consider adding additional support brackets or crossbeams to strengthen the structure.
5. Secure the top and bottom: Attach the top and bottom pieces of the cabinet securely using wood glue and screws. This will create a solid enclosure for your equipment.
6. Apply the finishing touches: Once the cabinet is assembled, take the time to inspect the joints and seams. Use wood filler to fill any gaps or imperfections, and sand the surfaces smooth. This step prepares the cabinet for the finishing process, where you can apply paint, stain, or any other desired finishing treatment.
7. Allow for drying time: If you have applied paint or stain, make sure to follow the manufacturer’s instructions for drying time. Allow sufficient time for the finish to cure before moving on to the next steps.
Assembling your stereo cabinet requires patience and attention to detail. Take your time to ensure that each piece is securely attached and aligned properly. Once the assembly is complete, you can proceed to step four: sanding and finishing.
Step 4: Sanding and Finishing
Now that your stereo cabinet is assembled, it’s time to give it a smooth and polished finish. Sanding and finishing play a crucial role in enhancing the appearance and durability of the cabinet. Follow these steps to achieve a professional-looking result:
1. Sand the surfaces: Start by sanding all the surfaces of the cabinet, including the frame, shelves, and any additional components. Use a medium-grit sandpaper to eliminate any roughness or imperfections. Follow up with a fine-grit sandpaper to achieve a smooth and even finish.
2. Round the edges: To add a touch of refinement to your stereo cabinet, consider rounding the edges of the wood. Use sandpaper or a router to gently round off the corners and edges, creating a more comfortable and aesthetically pleasing appearance.
3. Remove dust: After sanding, thoroughly clean the cabinet to remove any dust or debris. Use a cloth or brush to ensure that the surface is clean and ready for the finishing treatment.
4. Apply the finish: Depending on your design preference, choose the appropriate finish for your stereo cabinet. You can opt for paint to match your existing decor, stain to highlight the natural beauty of the wood, or a clear varnish for a protective and glossy finish. Apply the finish using a brush or roller, following the manufacturer’s instructions for proper application and drying time.
5. Multiple coats: For a durable and high-quality finish, consider applying multiple coats of the chosen finish. Allow each coat to dry completely before applying the next one. This will ensure a smooth and long-lasting result.
6. Optional sealant: If desired, apply a sealant or protective coating to further enhance the durability and lifespan of your stereo cabinet. This can help protect the wood from moisture, scratches, and daily wear and tear.
7. Final touch-ups: Once the finishing is complete, carefully inspect the cabinet for any areas that may require touch-ups. Apply additional paint, stain, or varnish as needed to achieve a flawless finish.
Remember, the sanding and finishing process requires attention to detail and patience. Take your time to achieve a smooth and professional-looking result. Once the cabinet is fully sanded, finished, and dry, you can move on to the next step: adding shelves and dividers.
Step 5: Adding Shelves and Dividers
With the cabinet sanded and finished, it’s time to focus on functionality and organization by adding shelves and dividers to accommodate your stereo equipment. This step will ensure that your audio components are well-organized and easily accessible. Follow these steps to add shelves and dividers to your stereo cabinet:
1. Measure and mark: Start by measuring and marking the desired locations for the shelves and dividers within the cabinet. Take into account the size and placement of your audio equipment to ensure sufficient space and proper alignment.
2. Cut the shelves and dividers: Using the appropriate measurements, cut the shelves and dividers from plywood sheets or solid wood boards. Ensure that they fit snugly within the cabinet while allowing ample space for your components.
3. Attach the shelves: Position the shelves within the cabinet according to your design. Use a combination of wood glue and screws to secure them in place. Double-check that the shelves are level and securely attached to prevent any accidents or damage to your equipment.
4. Install dividers: If you prefer to have separate compartments for different components, consider adding dividers. Cut the dividers to the appropriate size and install them using wood glue and screws. This will help organize and separate your audio equipment, minimizing any potential interference or vibrations.
5. Adjustable shelves: If you anticipate changes in your audio setup or equipment over time, opt for adjustable shelves. Use shelf support pegs or brackets that allow you to easily reposition or remove the shelves as needed.
6. Cable management: As you install the shelves and dividers, take the opportunity to incorporate cable management solutions. Include holes or channels in the back of the cabinet for routing cables, ensuring a clean and organized appearance.
7. Test the fit: Once you have added the shelves and dividers, test the fit by placing your stereo equipment within the cabinet. Ensure that the components fit comfortably and that there is enough space for ventilation and cable connections.
By adding shelves and dividers, you can customize your stereo cabinet to suit your specific needs and equipment. Take your time during this step to ensure that everything is aligned and securely attached. With the shelves and dividers in place, you are ready to move on to step six: installing doors or panels.
Step 6: Installing Doors or Panels
At this stage, you have created a functional and organized interior for your stereo cabinet. Now it’s time to consider the exterior by installing doors or panels. This step not only adds a polished look to your cabinet but also provides protection for your audio equipment. Here’s how to install doors or panels:
1. Choose the type of enclosure: Determine whether you want to install doors or panels on the front of the cabinet. Doors provide easy access to your equipment, while panels create a sleek and minimalist look.
2. Measure and mark: Measure the dimensions of the front opening of the cabinet and mark the corresponding measurements on the doors or panels. Ensure that the doors or panels cover the entire opening and align properly with the cabinet.
3. Cut the doors or panels: Using the measurements as a guide, cut the doors or panels from plywood or solid wood boards. Use a saw or a router to achieve clean and precise cuts.
4. Hinges or sliders: Decide on the type of hardware you want to use for the doors or panels. Hinges are commonly used for doors, while sliders or tracks are suitable for panels. Install the hinges or sliders according to the manufacturer’s instructions, ensuring they are securely attached to both the cabinet and the doors or panels.
5. Test the fit: Carefully attach the doors or panels to the cabinet using the chosen hardware. Test the fit and operation, making sure the doors open and close smoothly. Make any necessary adjustments to ensure a proper fit.
6. Optional handles or knobs: If desired, add handles or knobs to the doors or panels for easy opening and closing. Choose hardware that complements the style of your cabinet and provides a comfortable grip.
7. Finishing touches: Once the doors or panels are installed, inspect the cabinet for any touch-ups or adjustments needed. Ensure that everything is level, aligned, and functioning as expected.
By installing doors or panels, you add the final touch to your stereo cabinet, improving its appearance and functionality. Take your time during this step to ensure that the doors or panels are properly aligned and attached. With this step complete, you are now ready to move on to step seven: mounting the stereo equipment.
Step 7: Mounting the Stereo Equipment
With your stereo cabinet fully assembled and doors or panels in place, it’s time to focus on mounting your valuable audio equipment securely. Properly mounting your stereo equipment ensures stability, organization, and optimal performance. Follow these steps to mount your stereo equipment:
1. Plan the equipment layout: Decide on the arrangement of your stereo equipment within the cabinet. Consider the size, weight, and ventilation requirements of each component. Plan for sufficient space between the components for proper airflow and easy access to the controls.
2. Place the equipment: Carefully position each piece of stereo equipment within the cabinet according to your plan. Make sure they are centered and aligned properly.
3. Use mounting brackets or shelves: Depending on the design of your stereo cabinet, you may need to use mounting brackets or shelves to hold the equipment securely in place. Attach these brackets or shelves to the interior of the cabinet, ensuring they are level and sturdy.
4. Fasten the equipment: Use the appropriate screws or fasteners provided by the manufacturer to secure each piece of equipment to the mounting brackets or shelves. Follow the equipment’s instruction manual to ensure proper installation.
5. Cable management: Organize the cables from your stereo equipment to maintain a neat and clutter-free interior. Use cable clips, ties, or sleeves to bundle and route the cables along the back or sides of the cabinet. This will help prevent tangling and make future maintenance easier.
6. Test functionality: Ensure that all connections are properly made and that each piece of equipment is functioning as expected. Test for audio output, control responsiveness, and any other features specific to your equipment.
7. Secure loose cables: If necessary, use adhesive-backed cable clips or zip ties to secure any loose cables inside the cabinet. This will prevent them from becoming tangled or accidentally disconnected when accessing the equipment.
By mounting your stereo equipment securely, you can enjoy a clean and organized setup while maximizing performance. Take your time to ensure that each piece is properly fastened and that the cables are managed effectively. With step seven complete, you are now ready to move on to the final step: adding the finishing touches and making any necessary adjustments.
Step 8: Final Touches and Adjustments
Congratulations! You’ve reached the final step of building your stereo cabinet. This step involves adding the finishing touches and making any necessary adjustments to ensure your cabinet is perfect. Here’s what you need to do:
1. Evaluate the cabinet: Take a step back and carefully evaluate the overall appearance and functionality of your stereo cabinet. Pay attention to any areas that may require touch-ups or adjustments.
2. Touch-up the finish: If you notice any imperfections in the finish, such as scratches or uneven areas, now is the time to touch them up. Use the appropriate paint, stain, or varnish to restore the flawless appearance of your cabinet.
3. Hardware adjustments: Check the functionality of the doors or panels and ensure that they open and close smoothly. Make any necessary adjustments to the hinges, sliders, handles, or knobs to ensure proper operation.
4. Alignment and stability: Verify that the cabinet is aligned properly and stands securely on the floor. Use a level to check for any discrepancies and make adjustments as needed.
5. Cleaning and dusting: Give your stereo cabinet a thorough cleaning, both inside and out. Remove any dust, fingerprints, or smudges using the appropriate cleaning products. Regular maintenance and cleaning will keep your cabinet looking its best.
6. Organize cables: Take a final look at the cable management inside the cabinet. Ensure that all cables are neatly organized and secured, avoiding any tangles or interference. Adjust or reposition cable clips or ties if necessary.
7. Functionality test: Once you have completed the final touches and adjustments, test the functionality of the cabinet as a whole. Open and close the doors or panels, access the stereo equipment, and listen for any unusual sounds or vibrations. This final test ensures that everything is in working order.
With the final touches and adjustments completed, you can step back and admire your completed stereo cabinet. It is now ready to showcase your audio equipment and provide years of enjoyment. Remember to maintain your cabinet by keeping it clean, checking for any loose screws or hardware periodically, and making adjustments as needed. Enjoy the immersive music experience that your custom-built stereo cabinet provides!
Conclusion
Congratulations on successfully building your own stereo cabinet! By following the steps outlined in this guide, you have created a functional and personalized space to house your valuable audio equipment. Not only does your stereo cabinet provide organization and protection for your components, but it also adds a touch of style to your living space.
Throughout the process, you learned the importance of planning, taking accurate measurements, and carefully cutting and assembling the pieces to create a sturdy structure. Sanding and finishing brought out the natural beauty of the wood and ensured a smooth and polished surface. By adding shelves and dividers, you optimized the interior for efficient organization. Installing doors or panels enhanced the cabinet’s appearance and provided easy access to your equipment. Mounting your stereo equipment securely allows for optimal performance and a clutter-free setup.
It’s worth noting that building a stereo cabinet is not just about functionality; it’s a journey of creativity and personalization. You had the opportunity to customize the design, choose the materials, and incorporate your personal style. Whether it’s a sleek modern cabinet or a rustic piece that exudes warmth, your stereo cabinet reflects your unique taste and complements your existing decor.
Remember to continue maintaining and caring for your stereo cabinet. Regular cleaning, checking for loose screws, and organizing cables will ensure its longevity and keep it in top shape for years to come.
Building a stereo cabinet is a testament to your skills as a DIY enthusiast and your passion for high-quality sound. It’s a project that you can be proud of and enjoy every time you listen to your favorite music or watch a movie with immersive sound. So sit back, relax, and let your custom-built stereo cabinet enhance your audio experience, bringing joy and harmony into your home.